2022 HYUNDAI SONATA warning
[x] Cancel search: warningPage 194 of 546
Convenient Features5-64
exterior FeAtures
Hood
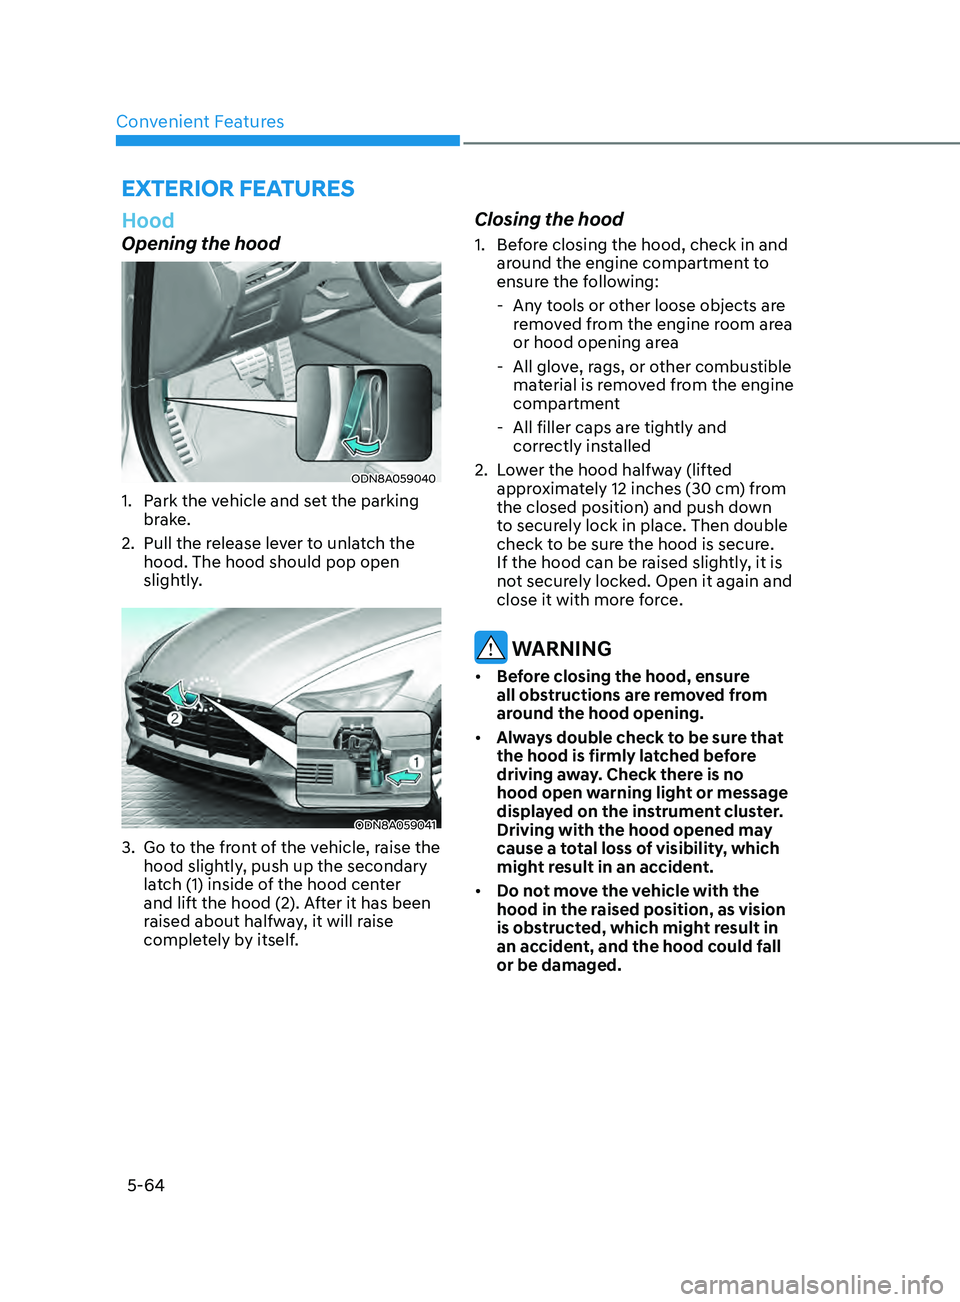
Opening the hood
ODN8A059040
1. Park the vehicle and set the parking brake.
2.
Pull the r
elease lever to unlatch the
hood. The hood should pop open
slightly.
ODN8A059041
3. Go to the front of the vehicle, raise the hood slightly, push up the secondary
latch (1) inside of the hood center
and lift the hood (2). After it has been
raised about halfway, it will raise
completely by itself.
Closing the hood
1. Before closing the hood, check in and around the engine compartment to
ensure the following:
- An
y tools or other loose objects are
removed from the engine room area
or hood opening area
- All glo
ve, rags, or other combustible
material is removed from the engine
compartment
- All filler caps ar
e tightly and
correctly installed
2.
L
ower the hood halfway (lifted
approximately 12 inches (30 cm) from
the closed position) and push down
to securely lock in place. Then double
check to be sure the hood is secure.
If the hood can be raised slightly, it is
not securely locked. Open it again and
close it with more force.
WARNING
• Before closing the hood, ensure
all obstructions are removed from
around the hood opening.
• Always double check to be sure that
the hood is firmly latched before
driving away. Check there is no
hood open warning light or message
displayed on the instrument cluster.
Driving with the hood opened may
cause a total loss of visibility, which
might result in an accident.
• Do not move the vehicle with the
hood in the raised position, as vision
is obstructed, which might result in
an accident, and the hood could fall
or be damaged.
Page 195 of 546
05
5-65
Trunk
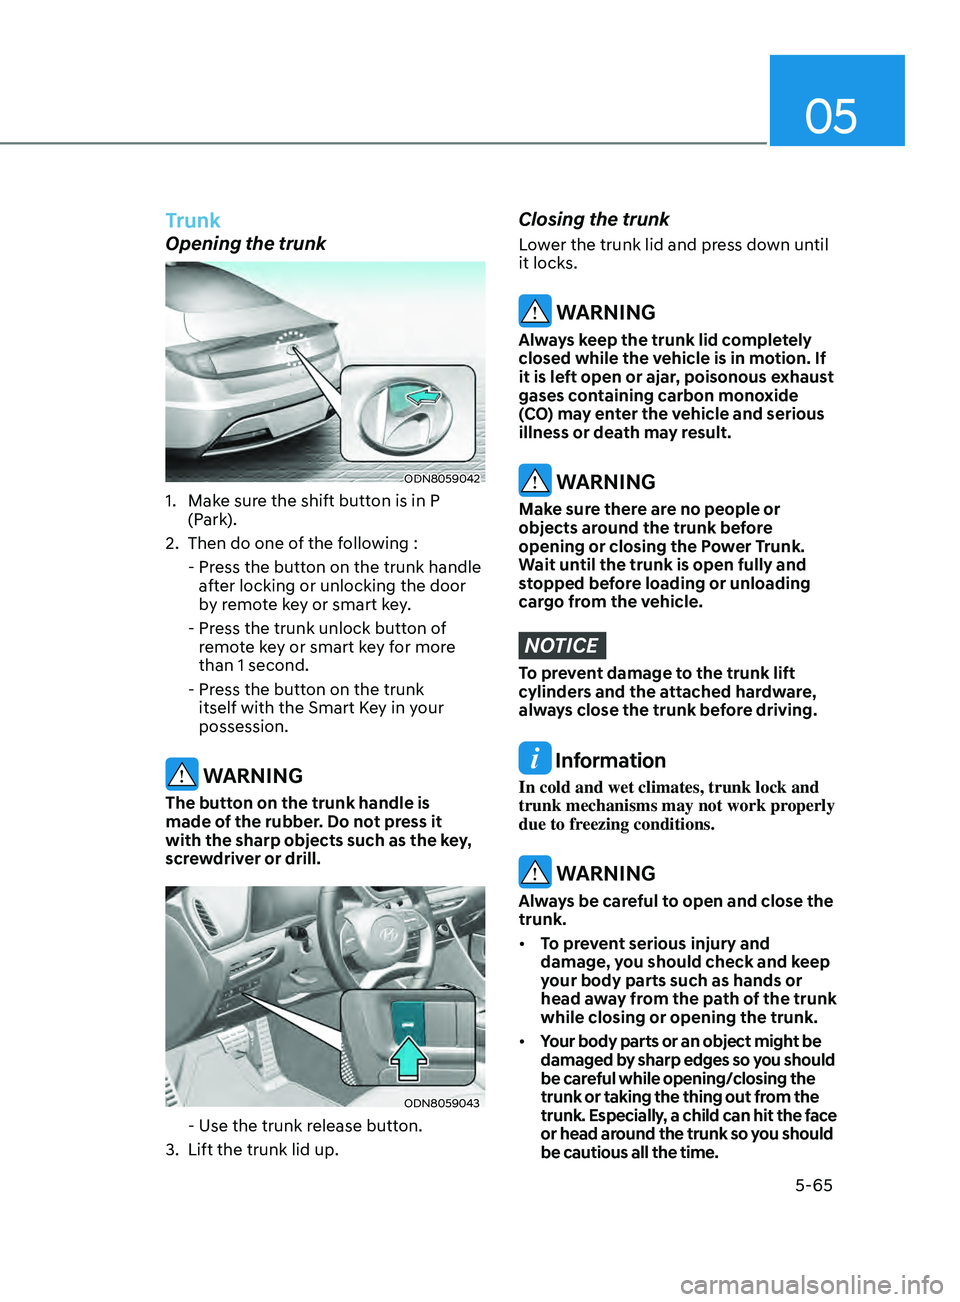
Opening the trunk
ODN8059042
1. Make sure the shift button is in P (Park).
2.
Then do one o
f the following :
-
Pr
ess the button on the trunk handle
after locking or unlocking the door
by remote key or smart key.
-
Pr
ess the trunk unlock button of
remote key or smart key for more
than 1 second.
-
Pr
ess the button on the trunk
itself with the Smart Key in your
possession.
WARNING
The button on the trunk handle is
made of the rubber. Do not press it
with the sharp objects such as the key,
screwdriver or drill.
ODN8059043
- Use the trunk release button.
3.
Lift the trunk lid up.
Closing the trunk
Lower the trunk lid and press down until
it locks.
WARNING
Always keep the trunk lid completely
closed while the vehicle is in motion. If
it is left open or ajar, poisonous exhaust
gases containing carbon monoxide
(CO) may enter the vehicle and serious
illness or death may result.
WARNING
Make sure there are no people or
objects around the trunk before
opening or closing the Power Trunk.
Wait until the trunk is open fully and
stopped before loading or unloading
cargo from the vehicle.
NOTICE
To prevent damage to the trunk lift
cylinders and the attached hardware,
always close the trunk before driving.
Information
In cold and wet climates, trunk lock and
trunk mechanisms may not work properly
due to freezing conditions.
WARNING
Always be careful to open and close the
trunk.
• To prevent serious injury and
damage, you should check and keep
your body parts such as hands or
head away from the path of the trunk
while closing or opening the trunk.
• Your body parts or an object might be
damaged by sharp edges so you should
be careful while opening/closing the
trunk or taking the thing out from the
trunk. Especially, a child can hit the face
or head around the trunk so you should
be cautious all the time.
Page 196 of 546
Convenient Features
5-66
Emergency Trunk Safety Release
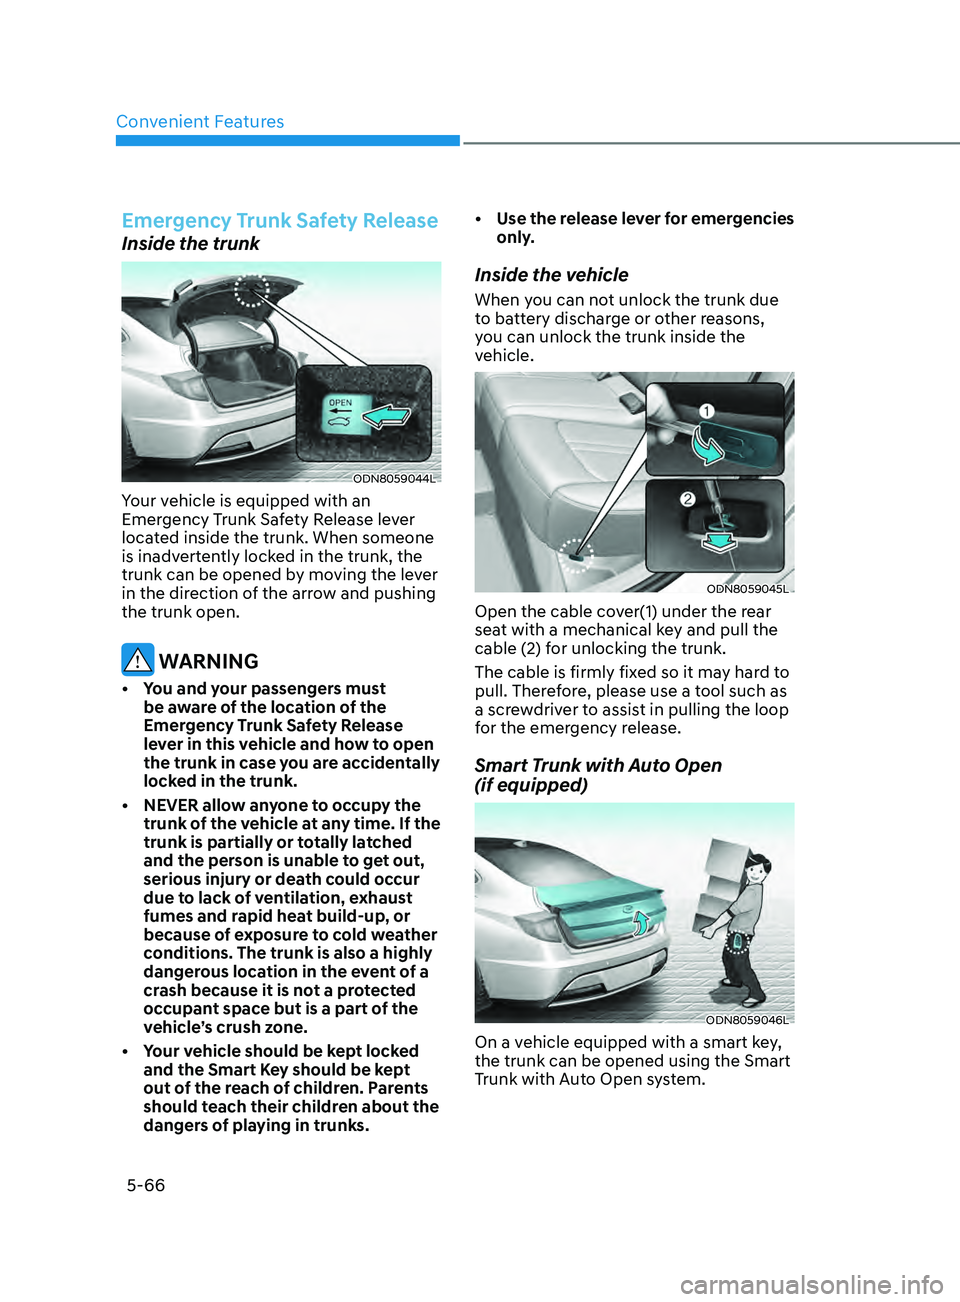
Inside the trunk
ODN8059044L
Your vehicle is equipped with an
Emergency Trunk Safety Release lever
located inside the trunk. When someone
is inadvertently locked in the trunk, the
trunk can be opened by moving the lever
in the direction of the arrow and pushing
the trunk open.
WARNING
• You and your passengers must be aware of the location of the
Emergency Trunk Safety Release
lever in this vehicle and how to open
the trunk in case you are accidentally
locked in the trunk.
•
NEVER allo
w anyone to occupy the
trunk of the vehicle at any time. If the
trunk is partially or totally latched
and the person is unable to get out,
serious injury or death could occur
due to lack of ventilation, exhaust
fumes and rapid heat build-up, or
because of exposure to cold weather
conditions. The trunk is also a highly
dangerous location in the event of a
crash because it is not a protected
occupant space but is a part of the
vehicle’s crush zone.
•
Y
our vehicle should be kept locked
and the Smart Key should be kept
out of the reach of children. Parents
should teach their children about the
dangers of playing in trunks. •
U
se the release lever for emergencies
only.
Inside the vehicle
When you can not unlock the trunk due
to battery discharge or other reasons,
you can unlock the trunk inside the
vehicle.
ODN8059045L
Open the cable cover(1) under the rear
seat with a mechanical key and pull the
cable (2) for unlocking the trunk.
The cable is firmly fixed so it may hard to
pull. Therefore, please use a tool such as
a screwdriver to assist in pulling the loop
for the emergency release.
Smart Trunk with Auto Open
(if equipped)
ODN8059046L
On a vehicle equipped with a smart key,
the trunk can be opened using the Smart
Trunk with Auto Open system.
Page 197 of 546
05
5-67
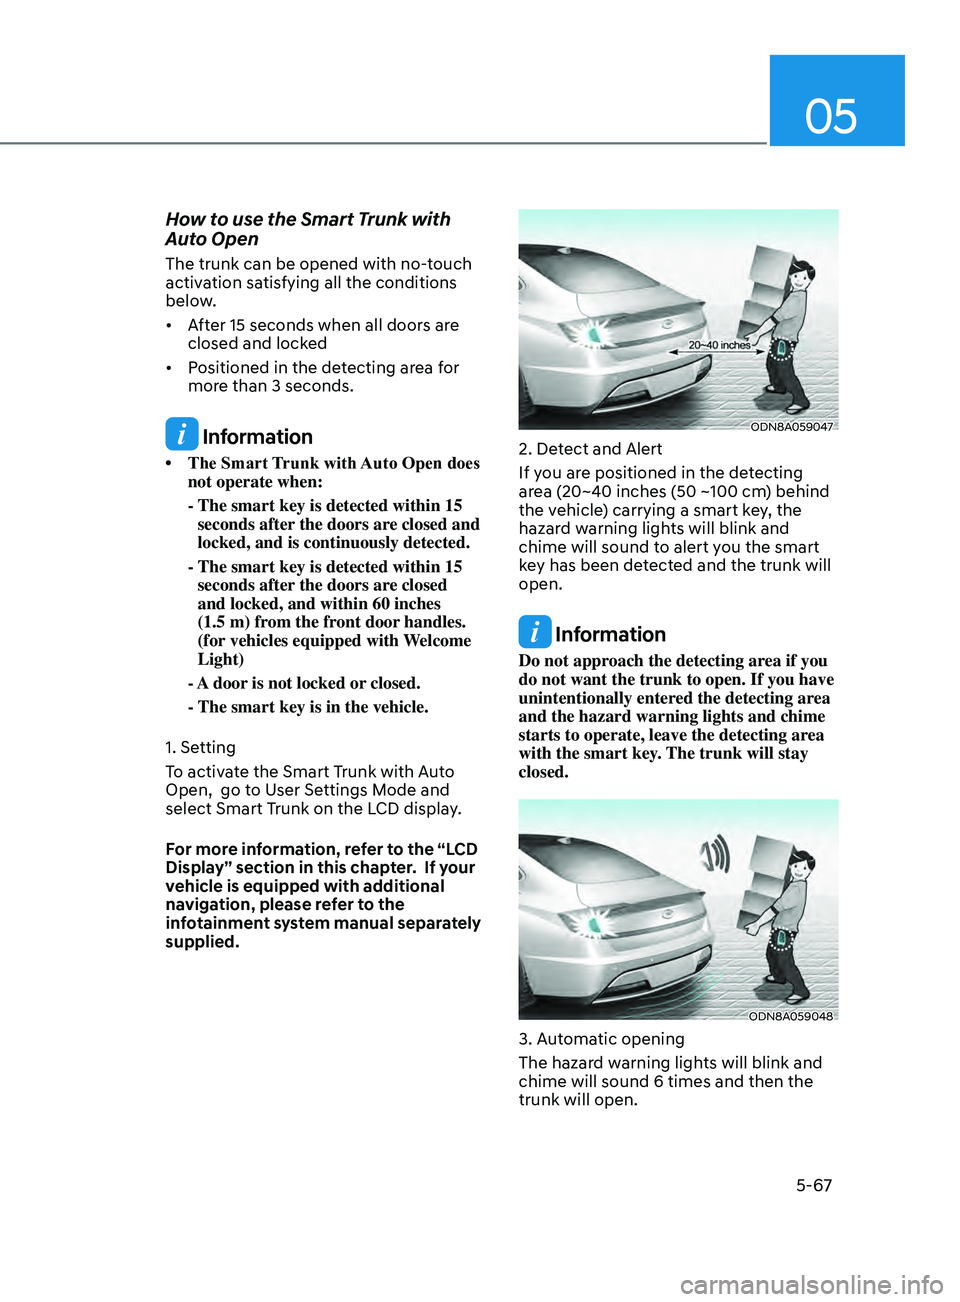
How to use the Smart Trunk with
Auto Open
The trunk can be opened with no-touch
activation satisfying all the conditions
below.
• After 15 seconds when all doors are
closed and lock
ed
• Positioned
in the detecting area for
mor
e than 3 seconds.
Information
• The Smart T runk with Auto Open does not operate when:
- The smart key is detected within 15
seconds after
the doors are closed and
locked, and is continuously detected.
- The smart key is detected within 15
seconds after
the doors are closed
and locked, and within 60 inches
(1.5 m) from the front door handles.
(for vehicles equipped with Welcome
Light)
- A
door is not locked or closed.
- The smart key is in the vehicl
e.
1. Setting
To activate the Smart Trunk with Auto
Open, go to User Settings Mode and
select Smart Trunk on the LCD display.
For more information, refer to the “LCD
Display” section in this chapter. If your
vehicle is equipped with additional
navigation, please refer to the
infotainment system manual separately
supplied.
ODN8A059047
2. Detect and Alert
If you are positioned in the detecting
area (20~40 inches (50 ~100 cm) behind
the vehicle) carrying a smart key, the
hazard warning lights will blink and
chime will sound to alert you the smart
key has been detected and the trunk will
open.
Information
Do not approach the detecting area if you
do not want the trunk to open. If you have
unintentionally entered the detecting area
and the hazard warning lights and chime
starts to operate, leave the detecting area
with the smart key. The trunk will stay
closed.
ODN8A059048
3. Automatic opening
The hazard warning lights will blink and
chime will sound 6 times and then the
trunk will open.
Page 198 of 546
Convenient Features
5-68
WARNING
•Make sure you close the trunk before
driving your vehicle.
•
Mak
e sure there are no people or
objects around the trunk before
opening or closing the trunk.
•
Mak
e sure objects in the trunk do not
come out when opening the trunk on
a slope. It may cause serious injury.
•
Mak
e sure to deactivate the Smart
Trunk when washing your vehicle.
Otherwise, the trunk may open
inadvertently.
•
The ke
y should be kept out of
reach of children. Children may
inadvertently open the Smart Trunk
while playing around the rear area of
the vehicle.
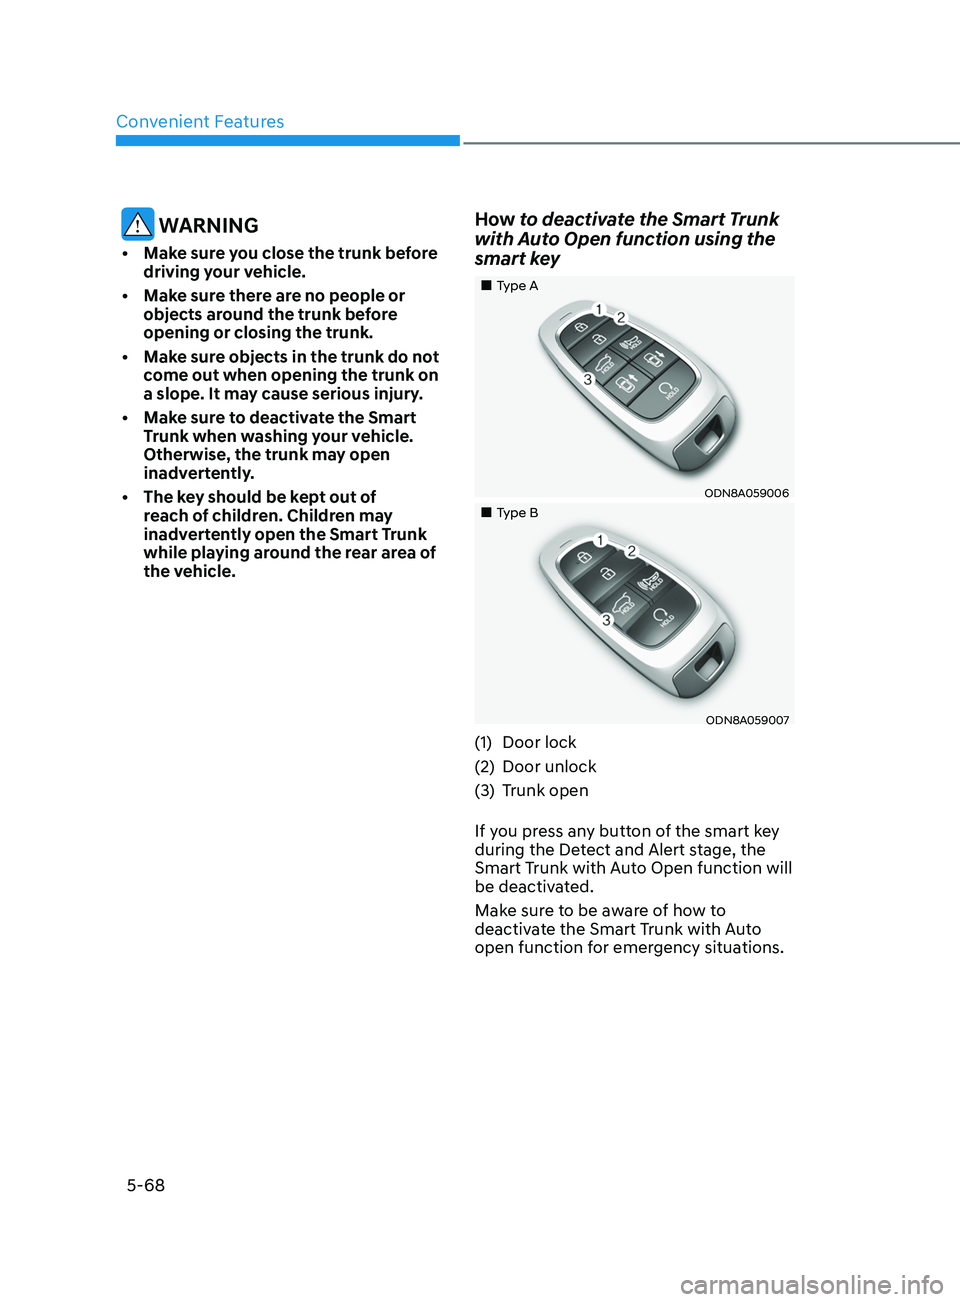
How to deactivate the Smart Trunk
with Auto Open function using the
smart key
„„Type A
ODN8A059006
„„Type B
ODN8A059007
(1)Door lock
(2)
Door unlock
(3)
Trunk open
If y
ou press any button of the smart key
during the Detect and Alert stage, the
Smart Trunk with Auto Open function will
be deactivated.
Make sure to be aware of how to
deactivate the Smart Trunk with Auto
open function for emergency situations.
Page 200 of 546
Convenient Features
5-70
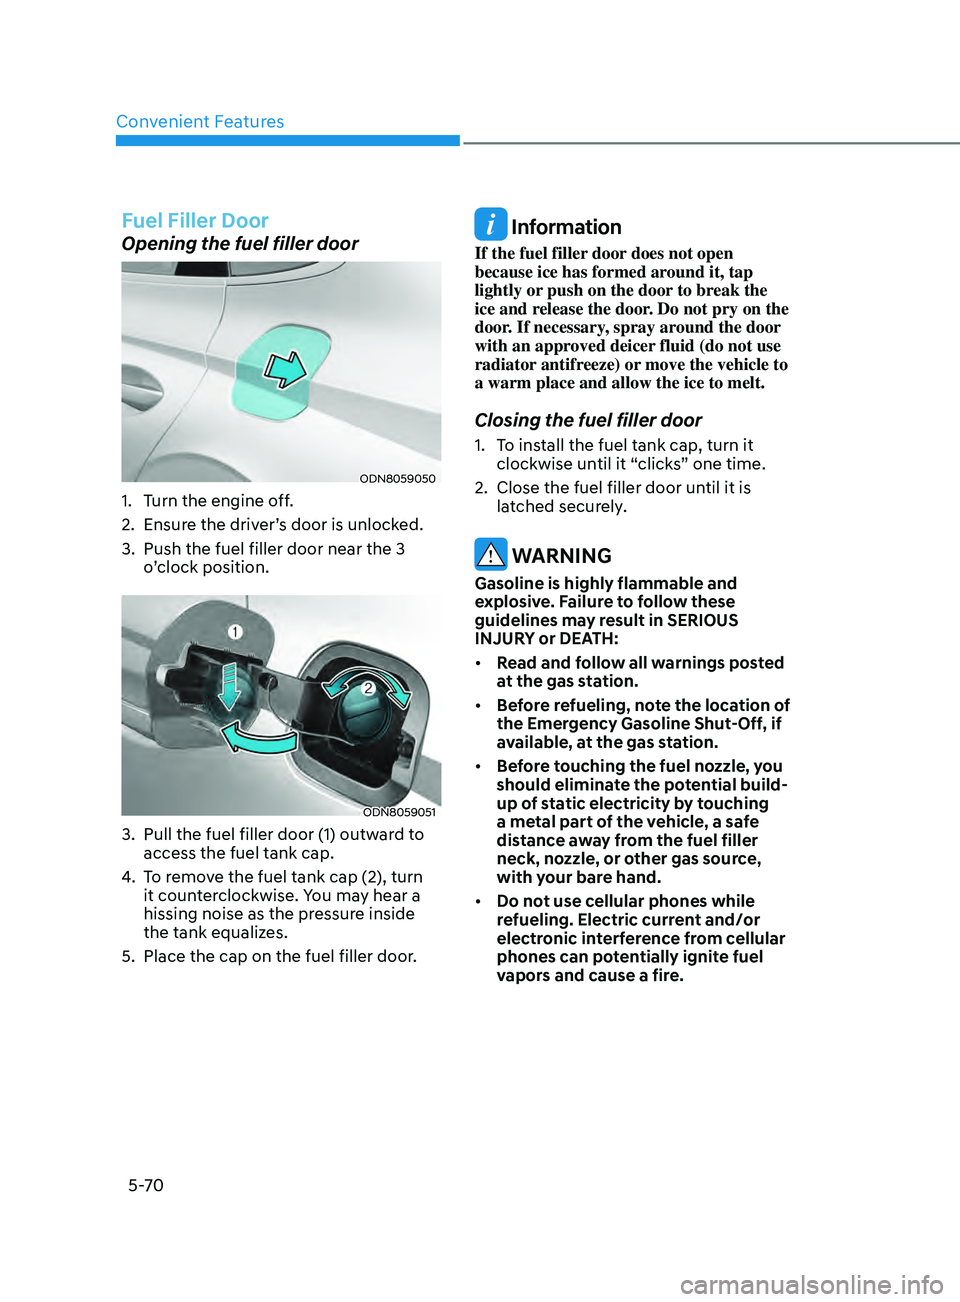
Fuel Filler Door
Opening the fuel filler door
ODN8059050
1. Turn the engine off.
2.
E
nsure the driver’s door is unlocked.
3.
Push the fuel filler door near the 3
o
’clock position.
ODN8059051
3. Pull the fuel filler door (1) outw ard to
access the fuel tank cap.
4.
T
o remove the fuel tank cap (2), turn
it counterclockwise. You may hear a
hissing noise as the pressure inside
the tank equalizes.
5.
Place the cap on the fuel filler door
.
Information
If the fuel filler door does not open
because ice has formed around it, tap
lightly or push on the door to break the
ice and release the door. Do not pry on the
door. If necessary, spray around the door
with an approved deicer fluid (do not use
radiator antifreeze) or move the vehicle to
a warm place and allow the ice to melt.
Closing the fuel filler door
1. To install the fuel tank cap, turn it clockwise until it “clicks” one time.
2.
Close the fuel filler door un
til it is
latched securely.
WARNING
Gasoline is highly flammable and
explosive. Failure to follow these
guidelines may result in SERIOUS
INJURY or DEATH:
• Read and follow all warnings posted
at the gas station.
• Before refueling, note the location of
the Emergency Gasoline Shut-Off, if
available, at the gas station.
• Before touching the fuel nozzle, you
should eliminate the potential build-
up of static electricity by touching
a metal part of the vehicle, a safe
distance away from the fuel filler
neck, nozzle, or other gas source,
with your bare hand.
• Do not use cellular phones while
refueling. Electric current and/or
electronic interference from cellular
phones can potentially ignite fuel
vapors and cause a fire.
Page 202 of 546
Convenient Features5-72
heAD Up DiSplAy ( h UD) (if eQU ippe D )
ODN8A059054
The Head-Up Display is an optional
feature that allows the driver to view
information projected onto a transparent
screen while still keeping your eyes
safely on the road ahead while driving.
Precautions while using the head up
display
It may sometimes be difficult to read
information on the head up display in the
following situations.
-
The driv
er is improperly positioned in
the driver’s seat.
-
The driv
er wears polarizing-filter
sunglasses.
-
An object is loca
ted above the head
up display cover.
-
The v
ehicle is driven on a wet road.
-
An
y improper lighting accessory is
installed inside the vehicle, or there
is incoming light from outside of the
vehicle.
-
The driv
er wears glasses.
-
The driv
er wears contact lenses.
When it is difficult to read the head up
display information, adjust the head
up display angle or the head up display
brightness level in the User Settings
mode. For more information, refer to
“LCD Display” in this chapter.
WARNING
• Do not tint the front windshield glass or add other types of metallic
coating. Otherwise, the head up
display image may be invisible.
•
Do no
t place any accessories on the
crash pad or attach any objects on
the windshield glass.
•
The Blind-spo
t Collision Warning
system warnings on the head up
display are supplemental. Do not
solely depend on them to change
lanes. Always take a look around
before changing lanes.
NOTICE
When replacing the front windshield
glass of the vehicle equipped with
the head up display, replace it with
a windshield glass designed for the
head up display operation. Otherwise,
duplicated images may be displayed on
the windshield glass.
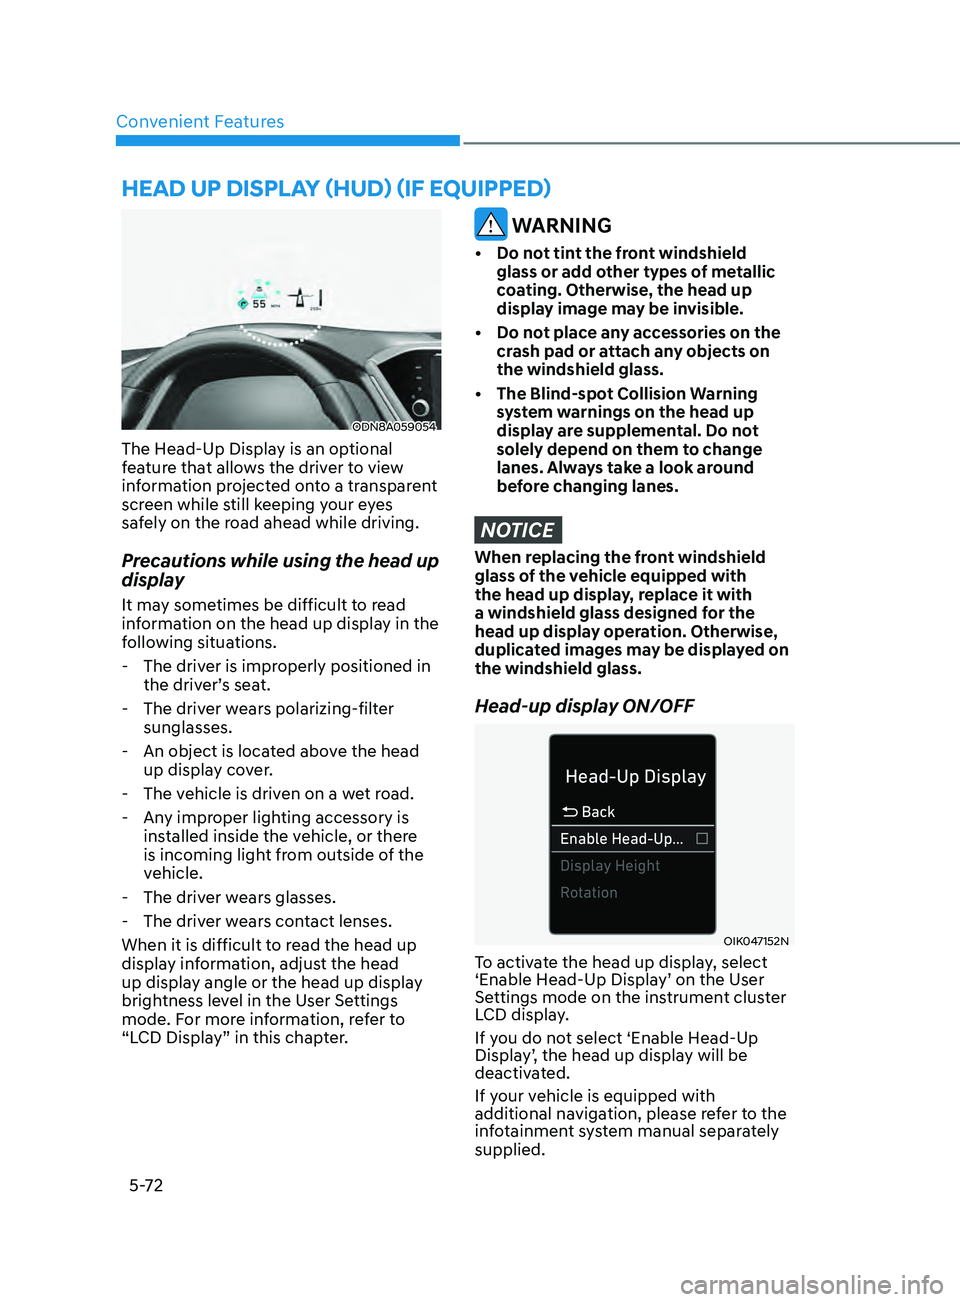
Head-up display ON/OFF
OIK047152N
To activate the head up display, select
‘Enable Head-Up Display’ on the User
Settings mode on the instrument cluster
LCD display.
If you do not select ‘Enable Head-Up
Display’, the head up display will be
deactivated.
If your vehicle is equipped with
additional navigation, please refer to the
infotainment system manual separately
supplied.
Page 203 of 546
05
5-73
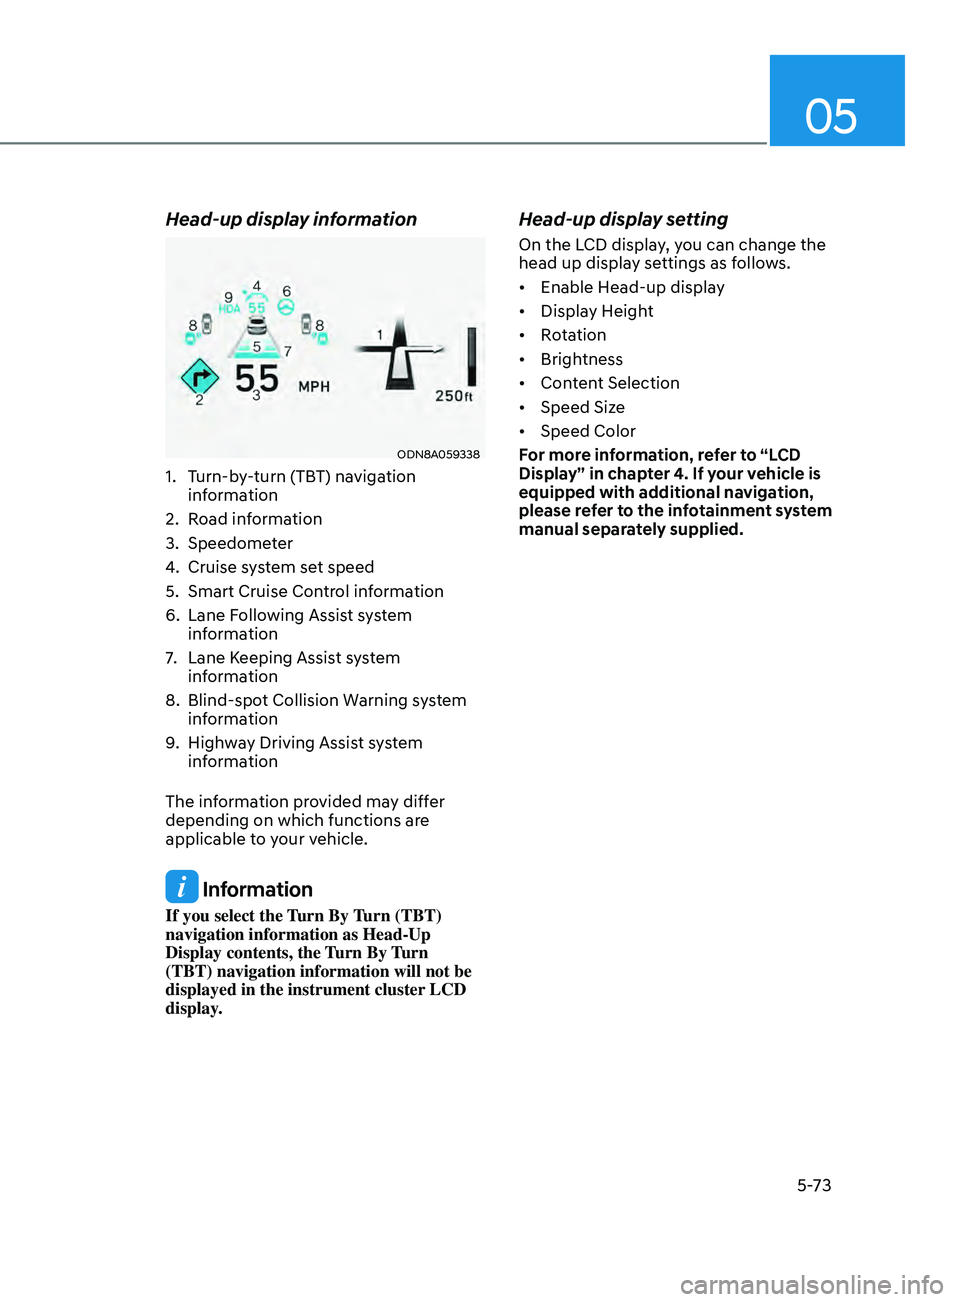
Head-up display information
ODN8A059338
1. Turn-by-turn (TBT) navigation
information
2.
Road information
3.
Speedome
ter
4.
Cruise s
ystem set speed
5.
Smart Cruise Con
trol information
6.
Lane F
ollowing Assist system
information
7.
Lane K
eeping Assist system
information
8.
Blind-spo
t Collision Warning system
information
9.
High
way Driving Assist system
information
The information provided may differ
depending on which functions are
applicable to your vehicle.
Information
If you select the Turn By Turn (TBT)
navigation information as Head-Up
Display contents, the Turn By Turn
(TBT) navigation information will not be
displayed in the instrument cluster LCD
display.
Head-up display setting
On the LCD display, you can change the
head up display settings as follows.
• Enable
Head-up display
• Display
Height
• Rotation
• Brightness
• Content
Selection
• Speed
Size
• Speed
Color
For more information, refer to “LCD
Display” in chapter 4. If your vehicle is
equipped with additional navigation,
please refer to the infotainment system
manual separately supplied.