2022 HYUNDAI SONATA LIMITED lock
[x] Cancel search: lockPage 72 of 546
3-44
• In addition to inflating in certain side
collisions, vehicles equipped with a
rollover sensor, side and curtain air
bags will inflate if the sensing system
detects a rollover.
When a rollover is detected, side and
curtain air bags will remain inflated
longer to help provide protection
from ejection, especially when used in
conjunction with the seat belts.
• To help provide protection, the air
bags must inflate rapidly. The speed
of air bag inflation is a consequence
of extremely short time in which
to inflate the air bag between the
occupant and the vehicle structures
before the occupant impacts those
structures. This speed of inflation
reduces the risk of serious or life-
threatening injuries and is thus a
necessary part of air bag design.
However, the rapid air bag inflation
can also cause injuries which can
include facial abrasions, bruises and
broken bones because the inflation
speed also causes the air bags to
expand with a great deal of force.
• There are even circumstances under
which contact with the air bag can
cause fatal injuries, especially if the
occupant is positioned excessively
close to the air bag.
You can take steps to help reduce the
risk of being injured by an inflating air
bag. The greatest risk is sitting too close
to the air bag. An air bag needs about 10
inches (25 cm) of space to inflate. NHTSA
recommends that drivers allow at least
10 inches (25 cm) between the center of
the steering wheel and the chest. WARNING
To reduce the risk of serious injury or
death from an inflating air bag, take the
following precautions:
• NEVER place a child restraint in the
front passenger seat.
Always properly restrain children
under age 13 in the rear seats of the
vehicle.
• Adjust the front passenger’s and
driver’s seats as far to the rear as
possible while allowing you to
maintain full control of the vehicle.
• Hold the steering wheel with
hands at the 9 o’clock and 3 o’clock
positions.
• NEVER place anything or anyone
between the air bag and the seat
occupant.
• Do not allow the front passenger
to place their feet or legs on the
dashboard.
Seats & Safety System
Page 80 of 546
3-52
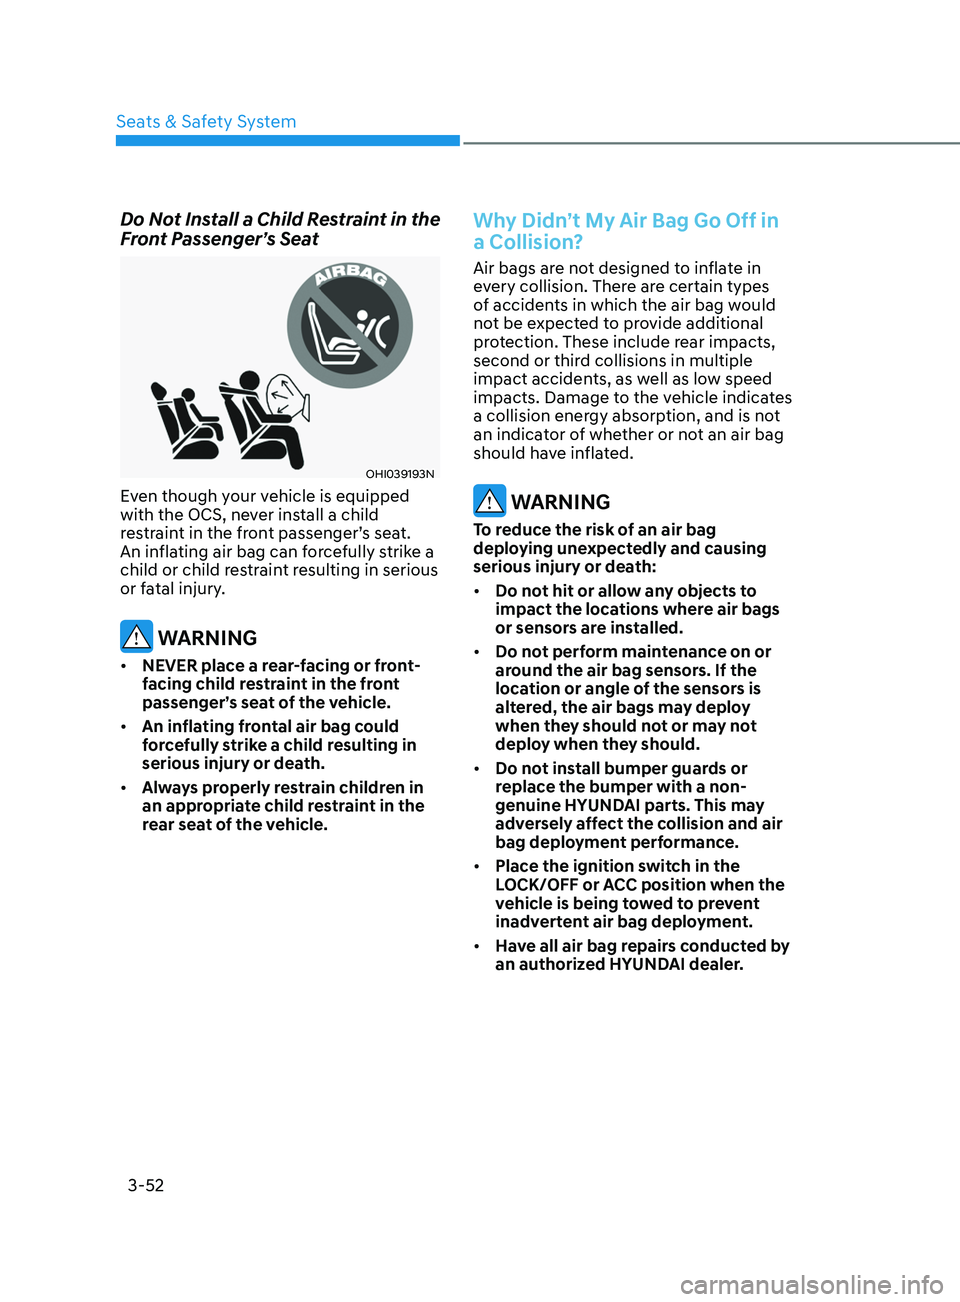
Do Not Install a Child Restraint in the
Front Passenger’s Seat
OHI039193N
Even though your vehicle is equipped
with the OCS, never install a child
restraint in the front passenger’s seat.
An inflating air bag can forcefully strike a
child or child restraint resulting in serious
or fatal injury.
WARNING
• NEVER place a rear-facing or front-
facing child restraint in the front
passenger’s seat of the vehicle.
• An inflating frontal air bag could
forcefully strike a child resulting in
serious injury or death.
• Always properly restrain children in
an appropriate child restraint in the
rear seat of the vehicle.
Why Didn’t My Air Bag Go Off in
a Collision?
Air bags are not designed to inflate in
every collision. There are certain types
of accidents in which the air bag would
not be expected to provide additional
protection. These include rear impacts,
second or third collisions in multiple
impact accidents, as well as low speed
impacts. Damage to the vehicle indicates
a collision energy absorption, and is not
an indicator of whether or not an air bag
should have inflated.
WARNING
To reduce the risk of an air bag
deploying unexpectedly and causing
serious injury or death:
• Do not hit or allow any objects to
impact the locations where air bags
or sensors are installed.
• Do not perform maintenance on or
around the air bag sensors. If the
location or angle of the sensors is
altered, the air bags may deploy
when they should not or may not
deploy when they should.
• Do not install bumper guards or
replace the bumper with a non-
genuine HYUNDAI parts. This may
adversely affect the collision and air
bag deployment performance.
• Place the ignition switch in the
LOCK/OFF or ACC position when the
vehicle is being towed to prevent
inadvertent air bag deployment.
• Have all air bag repairs conducted by
an authorized HYUNDAI dealer.
Seats & Safety System
Page 94 of 546
04
4-9
Anti-lock Brake System (ABS)
Warning Light
This warning light illuminates:
• When you place the ignition switch to
the ON position.
- The ABS w
arning light illuminates
for about 3 seconds and then turns
off.
• Whenever there is a malfunction with
the ABS.
Note that the hydraulic braking
system will still be operational even if
there is a malfunction with the ABS.
Electronic Brake Force
Distribution (EBD) System
Warning Light
These two warning lights illuminate at the
same time while driving:
When the ABS and regular brake system
may not work normally.
In this case, have the vehicle inspected
by an authorized HYUNDAI dealer.
WARNING
Electronic Brake Force Distribution
(EBD) System Warning Light
When both ABS and Parking Brake &
Brake Fluid Warning Lights are on, the
brake system will not work normally
and you may experience an unexpected
and dangerous situation during sudden
braking.
In this case, avoid high speed driving
and abrupt braking.
Have the vehicle inspected by an
authorized HYUNDAI dealer as soon as
possible.
Information - Electronic Brake
Force Distribution (EBD)
System Warning Light
When the ABS Warning Light is on
or both ABS and Parking Brake &
Brake Fluid Warning Lights are on, the
speedometer, odometer, or tripmeter may
not work. Also, the EPS Warning Light
may illuminate and the steering effort may
increase or decrease.
In this case, have the vehicle inspected by
an authorized HYUNDAI dealer as soon
as possible.
Electronic Parking Brake
(EPB) Warning Light
EPB
This warning light illuminates:
• When you place the Engine Start/Stop
button to the ON position.
- The EPB w
arning light illuminates
for approximately 3 seconds and
then turns off.
• Whenever there is a malfunction with
the EPB.
If this occurs, have the vehicle
inspected by an authorized HYUNDAI
dealer.
Information
The Electronic Parking Brake (EPB)
Warning Light may illuminate when
the Electronic Stability control (ESC)
Indicator Light comes on to indicates that
the ESC is not working properly (This
does not indicate malfunction of the EPB).
Page 97 of 546
Instrument Cluster
4-12
Master Warning Light
This indicator light illuminates:
When there is a malfunction in operation
in any of the following systems:
- F
orward Collision-Avoidance Assist
system malfunction (if equipped)
- F
orward Collision-Avoidance Assist
radar blocked (if equipped)
- Blind-
Spot Collision Warning system
malfunction (if equipped)
- Blind-
Spot Collision Warning radar
blocked (if equipped)
- High Beam Assis
t malfunction (if
equipped)
- Lamp malfunction (if equipped)
- Smart Cruise Con
trol malfunction (if
equipped)
- Tir
e Pressure Monitoring System
(TPMS) malfunction (if equipped)
To identify the details of the warning,
look at the LCD display.
Low Tire Pressure Warning
Light (if equipped)
This warning light illuminates:
• When you place the ignition in the ON
position.
- It illumina
tes for approximately 3
seconds and then goes off.
• When one or more of your tires are
significantly underinflated. (The
location of the underinflated tires is
displayed on the LCD display.)
For more information, refer to "Tire
Pressure Monitoring System (TPMS)" in
chapter 7. This warning light remains ON after
blinking for approximately 60 seconds, or
repeatedly blinks ON and OFF in 3 second
intervals:
When there is a malfunction with the
TPMS.
In this case, have the vehicle inspected
by an authorized HYUNDAI dealer as
soon as possible.
For more information, refer to "Tire
Pressure Monitoring System (TPMS)" in
chapter 7.
WARNING
Safe Stopping
•
The TPMS cannot alert you to severe
and sudden tire damage caused by
external factors.
• If you notice any vehicle instability,
immediately take your foot off the
accelerator pedal, apply the brakes
gradually with light force, and slowly
move to a safe position off the road.
Electronic Stability Control
(ESC) Indicator Light
This indicator light illuminates:
• When you place the ignition switch to
the ON position.
- The Electr
onic Stability Control
indicator light illuminates for about
3 seconds and then goes off.
• Whenever there is a malfunction with
the ESC system.
If this occurs, have the vehicle
inspected by an authorized HYUNDAI
dealer.
This indicator light blinks:
While the ESC is operating.
For more information, refer to
“Electronic Stability Control (ESC)” in
chapter 6.
Page 105 of 546
Instrument Cluster
4-20
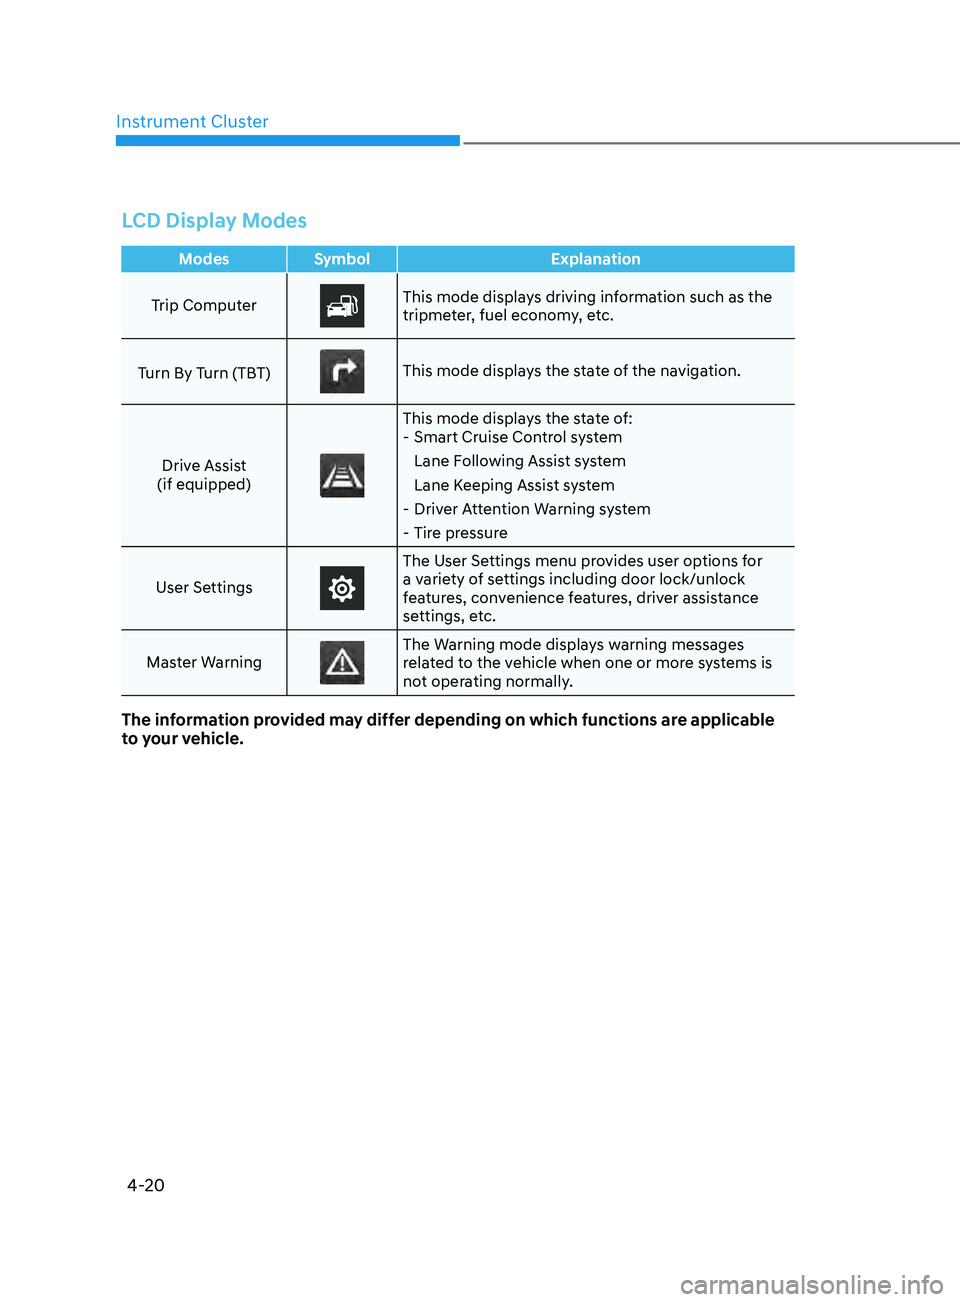
LCD Display Modes
ModesSymbol Explanation
Trip Computer
This mode displays driving information such as the
tripmeter, fuel economy, etc.
Turn By Turn (TBT)
This mode displays the state of the navigation.
Drive Assist
(if equipped)
This mode displays the state of: - Smart Cruise Con trol system
Lane Following Assist system
Lane Keeping Assist system
- Driv
er Attention Warning system
- Tir
e pressure
User Settings
The User Settings menu provides user options for
a variety of settings including door lock/unlock
features, convenience features, driver assistance
settings, etc.
Master Warning
The Warning mode displays warning messages
related to the vehicle when one or more systems is
not operating normally.
The information provided may differ depending on which functions are applicable
to your vehicle.
Page 107 of 546
Instrument Cluster4-22
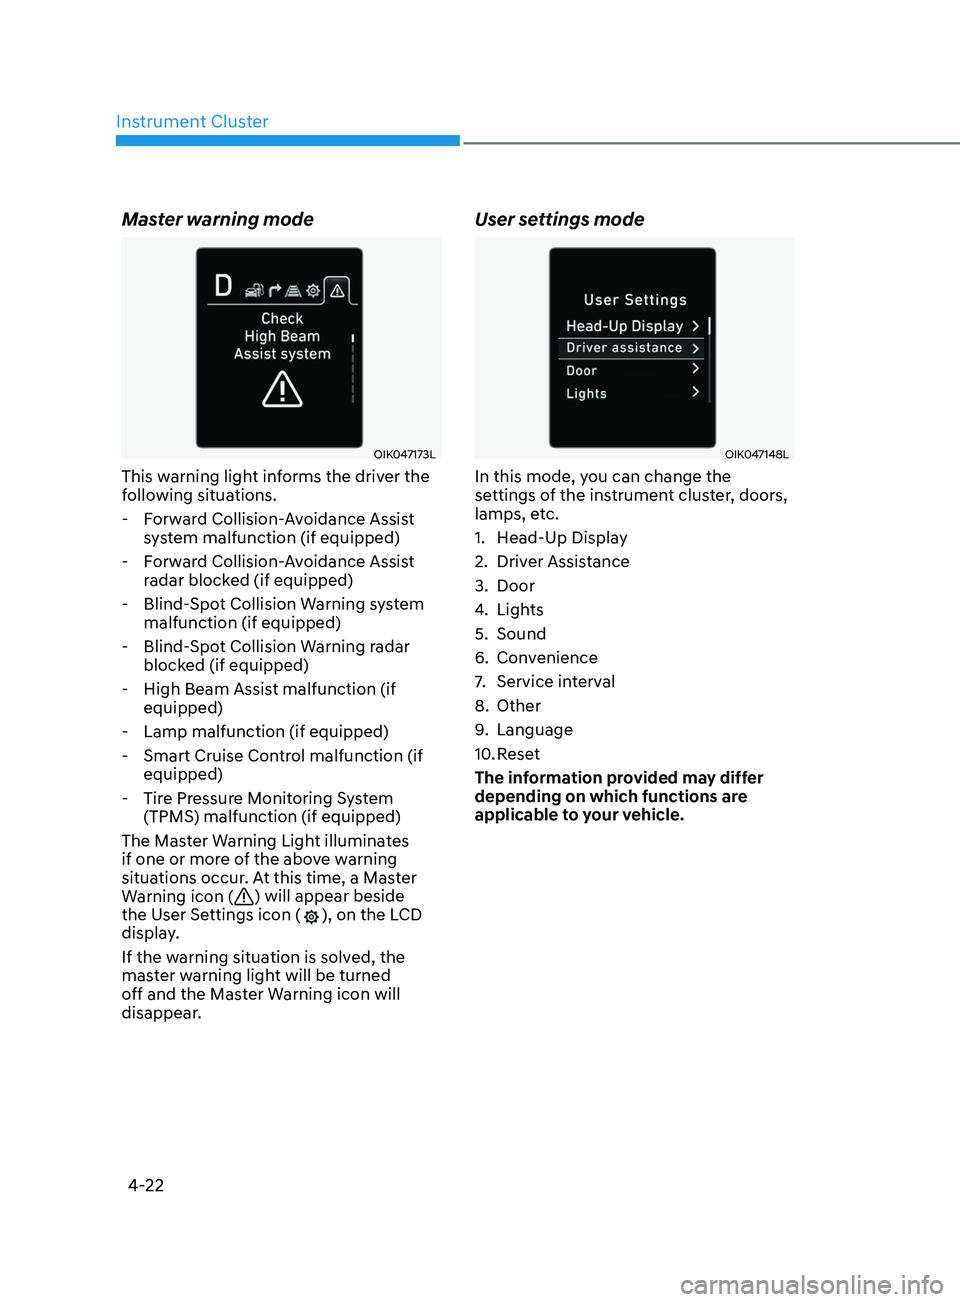
Master warning mode
OIK047173L
This warning light informs the driver the
following situations. - Forward Collision-Avoidance Assist system malfunction (if equipped)
- Forward Collision-Avoidance Assist radar blocked (if equipped)
- Blind-Spot Collision Warning system malfunction (if equipped)
- Blind-Spot Collision Warning radar blocked (if equipped)
- High Beam Assist malfunction (if equipped)
- Lamp malfunction (if equipped)
- Smart Cruise Control malfunction (if equipped)
- Tire Pressure Monitoring System (TPMS) malfunction (if equipped)
The Master Warning Light illuminates
if one or more of the above warning
situations occur. At this time, a Master
Warning icon (
) will appear beside
the User Settings icon (), on the LCD
display.
If the warning situation is solved, the
master warning light will be turned
off and the Master Warning icon will
disappear.
User settings mode
OIK047148L
In this mode, you can change the
settings of the instrument cluster, doors,
lamps, etc.
1. Head-Up Display
2. Driver Assistance
3. Door
4. Lights
5. Sound
6. Convenience
7. Service interval
8. Other
9. Language
10. Reset
The information provided may differ
depending on which functions are
applicable to your vehicle.
Page 112 of 546
04
4-27
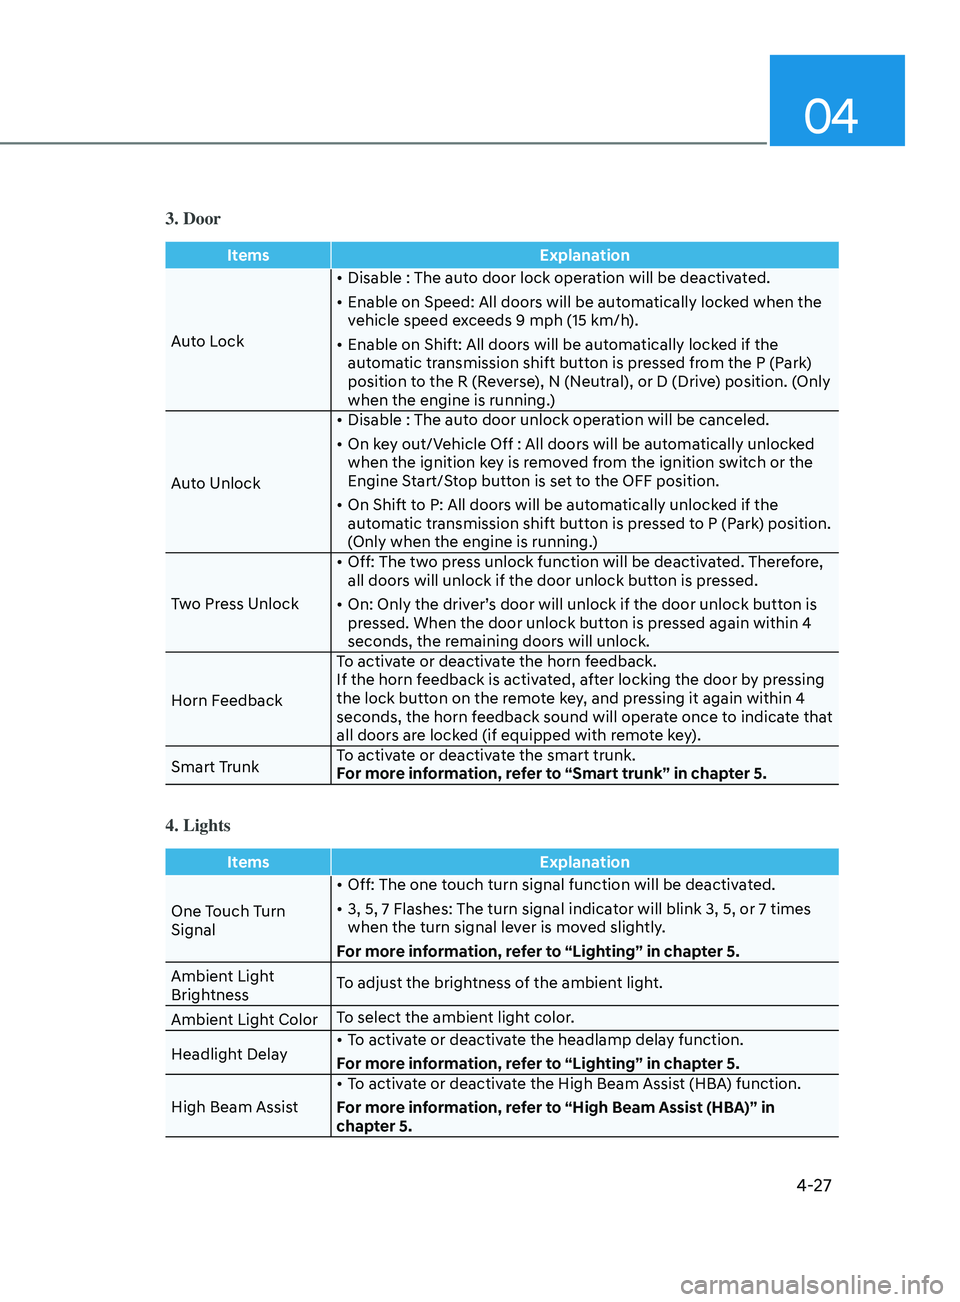
3. Door
ItemsExplanation
Auto Lock •
Disable : The auto door lock operation will be deactivated.
•
E
nable on Speed: All doors will be automatically locked when the
vehicle speed exceeds 9 mph (15 km/h).
•
E
nable on Shift: All doors will be automatically locked if the
automatic transmission shift button is pressed from the P (Park)
position to the R (Reverse), N (Neutral), or D (Drive) position. (Only
when the engine is running.)
Auto Unlock •
Disable : The aut
o door unlock operation will be canceled.
•
On k
ey out/Vehicle Off : All doors will be automatically unlocked
when the ignition key is removed from the ignition switch or the
Engine Start/Stop button is set to the OFF position.
•
On Shift t
o P: All doors will be automatically unlocked if the
automatic transmission shift button is pressed to P (Park) position.
(Only when the engine is running.)
Two Press Unlock •
Off: The tw
o press unlock function will be deactivated. Therefore,
all doors will unlock if the door unlock button is pressed.
•
On: Only the driv
er’s door will unlock if the door unlock button is
pressed. When the door unlock button is pressed again within 4
seconds, the remaining doors will unlock.
Horn Feedback To activate or deactivate the horn feedback.
If the horn feedback is activated, after locking the door by pressing
the lock button on the remote key, and pressing it again within 4
seconds, the horn feedback sound will operate once to indicate that
all doors are locked (if equipped with remote key).
Smart Trunk To activate or deactivate the smart trunk.
For more information, refer to “Smart trunk” in chapter 5.
4. Lights
Items
Explanation
One Touch Turn
Signal •
Off: The one touch turn signal function will be deactivated.
•
3, 5, 7 Flashes: The turn signal indica
tor will blink 3, 5, or 7 times
when the turn signal lever is moved slightly.
For more information, refer to “Lighting” in chapter 5.
Ambient Light
Brightness To adjust the brightness of the ambient light.
Ambient Light Color To select the ambient light color.
Headlight Delay •
To activate or deactivate the headlamp delay function.
For more information, refer to “Lighting” in chapter 5.
High Beam Assist •
To activate or deactivate the High Beam Assist (HBA) function.
For more information, refer to “High Beam Assist (HBA)” in
chapter 5.
Page 127 of 546
Instrument Cluster
4-42
3. Door
ItemsExplanation
Auto Lock •
Disable : The auto door lock operation will be deactivated.
•
E
nable on Speed: All doors will be automatically locked when the
v
ehicle speed exceeds 9 mph (15 km/h).
•
E
nable on Shift: All doors will be automatically locked if the
aut
omatic transmission shift button is pressed from the P (Park)
position to the R (Reverse), N (Neutral), or D (Drive) position. (Only
when the engine is running.)
Auto Unlock •
Disable
: The auto door unlock operation will be canceled.
•
On
key out/Vehicle Off : All doors will be automatically unlocked
when the ignition k
ey is removed from the ignition switch or the
Engine Start/Stop button is set to the OFF position.
•
On
Shift to P: All doors will be automatically unlocked if the
aut
omatic transmission shift button is pressed to P (Park) position.
(Only when the engine is running.)
Two Press Unlock •
Off:
The two press unlock function will be deactivated. Therefore,
all door
s will unlock if the door unlock button is pressed.
•
On:
Only the driver’s door will unlock if the door unlock button is
pr
essed. When the door unlock button is pressed again within 4
seconds, the remaining doors will unlock.
Horn Feedback To activate or deactivate the horn feedback.
If the horn feedback is activated, after locking the door by pressing
the lock button on the remote key, and pressing it again within 4
seconds, the horn feedback sound will operate once to indicate that
all doors are locked (if equipped with remote key).
Smart Trunk To activate or deactivate the smart trunk.
For more information, refer to “Smart trunk” in chapter 5.
4. Lights
Items
Explanation
One Touch Turn
Signal •
Off: The one touch turn signal function will be deactivated.
•
3,
5, 7 Flashes: The turn signal indicator will blink 3, 5, or 7 times
when the turn signal le
ver is moved slightly.
For more information, refer to “Lighting” in chapter 5.
Ambient Light
Brightness To adjust the brightness of the ambient light.
Ambient Light Color To select the ambient light color.
Headlight Delay •
To activate or deactivate the headlamp delay function.
For more information, refer to “Lighting” in chapter 5.
High Beam Assist •
To activate or deactivate the High Beam Assist (HBA) function.
For more information, refer to “High Beam Assist (HBA)” in chapter 5.