Page 180 of 546
Convenient Features
5-50
7. Return to the vehicle and firmly press, hold for two seconds and release the
HomeLink button up to three times.
Do not press the HomeLink button
rapidly. At this point programming
is complete and your device should
operate when the HomeLink button is
pressed and released.
Information
• Some garage door openers require to
press the programmed button on the
mirror up to three times right after
the programming is just completed to
operate the garage door.
• The indicator (4) is turned ON in
Orange and flashes for about 60
seconds, during the programing mode
and if a programing is not succeeded
within the 60 seconds, the programing
mode will be abort.
HomeLink® should now activate your
rolling code equipped device. Gate operator & Canadian programming
During programming, your handheld
transmitter may automatically stop
transmitting. Continue to press the
Integrated HomeLink® Wireless Control
System button while you press and re-
press (“cycle”) your handheld transmitter
every two seconds until the frequency
signal has been learned. The indicator
light will flash slowly and then rapidly
after several seconds upon successful
training.
ODN8A059136
Operating HomeLink®
1.
Pr
ess and release one of the
HomeLink buttons (1, 2 or 3) that
programed.
2.
The H
omeLink indicator (4) will
operate as below:
-
Indica
tes Green and is continuously
ON (Fixed Code Garage Door
Opener)
-
Flashes in Gr
een rapidly (Rolling
Code Garage Door Opener)
Page 181 of 546
05
5-51
ODN8A059138
Erasing HomeLink® buttons
1.
Pr
ess and hold the button (1) and (3)
simultaneously.
2.
The indica
tor (4) is turned
continuously ON in orange for about
10 seconds.
3.
Then the indica
tor (4) color changes
to Green and flashes rapidly.
R
elease the buttons once the green
indicator flashes.
4.
N
ow HomeLink button (1), (2) and (4)
memories are all cleared.
NVS® is a registered trademark and
Z-Nav™ is a trademark of the Gentex
Corporation, Zeeland, Michigan.
HomeLink® is a registered trademark
owned by Johnson Controls,
Incorporated, Milwaukee, Wisconsin.
FCC ID: NZLUAHL5A
IC: 4112A-UAHL5A
Information
This device complies with Part 15 of the
FCC Rules.
Operation is subject to the following three
conditions:
1.
This device m
ay not cause harmful
interference, and
2.
This device m
ust accept any
interference received, including
interference that may cause undesired
operation. 3.
The transceiver
has been tested
and complies with FCC and
Industry Canada rules. Changes or
modifications not expressly approved
by the party responsible for compliance
could void the user’s authority to
operate the device.
Two Way Communication Programing
1.
Comple
te the HomeLink
“Programming” first.
2.
Be
fore the first 10 times HomeLink
button is pressed after the
programming, the following steps
MUST occur to program two way
communication. (only for some older
garage doors)
ODN8A059139
3. Press and release the programed HomeLink button to activate the
garage door.
4.
Once the gar
age door is stopped,
press and release the “Learn” or
“Smart” button on the Garage door
opener within 1 minute from the time
of pressing the programed HomeLink
button on mirror.
Page 182 of 546
Convenient Features
5-52
ODN8A059137
5. If the both indicator (4) and (6) are flashing rapidly for about 5 seconds,
the two way synchronization is
completed.
Information
Some newer garage door openers provide
two-way communication synchronizing
when programming the original
transmitter.
ODN8A059139
Operating Two Way Communication
1.
Pr
ess and release (1), (2) or (3) button.
ODN8A059140
2. The indica tor (4) and (6) operates as
below:
-
If the indica
tor (4) flashes in Orange,
it indicates that the garage door is
“closing”.
- If the indica
tor (4) is ON continuously
in Green, it indicates that the garage
door is “closed”.
-
If the indica
tor (6) flashes in Orange,
it indicates that the garage door is
“Opening”.
-
If the indica
tor (6) is ON
continuously in Green, it indicates
that the garage door is “Opened”.
-
If the indica
tor (4) or (6) does not
turn to Green, it indicates that the
last status of garage door was not
received properly. The HomeLink
mirror tries to receive the last
known status of the garage door for
a few seconds.
Recalling Garage Door Status
Homelink mirror with two way
communication provides a way to view
the last stored message from the garage
door opener. In order to recall the last
known status of the last activated device,
press the buttons “1 and 2” OR “2 and 3”
simultaneously.
• If
the indicator (4) is ON continuously
in Gr
een, it indicates that the last
activated device was “closed” properly.
• If
the indicator (6) is ON continuously
in Gr
een, it indicates that the last
activated device was “open” properly.
Page 248 of 546
5-118
Convenient Features
1. Fan speed control knob
2.
T
emperature control knob
3.
M
ode selection buttons
4.
F
ront windshield defroster button 5.
R ear window defroster button
6.
A/C (
Air conditioning) button
7.
Air in
take control button
8.
Max A/C selection butt
on
mAnUAl climATe conT rol SyS T em ( if eQU ippe D)
„„Type A
ODN8A059100
„„Type B
ODN8A059101
Page 259 of 546
05
5-129
ODN8059214
NOTICE
Never place anything near the ambient
light/solar sensor to ensure better
control of the heating and cooling
system.
Manual Temperature Control
Mode
The heating and cooling system can be
controlled manually by pushing buttons
other than the AUTO button. In this case,
the system works sequentially according
to the order of buttons selected.
When pressing any button except the
AUTO button while using automatic
operation, the functions not selected will
be controlled automatically.
1.
S
tart the engine.
2.
Se
t the mode to the desired position.
To improve the effectiveness of
heating and cooling, select the mode
according to the following:
- H
eating:
- Cooling:
3. Set the temperature control to the desired position.
4.
Se
t the air intake control to Fresh
mode position.
5.
Se
t the fan speed control to the
desired speed.
6.
If air conditioning is desir
ed, turn the
air conditioning system on.
7.
Pr
ess the AUTO button to convert to
full automatic control of the system.
When starting the vehicle in cold
weather using manual temperature
control, operate the system in the
following method to improve heating.
- T
urn off or lower the blower, right
after starting the engine.
• Allow the engine to warm up during this
time since the air flow from the heater is
still cold.
- After a few minutes of engine warm
up, turn on or set the fan to a higher
level and adjust the temperature
setting to hot.
Page 264 of 546
Convenient Features
5-134
Fan speed control
ODN8H059319
The fan speed can be set to the desired
speed by using the fan speed control
toggle switch.
More air is delivered with higher fan
speeds.
Pressing the OFF button turns off the fan.
Information
For better sound quality, fan speed may
automatically slow down for a couple
of minutes when you activate voice
recognition or hands free.
NOTICE
Operating the fan when the ignition
switch is in the ON position could cause
the battery to discharge. Operate the
fan when the engine is running.
Air conditioning
ODN8059121
Push the A/C button to manually turn
the air conditioning system on (indicator
light will illuminate).
Push the button again to turn the air
conditioning system off.
OFF mode
ODN8059123
Push the OFF button of the front to
turn off the air climate control system.
However, you can still operate the mode
and air intake buttons as long as the
ignition switch is in the ON position.
Page 283 of 546
05
5-153
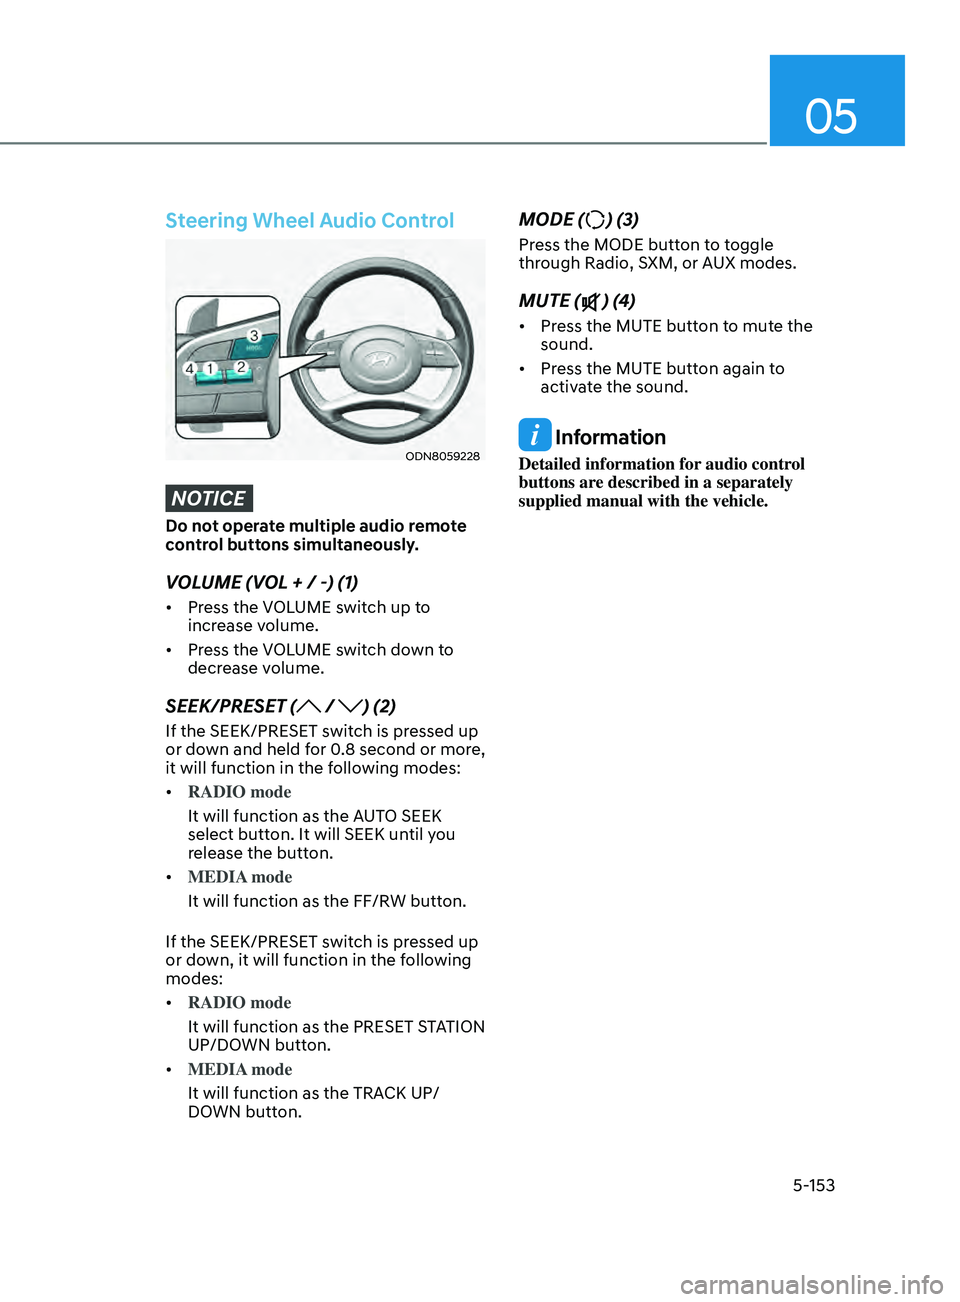
Steering Wheel Audio Control
ODN8059228
NOTICE
Do not operate multiple audio remote
control buttons simultaneously.
VOLUME (VOL + / -) (1)
• Press the VOLUME switch up to
increase volume.
• Press the VOLUME switch down to
decrease volume.
SEEK/PRESET ( / ) (2)
If the SEEK/PRESET switch is pressed up
or down and held for 0.8 second or more,
it will function in the following modes:
• RADIO mode
It will function as the AUTO SEEK
select button. It will SEEK until you
release the button.
• MEDIA mode
It will function as the FF/RW button.
If the SEEK/PRESET switch is pressed up
or down, it will function in the following
modes:
• RADIO mode
It will function as the PRESET STATION
UP/DOWN button.
• MEDIA mode
It will function as the TRACK UP/
DOWN button.
MODE () (3)
Press the MODE button to toggle
through Radio, SXM, or AUX modes.
MUTE () (4)
• Press the MUTE button to mute the
sound.
• Press the MUTE button again to
activate the sound.
Information
Detailed information for audio control
buttons are described in a separately
supplied manual with the vehicle.