2022 HYUNDAI SONATA LIMITED lock
[x] Cancel search: lockPage 238 of 546
Convenient Features
5-108
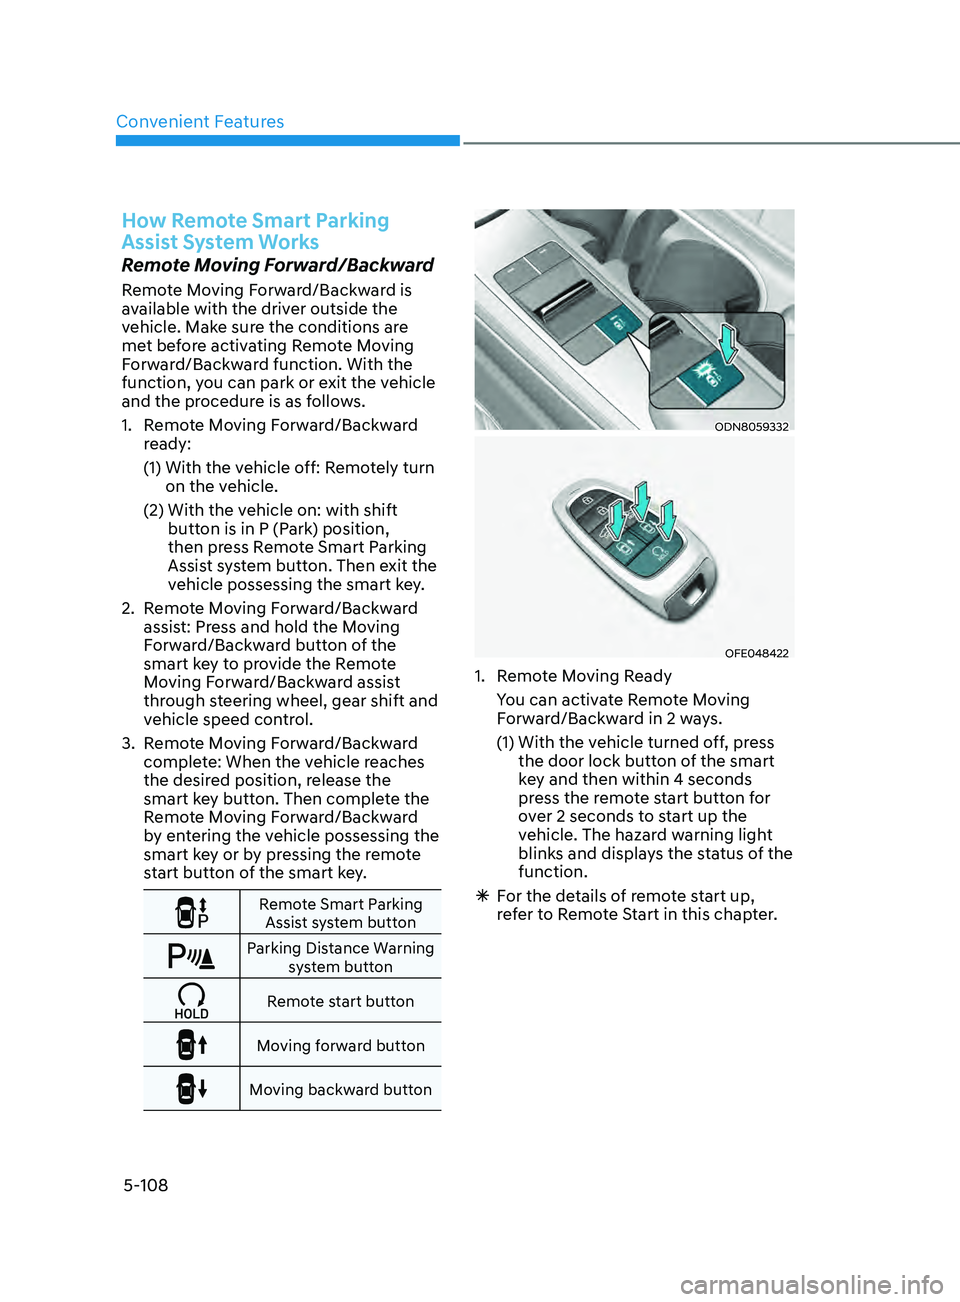
How Remote Smart Parking
Assist System Works
Remote Moving Forward/Backward
Remote Moving Forward/Backward is
available with the driver outside the
vehicle. Make sure the conditions are
met before activating Remote Moving
Forward/Backward function. With the
function, you can park or exit the vehicle
and the procedure is as follows.
1.
R
emote Moving Forward/Backward
ready:
(1)
With the v
ehicle off: Remotely turn
on the vehicle.
(2)
With the v
ehicle on: with shift
button is in P (Park) position,
then press Remote Smart Parking
Assist system button. Then exit the
vehicle possessing the smart key.
2.
R
emote Moving Forward/Backward
assist: Press and hold the Moving
Forward/Backward button of the
smart key to provide the Remote
Moving Forward/Backward assist
through steering wheel, gear shift and
vehicle speed control.
3.
R
emote Moving Forward/Backward
complete: When the vehicle reaches
the desired position, release the
smart key button. Then complete the
Remote Moving Forward/Backward
by entering the vehicle possessing the
smart key or by pressing the remote
start button of the smart key.
Remote Smart Parking
Assist system button
Parking Distance Warning system button
Remote start button
Moving forward button
Moving backward button
ODN8059332
OFE048422
1. Remote Moving Ready
Y
ou can activate Remote Moving
Forward/Backward in 2 ways.
(1)
With the v
ehicle turned off, press
the door lock button of the smart
key and then within 4 seconds
press the remote start button for
over 2 seconds to start up the
vehicle. The hazard warning light
blinks and displays the status of the
function.
à F
or the details of remote start up,
refer to Remote Start in this chapter.
Page 246 of 546
Convenient Features
5-116
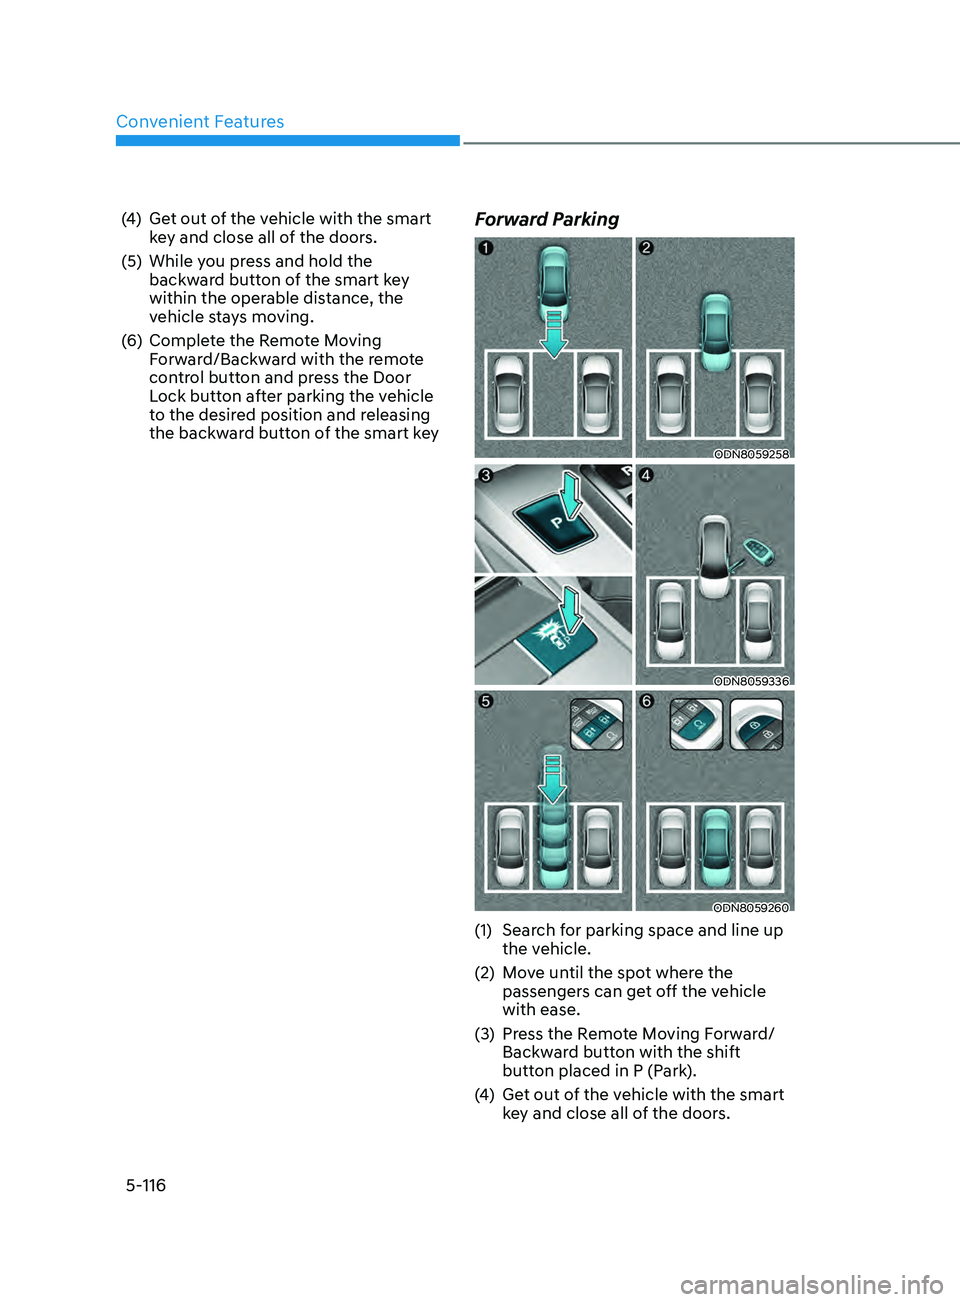
(4) Get out of the vehicle with the smart key and close all of the doors.
(5)
While y
ou press and hold the
backward button of the smart key
within the operable distance, the
vehicle stays moving.
(6)
Comple
te the Remote Moving
Forward/Backward with the remote
control button and press the Door
Lock button after parking the vehicle
to the desired position and releasing
the backward button of the smart keyForward Parking
ODN8059258
ODN8059336
ODN8059260
(1) Search for parking space and line up the vehicle.
(2)
M
ove until the spot where the
passengers can get off the vehicle
with ease.
(3)
Pr
ess the Remote Moving Forward/
Backward button with the shift
button placed in P (Park).
(4)
Ge
t out of the vehicle with the smart
key and close all of the doors.
Page 247 of 546
05
5-117
(5) While you press and hold the forward button of the smart key within the
operable distance, the vehicle stays
moving.
(6)
Comple
te the Remote Moving
Forward/Backward with the remote
control button and press the Door
Lock button after parking the vehicle
to the desired position and releasing
the forward button of the smart key.
Page 272 of 546
Convenient Features
5-142
DefrosterNOTICE
To prevent damage to the conductors
bonded to the inside surface of the rear
window, never use sharp instruments or
window cleaners containing abrasives
to clean the window.
Information
If you want to defrost and defog the
front windshield, refer to “Windshield
Defrosting and Defogging” in this chapter.
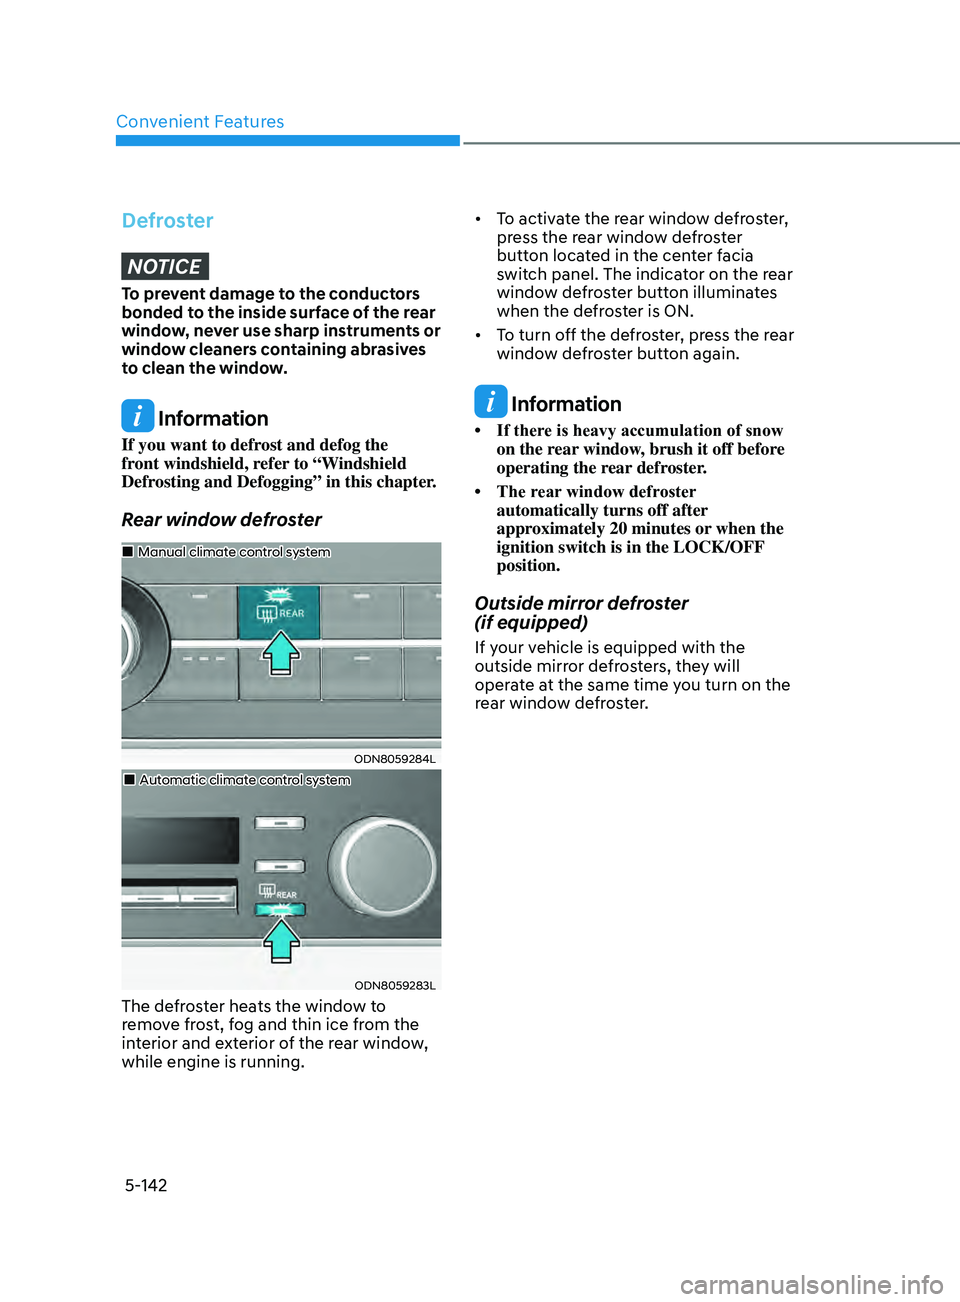
Rear window defroster
ODN8059284L
„„Manual climate control system
„„Automatic climate control system
ODN8059283L
The defroster heats the window to
remove frost, fog and thin ice from the
interior and exterior of the rear window,
while engine is running. • To
activate the rear window defroster,
pr
ess the rear window defroster
button located in the center facia
switch panel. The indicator on the rear
window defroster button illuminates
when the defroster is ON.
• To turn off the defroster, press the rear
windo
w defroster button again.
Information
• If there is heavy accumulation of snow on the r
ear window, brush it off before
operating the rear defroster.
• The
rear
window defroster
automatically turns off after
approximately 20 minutes or when the
ignition switch is in the LOCK/OFF
position.
Outside mirror defroster
(if equipped)
If your vehicle is equipped with the
outside mirror defrosters, they will
operate at the same time you turn on the
rear window defroster.
Page 276 of 546
Convenient Features5-146
Sunvisor
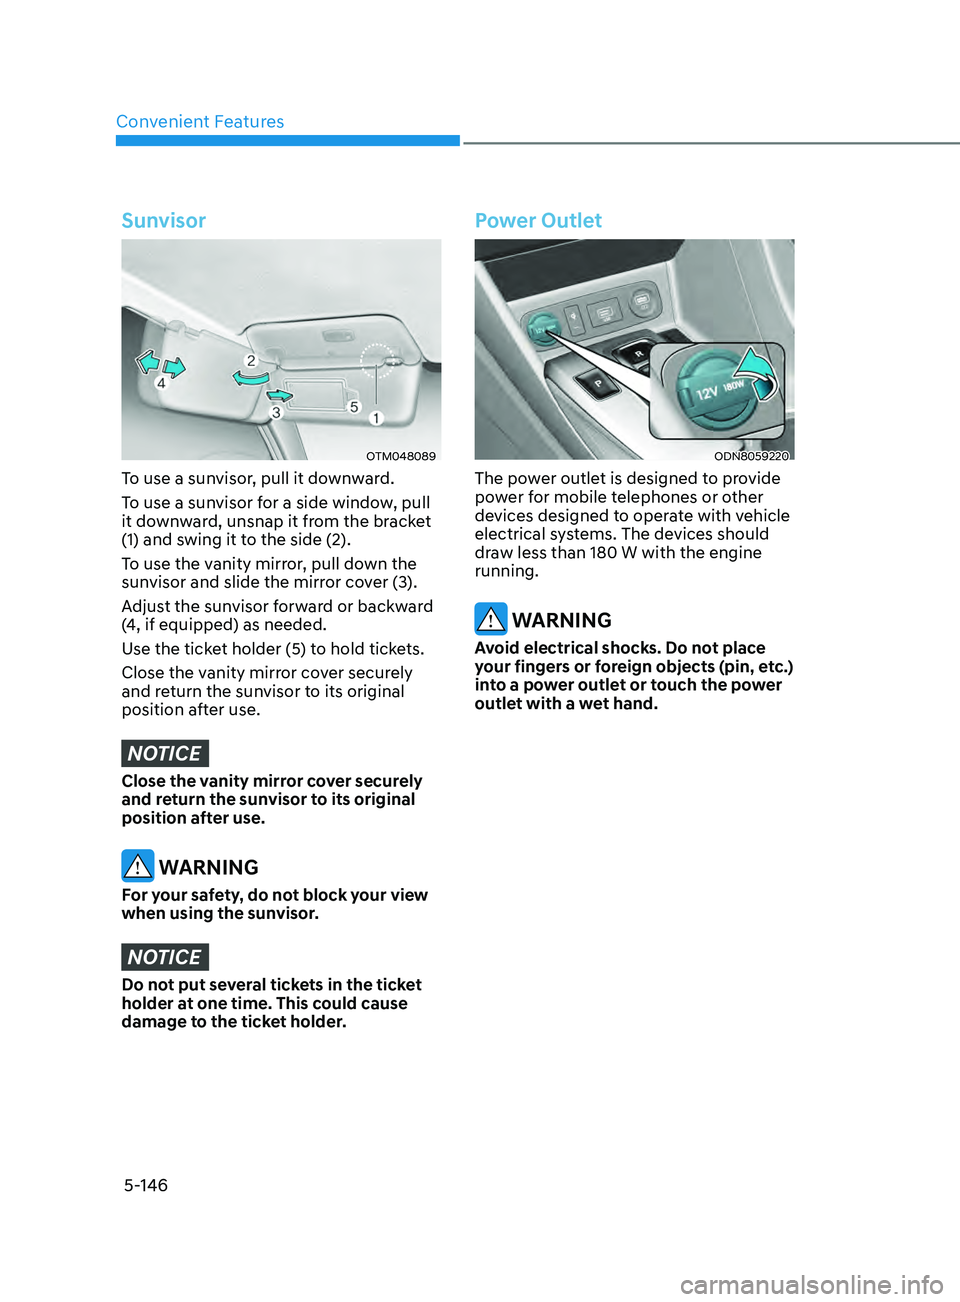
OTM048089
To use a sunvisor, pull it downward.
To use a sunvisor for a side window, pull
it downward, unsnap it from the bracket
(1) and swing it to the side (2).
To use the vanity mirror, pull down the
sunvisor and slide the mirror cover (3).
Adjust the sunvisor forward or backward
(4, if equipped) as needed.
Use the ticket holder (5) to hold tickets.
Close the vanity mirror cover securely
and return the sunvisor to its original
position after use.
NOTICE
Close the vanity mirror cover securely
and return the sunvisor to its original
position after use.
WARNING
For your safety, do not block your view
when using the sunvisor.
NOTICE
Do not put several tickets in the ticket
holder at one time. This could cause
damage to the ticket holder.
Power Outlet
ODN8059220
The power outlet is designed to provide
power for mobile telephones or other
devices designed to operate with vehicle
electrical systems. The devices should
draw less than 180 W with the engine
running.
WARNING
Avoid electrical shocks. Do not place
your fingers or foreign objects (pin, etc.)
into a power outlet or touch the power
outlet with a wet hand.
Page 278 of 546
![HYUNDAI SONATA LIMITED 2022 Owners Manual Convenient Features
5-148
Wireless Cellular Phone
Charging System (if equipped)
ODN8059223
[A]: Indicator light, [B]: Charging pad
On certain models, the vehicle comes
equipped with a wireless cellu HYUNDAI SONATA LIMITED 2022 Owners Manual Convenient Features
5-148
Wireless Cellular Phone
Charging System (if equipped)
ODN8059223
[A]: Indicator light, [B]: Charging pad
On certain models, the vehicle comes
equipped with a wireless cellu](/manual-img/35/56192/w960_56192-277.png)
Convenient Features
5-148
Wireless Cellular Phone
Charging System (if equipped)
ODN8059223
[A]: Indicator light, [B]: Charging pad
On certain models, the vehicle comes
equipped with a wireless cellular phone
charger.
The system is available when all doors
are closed, and when the ignition switch
is ON.
To charge a cellular phone
The wireless cellular phone charging
system charges only the Qi-enabled
cellular phones. Read the label on the
cellular phone accessory cover or visit
your cellular phone manufacturer’s
website to check whether your cellular
phone supports the Qi technology.
The wireless charging process starts
when you put a Qi-enabled cellular
phone on the wireless charging unit.
1.
R
emove other items, including the
smart key, from the wireless charging
unit. If not, the wireless charging
process may be interrupted. Place
the cellular phone on the center of
the charging pad (
).
2.
The indica
tor light is orange when
the cellular phone is charging. The
indicator light turns green when
phone charging is complete.
3.
Y
ou can turn ON or OFF the wireless
charging function in the user settings
mode on the instrument cluster. For
further information, refer to the “LCD
Display Modes” in this chapter.
If your cellular phone is not charging:
-
Sligh
tly change the position of the
cellular phone on the charging pad.
-
Mak
e sure the indicator light is
orange.
The indicator light will blink orange for 10
seconds if there is a malfunction in the
wireless charging system.
In this case, temporarily stop the
charging process, and re-attempt to
charge your cellular phone again.
The system warns you with a message
on the LCD display if the cellular phone
is still on the wireless charging unit after
the engine is turned OFF and the front
door is opened.
Information
For some manufacturers’ cellular phones,
the system may not warn you even though
the cellular phone is left on the wireless
charging unit. This is due to the particular
characteristic of the cellular phone and
not a malfunction of the wireless charging.
NOTICE
• The wireless cellular phone charging system may not support certain
cellular phones, which are not
verified for the Qi specification (
).
•
When placing y
our cellular phone
on the charging mat, position the
phone in the middle of the mat for
optimal charging performance. If
your cellular phone is off to the side,
the charging rate may be less and in
some cases the cellular phone may
experience higher heat conduction.
•
In some cases, the wir
eless charging
may stop temporarily when the
Remote Key or Smart Key is used,
either when starting the vehicle or
locking/unlocking the doors, etc.
•
When char
ging certain cellular
phones, the charging indicator
may not change to green when the
cellular phone is fully charged.
Page 280 of 546
Convenient Features5-150
Clock
WARNING
Do not attempt to adjust the clock
while driving. Doing so may result in
distracted driving which may lead to
an accident involving personal injury or
death.
For more information, please refer to
the manual that was supplied with your
vehicle.
Clothes Hanger
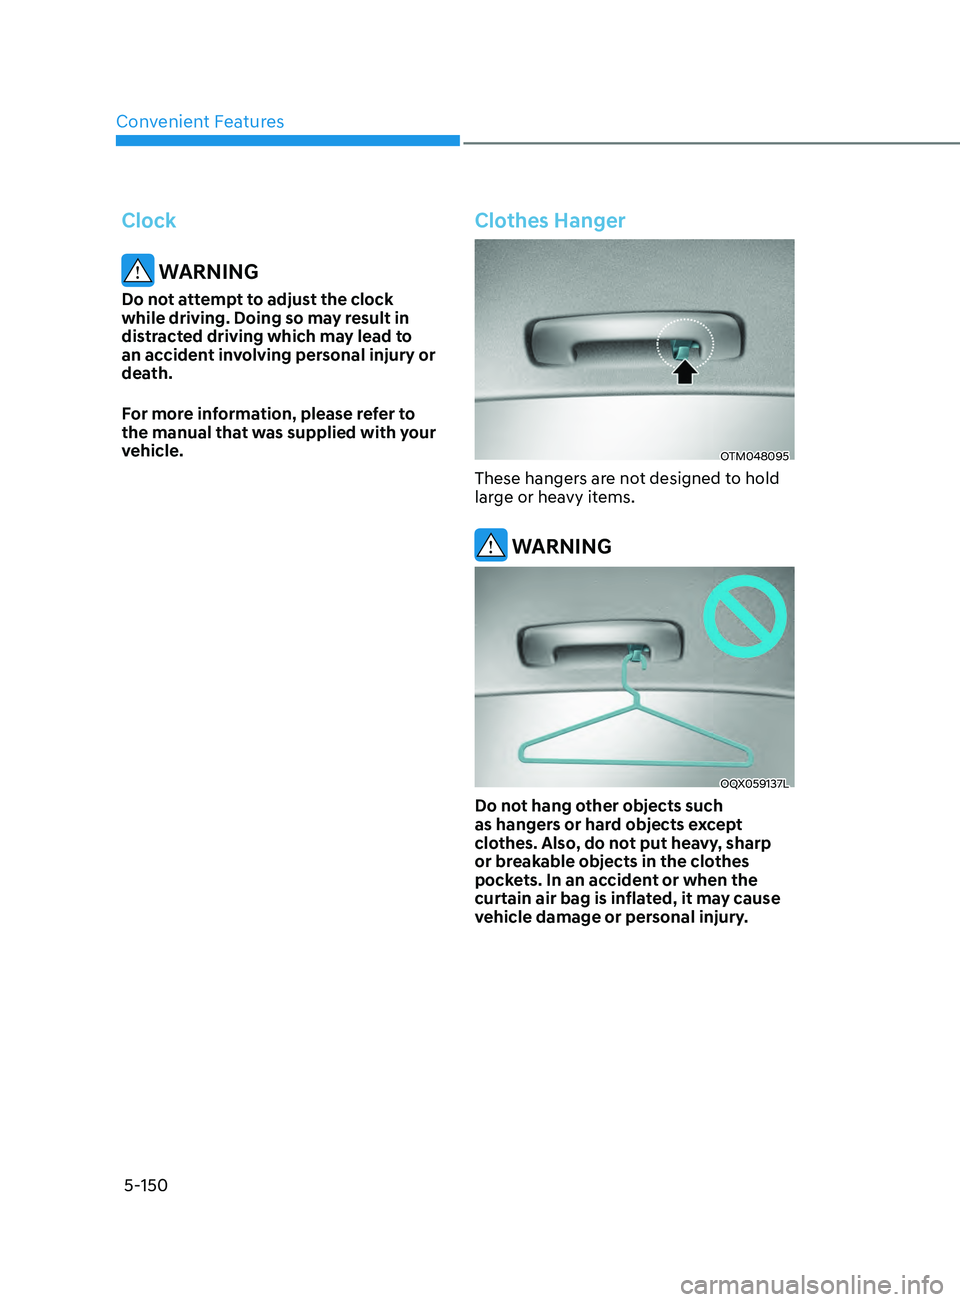
OTM048095
These hangers are not designed to hold
large or heavy items.
WARNING
OQX059137L
Do not hang other objects such
as hangers or hard objects except
clothes. Also, do not put heavy, sharp
or breakable objects in the clothes
pockets. In an accident or when the
curtain air bag is inflated, it may cause
vehicle damage or personal injury.
Page 285 of 546
6
6. While Driving
Before Driving ........................................................................\
........................6-5Before Entering the Vehicle ........................................................................\
.............6-5
Be fore Starting ........................................................................\
................................. 6-5
Ignition Switch ........................................................................\
.......................6-6Key Ignition Switch ........................................................................\
........................... 6-6
E ngine Start/Stop Button ........................................................................\
................ 6-9
Remote Start
........................................................................\
.................................... 6-12
Automatic Transmission ........................................................................\
.......6- 13Automatic Transmission Operation ........................................................................\
6- 13
Parking ........................................................................\
............................................. 6-16
LCD Display Message
........................................................................\
...................... 6-17
Good Driving Practices
........................................................................\
.................. 6-18
Paddle Shifter (Manual Shift Mode)
......................................................................
6-19
Brake System ........................................................................\
........................6- 20Power Brakes ........................................................................\
..................................6- 20
Disc Brakes Wear Indicator........................................................................\
............ 6-20
Electronic Parking Brake (EPB)
........................................................................\
....... 6-21
Auto Hold
........................................................................\
........................................ 6-24
Anti-lock Brake System (ABS) .....................................................................6- 27Electronic Stability Control (ESC) ........................................................................\
.6- 29
Vehicle Stability Management (VSM) .................................................................... 6-31
Hill-Start Assist Control (HAC)
........................................................................\
....... 6-32
Good Braking Practices
........................................................................\
................. 6-32
ISG (Idle Stop and Go) system..................................................................... 6-33To Activate the ISG System ........................................................................\
............6- 33
To Deactivate the ISG System ........................................................................\
....... 6-35
ISG System Malfunction
........................................................................\
................ 6-35
Battery Sensor Deactivation
........................................................................\
.......... 6-36
Drive Mode Integrated Control System ......................................................6- 37Drive Mode ........................................................................\
.....................................6- 37
Forward Collision – Avoidance Assist (FCA) - Sensor Fusion ..................6-40System Setting and Activation ........................................................................\
..... 6-40
F CA Warning Message and Brake Control ............................................................6-42
FCA Sensor
........................................................................\
..................................... 6-45
System Malfunction
........................................................................\
....................... 6-47
Limitations of the System
........................................................................\
.............. 6-48
Forward Collision-Avoidance Assist - Junction Turning
......................................6-55