2022 HYUNDAI SONATA HYBRID steering wheel
[x] Cancel search: steering wheelPage 393 of 527
06
6-117
Warning Message
Hands-off warning
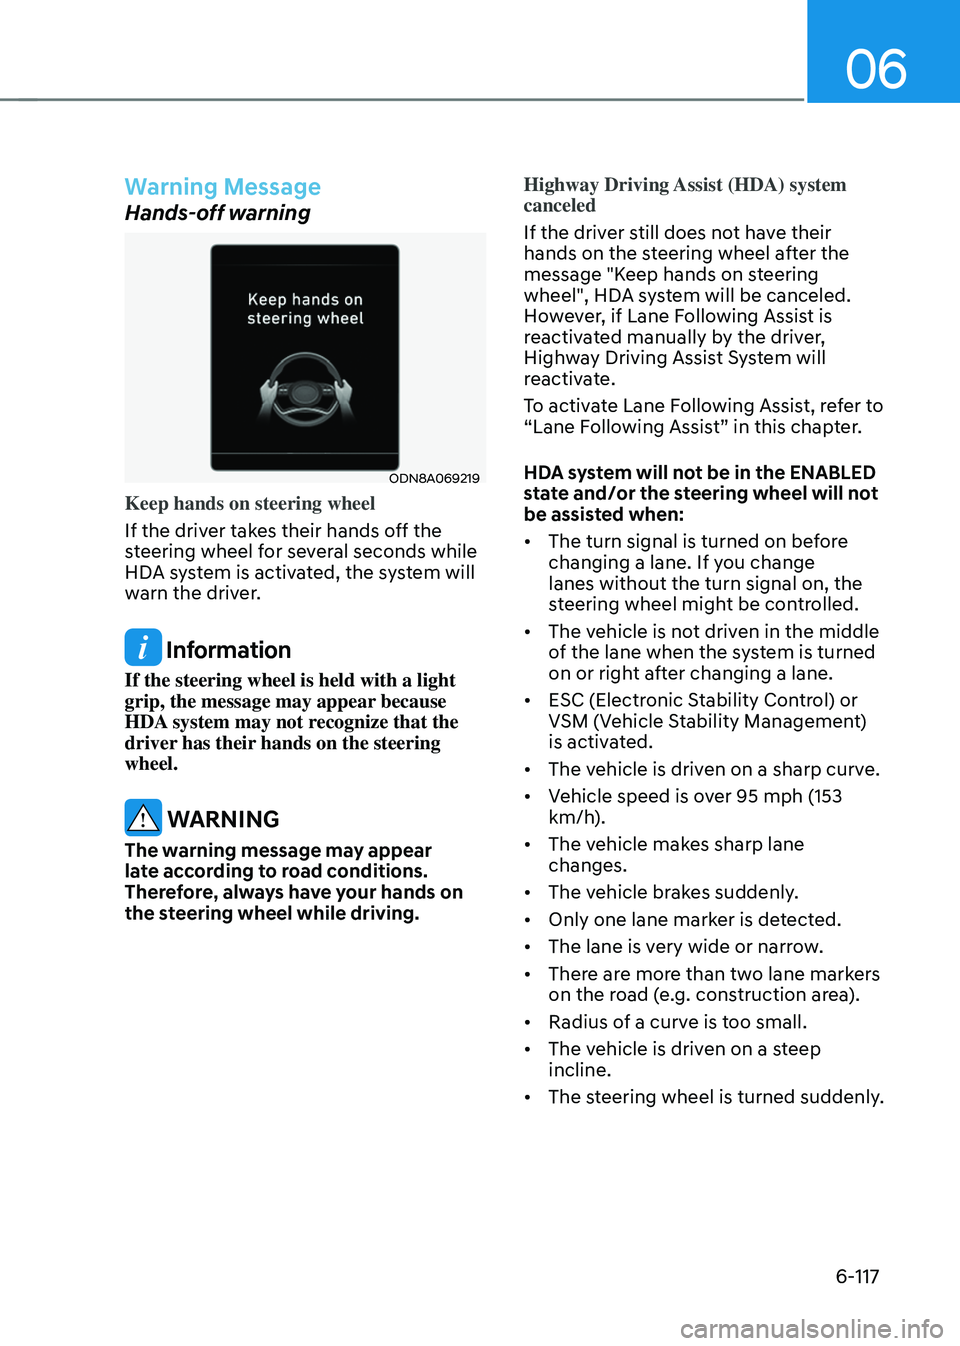
ODN8A069219
Keep hands on steering wheel
If the driver takes their hands off the
steering wheel for several seconds while
HDA system is activated, the system will
warn the driver.
Information
If the steering wheel is held with a light
grip, the message may appear because
HDA system may not recognize that the
driver has their hands on the steering
wheel.
WARNING
The warning message may appear
late according to road conditions.
Therefore, always have your hands on
the steering wheel while driving.Highway Driving Assist (HDA) system
canceled
If the driver still does not have their
hands on the steering wheel after the
message "Keep hands on steering
wheel", HDA system will be canceled.
However, if Lane Following Assist is
reactivated manually by the driver,
Highway Driving Assist System will
reactivate.
To activate Lane Following Assist, refer to
“Lane Following Assist” in this chapter.
HDA system will not be in the ENABLED
state and/or the steering wheel will not
be assisted when:
•
The turn signal is turned on before
changing a lane. If you change
lanes without the turn signal on, the
steering wheel might be controlled.
• The vehicle is not driven in the middle
of the lane when the system is turned
on or right after changing a lane.
• ESC (Electronic Stability Control) or
VSM (Vehicle Stability Management)
is activated.
• The vehicle is driven on a sharp curve.
• Vehicle speed is over 95 mph (153
km/h).
• The vehicle makes sharp lane
changes.
• The vehicle brakes suddenly.
• Only one lane marker is detected.
• The lane is very wide or narrow.
• There are more than two lane markers
on the road (e.g. construction area).
• Radius of a curve is too small.
• The vehicle is driven on a steep
incline.
• The steering wheel is turned suddenly.
Page 408 of 527
While Driving
6-132
Hazardous Driving Conditions
When hazardous driving elements
are encountered such as water, snow,
ice, mud and sand, take the below
suggestions:
• Drive cautiously and keep a longer
braking distance.
• Avoid abrupt braking or steering.
• When your vehicle is stuck in
snow, mud, or sand, use second
gear. Accelerate slowly to avoid
unnecessary wheel spin.
• Put sand, rock salt, tire chains or other
non-slip materials under the wheels to
provide additional traction while the
vehicle becomes stuck in ice, snow,
or mud.
WARNING
Downshifting with an automatic
transmission while driving on slippery
surfaces can cause an accident. The
sudden change in tire speed could
cause the tires to skid. Be careful when
downshifting on slippery surfaces.
Rocking the Vehicle
If it is necessary to rock the vehicle to
free it from snow, sand, or mud, first turn
the steering wheel right and left to clear
the area around your front wheels. Then,
shift back and forth between R (Reverse)
and a forward gear.
Try to avoid spinning the wheels, and do
not race the engine.
To prevent transmission wear, wait until
the wheels stop spinning before shifting
gears. Release the accelerator pedal
while shifting, and press lightly on the
accelerator pedal while the transmission
is in gear. Slowly spinning the wheels in
forward and reverse directions causes a
rocking motion that may free the vehicle.
WARNING
If the vehicle is stuck and excessive
wheel spin occurs, the temperature
of the tires can increase very quickly.
If the tires become damaged, a tire
blow out or tire explosion can occur.
This condition is dangerous - you and
others may be injured. Do not attempt
this procedure if people or objects are
anywhere near the vehicle.
If you attempt to free the vehicle, the
vehicle can overheat quickly, possibly
causing an engine compartment fire
or other damage. Try to avoid spinning
the wheels as much as possible to
prevent overheating of either the tires
or the engine. DO NOT allow the vehicle
to spin the wheels above 35 mph (56
km/h).
Information
The ESC system must be turned OFF
before rocking the vehicle.
NOTICE
If you are still stuck after rocking the
vehicle a few times, have the vehicle
pulled out by a tow vehicle to avoid
engine overheating, possible damage to
the transmission, and tire damage. See
"Towing" in chapter 7.
SPECIAL DRIVING CONDITIONS
Page 414 of 527

While Driving
6-138
Check spark plugs and ignition
system
Inspect your spark plugs as described in
chapter 8 and replace them if necessary.
Also check all ignition wiring and
components to be sure they are not
cracked, worn or damaged in any way.
Use approved window washer anti-
freeze in system
To keep the water in the window washer
system from freezing, add an approved
window washer anti-freeze solution in
accordance with instructions on the
container. Window washer anti-freeze is
available from an authorized HYUNDAI
dealer and most auto parts outlets. Do
not use engine coolant or other types
of antifreeze as these may damage the
paint finish.
Do not let your parking brake freeze
Under some conditions your parking
brake can freeze in the engaged position.
This is most likely to happen when
there is an accumulation of snow or
ice around or near the rear brakes or
if the brakes are wet. If there is a risk
the parking brake may freeze, apply
it only temporarily while you put the
gear selector lever in P and block the
rear wheels so the car cannot roll. Then
release the parking brake.
Do not let ice and snow accumulate
underneath
Under some conditions, snow and ice
can build up under the fenders and
interfere with the steering. When driving
in severe winter conditions where this
may happen, you should periodically
check underneath the car to be sure the
movement of the front wheels and the
steering components is not obstructed.
Don't place foreign objects
or materials in the engine
compartment
Placement of foreign object or materials
which prevent cooling of the engine, in
the engine compartment, may cause a
failure or combustion. The manufacturer
is not responsible for the damage caused
by such placement.
To keep locks from freezing
To keep the locks from freezing, squirt
an approved de-icer fluid or glycerine
into the key opening. If a lock is covered
with ice, squirt it with an approved de-
icing fluid to remove the ice. If the lock
is frozen internally, you may be able to
thaw it out by using a heated key. Handle
the heated key with care to avoid injury.
Page 423 of 527
07
7-3
If You Have a Flat Tire While
Driving
If a tire goes flat while you are driving:
• Take your foot off the accelerator
pedal and let the vehicle slow down
while driving straight ahead. Do not
apply the brakes immediately or
attempt to pull off the road as this
may cause loss of vehicle control
resulting in an accident. When the
vehicle has slowed to such a speed
that it is safe to do so, brake carefully
and pull off the road. Drive off the
road as far as possible and park on
firm, level ground. If you are on a
divided highway, do not park in the
median area between the two traffic
lanes.
• When the vehicle is stopped, press the
hazard warning flasher button, shift
the gear to P (Park), apply the parking
brake, and press the Engine Start/Stop
button to the OFF position.
• Have all passengers get out of the
vehicle. Be sure they all get out on the
side of the vehicle that is away from
traffic.
• When changing a flat tire, follow the
instructions provided later in this
chapter.
IF THE ENGINE WILL NOT
S TA RT
• Be sure to shift the gear to P (Park).
The vehicle starts only when the gear
is in P (Park).
• This vehicle does not have a regular
12V battery that needs periodic
replacement. It is lithium ion polymer
type integrated into the HEV high
voltage battery. The vehicle has a
12V battery protection system that
cuts 12V battery from vehicle draw
to prevent full discharge. If vehicle
will not start, first try pressing the
12V Battery Reset switch (left side of
the steering wheel near the fuel door
open switch) to reconnect the 12V
battery, but you must start vehicle
within 15 seconds of pressing the 12V
Battery Reset switch. After starting
the vehicle (
indicator ON ),
operate the vehicle safely outdoors in
ready mode stopped and/or drive it
for 30 minutes total to charge the 12V
battery fully.
• Check the fuel level and add fuel if
necessary.
If the vehicle still does not start, call
an authorized HYUNDAI dealer for
assistance.
NOTICE
Push or pull starting the vehicle may
cause the catalytic converter to
overload which can lead to damage to
the emission control system.
Page 443 of 527
07
7-23
WARNING
Do not use the tire sealant after
the sealant has expired (i.e. past
the expiration date on the sealant
container). This can increase the risk of
tire failure.
WARNING
• Keep out of reach of children.
• Avoid contact with eyes.
• Do not swallow.
Using the Tire Mobility Kit
WARNING
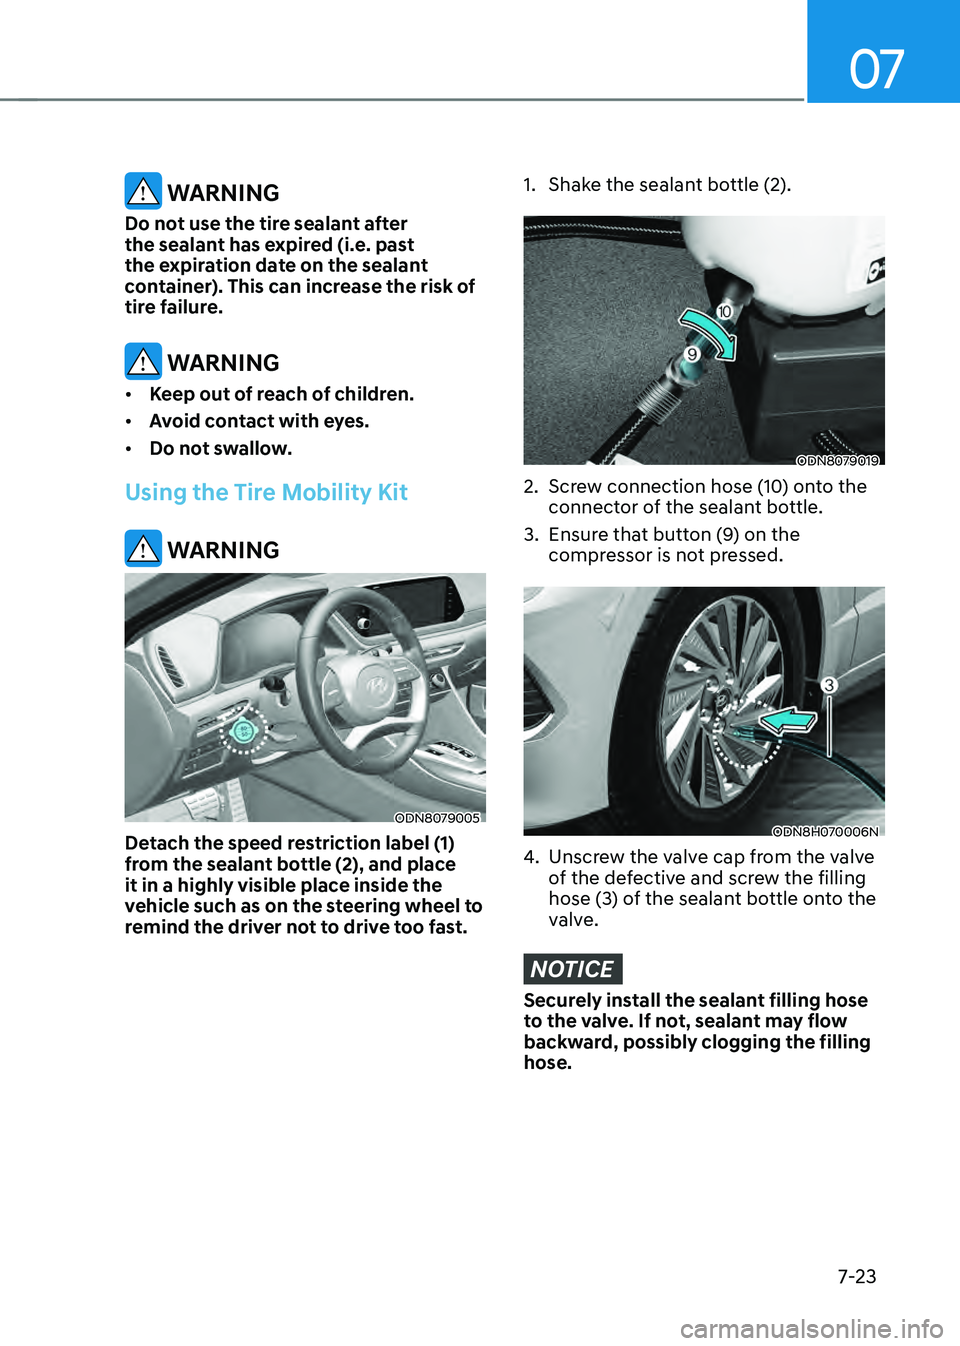
ODN8079005
Detach the speed restriction label (1)
from the sealant bottle (2), and place
it in a highly visible place inside the
vehicle such as on the steering wheel to
remind the driver not to drive too fast.
1. Shake the sealant bottle (2).
ODN8079019
2. Screw connection hose (10) onto the
connector of the sealant bottle.
3. Ensure that button (9) on the
compressor is not pressed.
ODN8H070006N
4. Unscrew the valve cap from the valve
of the defective and screw the filling
hose (3) of the sealant bottle onto the
valve.
NOTICE
Securely install the sealant filling hose
to the valve. If not, sealant may flow
backward, possibly clogging the filling
hose.
Page 448 of 527
Emergency situations
7-28
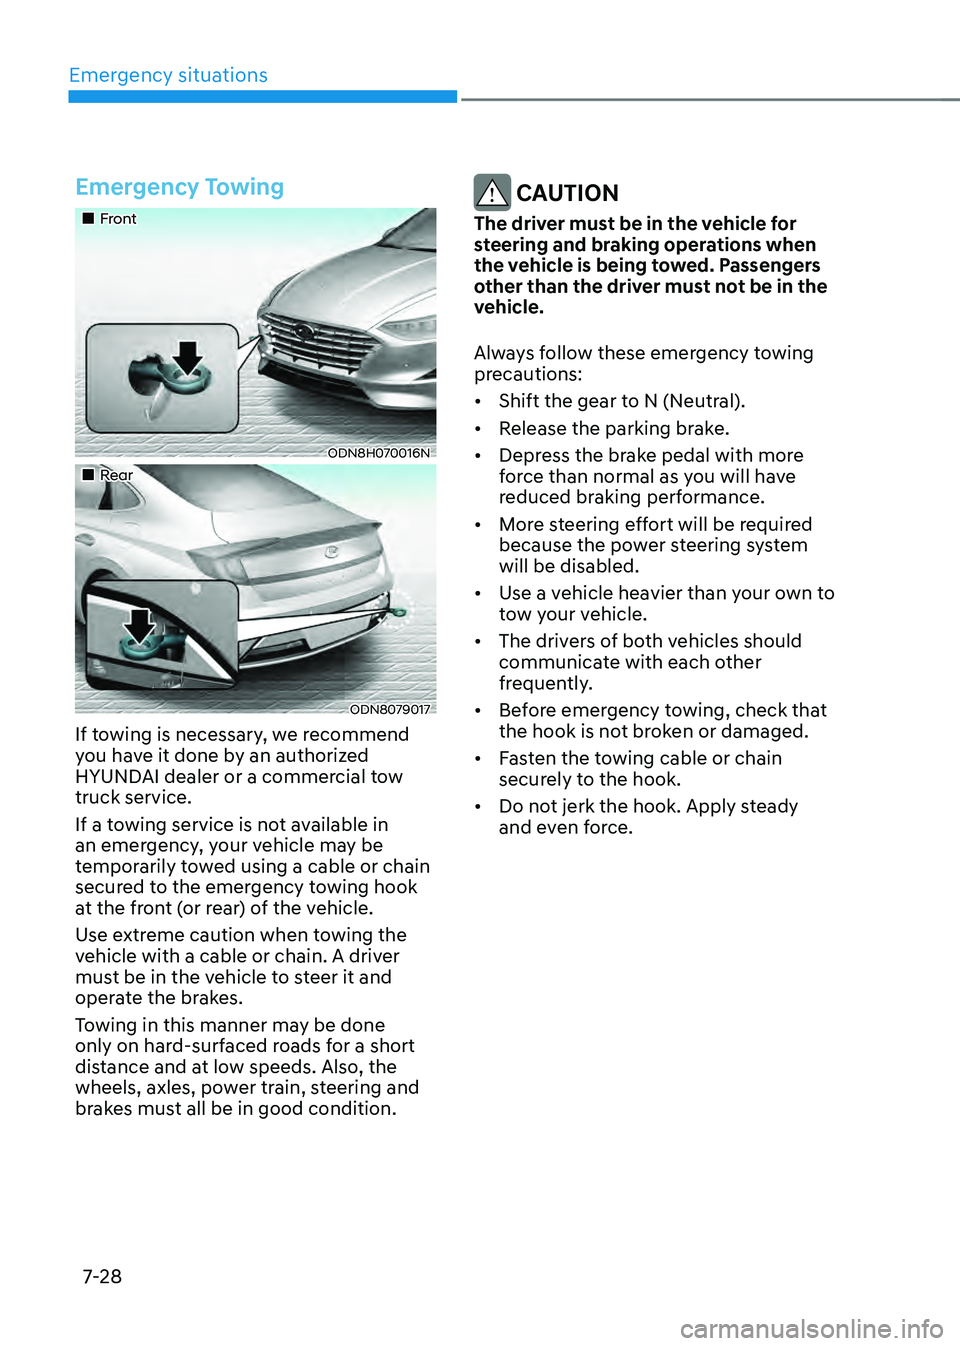
Emergency Towing
„„Front
ODN8H070016N
„„Rear
ODN8079017
If towing is necessary, we recommend
you have it done by an authorized
HYUNDAI dealer or a commercial tow
truck service.
If a towing service is not available in
an emergency, your vehicle may be
temporarily towed using a cable or chain
secured to the emergency towing hook
at the front (or rear) of the vehicle.
Use extreme caution when towing the
vehicle with a cable or chain. A driver
must be in the vehicle to steer it and
operate the brakes.
Towing in this manner may be done
only on hard-surfaced roads for a short
distance and at low speeds. Also, the
wheels, axles, power train, steering and
brakes must all be in good condition.
CAUTION
The driver must be in the vehicle for
steering and braking operations when
the vehicle is being towed. Passengers
other than the driver must not be in the
vehicle.
Always follow these emergency towing
precautions:
• Shift the gear to N (Neutral).
• Release the parking brake.
• Depress the brake pedal with more
force than normal as you will have
reduced braking performance.
• More steering effort will be required
because the power steering system
will be disabled.
• Use a vehicle heavier than your own to
tow your vehicle.
• The drivers of both vehicles should
communicate with each other
frequently.
• Before emergency towing, check that
the hook is not broken or damaged.
• Fasten the towing cable or chain
securely to the hook.
• Do not jerk the hook. Apply steady
and even force.
Page 455 of 527

Maintenance
8-6
While operating your vehicle:
• Note any changes in the sound of the
exhaust or any smell of exhaust fumes
in the vehicle.
• Check for vibrations in the steering
wheel. Notice if there is any increased
steering effort or looseness in the
steering wheel, or change in its
straight-ahead position.
• Notice if your vehicle constantly turns
slightly or “pulls” to one side when
traveling on smooth, level road.
• When stopping, listen and check for
unusual sounds, pulling to one side,
increased brake pedal travel or “hard-
to-push” brake pedal.
• If any slipping or changes in the
operation of your transmission occurs,
check the transmission fluid level.
• Check the automatic transmission P
(Park) function.
• Check the parking brake.
• Check for fluid leaks under your
vehicle (water dripping from the air
conditioning system during or after
use is normal).
At least monthly:
• Check coolant level in the engine
coolant reservoir.
• Check the operation of all exterior
lights, including the stoplights, turn
signals and hazard warning flashers.
• Check the inflation pressures of all
tires including the spare for tires that
are worn, show uneven wear, or are
damaged.
• Check for loose wheel lug nuts.
At least twice a year: (i.e., every
Spring and Autumn)
• Check radiator, heater and air
conditioning hoses for leaks or
damage.
• Check windshield washer spray and
wiper operation. Clean wiper blades
with a clean cloth dampened with
washer fluid.
• Check headlamp alignment.
• Check muffler, exhaust pipes, shields
and clamps.
• Check the seat belts for wear and
function.
At least once a year:
• Clean body and door drain holes.
• Lubricate door hinges and hood
hinges.
• Lubricate door and hood locks and
latches.
• Lubricate door rubber weather strips.
• Check the air conditioning system.
• Inspect and lubricate automatic
transmission linkage and controls.
• Clean the battery and terminals.
• Check the brake fluid level.
Page 463 of 527

Maintenance
8-14
Information
Automatic transmission fluid color is red
when new.
As the vehicle is driven, the automatic
transmission fluid will begin to look
darker. This is a normal condition and you
should not judge the need to replace the
fluid based upon the changed color.
NOTICE
The use of a non-specified fluid could
result in transmission malfunction
and failure. Use only the specified
automatic transmission fluid (refer
to “Recommended Lubricants and
Capacities” in chapter 2).
Engine Clutch Actuator Fluid
The engine clutch actuator fluid level
should be inspected or replaced to the
intervals specified in the maintenance
schedule.
Brake Hoses and Lines
Visually check for proper installation,
chafing, cracks, deterioration and any
leakage. Replace any deteriorated or
damaged parts immediately.
Brake Fluid
Check the brake fluid level in the brake
fluid reservoir. The level should be
between the MIN and the MAX marks
on the side of the reservoir. Use only
hydraulic brake fluid conforming to DOT
4 specification.
Parking Brake
Inspect the parking brake system.
Brake Discs, Pads, Calipers and
Rotors
Check the pads, the disc, and the rotor
for any excessive wear-out. Inspect
calipers for any fluid leakage
Exhaust Pipe and Muffler
Visually inspect the exhaust pipes,
muffler and hangers for cracks,
deterioration, or damage. Start
the engine and listen carefully for
any exhaust gas leakage. Tighten
connections or replace parts as
necessary.
Suspension Mounting Bolts
Check the suspension connections for
looseness or damage. Retighten to the
specified torque.
Steering Gear Box, Linkage &
Boots/Lower Arm Ball Joint
With the vehicle stopped and the hybrid
system off, check for excessive free-play
in the steering wheel. Check the linkage
for bends or damage. Check the dust
boots and ball joints for deterioration,
cracks, or damage.
Replace any damaged parts.
Drive Shafts and Boots
Check the drive shafts, boots and clamps
for cracks, deterioration, or damage.
Replace any damaged parts and, if
necessary, repack the grease.
Air Conditioning Refrigerant
Check the air conditioning lines and
connections for leakage and damage.