2022 HYUNDAI SONATA HYBRID service
[x] Cancel search: servicePage 383 of 527
06
6-107
CAUTION
Navigation-based Cruise Control
system may not function properly in the
following situations:
• The navigation is not working
properly.
• The navigation is not updated.
• The real-time GPS or map
information provided has errors.
• The navigation is overloaded by
performing functions such as route
search, video playback, voice
recognition, etc. are performing
simultaneously.
• GPS signals are blocked in areas such
as a tunnel.
• The driver goes off course or the
route to the destination is changed
or canceled by resetting the
navigation.
• The vehicle enters a service station
or rest area.
• A section of the highway’s shape has
changed.
• Android Auto or Car Play is operating.
• The navigation cannot detect the
current vehicle position (ex: elevated
roads including overpass adjacent to
general roads or nearby roads exist
in a parallel way).
• The navigation is being updated
while driving.
• The navigation is being reset while
driving.
• The road is slippery due to bad
weather such as rain or snow.
Information
This device complies with Part 15 of the
FCC rules.
Operation is subject to the following three
conditions:
1. This device may not cause harmful
interference, and
2. This device must accept any
interference received, including
interference that may cause undesired
operation.
3. Changes or modifications not expressly
approved by the party responsible
for compliance could void the user's
authority to operate the device.
Information
Radio frequency radiation exposure
information:
This equipment complies with FCC
radiation exposure limits set forth for an
uncontrolled environment.
This equipment should be installed and
operated with minimum distance of 8 in.
(20 cm) between the radiator (antenna)
and your body.
This transmitter must not be co-located or
operating in conjunction with any other
antenna or transmitter.
Page 395 of 527
06
6-119
CAUTION
Highway Driving Assist system may
not function properly in the following
situations:
• The navigation is not working
properly.
• The navigation is not updated.
• The real-time GPS or map
information provided has errors.
• The navigation is overloaded by
performing functions such as route
search, video playback, voice
recognition, etc. are performing
simultaneously.
• GPS signals are blocked in areas such
as a tunnel.
• The driver goes off course or the
route to the destination is changed
or canceled by resetting the
navigation.
• The vehicle enters a service station
or rest area
• Android Auto or Car Play is operating.
• The navigation cannot detect the
current vehicle position (ex: elevated
roads including overpass adjacent to
general roads or nearby roads exist
in a parallel way).
• The navigation is being updated
while driving.
• The navigation is being reset while
driving.
• The road is slippery due to bad
weather such as rain or snow.
Information
• For information's on headway control
and the front radar, refer to "Smart
Cruise Control (SCC)" in this chapter.
• For information's on steering control
and distance control and the front
camera, refer to "Lane Following Assist
(LFA)" in this chapter.
Information
This device complies with Part 15 of the
FCC rules.
Operation is subject to the following three
conditions:
1. This device may not cause harmful
interference, and
2. This device must accept any
interference received, including
interference that may cause undesired
operation.
3. Changes or modifications not expressly
approved by the party responsible
for compliance could void the user's
authority to operate the device.
Information
Radio frequency radiation exposure
information:
This equipment complies with FCC
radiation exposure limits set forth for an
uncontrolled environment.
This equipment should be installed and
operated with minimum distance of 8 in.
(20 cm) between the radiator (antenna)
and your body.
This transmitter must not be co-located or
operating in conjunction with any other
antenna or transmitter.
Page 413 of 527
06
6-137
Chain installation
When installing tire chains, follow the
manufacturer’s instructions and mount
them as tightly possible. Drive slowly
(less than 20 mph (30 km/h)) with
chains installed. If you hear the chains
contacting the body or chassis, stop and
tighten them. If they still make contact,
slow down until the noise stops. Remove
the tire chains as soon as you begin
driving on cleared roads.
When mounting snow chains, park the
vehicle on level ground away from traffic.
Turn on the vehicle Hazard Warning
Flasher and place a triangular emergency
warning device behind the vehicle (if
available). Always place the vehicle in P
(Park), apply the parking brake and turn
off the engine before installing snow
chains.
NOTICE
When using tire chains:
• Wrong size chains or improperly
installed chains can damage your
vehicle's brake lines, suspension,
body and wheels.
• Use SAE "S" class or wire chains.
• If you hear noise caused by chains
contacting the body, retighten the
chain to prevent contact with the
vehicle body.
• To prevent body damage, retighten
the chains after driving 0.3~0.6 miles
(0.5~1.0 km).
• Do not use tire chains on vehicles
equipped with aluminum wheels. If
unavoidable, use a wire type chain.
• Use wire chains less than 0.59 inch
(15mm) wide to prevent damage to
the chain’s connection.
Winter Precautions
Use high quality ethylene glycol
coolant
Your vehicle is delivered with high
quality ethylene glycol coolant in the
cooling system. It is the only type of
coolant that should be used because it
helps prevent corrosion in the cooling
system, lubricates the water pump and
prevents freezing. Be sure to replace or
replenish your coolant in accordance
with the maintenance schedule in
chapter 8. Before winter, have your
coolant tested to assure that its freezing
point is sufficient for the temperatures
anticipated during the winter.
Change to "winter weight" oil if
necessary
In some climates it is recommended that
a lower viscosity "winter weight" oil be
used during cold weather. See chapter 8
for recommendations. If you aren't sure
what weight oil you should use, consult
an authorized HYUNDAI dealer.
Check battery and cables
Winter puts additional burdens on the
battery system. Visually inspect the
battery and cables as described in
chapter 8. The level of charge in your
battery can be checked by an authorized
HYUNDAI dealer or a service station.
Page 421 of 527
7. Emergency situations
Hazard Warning Flasher ........................................................................\
............7-2
In Case of an Emergency While driving
...........................................................7-2If the Engine Stalls While Driving ........................................................................\
........7-2
If the Engine Stalls at a Crossroad or Crossing ..........................................................7-2
If You Have a Flat Tire While Driving ........................................................................\
...7-3
If the Engine Will Not Start ........................................................................\
........7-3
If the 12 Volt Battery Is Discharged
..................................................................7-4Before Jump Starting ........................................................................\
...........................7-4
Jump Starting ........................................................................\
.......................................7-5
If the Engine Overheats ........................................................................\
.............7-7
Tire Pressure Monitoring System (TPMS)
........................................................7-9Check Tire Pressure ........................................................................\
..............................7-9
Tire Pressure Monitoring System ........................................................................\
.......7-10
Low Tire Pressure Telltale ........................................................................\
....................7-11
Low Tire Pressure LCD Display with Position Indicator .............................................7-11
TPMS (Tire Pressure Monitoring System) Malfunction Indicator .............................7-12
Changing a Tire with TPMS ........................................................................\
................7-12
If You Have a Flat Tire (with Spare Tire) ..........................................................7-14Jack and Tools ........................................................................\
.....................................7-14
Changing Tires ........................................................................\
.....................................7-15
Jack Label ........................................................................\
............................................7-19
If You Have a Flat Tire (with Tire Mobility Kit) ................................................7-20Introduction ........................................................................\
........................................7-20
Notes on the Safe Use of the Tire Mobility Kit ..........................................................7-21
Components of the Tire Mobility Kit ........................................................................\
.7-22
Using the Tire Mobility Kit ........................................................................\
.................7-23
Checking the Tire Inflation Pressure ........................................................................\
.7-25
Towing ........................................................................\
......................................7-26Towing Service ........................................................................\
...................................7-26
Removable Towing Hook ........................................................................\
....................7-27
Emergency Towing ........................................................................\
.............................7-28
Emergency situations
7
Page 425 of 527
07
7-5
NOTICE
External power source using 12V battery
The use of external power accessories
may reduce performance and function
of the vehicle. Especially, the use of
dash cameras may shut off the power of
the vehicle prior to the dash camera’s
automatic shut-down.
If the power of the vehicle is shut off,
start the vehicle as explained. (refer to
“Using the 12V Battery Reset Switch”)
Jump Starting
In the event vehicle still does not have a
functional 12V battery (check if interior
lights will not turn on) then you can try
a jump start to the engine compartment
jumper terminals using a 12V booster
pack or jumper cables from another
vehicle’s 12V battery according to the
following instructions.
CAUTION
Jump starting can be dangerous if
done incorrectly. Follow the jump
starting procedure in this section to
avoid serious injury or damage to
your vehicle. If in doubt about how to
properly jump start your vehicle, we
strongly recommend that you have a
service technician or towing service do
it for you.
1. Position the vehicles close enough
that the jumper cables will reach, but
do not allow the vehicles to touch.
Avoid fans or any moving parts in the
engine compartment at all times, even
when the vehicles are turned off.
2. Turn off all electrical devices such as
radios, lights, air conditioning, etc.
Put the vehicles in P (Park) and set the
parking brake. Turn both vehicles OFF.
ODN8H070022N
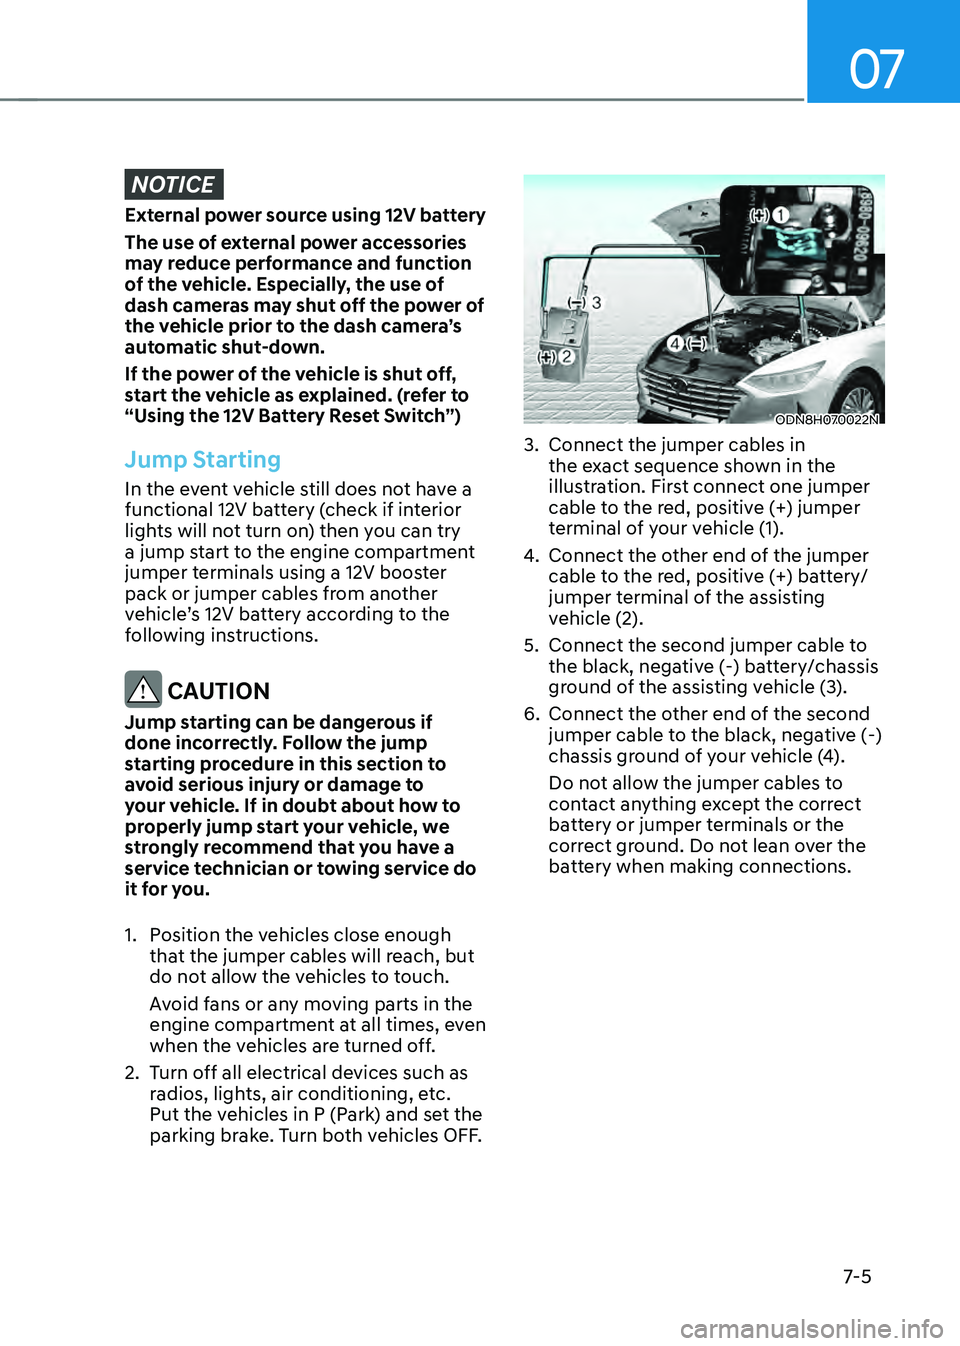
3. Connect the jumper cables in
the exact sequence shown in the
illustration. First connect one jumper
cable to the red, positive (+) jumper
terminal of your vehicle (1).
4. Connect the other end of the jumper
cable to the red, positive (+) battery/
jumper terminal of the assisting
vehicle (2).
5. Connect the second jumper cable to
the black, negative (-) battery/chassis
ground of the assisting vehicle (3).
6. Connect the other end of the second
jumper cable to the black, negative (-)
chassis ground of your vehicle (4).
Do not allow the jumper cables to
contact anything except the correct
battery or jumper terminals or the
correct ground. Do not lean over the
battery when making connections.
Page 431 of 527
07
7-11
Low Tire Pressure Telltale
Low Tire Pressure LCD Display
with Position Indicator
ODN8H070029N
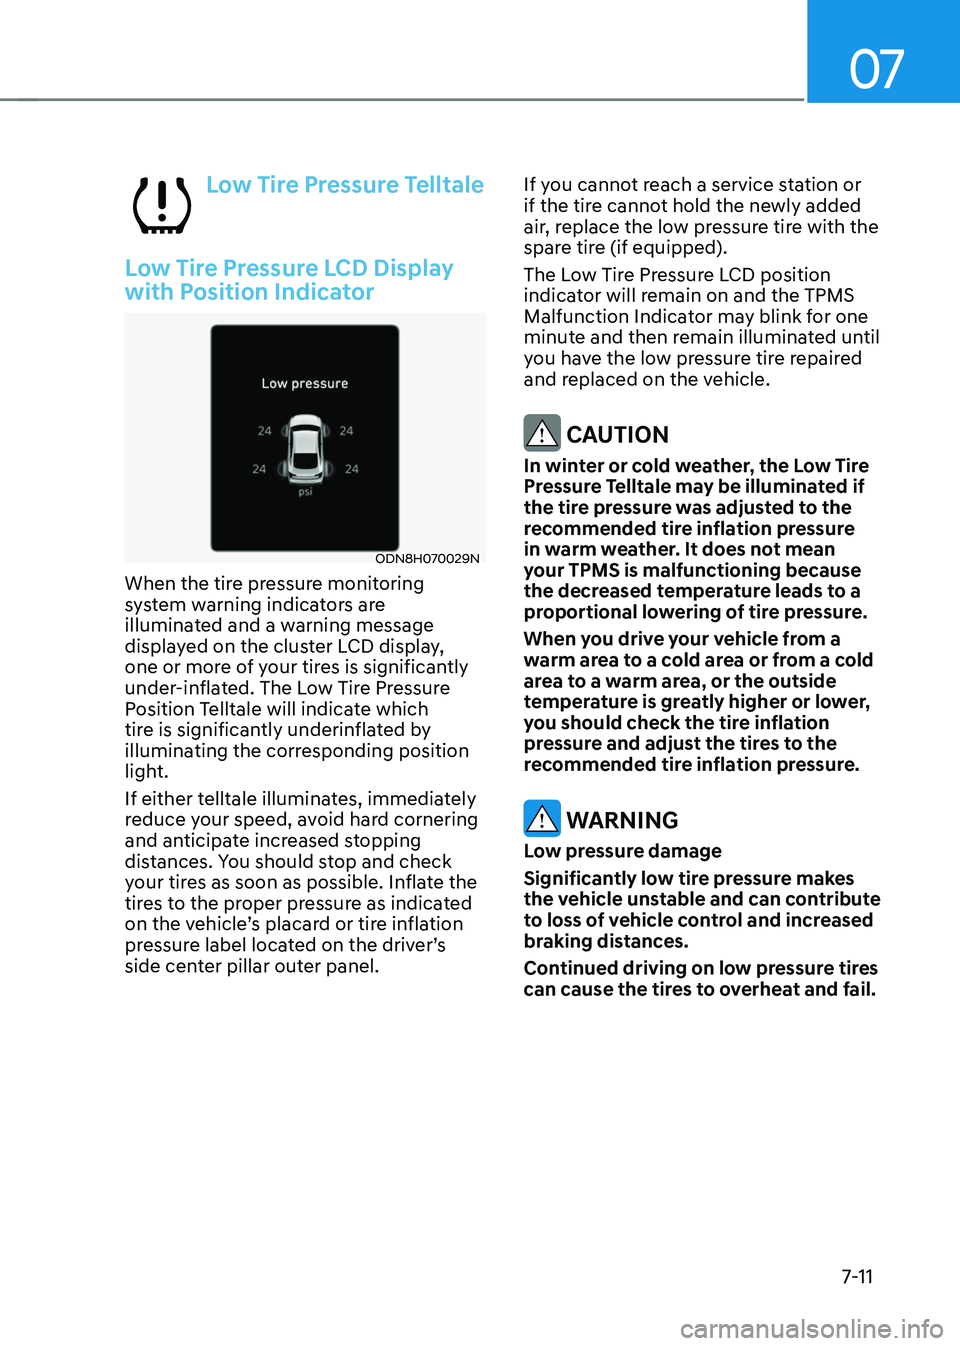
When the tire pressure monitoring
system warning indicators are
illuminated and a warning message
displayed on the cluster LCD display,
one or more of your tires is significantly
under-inflated. The Low Tire Pressure
Position Telltale will indicate which
tire is significantly underinflated by
illuminating the corresponding position
light.
If either telltale illuminates, immediately
reduce your speed, avoid hard cornering
and anticipate increased stopping
distances. You should stop and check
your tires as soon as possible. Inflate the
tires to the proper pressure as indicated
on the vehicle’s placard or tire inflation
pressure label located on the driver’s
side center pillar outer panel.If you cannot reach a service station or
if the tire cannot hold the newly added
air, replace the low pressure tire with the
spare tire (if equipped).
The Low Tire Pressure LCD position
indicator will remain on and the TPMS
Malfunction Indicator may blink for one
minute and then remain illuminated until
you have the low pressure tire repaired
and replaced on the vehicle.
CAUTION
In winter or cold weather, the Low Tire
Pressure Telltale may be illuminated if
the tire pressure was adjusted to the
recommended tire inflation pressure
in warm weather. It does not mean
your TPMS is malfunctioning because
the decreased temperature leads to a
proportional lowering of tire pressure.
When you drive your vehicle from a
warm area to a cold area or from a cold
area to a warm area, or the outside
temperature is greatly higher or lower,
you should check the tire inflation
pressure and adjust the tires to the
recommended tire inflation pressure.
WARNING
Low pressure damage
Significantly low tire pressure makes
the vehicle unstable and can contribute
to loss of vehicle control and increased
braking distances.
Continued driving on low pressure tires
can cause the tires to overheat and fail.
Page 432 of 527
Emergency situations
7-12
TPMS (Tire Pressure
Monitoring System)
Malfunction Indicator
The TPMS Malfunction Indicator
will illuminate after it blinks for
approximately one minute when there
is a problem with the Tire Pressure
Monitoring System.
Have the system checked by an
authorized HYUNDAI dealer as soon as
possible.
NOTICE
If there is a malfunction with the TPMS,
the Low Tire Pressure Position Telltale
will not be displayed even though the
vehicle has an under-inflated tire.
NOTICE
The TPMS Malfunction Indicator may
illuminate after blinking for one minute
if the vehicle is near electric power
supply cables or radio transmitters
such as police stations, government
and public offices, broadcasting
stations, military installations, airports,
transmitting towers, etc.
Additionally, the TPMS Malfunction
Indicator may illuminate if snow chains
are used or electronic devices such as
computers, chargers, remote starters,
navigation, etc. This may interfere with
normal operation of the TPMS.
Changing a Tire with TPMS
If you have a flat tire, the Low Tire
Pressure and Position telltales will come
on. Have the flat tire repaired by an
authorized HYUNDAI dealer as soon as
possible or replace the flat tire with the
spare tire (if equipped).
NOTICE
It is recommended that you do not use a
puncture-repairing agent not approved
by a HYUNDAI dealer to repair and/or
inflate a low pressure tire. Tire sealant
not approved by a HYUNDAI dealer may
damage the tire pressure sensor.
The spare tire (if equipped) does not
come with a tire pressure monitoring
sensor. When the low pressure tire or
the flat tire is replaced with the spare
tire, the Low Tire Pressure LCD position
indicator will remain on. Also, the TPMS
Malfunction Indicator will illuminate after
blinking for one minute if the vehicle
is driven at speed above 15.5 mph (25
km/h) for approximately 20 minutes.
Once the original tire equipped with
a tire pressure monitoring sensor is
reinflated to the recommended pressure
and reinstalled on the vehicle, the
Low Tire Pressure Telltale and TPMS
Malfunction Indicator will go off within a
few minutes of driving.
If the indicators do not extinguish after a
few minutes, please visit an authorized
HYUNDAI dealer.
Each wheel is equipped with a tire
pressure sensor mounted inside the tire
behind the valve stem (except for the
spare tire). You must use TPMS specific
wheels. It is recommended that you
always have your tires serviced by an
authorized HYUNDAI dealer.
Page 435 of 527
07
7-15
Changing Tires
WARNING
A vehicle can slip or roll off of a jack
causing serious injury or death to you or
those nearby. Take the following safety
precautions:
• Do not get under a vehicle that is
supported by a jack.
• NEVER attempt to change a tire in
the lane of traffic. ALWAYS move the
vehicle completely off the road on
level, firm ground away from traffic
before trying to change a tire. If you
cannot find a level, firm place off
the road, call a towing service for
assistance.
• Be sure to use the jack provided with
the vehicle.
• ALWAYS place the jack on the
designated jacking positions on the
vehicle and NEVER on the bumpers
or any other part of the vehicle for
jacking support.
• Do not start or run the engine while
the vehicle is on the jack.
• Do not allow anyone to remain in the
vehicle while it is on the jack.
• Keep children away from the road
and the vehicle. Follow these steps to change your
vehicle’s tire:
1. Park on a level, firm surface.
2. Shift the gear to P (Park), apply the
parking brake, and press the Engine
Start/Stop button to the OFF position.
3. Press the hazard warning flasher
button.
4. Remove the wheel lug nut wrench,
jack, jack handle, and spare tire from
the vehicle.
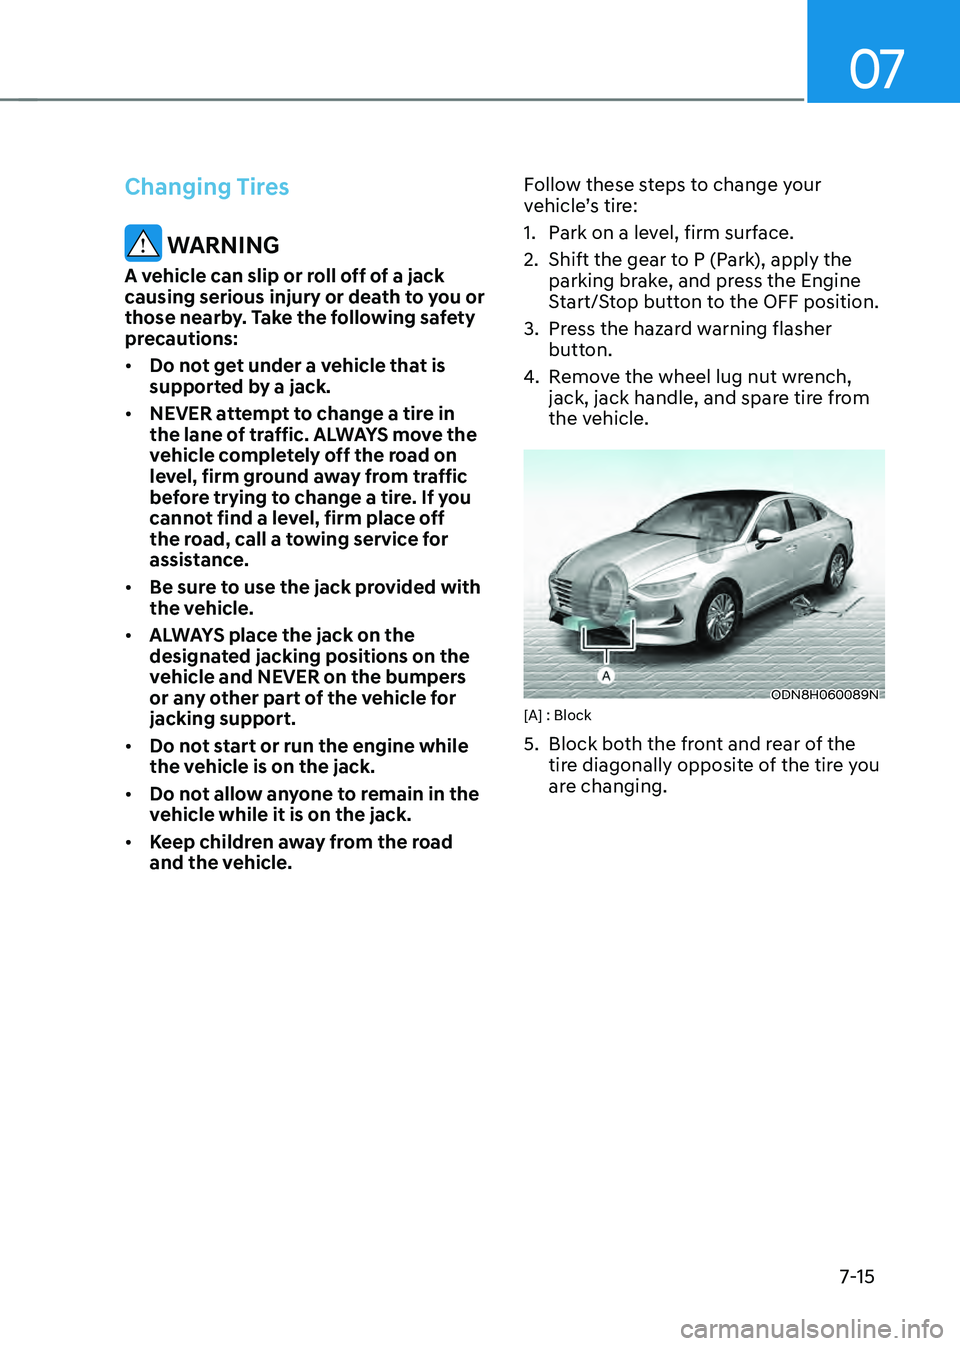
ODN8H060089N[A] : Block
5. Block both the front and rear of the
tire diagonally opposite of the tire you
are changing.