Page 437 of 527
07
7-17
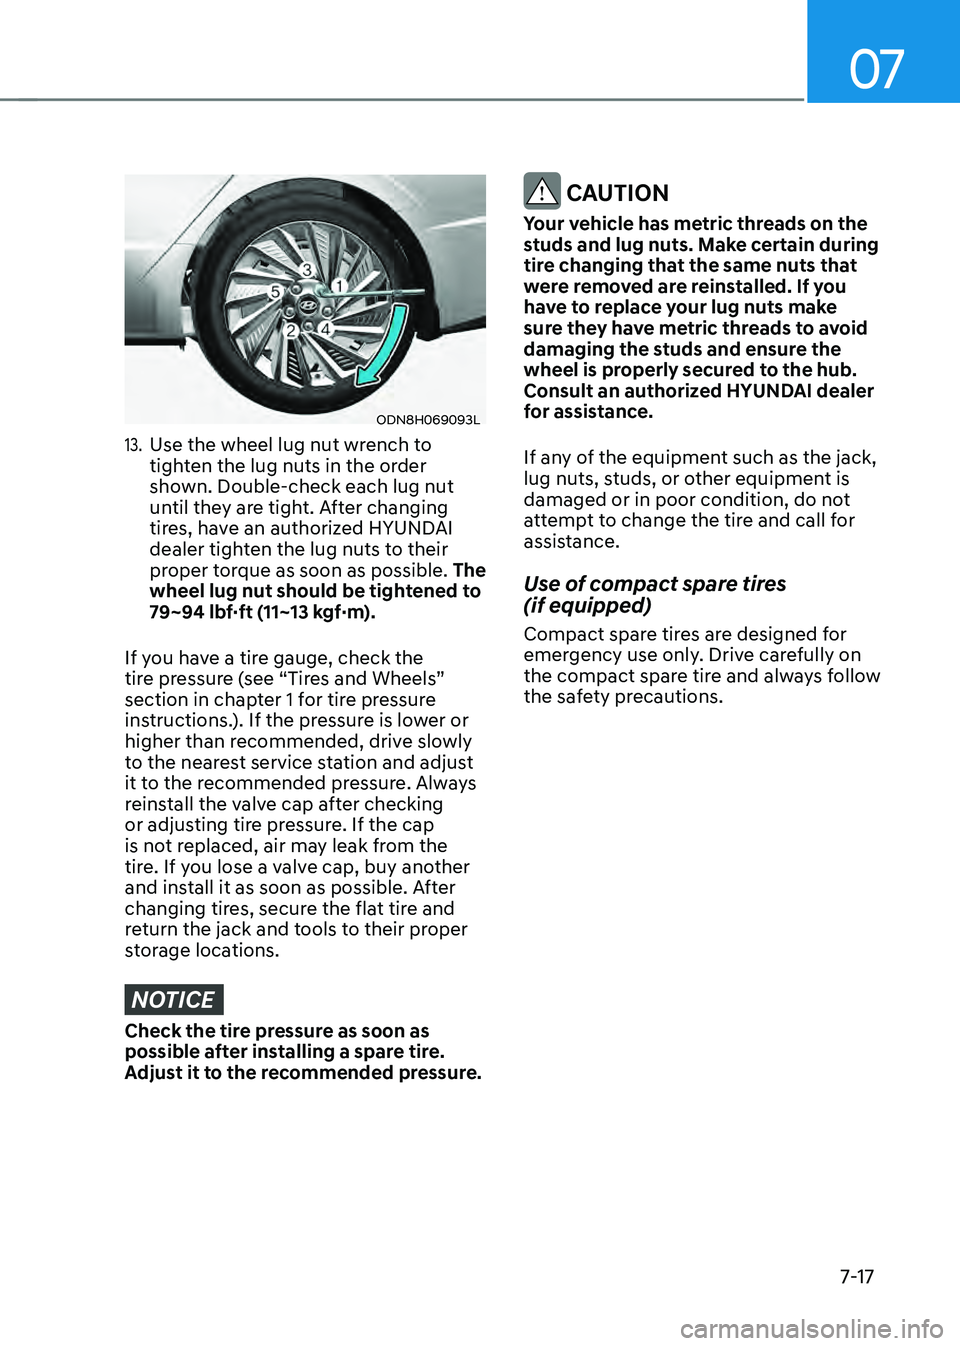
ODN8H069093L
13. Use the wheel lug nut wrench to
tighten the lug nuts in the order
shown. Double-check each lug nut
until they are tight. After changing
tires, have an authorized HYUNDAI
dealer tighten the lug nuts to their
proper torque as soon as possible. The
wheel lug nut should be tightened to
79~94 lbf·ft (11~13 kgf·m).
If you have a tire gauge, check the
tire pressure (see “Tires and Wheels”
section in chapter 1 for tire pressure
instructions.). If the pressure is lower or
higher than recommended, drive slowly
to the nearest service station and adjust
it to the recommended pressure. Always
reinstall the valve cap after checking
or adjusting tire pressure. If the cap
is not replaced, air may leak from the
tire. If you lose a valve cap, buy another
and install it as soon as possible. After
changing tires, secure the flat tire and
return the jack and tools to their proper
storage locations.
NOTICE
Check the tire pressure as soon as
possible after installing a spare tire.
Adjust it to the recommended pressure.
CAUTION
Your vehicle has metric threads on the
studs and lug nuts. Make certain during
tire changing that the same nuts that
were removed are reinstalled. If you
have to replace your lug nuts make
sure they have metric threads to avoid
damaging the studs and ensure the
wheel is properly secured to the hub.
Consult an authorized HYUNDAI dealer
for assistance.
If any of the equipment such as the jack,
lug nuts, studs, or other equipment is
damaged or in poor condition, do not
attempt to change the tire and call for
assistance.
Use of compact spare tires
(if equipped)
Compact spare tires are designed for
emergency use only. Drive carefully on
the compact spare tire and always follow
the safety precautions.
Page 455 of 527

Maintenance
8-6
While operating your vehicle:
• Note any changes in the sound of the
exhaust or any smell of exhaust fumes
in the vehicle.
• Check for vibrations in the steering
wheel. Notice if there is any increased
steering effort or looseness in the
steering wheel, or change in its
straight-ahead position.
• Notice if your vehicle constantly turns
slightly or “pulls” to one side when
traveling on smooth, level road.
• When stopping, listen and check for
unusual sounds, pulling to one side,
increased brake pedal travel or “hard-
to-push” brake pedal.
• If any slipping or changes in the
operation of your transmission occurs,
check the transmission fluid level.
• Check the automatic transmission P
(Park) function.
• Check the parking brake.
• Check for fluid leaks under your
vehicle (water dripping from the air
conditioning system during or after
use is normal).
At least monthly:
• Check coolant level in the engine
coolant reservoir.
• Check the operation of all exterior
lights, including the stoplights, turn
signals and hazard warning flashers.
• Check the inflation pressures of all
tires including the spare for tires that
are worn, show uneven wear, or are
damaged.
• Check for loose wheel lug nuts.
At least twice a year: (i.e., every
Spring and Autumn)
• Check radiator, heater and air
conditioning hoses for leaks or
damage.
• Check windshield washer spray and
wiper operation. Clean wiper blades
with a clean cloth dampened with
washer fluid.
• Check headlamp alignment.
• Check muffler, exhaust pipes, shields
and clamps.
• Check the seat belts for wear and
function.
At least once a year:
• Clean body and door drain holes.
• Lubricate door hinges and hood
hinges.
• Lubricate door and hood locks and
latches.
• Lubricate door rubber weather strips.
• Check the air conditioning system.
• Inspect and lubricate automatic
transmission linkage and controls.
• Clean the battery and terminals.
• Check the brake fluid level.
Page 463 of 527

Maintenance
8-14
Information
Automatic transmission fluid color is red
when new.
As the vehicle is driven, the automatic
transmission fluid will begin to look
darker. This is a normal condition and you
should not judge the need to replace the
fluid based upon the changed color.
NOTICE
The use of a non-specified fluid could
result in transmission malfunction
and failure. Use only the specified
automatic transmission fluid (refer
to “Recommended Lubricants and
Capacities” in chapter 2).
Engine Clutch Actuator Fluid
The engine clutch actuator fluid level
should be inspected or replaced to the
intervals specified in the maintenance
schedule.
Brake Hoses and Lines
Visually check for proper installation,
chafing, cracks, deterioration and any
leakage. Replace any deteriorated or
damaged parts immediately.
Brake Fluid
Check the brake fluid level in the brake
fluid reservoir. The level should be
between the MIN and the MAX marks
on the side of the reservoir. Use only
hydraulic brake fluid conforming to DOT
4 specification.
Parking Brake
Inspect the parking brake system.
Brake Discs, Pads, Calipers and
Rotors
Check the pads, the disc, and the rotor
for any excessive wear-out. Inspect
calipers for any fluid leakage
Exhaust Pipe and Muffler
Visually inspect the exhaust pipes,
muffler and hangers for cracks,
deterioration, or damage. Start
the engine and listen carefully for
any exhaust gas leakage. Tighten
connections or replace parts as
necessary.
Suspension Mounting Bolts
Check the suspension connections for
looseness or damage. Retighten to the
specified torque.
Steering Gear Box, Linkage &
Boots/Lower Arm Ball Joint
With the vehicle stopped and the hybrid
system off, check for excessive free-play
in the steering wheel. Check the linkage
for bends or damage. Check the dust
boots and ball joints for deterioration,
cracks, or damage.
Replace any damaged parts.
Drive Shafts and Boots
Check the drive shafts, boots and clamps
for cracks, deterioration, or damage.
Replace any damaged parts and, if
necessary, repack the grease.
Air Conditioning Refrigerant
Check the air conditioning lines and
connections for leakage and damage.
Page 504 of 527
08
8-55
NOTICE
• Never allow water or other liquids
to come in contact with electrical/
electronic components inside the
vehicle as this may damage them.
• When cleaning leather products
(steering wheel, seats etc.), use
neutral detergents or low alcohol
content solutions. If you use high
alcohol content solutions or acid/
alkaline detergents, the color of the
leather may fade or the surface may
get stripped off.
Cleaning the upholstery and interior
trim
Vinyl (if equipped)
Remove dust and loose dirt from vinyl
with a whisk broom or vacuum cleaner.
Clean vinyl surfaces with a vinyl cleaner.
Fabric (if equipped)
Remove dust and loose dirt from
fabric with a whisk broom or vacuum
cleaner. Clean with a mild soap solution
recommended for upholstery or carpets.
Remove fresh spots immediately with
a fabric spot cleaner. If fresh spots do
not receive immediate attention, the
fabric can be stained and its color can be
affected. Also, its fire-resistant properties
can be reduced if the material is not
properly maintained.
NOTICE
Using anything but recommended
cleaners and procedures may affect the
fabric’s appearance and fire-resistant
properties.
Leather (if equipped)
• Features of seat leather
-Leather is made from the outer skin
of an animal, which goes through a
special process to be available for
use. Since it is a natural product,
each part differs in thickness or
density.
Wrinkles may appear as a natural
result of stretching and shrinking
depending on the temperature and
humidity.
-The seat is made of stretchable
fabric to improve comfort.
-The parts contacting the body are
curved and the side supporting
area is high which provides driving
comfort and stability.
-Wrinkles may appear naturally
from usage. It is not a fault of the
products.
NOTICE
• Wrinkles or abrasions which appear
naturally from usage are not covered
by warranty.
• Belts with metallic accessories,
zippers or keys inside the back
pocket may damage the seat fabric.
• Make sure not to wet the seat. It may
change the nature of natural leather.
• Jeans or clothes which could bleach
may contaminate the surface of the
seat covering fabric.