Page 436 of 527
Emergency situations
7-16
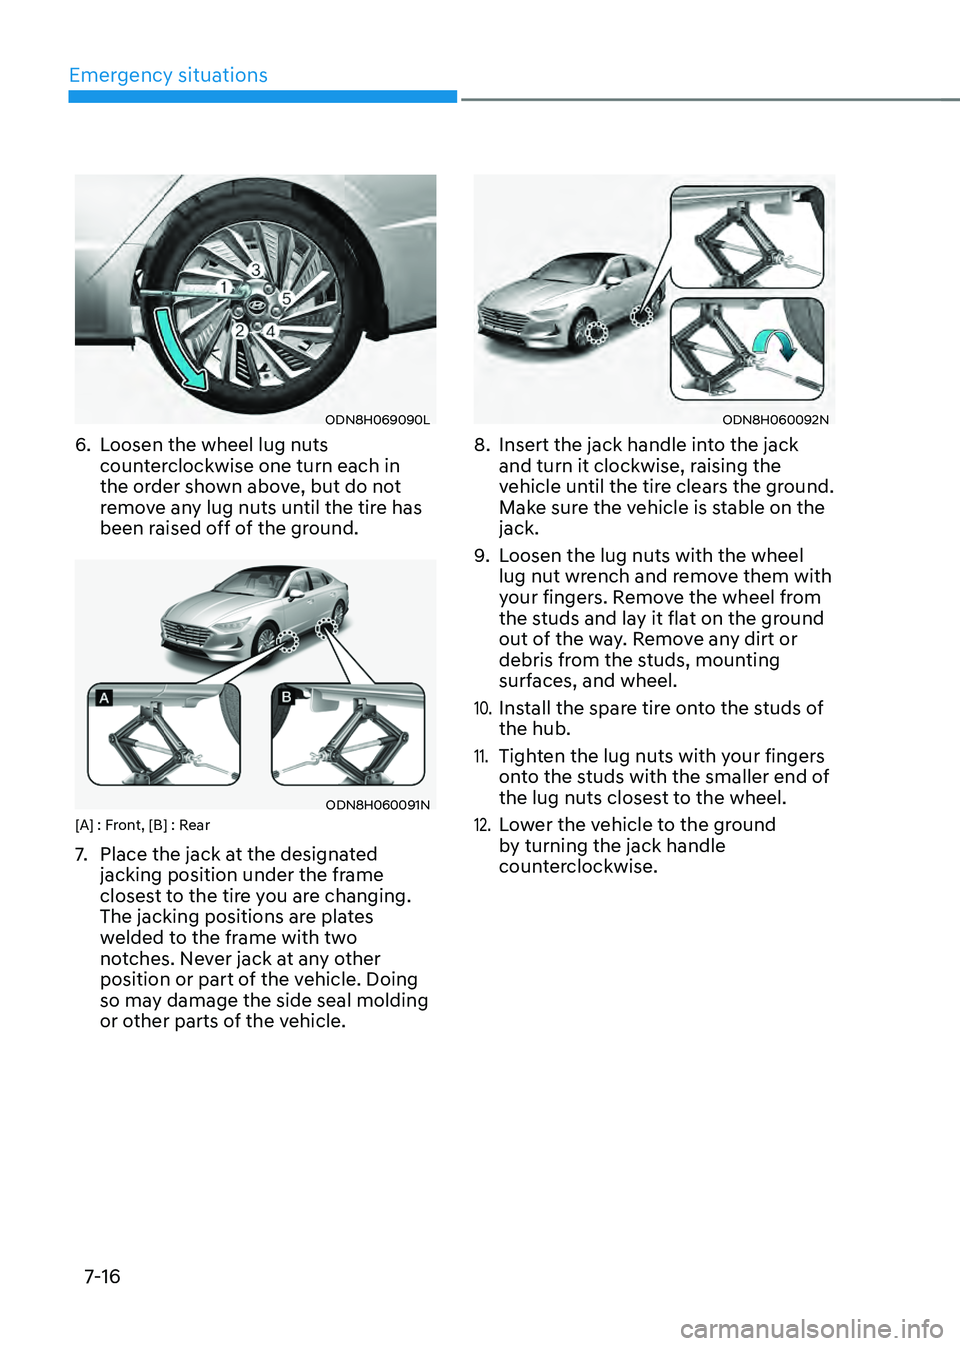
ODN8H069090L
6. Loosen the wheel lug nuts
counterclockwise one turn each in
the order shown above, but do not
remove any lug nuts until the tire has
been raised off of the ground.
ODN8H060091N[A] : Front, [B] : Rear
7. Place the jack at the designated
jacking position under the frame
closest to the tire you are changing.
The jacking positions are plates
welded to the frame with two
notches. Never jack at any other
position or part of the vehicle. Doing
so may damage the side seal molding
or other parts of the vehicle.
ODN8H060092N
8. Insert the jack handle into the jack
and turn it clockwise, raising the
vehicle until the tire clears the ground.
Make sure the vehicle is stable on the
jack.
9. Loosen the lug nuts with the wheel
lug nut wrench and remove them with
your fingers. Remove the wheel from
the studs and lay it flat on the ground
out of the way. Remove any dirt or
debris from the studs, mounting
surfaces, and wheel.
10. Install the spare tire onto the studs of
the hub.
11. Tighten the lug nuts with your fingers
onto the studs with the smaller end of
the lug nuts closest to the wheel.
12. Lower the vehicle to the ground
by turning the jack handle
counterclockwise.
Page 447 of 527
07
7-27
Removable Towing Hook
ODN8079013
1. Open the trunk, and remove the
towing hook from the tool case.
„„Front
ODN8H070014N
„„Rear
ODN8079015
2. Remove the hole cover by pressing
the lower part of the cover on the
bumper.
3. Install the towing hook by turning it
clockwise into the hole until it is fully
secured.
4. Remove the towing hook and install
the cover after use.
Page 454 of 527
08
8-5
WARNING
Performing maintenance work on a
vehicle can be dangerous. If you lack
sufficient knowledge and experience or
the proper tools and equipment to do
the work, have it done by an authorized
HYUNDAI dealer.
ALWAYS follow these precautions for
performing maintenance work:
• Park your vehicle on level ground,
shift the gear to P (Park), apply
the parking brake, and press the
Engine Start/Stop button to the OFF
position.
• Block the tires (front and back) to
prevent the vehicle from moving.
Remove loose clothing or jewelry
that can become entangled in
moving parts.
• If you must run the engine during
maintenance, do so out doors or in
an area with plenty of ventilation.
• Keep flames, sparks, or smoking
materials away from the battery and
fuel-related parts. The following lists are vehicle checks and
inspections that should be performed
by the owner or an authorized HYUNDAI
dealer at the frequencies indicated to
help ensure safe, dependable operation
of your vehicle.
Any adverse conditions should be
brought to the attention of your dealer as
soon as possible.
These Owner Maintenance vehicle
checks are generally not covered by
warranties and you may be charged for
labor, parts and lubricants used.
Owner Maintenance Schedule
When you stop for fuel:
•
Check the engine oil level.
• Check the coolant level in the engine
coolant reservoir.
• Check the windshield washer fluid
level.
• Check for low or under-inflated tires.
WARNING
Be careful when checking your engine
coolant/inverter coolant level when the
engine is hot. This may result in coolant
being blown out of the opening and
cause serious burns and other injuries.
OWNER MAINTENANCE
Page 455 of 527

Maintenance
8-6
While operating your vehicle:
• Note any changes in the sound of the
exhaust or any smell of exhaust fumes
in the vehicle.
• Check for vibrations in the steering
wheel. Notice if there is any increased
steering effort or looseness in the
steering wheel, or change in its
straight-ahead position.
• Notice if your vehicle constantly turns
slightly or “pulls” to one side when
traveling on smooth, level road.
• When stopping, listen and check for
unusual sounds, pulling to one side,
increased brake pedal travel or “hard-
to-push” brake pedal.
• If any slipping or changes in the
operation of your transmission occurs,
check the transmission fluid level.
• Check the automatic transmission P
(Park) function.
• Check the parking brake.
• Check for fluid leaks under your
vehicle (water dripping from the air
conditioning system during or after
use is normal).
At least monthly:
• Check coolant level in the engine
coolant reservoir.
• Check the operation of all exterior
lights, including the stoplights, turn
signals and hazard warning flashers.
• Check the inflation pressures of all
tires including the spare for tires that
are worn, show uneven wear, or are
damaged.
• Check for loose wheel lug nuts.
At least twice a year: (i.e., every
Spring and Autumn)
• Check radiator, heater and air
conditioning hoses for leaks or
damage.
• Check windshield washer spray and
wiper operation. Clean wiper blades
with a clean cloth dampened with
washer fluid.
• Check headlamp alignment.
• Check muffler, exhaust pipes, shields
and clamps.
• Check the seat belts for wear and
function.
At least once a year:
• Clean body and door drain holes.
• Lubricate door hinges and hood
hinges.
• Lubricate door and hood locks and
latches.
• Lubricate door rubber weather strips.
• Check the air conditioning system.
• Inspect and lubricate automatic
transmission linkage and controls.
• Clean the battery and terminals.
• Check the brake fluid level.
Page 464 of 527
08
8-15
Checking the Engine Oil Level
1. Follow all of the oil manufacturer’s
precautions.
2. Be sure the vehicle is on the level
ground in P (Park) with the parking
brake set and the wheels blocked.
3. Turn the engine on and allow the
engine to reach normal operating
temperature.
4. Turn the engine off and wait about
five minutes for the oil to return to the
oil pan.
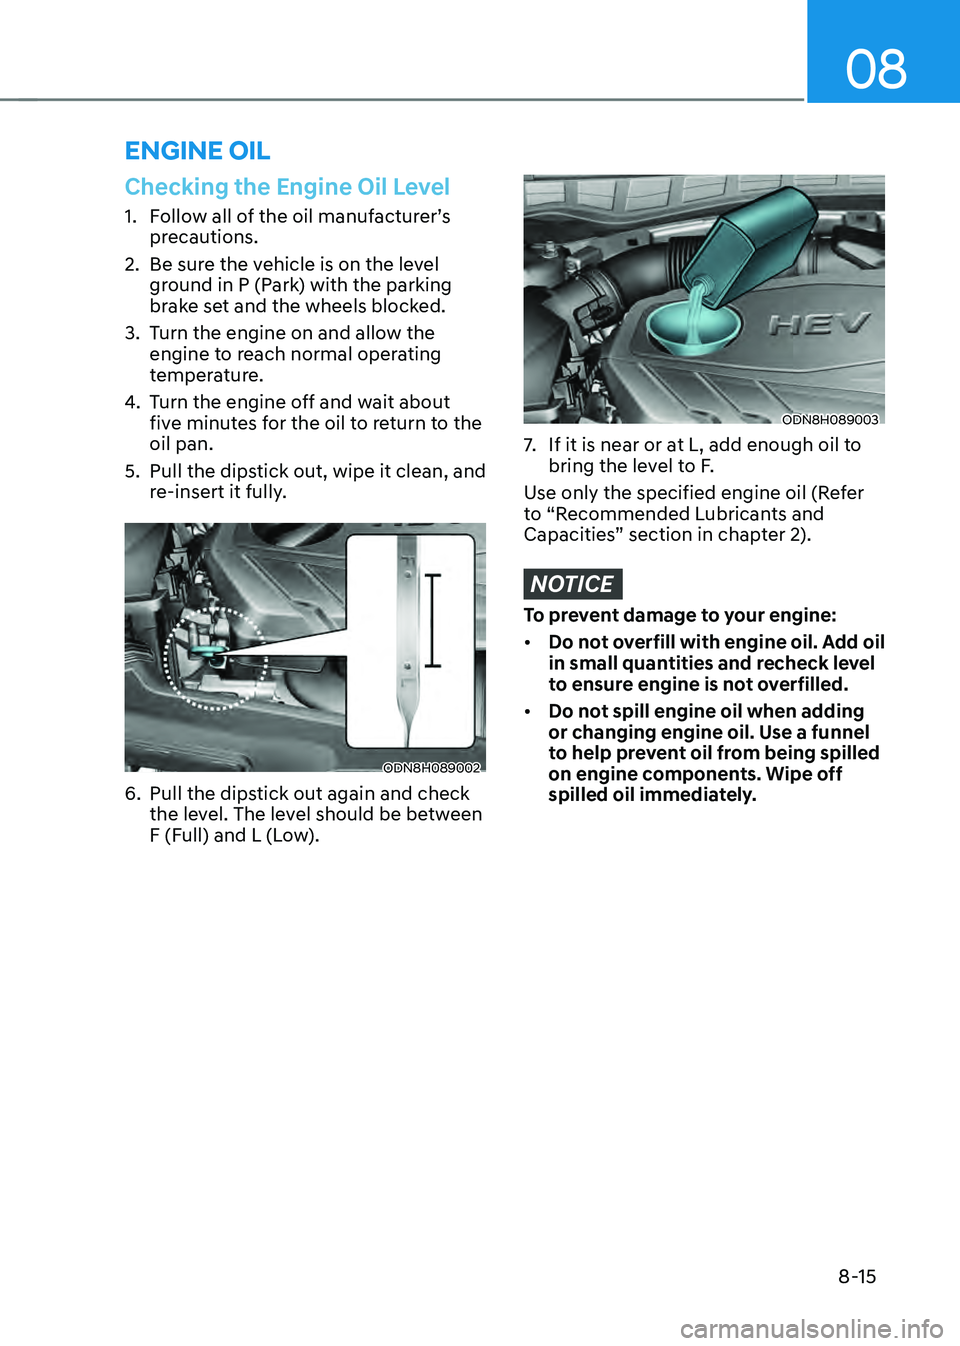
5. Pull the dipstick out, wipe it clean, and
re-insert it fully.
ODN8H089002
6. Pull the dipstick out again and check
the level. The level should be between
F (Full) and L (Low).
ODN8H089003
7. If it is near or at L, add enough oil to
bring the level to F.
Use only the specified engine oil (Refer
to “Recommended Lubricants and
Capacities” section in chapter 2).
NOTICE
To prevent damage to your engine:
• Do not overfill with engine oil. Add oil
in small quantities and recheck level
to ensure engine is not overfilled.
• Do not spill engine oil when adding
or changing engine oil. Use a funnel
to help prevent oil from being spilled
on engine components. Wipe off
spilled oil immediately.
ENGINE OIL
Page 467 of 527
Maintenance
8-18
Turn the vehicle off and wait until
the engine cools down. Use extreme
care when removing the engine
coolant cap and/or inverter coolant
cap. Wrap a thick towel around it,
and turn it counterclockwise slowly
while the pressure is released from
the cooling system. When you are sure
all the pressure has been released,
using a thick towel, continue turning
counterclockwise to remove it.
Information
The engine coolant and/or inverter coolant
level is influenced by the hybrid system
temperature. Before checking or refilling
the engine coolant and/or inverter coolant,
turn the hybrid vehicle off.
WARNING
The electric motor for the cooling fan may continue to
operate or start up when the
engine is not running and can
cause serious injury. Keep
hands, clothing and tools away
from the rotating fan blades of
the cooling fan.
Keep hands, clothing and tools away
from the rotating fan blades of the
cooling fan.
Always turn off the vehicle unless the
vehicle has to be inspected with the
engine on. Be cautious as the cooling
fan may operate if the negative (-)
battery terminal is not disconnected.
WARNING
Make sure the coolant cap is properly
closed after refilling coolant. Otherwise
the engine could be overheated while
driving.
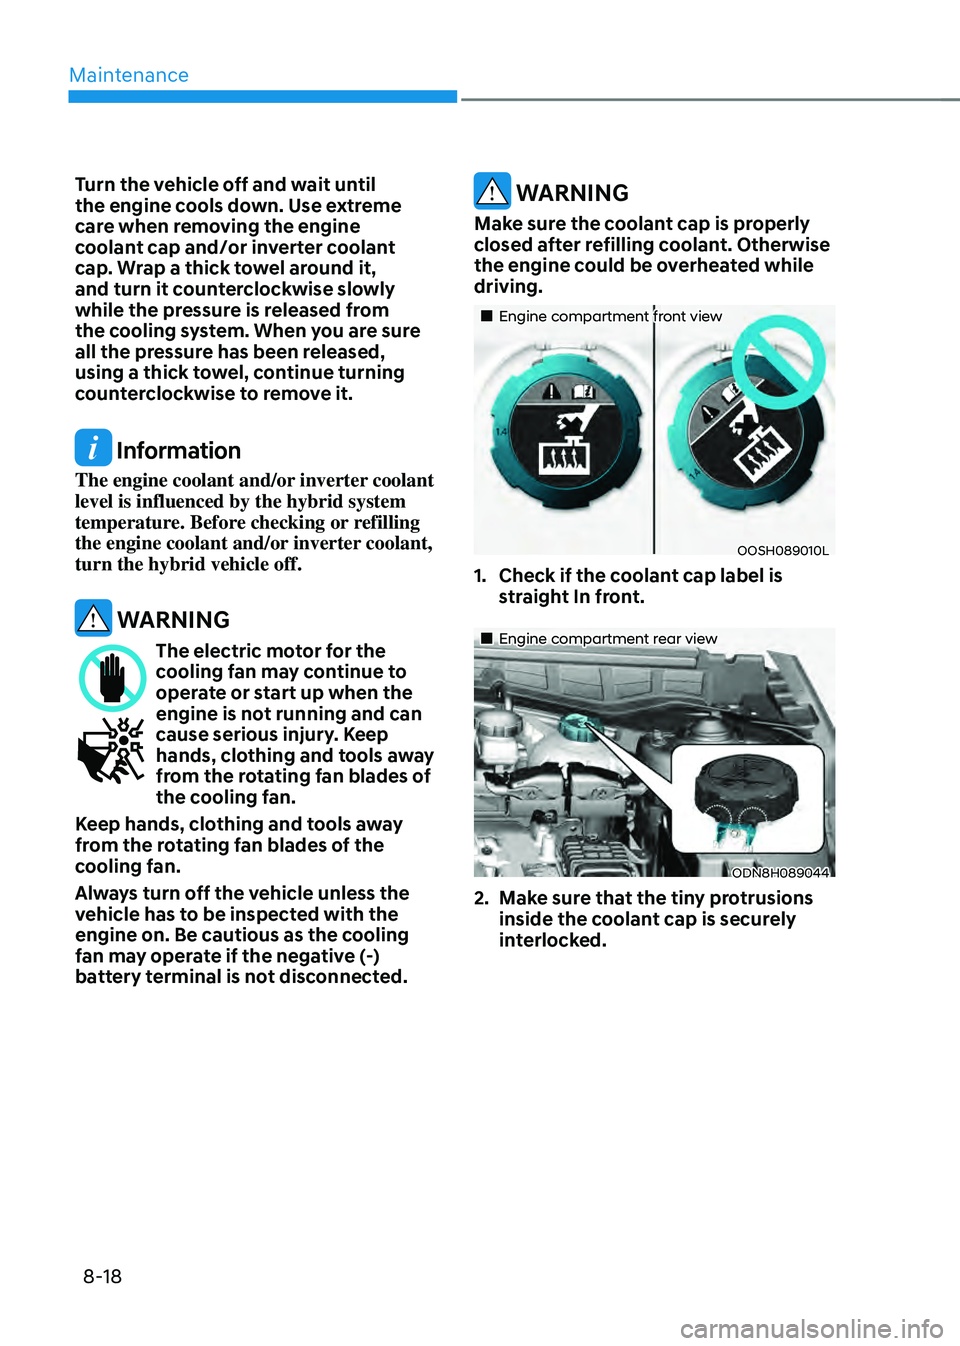
„„Engine compartment front view
OOSH089010L
1. Check if the coolant cap label is
straight In front.
„„Engine compartment rear view
ODN8H089044
2. Make sure that the tiny protrusions
inside the coolant cap is securely
interlocked.
Page 471 of 527
Maintenance
8-22
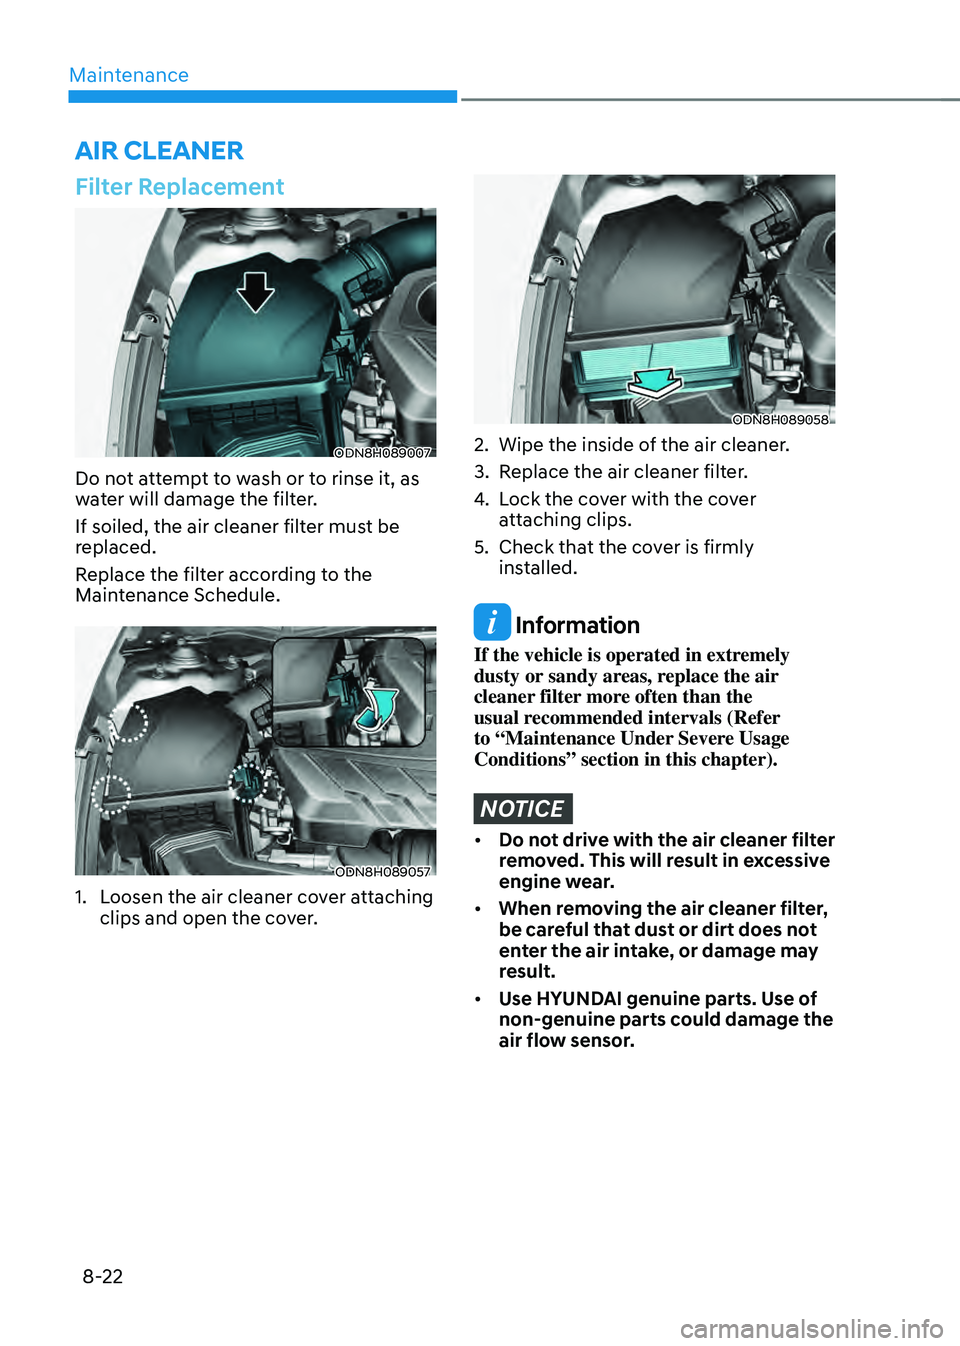
Filter Replacement
ODN8H089007
Do not attempt to wash or to rinse it, as
water will damage the filter.
If soiled, the air cleaner filter must be
replaced.
Replace the filter according to the
Maintenance Schedule.
ODN8H089057
1. Loosen the air cleaner cover attaching
clips and open the cover.
ODN8H089058
2. Wipe the inside of the air cleaner.
3. Replace the air cleaner filter.
4. Lock the cover with the cover
attaching clips.
5. Check that the cover is firmly
installed.
Information
If the vehicle is operated in extremely
dusty or sandy areas, replace the air
cleaner filter more often than the
usual recommended intervals (Refer
to “Maintenance Under Severe Usage
Conditions” section in this chapter).
NOTICE
• Do not drive with the air cleaner filter
removed. This will result in excessive
engine wear.
• When removing the air cleaner filter,
be careful that dust or dirt does not
enter the air intake, or damage may
result.
• Use HYUNDAI genuine parts. Use of
non-genuine parts could damage the
air flow sensor.
AIR CLEANER
Page 472 of 527
08
8-23
Filter Inspection
The cabin air filter should be replaced
according to the Maintenance Schedule.
If the vehicle is operated in severely air-
polluted cities or on dusty rough roads
for a long period, it should be inspected
more frequently and replaced sooner.
Replace the cabin air filter by following
the procedure below and be careful to
avoid damaging other components.
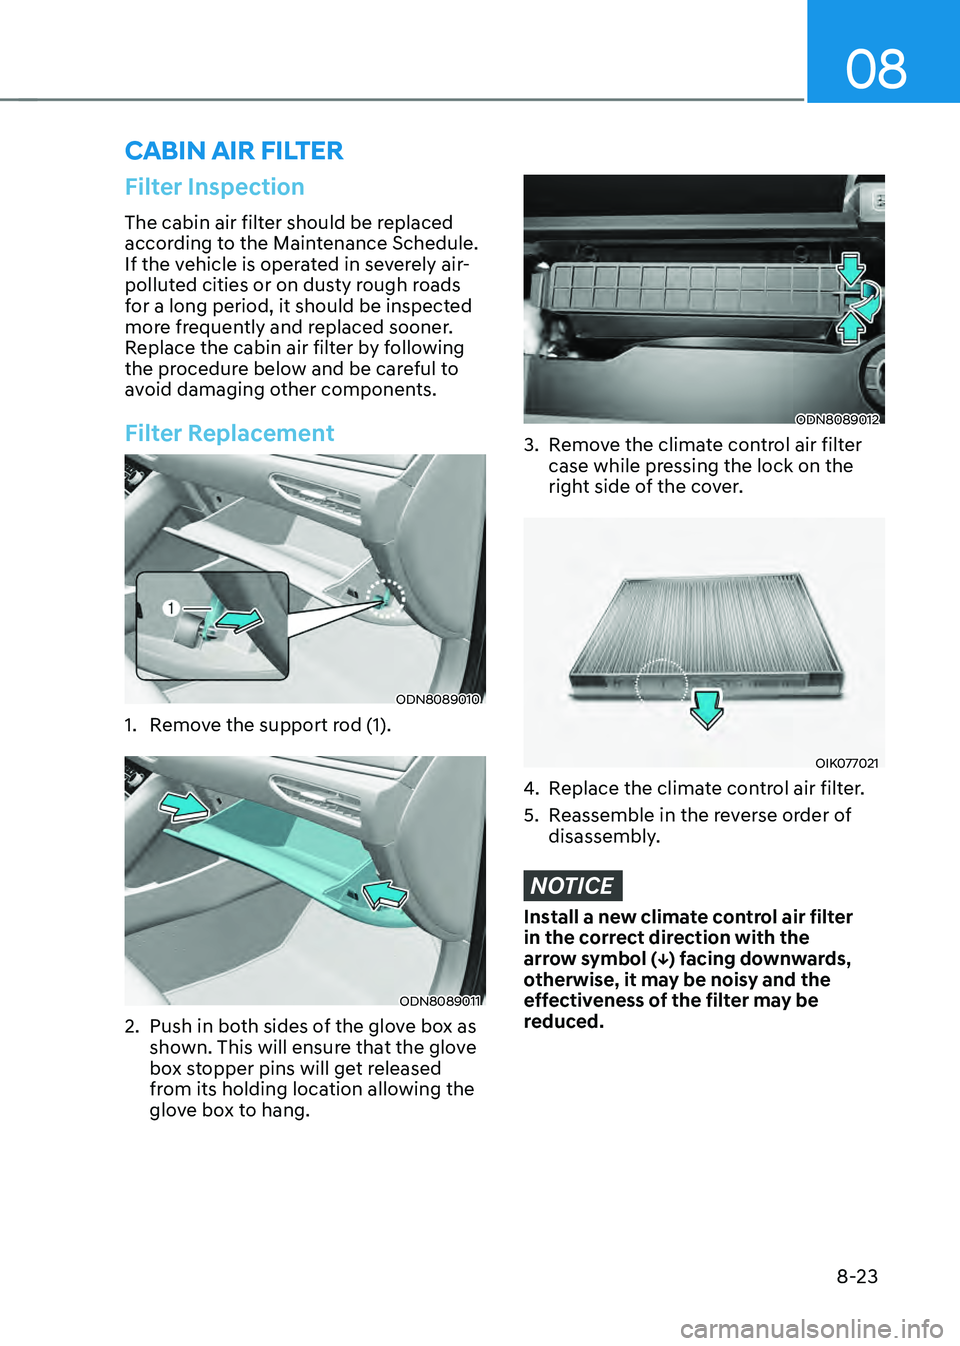
Filter Replacement
ODN8089010
1. Remove the support rod (1).
ODN8089011
2. Push in both sides of the glove box as
shown. This will ensure that the glove
box stopper pins will get released
from its holding location allowing the
glove box to hang.
ODN8089012
3. Remove the climate control air filter
case while pressing the lock on the
right side of the cover.
OIK077021
4. Replace the climate control air filter.
5. Reassemble in the reverse order of
disassembly.
NOTICE
Install a new climate control air filter
in the correct direction with the
arrow symbol (↓) facing downwards,
otherwise, it may be noisy and the
effectiveness of the filter may be
reduced.
CABIN AIR FILTER