Page 20 of 637
Vehicle Information, Consumer Information and Reporting Safety Defects
2-8
Items in (mm)
Overall length 188.4 (4,785)
Overall width 74.8 (1,900)
Overall height2WD 4WD
66.3 (1,685) / 67.3 (1,710)* 67.1 (1,705) / 68.1 (1,730)*
TreadFront Rear
18’’ / 19’’ : 64.80 (1,646) 18’’ / 19’’ : 65.19 (1,656)
20’’ : 64.44 (1,637) 20’’ : 64.84 (1,647)
Wheelbase 108.9 (2,765)
* : if equipped with roof rack
ENGINE
EngineDisplacement
cu. in (cc)Bore x Stroke
in. (mm)Firing order No. of cylinders
Smartstream G 2.5 GDI
152.4
(2,497)3.5 x 4
(88.5 x 101.5)1-3-4-2 4, in-line
Smartstream G 2.5 T-GDI
DIMENSIONS
Page 33 of 637
3-3
03
Front seat
(1) Forward and rearward
(2) Seatback angle
(3) Seat cushion angle
(4) Seat cushion height
(5) Seat cushion length*
(6) Lumbar support (Driver’s seat)*
(7) Seat warmer*
(8) Air ventilation seat*
(9) Head restraints2nd row seat
(10) Seatback angle
(11) Head restraints
(12) Seat warmer*
(13) 2nd row seat remote folding switch*
*: if equipped
SEATS
The information provided may differ depending on which functions are
applicable to your vehicle.
OTMA030001OTMA030001
003_TMa_HMA.indd 3-32021-08-26 9:00:55
Page 37 of 637

03
3-7
Seat belts must be snug against your
hips and chest to work properly. When
the seatback is reclined, the shoulder
belt cannot do its job because it will not
be snug against your chest. Instead,
it will be in front of you. During an
accident, you could be thrown into the
seat belt, causing neck or other injuries.
The more the seatback is reclined,
the greater chance the passenger’s
hips will slide under the lap belt or the
passenger’s neck will strike the shoulder
belt.
OTM030040OTM030040
Seat cushion height
To change the height of the seat cushion:
• Push down the lever several times, to
lower the seat cushion.
• Pull up the lever several times, to raise
the seat cushion.
Power adjustment (if equipped)
The front seat can be adjusted by using
the control switches located on the
outside of the seat cushion. Before
driving, adjust the seat to the proper
position so that you can easily control
the steering wheel, foot pedals and
controls on the instrument panel.
WARNING
NEVER allow children in the vehicle
unattended. The power seats are
operable when the vehicle is turned off.
NOTICE
To prevent damage to the seats:
• Always stop adjusting the seats when
the seat has been adjusted as far
forward or rearward as possible.
• Do not adjust the seats longer than
necessary when the vehicle is turned
off. This may result in unnecessary
battery drain.
• Do not operate two or more seats at
the same time. This may result in an
electrical malfunction.
003_TMa_HMA.indd 3-72021-08-26 9:00:56
Page 39 of 637

03
3-9
Seat belts must be snug against your
hips and chest to work properly. When
the seatback is reclined, the shoulder
belt cannot do its job because it will not
be snug against your chest. Instead,
it will be in front of you. During an
accident, you could be thrown into the
seat belt, causing neck or other injuries.
The more the seatback is reclined,
the greater chance the passenger’s
hips will slide under the lap belt or the
passenger’s neck will strike the shoulder
belt.
OTM030054OTM030054
Seat cushion tilt (1)
To change the angle of the front part of
the seat cushion:
Push the front portion of the control
switch up to raise or down to lower the
front part of the seat cushion.
Release the switch once the seat reaches
the desired position.
Seat cushion height (2)
To change the height of the seat cushion:
Push the rear portion of the control
switch up to raise or down to lower the
height of the seat cushion.
Release the switch once the seat reaches
the desired position.
Seat cushion extension adjustment
(for driver's seat) (if equipped)
OTM030045OTM030045
To move the front part of cushion
forward:
1. Push the front part of control switch
to move the seat cushion to the
desired length.
2. Release the switch once the seat
cushion reaches the desired length.
To move the front part of cushion
rearward:
1. Push the rear part of control switch to
move the seat cushion to the desired
length.
2. Release the switch once the seat
cushion reaches the desired length.
003_TMa_HMA.indd 3-92021-08-26 9:00:57
Page 44 of 637

Seats & Safety System
3-14
Armrest
OTMPH031004NOTMPH031004N
The armrest is located in the center of
the rear seat. Pull the armrest down from
the seatback to use it.
Rear occupant alert system (2nd
seat)
This function alerts driver when you get
out of a car while the passengers remain
in the 2nd row seat.
If the front door is opened with
passengers in the 2nd row seats, A
warning message will appear in the
instrument cluster. After the 1st warning
if movement is detected in the 2nd row
seat after all doors are locked, a second
audible warning will be triggered.
Even if your vehicle is equipped with
Rear Occupant Alert, always make sure
to check the rear seat before you leave
the vehicle.
For more information, refer to the “Rear
occupant alert system” in chapter 3.
Head Restraints
The vehicle’s front and rear (second row
and/or third row) seats have adjustable
head restraints. The head restraints
provide comfort for passengers, but
more importantly they are designed to
help protect passengers from whiplash
and other neck and spinal injuries during
an accident, especially in a rear impact
collision.
WARNING
To reduce the risk of serious injury or
death in an accident, take the following
precautions when adjusting your head
restraints:
• Always properly adjust the head
restraints for all passengers BEFORE
starting the vehicle.
• NEVER let anyone ride in a seat
with the head restraints removed or
reversed.
OHI039190NOHI039190N
• Adjust the head restraints so the
middle of the head restraints is at the
same height as the height of the top
of the eyes.
• NEVER adjust the head restraints
position of the driver’s seat when the
vehicle is in motion.
• Adjust the head restraints as close to
the passenger’s head as possible. Do
not use a seat cushion that holds the
body away from the seatback.
• Make sure the head restraints locks
into position after adjusting it.
003_TMa_HMA.indd 3-142021-08-26 9:00:59
Page 45 of 637
03
3-15
WARNING
OTL035061OTL035061
When sitting on the rear seat, do not
adjust the height of the head restraints
to the lowest position.
CAUTION
When there is no occupant in the rear
seats, adjust the height of the head
restraints to the lowest position. The
rear seat head restraints can reduce the
visibility of the rear area.
NOTICE
To prevent damage, NEVER hit or pull
on the head restraints.
Front seat head restraints
OOSEV038012LOOSEV038012L
The driver’s and front passenger’s seats
are equipped with adjustable head
restraint for the passengers safety and
comfort.
OTM030056OTM030056
Adjusting the height up and down
To raise the head restraint:
1. Pull it up to the desired position (1).
To lower the head restraint:
1. Push and hold the release button (2)
on the head restraint support.
2. Lower the head restraint to the
desired position (3).
003_TMa_HMA.indd 3-152021-08-26 9:01:00
Page 47 of 637
03
3-17
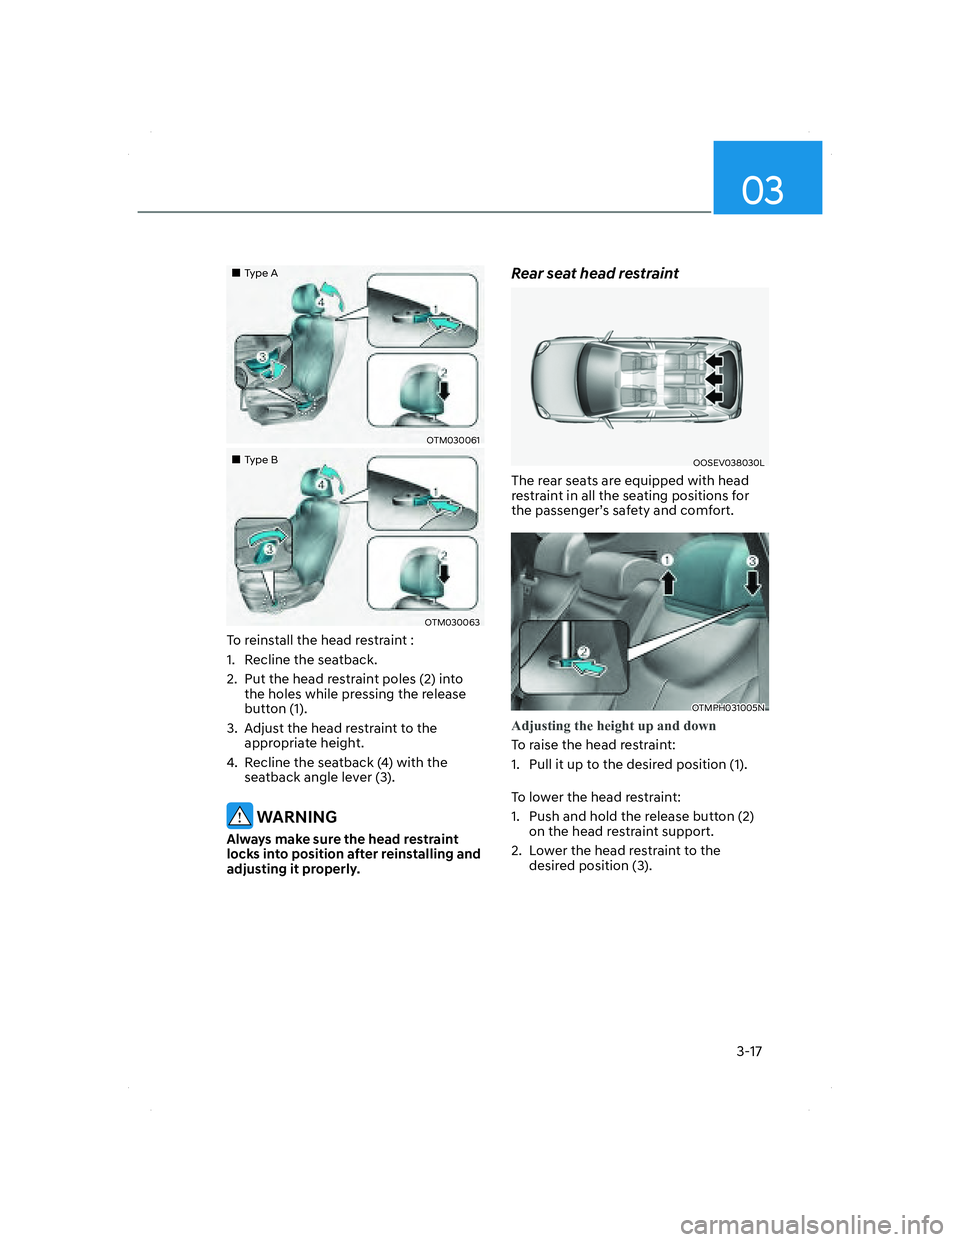
�����„�„Type AType A
OTM030061OTM030061
�����„�„Type BType B
OTM030063OTM030063
To reinstall the head restraint :
1. Recline the seatback.
2. Put the head restraint poles (2) into
the holes while pressing the release
button (1).
3. Adjust the head restraint to the
appropriate height.
4. Recline the seatback (4) with the
seatback angle lever (3).
WARNING
Always make sure the head restraint
locks into position after reinstalling and
adjusting it properly.
Rear seat head restraint
OOSEV038030LOOSEV038030L
The rear seats are equipped with head
restraint in all the seating positions for
the passenger’s safety and comfort.
OTMPH031005NOTMPH031005N
Adjusting the height up and down
To raise the head restraint:
1.
Pull it up to the desired position (1).
To lower the head restraint:
1. Push and hold the release button (2)
on the head restraint support.
2. Lower the head restraint to the
desired position (3).
003_TMa_HMA.indd 3-172021-08-26 9:01:01
Page 48 of 637

Seats & Safety System
3-18
OTMPH031006NOTMPH031006N
Removal/Reinstallation
To remove the head restraint:
1. Raise the head restraint as far as it can
go.
2. Press the head restraint release button
(1) while pulling the headrest up (2).
To reinstall the head restraint:
1. Put the head restraint poles into the
holes (3) while pressing the release
button (1).
2. Adjust the head restraint to the
appropriate height.
Seat warmers (if equipped)
Seat warmers are provided to warm the
seats during cold weather.
During mild weather or under conditions
where the operation of the seat warmer
is not needed, keep the seat warmers
OFF.
WARNING
The seat warmers can cause a SERIOUS
BURN, even at low temperatures and
especially if used for long periods of
time.
Passengers must be able to feel if the
seat is becoming too warm so they can
turn it off, if needed.
People who cannot detect temperature
change or pain to the skin should
use extreme caution, especially the
following types of passengers:
• Infants, children, elderly or disabled
persons, or hospital outpatients.
• People with sensitive skin or who
burn easily.
• Fatigued individuals.
• Intoxicated individuals.
• People taking medication that can
cause drowsiness or sleepiness.
WARNING
NEVER place anything on the seat
that insulates against heat when the
seat warmer is in operation, such as a
blanket or seat cushion. This may cause
the seat warmer to overheat, causing a
burn or damage to the seat.
003_TMa_HMA.indd 3-182021-08-26 9:01:01

Overall length 188.4 (4,785)
Overall width 74.8 (1,900)
Overall height2WD 4WD
66.3 (1,685) / 67.3 (1,710)* 67.1")
 Forward and rearward
(2) Seatback angle
(3) Seat cushion angle
(4) Seat cushion height
(5) Seat cushion length*
(6) Lumbar support (Driver’s seat)*
(7) Seat warmer*
(8) A")