2022 HYUNDAI KONA safety
[x] Cancel search: safetyPage 167 of 579
05
5-33
Auto door lock/unlock features
Your vehicle is equipped with features
that will automatically lock or unlock
your vehicle based on settings you select
in the infotainment system screen.
Auto LOCK Enable on speed
When this feature is set in the
infotainment system screen, all the doors
will be locked automatically when the
vehicle exceeds 9 mph (15 km/h).
Auto LOCK Enable on shift
When this feature is set in the
infotainment system screen, all the doors
will be locked automatically when the
vehicle is shifted out of P (Park) while the
engine is running.
Auto UNLOCK On Shift to P
When this feature is set in the
infotainment system screen, all the doors
will be unlocked automatically when the
vehicle is shifted back into P (Park) while
the engine is running.
Auto UNLOCK Vehicle off
When this feature is set in the
infotainment system screen, all the doors
will be unlocked automatically when the
vehicle is turned off.
See additional information in supplied
Infotainment Manual.
Additional unlock safety feature air
bag deployment
As an additional safety feature, all doors
will be automatically unlocked when an
impact causes the air bags to deploy.
Child-protector rear door locks
(if equipped)
OOS047005N
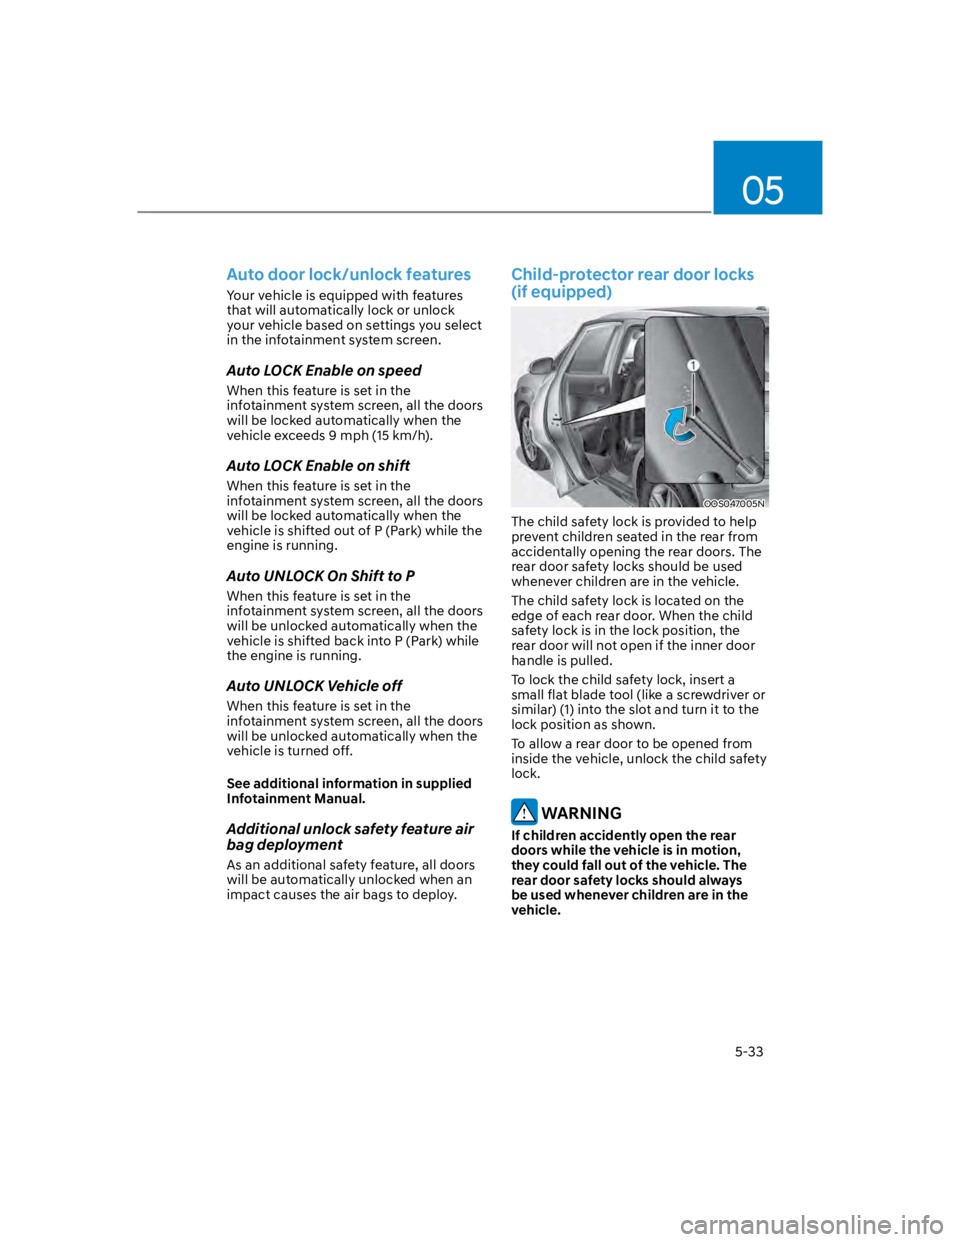
The child safety lock is provided to help
prevent children seated in the rear from
accidentally opening the rear doors. The
rear door safety locks should be used
whenever children are in the vehicle.
The child safety lock is located on the
edge of each rear door. When the child
safety lock is in the lock position, the
rear door will not open if the inner door
handle is pulled.
To lock the child safety lock, insert a
small flat blade tool (like a screwdriver or
similar) (1) into the slot and turn it to the
lock position as shown.
To allow a rear door to be opened from
inside the vehicle, unlock the child safety
lock.
WARNING
If children accidently open the rear
doors while the vehicle is in motion,
they could fall out of the vehicle. The
rear door safety locks should always
be used whenever children are in the
vehicle.
Page 175 of 579
05
5-41
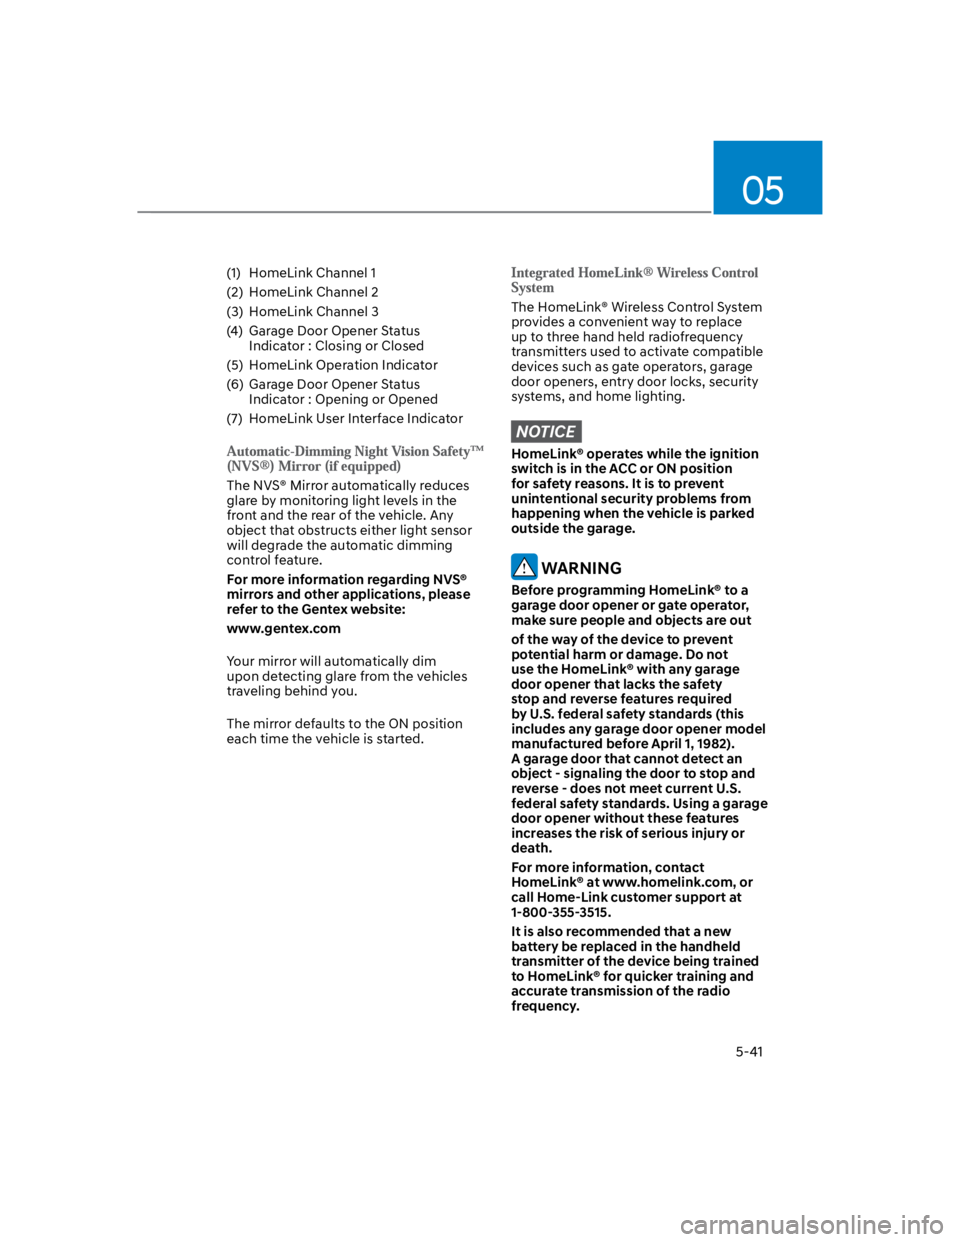
(1) HomeLink Channel 1
(2) HomeLink Channel 2
(3) HomeLink Channel 3
(4) Garage Door Opener Status
Indicator : Closing or Closed
(5) HomeLink Operation Indicator
(6) Garage Door Opener Status
Indicator : Opening or Opened
(7) HomeLink User Interface Indicator
The NVS® Mirror automatically reduces
glare by monitoring light levels in the
front and the rear of the vehicle. Any
object that obstructs either light sensor
will degrade the automatic dimming
control feature.
For more information regarding NVS®
mirrors and other applications, please
refer to the Gentex website:
www.gentex.com
Your mirror will automatically dim
upon detecting glare from the vehicles
traveling behind you.
The mirror defaults to the ON position
each time the vehicle is started.
The HomeLink® Wireless Control System
provides a convenient way to replace
up to three hand held radiofrequency
transmitters used to activate compatible
devices such as gate operators, garage
door openers, entry door locks, security
systems, and home lighting.
NOTICE
HomeLink® operates while the ignition
switch is in the ACC or ON position
for safety reasons. It is to prevent
unintentional security problems from
happening when the vehicle is parked
outside the garage.
WARNING
Before programming HomeLink® to a
garage door opener or gate operator,
make sure people and objects are out
of the way of the device to prevent
potential harm or damage. Do not
use the HomeLink® with any garage
door opener that lacks the safety
stop and reverse features required
by U.S. federal safety standards (this
includes any garage door opener model
manufactured before April 1, 1982).
A garage door that cannot detect an
object - signaling the door to stop and
reverse - does not meet current U.S.
federal safety standards. Using a garage
door opener without these features
increases the risk of serious injury or
death.
For more information, contact
HomeLink® at www.homelink.com, or
call Home-Link customer support at
1-800-355-3515.
It is also recommended that a new
battery be replaced in the handheld
transmitter of the device being trained
to HomeLink® for quicker training and
accurate transmission of the radio
frequency.
Page 198 of 579
Convenient features
5-64
Emergency liftgate safety release
OOS050008K
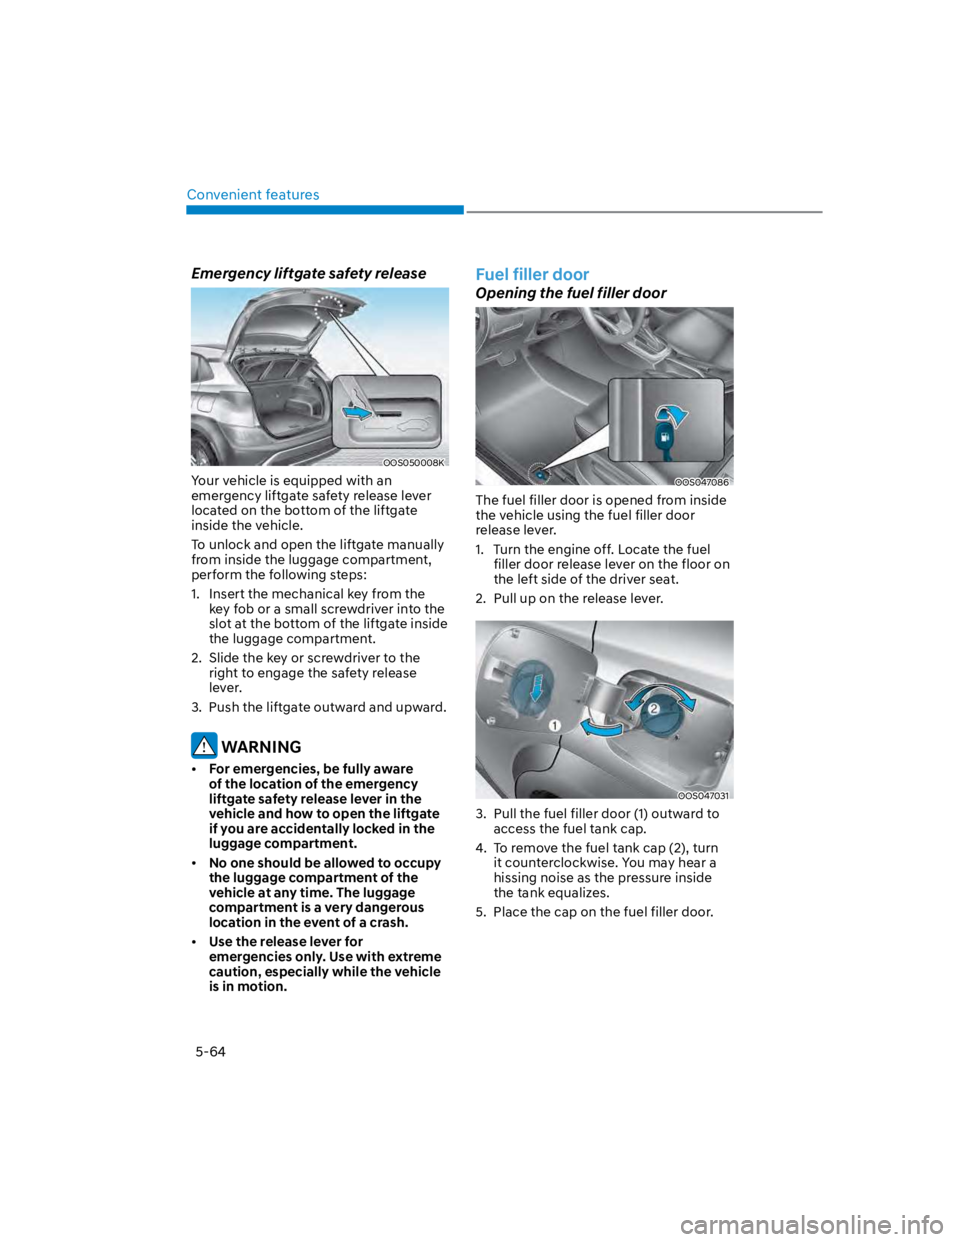
Your vehicle is equipped with an
emergency liftgate safety release lever
located on the bottom of the liftgate
inside the vehicle.
To unlock and open the liftgate manually
from inside the luggage compartment,
perform the following steps:
1. Insert the mechanical key from the
key fob or a small screwdriver into the
slot at the bottom of the liftgate inside
the luggage compartment.
2. Slide the key or screwdriver to the
right to engage the safety release
lever.
3. Push the liftgate outward and upward.
WARNING
For emergencies, be fully aware
of the location of the emergency
liftgate safety release lever in the
vehicle and how to open the liftgate
if you are accidentally locked in the
luggage compartment.
No one should be allowed to occupy
the luggage compartment of the
vehicle at any time. The luggage
compartment is a very dangerous
location in the event of a crash.
Use the release lever for
emergencies only. Use with extreme
caution, especially while the vehicle
is in motion.
Fuel filler door
Opening the fuel filler door
OOS047086
The fuel filler door is opened from inside
the vehicle using the fuel filler door
release lever.
1. Turn the engine off. Locate the fuel
filler door release lever on the floor on
the left side of the driver seat.
2. Pull up on the release lever.
OOS047031
3. Pull the fuel filler door (1) outward to
access the fuel tank cap.
4. To remove the fuel tank cap (2), turn
it counterclockwise. You may hear a
hissing noise as the pressure inside
the tank equalizes.
5. Place the cap on the fuel filler door.
Page 200 of 579

Convenient features
5-66
Do not over-fill or top-off your
vehicle tank, which can cause fuel
spillage.
If a fire breaks out during refueling,
leave the vicinity of the vehicle, and
immediately contact the manager
of the gas station and then contact
the local fire department. Follow any
safety instructions they provide.
If pressurized fuel sprays out, it can
cover your clothes or skin and thus
subject you to the risk of fire and
burns. Always remove the fuel cap
carefully and slowly. If the cap is
venting fuel or if you hear a hissing
sound, wait until the condition stops
before completely removing the cap.
Always check that the fuel cap is
installed securely to prevent fuel
spillage in the event of an accident.
Information
NOTICE
Do not spill fuel on the exterior
surfaces of the vehicle. Any type of
fuel spilled on painted surfaces may
damage the paint.
If the fuel filler cap requires
replacement, use only a genuine
HYUNDAI cap or the equivalent
specified for your vehicle. An
incorrect fuel filler cap can result
in a serious malfunction of the fuel
system or emission control system.
Page 210 of 579

Convenient features
5-76
When it is affected by an external
condition
When there is a similar shaped lamp
with the vehicle front vehicle’s
lamps.
When the headlamp is not repaired
or replaced at an authorized dealer.
When headlamp aiming is not
properly adjusted.
When driving on a narrow winding
road or rough road.
When driving downhill or uphill.
When only part of the vehicle in
front is visible on a crossroad or on a
corner.
When there is a traffic light,
reflecting sign, flashing sign or
mirror.
When the road conditions are bad
such as being wet or covered with
snow.
When a vehicle suddenly appears
from around a corner.
When the vehicle is tilted from a flat
tire or being towed.
When the front visibility is poor
When the light from the on-coming
or vehicle in front is not detected
because of exhaust fume, smoke,
fog, snow, Heavy rain, dust, etc.
When the front window is covered
with foreign matter.
WARNING
Do not disassemble a front view
camera temporarily for tinted
window or attaching any types
of coatings and accessories. If
you disassemble the camera and
assemble it again, take your vehicle
to an authorized HYUNDAI dealer
and have the function checked to
need a calibration.
When you replace or reinstall the
windshield glass, front view camera,
we recommend that you take your
vehicle to an authorized HYUNDAI
dealer and have the function
checked.
Be careful that water doesn’t get into
High Beam Assist unit and do not
remove or damage related parts of
High Beam Assist.
Do not place objects on the crash
pad that reflect light such as mirrors,
white paper, etc. The function may
malfunction if sunlight is reflected.
At times, High Beam Assist may
not work properly. The function is
for your convenience only. It is the
responsibility of the driver for safe
driving practices and always check
the road conditions for your safety.
When the function does not operate
normally, change the lamp position
manually between the high beam
and low beam.
Page 242 of 579
Convenient features
5-108
Sunvisor
OOS047062
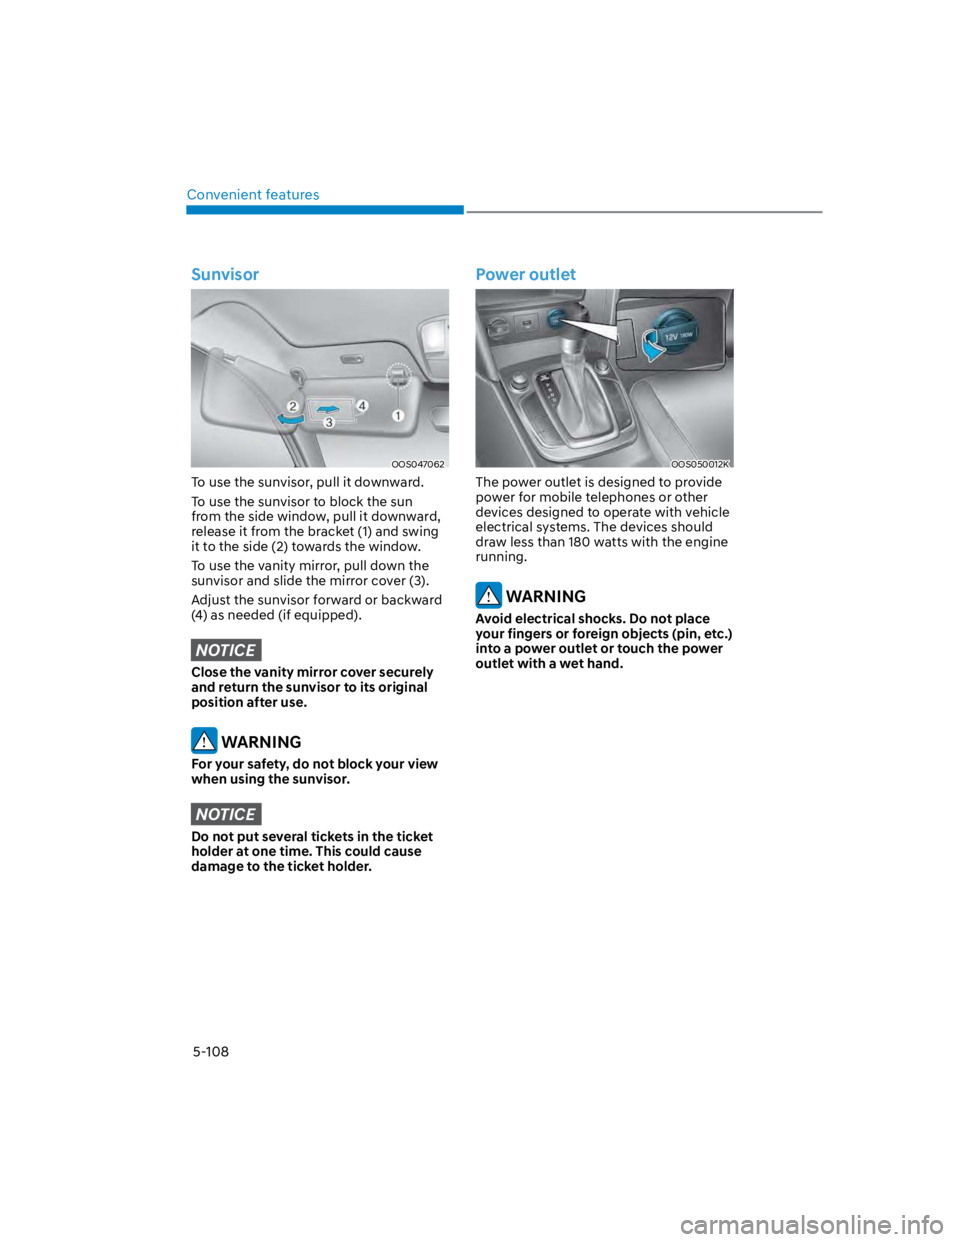
To use the sunvisor, pull it downward.
To use the sunvisor to block the sun
from the side window, pull it downward,
release it from the bracket (1) and swing
it to the side (2) towards the window.
To use the vanity mirror, pull down the
sunvisor and slide the mirror cover (3).
Adjust the sunvisor forward or backward
(4) as needed (if equipped).
NOTICE
Close the vanity mirror cover securely
and return the sunvisor to its original
position after use.
WARNING
For your safety, do not block your view
when using the sunvisor.
NOTICE
Do not put several tickets in the ticket
holder at one time. This could cause
damage to the ticket holder.
Power outlet
OOS050012K
The power outlet is designed to provide
power for mobile telephones or other
devices designed to operate with vehicle
electrical systems. The devices should
draw less than 180 watts with the engine
running.
WARNING
Avoid electrical shocks. Do not place
your fingers or foreign objects (pin, etc.)
into a power outlet or touch the power
outlet with a wet hand.
Page 266 of 579
06
6-9
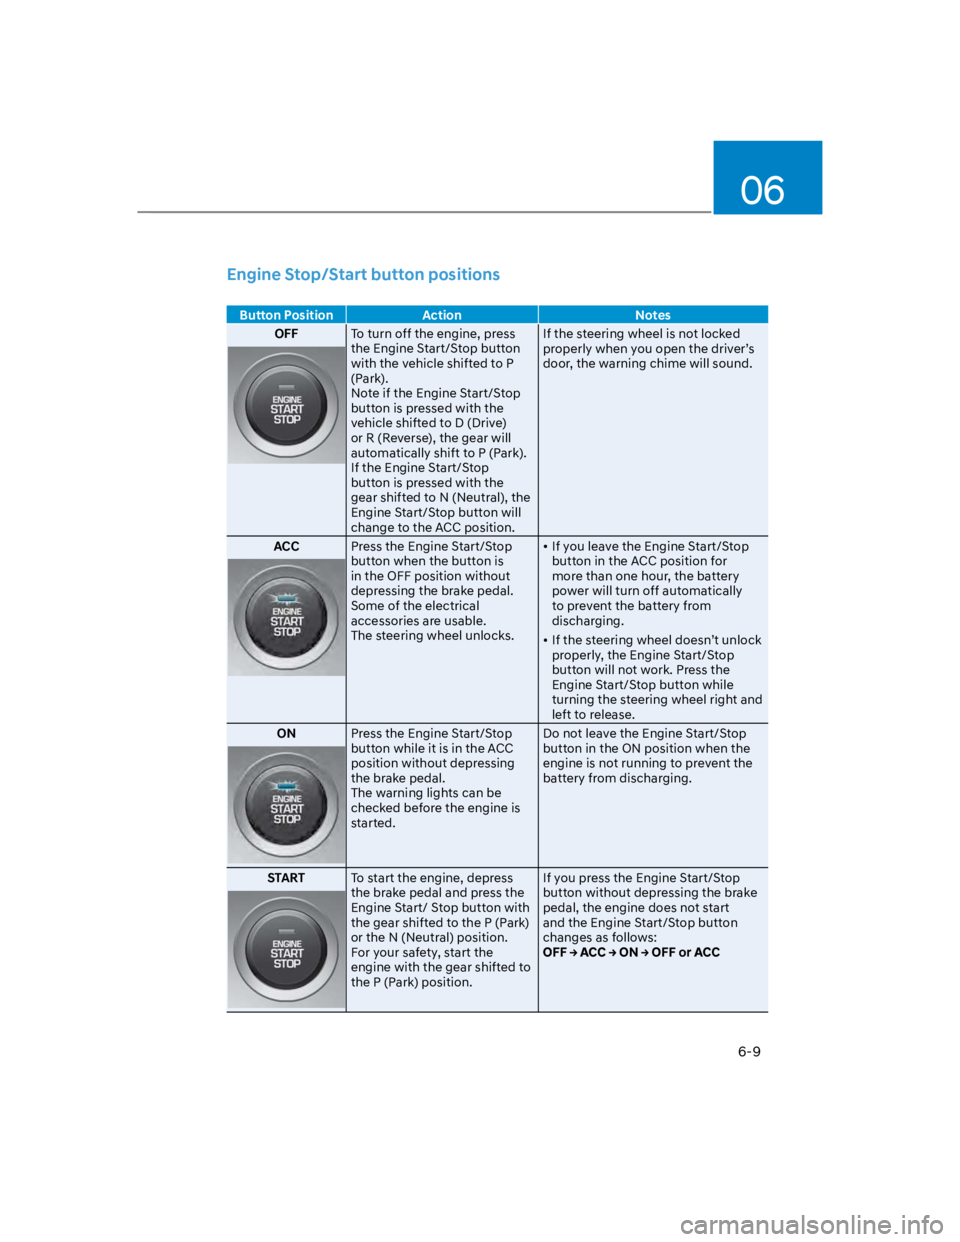
Engine Stop/Start button positions
Button Position Action Notes
OFFTo turn off the engine, press
the Engine Start/Stop button
with the vehicle shifted to P
(Park).
Note if the Engine Start/Stop
button is pressed with the
vehicle shifted to D (Drive)
or R (Reverse), the gear will
automatically shift to P (Park).
If the Engine Start/Stop
button is pressed with the
gear shifted to N (Neutral), the
Engine Start/Stop button will
change to the ACC position.
If the steering wheel is not locked
properly when you open the driver’s
door, the warning chime will sound.
ACCPress the Engine Start/Stop
button when the button is
in the OFF position without
depressing the brake pedal.
Some of the electrical
accessories are usable.
The steering wheel unlocks.
If you leave the Engine Start/Stop
button in the ACC position for
more than one hour, the battery
power will turn off automatically
to prevent the battery from
discharging.
If the steering wheel doesn’t unlock
properly, the Engine Start/Stop
button will not work. Press the
Engine Start/Stop button while
turning the steering wheel right and
left to release.
ONPress the Engine Start/Stop
button while it is in the ACC
position without depressing
the brake pedal.
The warning lights can be
checked before the engine is
started.
Do not leave the Engine Start/Stop
button in the ON position when the
engine is not running to prevent the
battery from discharging.
STARTTo start the engine, depress
the brake pedal and press the
Engine Start/ Stop button with
the gear shifted to the P (Park)
or the N (Neutral) position.
For your safety, start the
engine with the gear shifted to
the P (Park) position.
If you press the Engine Start/Stop
button without depressing the brake
pedal, the engine does not start
and the Engine Start/Stop button
changes as follows:
Page 268 of 579
06
6-11
NOTICE
To prevent damage to the vehicle:
If the engine stalls while you are in
motion, do not attempt to shift the
gear to the P (Park) position.
If traffic and road conditions permit,
you may put the gear in N (Neutral)
while the vehicle is still moving and
press the Engine Start/Stop button in
an attempt to restart the engine.
Do not push or tow your vehicle to
start the vehicle.
NOTICE
To prevent damage to the vehicle:
Do not press the Engine Start/Stop
button for more than 10 seconds except
when the stop lamp fuse is blown.
When the stop lamp fuse is blown,
you cannot normally start the engine.
Replace the fuse with a new one. If you
are not able to replace the fuse, you
can start the engine by pressing and
holding the Engine Start/Stop button
for 10 seconds with the Engine Start/
Stop button in the ACC position.
For your safety always depress the
brake pedal before starting the vehicle.
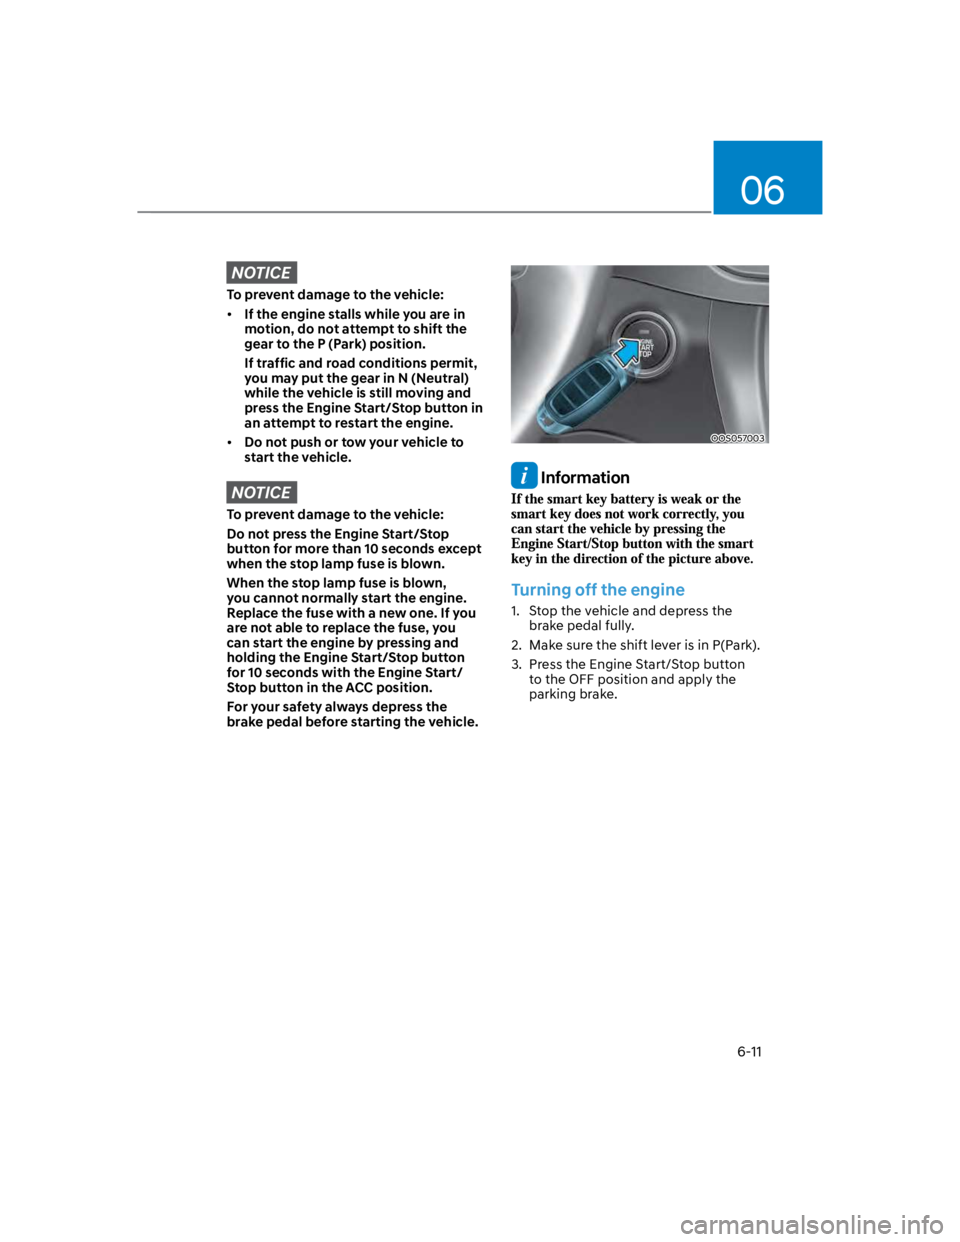
OOS057003
Information
Turning off the engine
1. Stop the vehicle and depress the
brake pedal fully.
2. Make sure the shift lever is in P(Park).
3. Press the Engine Start/Stop button
to the OFF position and apply the
parking brake.