Page 181 of 579
05
5-47
1) Erasing and Reprogramming a Single
HomeLink® Button:
1. Press and hold the desired HomeLink
button you want to re-program. DO
NOT release the button.
2. The HomeLink indicator light (7) will
illuminate solid green. Release the
button as soon as the HomeLink
indicator light (7) begins to flash
orange, usually about 20 seconds.
3. Proceed with the steps in the
“Programming a New HomeLink
Button” section.
Information
2) The following instructions will erase
ALL HomeLink® programming from
ALL buttons:
OOS040098N
1. Press and hold the buttons (1) and (3)
simultaneously.
2. The HomeLink indicator light (7) will
illuminate solid Orange for about 10
seconds.
3. Release the buttons once the
HomeLink indicator light (7) changes
to Green and flashes rapidly.
4. Now all three HomeLink buttons
(1), (2) and (3) are cleared of any
programming.
Information
Page 191 of 579

05
5-57
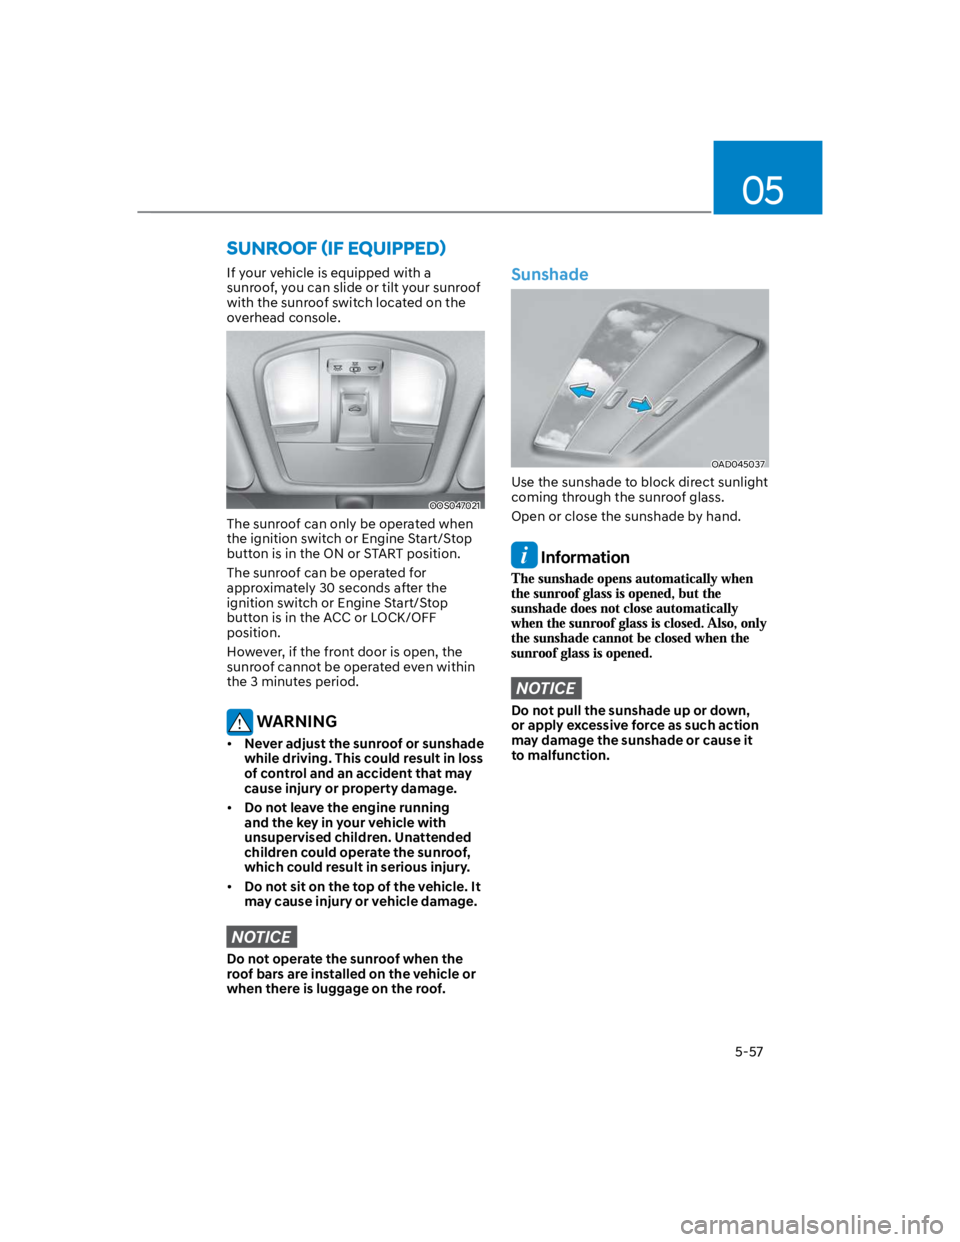
If your vehicle is equipped with a
sunroof, you can slide or tilt your sunroof
with the sunroof switch located on the
overhead console.
OOS047021
The sunroof can only be operated when
the ignition switch or Engine Start/Stop
button is in the ON or START position.
The sunroof can be operated for
approximately 30 seconds after the
ignition switch or Engine Start/Stop
button is in the ACC or LOCK/OFF
position.
However, if the front door is open, the
sunroof cannot be operated even within
the 3 minutes period.
WARNING
Never adjust the sunroof or sunshade
while driving. This could result in loss
of control and an accident that may
cause injury or property damage.
Do not leave the engine running
and the key in your vehicle with
unsupervised children. Unattended
children could operate the sunroof,
which could result in serious injury.
Do not sit on the top of the vehicle. It
may cause injury or vehicle damage.
NOTICE
Do not operate the sunroof when the
roof bars are installed on the vehicle or
when there is luggage on the roof.
Sunshade
OAD045037
Use the sunshade to block direct sunlight
coming through the sunroof glass.
Open or close the sunshade by hand.
Information
NOTICE
Do not pull the sunshade up or down,
or apply excessive force as such action
may damage the sunshade or cause it
to malfunction.
Page 194 of 579

Convenient features
5-60
Resetting the sunroof
In some circumstances resetting the
sunroof operation may need to be
performed. Some instances where
resetting the sunroof may be required
include:
- When the 12-volt battery is either
disconnected or discharged
- When the sunroof fuse is replaced
- If the sunroof one-touch AUTO OPEN/
CLOSE operation is not functioning
properly
Sunroof resetting procedure:
1. It is recommended to perform the
reset procedure with the vehicle
engine running. Start the vehicle in P
(Park).
2. Make sure the sunroof glass is in the
fully closed position. If the sunroof
glass is open, push the switch forward
until the sunroof glass is fully closed.
3. Release the switch when the sunroof
glass is fully closed.
4. Push the switch forward until the
sunroof glass moves slightly. Then
release the switch.
5. Once again push and hold the sunroof
switch forward until the sunroof glass
slides open and close. Do not release
the switch until the operation is
completed. If you release the switch
during operation, start the procedure
again from step 2.
Information
Sunroof Open Warning
(if equipped)
If the driver turns off the engine when
the sunroof is not fully closed, the
warning chime will sound for several
seconds and the sunroof open warning
will appear on the LCD display.
Close the sunroof securely when leaving
your vehicle.
CAUTION
Make sure the sunroof is closed fully
when leaving your vehicle.
If the sunroof is left open, rain or snow
may wet the interior of the vehicle.
Also, leaving the sunroof open when the
vehicle is unattended may invite theft.
Page 195 of 579
05
5-61
Hood
Opening the hood
OOS040024
1. Park the vehicle and set the parking
brake.
2. Pull the release lever to unlatch the
hood. The hood should pop open
slightly.
OOS050005N
3. Go to the front of the vehicle, raise the
hood slightly, push up the secondary
latch (1) inside of the hood center and
lift the hood (2).
OOS047026
4. Pull out the support rod and hold the
hood open with the support rod (1).
WARNING
When handling the support rod,
grasp the rod in the area wrapped
with rubber only. In some cases
where the engine has been running
the support rod may be hot. Caution
should be taken to avoid getting
burned by the support rod.
The support rod must be inserted
completely into the hole provided
whenever you inspect the engine
compartment. This will prevent the
hood from becoming dislodged and
falling and causing potential injury.
EXTERIOR FEATURES
Page 196 of 579

Convenient features
5-62
Closing the hood
1. Before closing the hood, check in and
around the engine compartment to
ensure the following:
- Any tools or other loose objects
are removed from the engine room
area or hood opening area
- All glove, rags, or other
combustible material is removed
from the engine compartment
- All filler caps are tightly and
correctly installed
2. Lower the hood halfway (lifted
approximately 12 in. (30 cm) from the
closed position) and push down to
securely lock in place. Then double
check to be sure the hood is secure.
If the hood can be raised slightly, it is
not securely locked. Open it again and
close it with more force.
WARNING
Before closing the hood, ensure
all obstructions are removed from
around the hood opening.
Always double check to be sure that
the hood is firmly latched before
driving away. Check there is no
hood open warning light or message
displayed on the instrument cluster.
Driving with the hood opened may
cause a total loss of visibility, which
might result in an accident.
Do not move the vehicle with the
hood in the raised position, as vision
is obstructed, which might result in
an accident, and the hood could fall
or be damaged.
Liftgate
Opening the liftgate
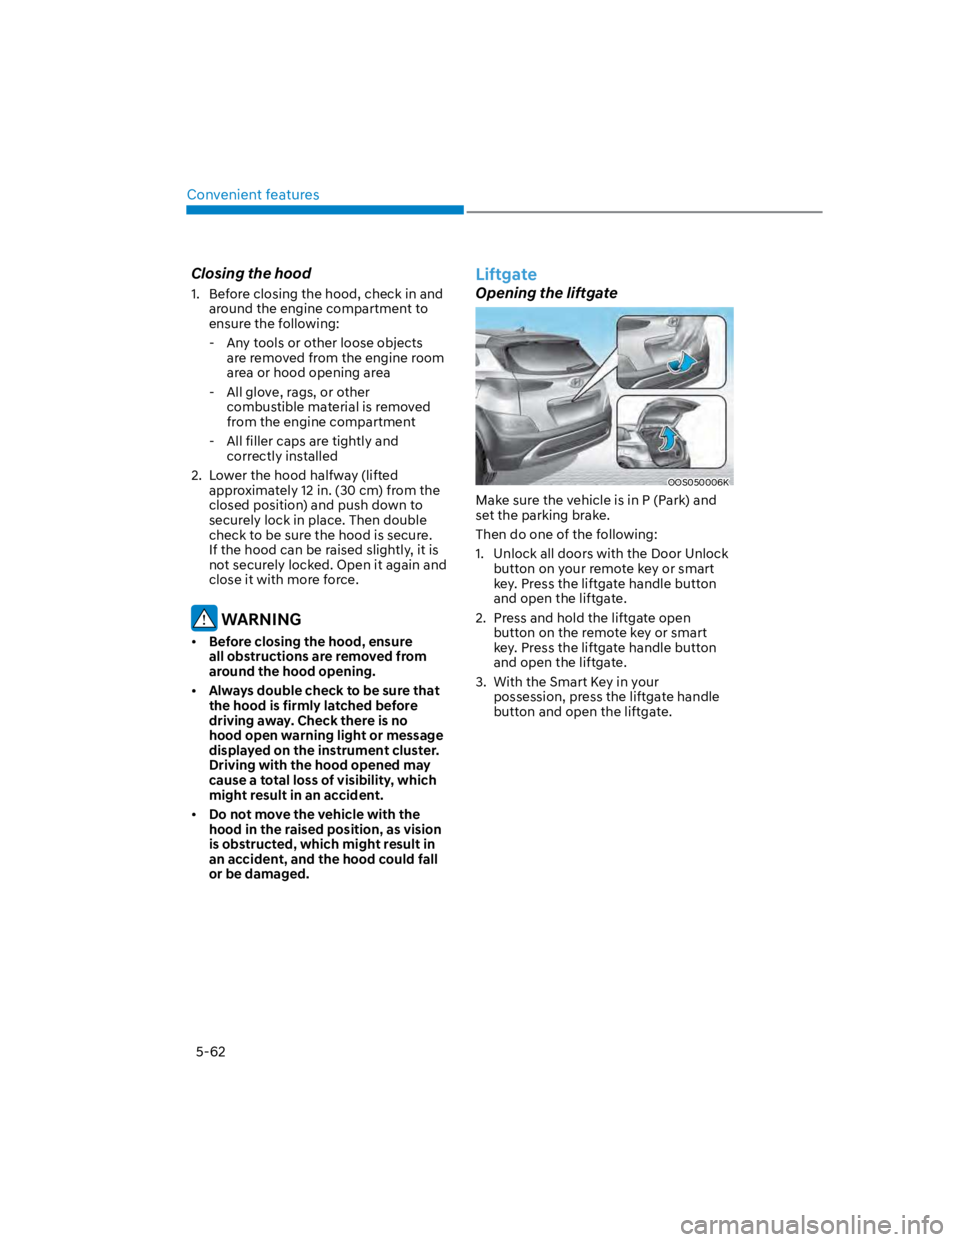
OOS050006K
Make sure the vehicle is in P (Park) and
set the parking brake.
Then do one of the following:
1. Unlock all doors with the Door Unlock
button on your remote key or smart
key. Press the liftgate handle button
and open the liftgate.
2. Press and hold the liftgate open
button on the remote key or smart
key. Press the liftgate handle button
and open the liftgate.
3. With the Smart Key in your
possession, press the liftgate handle
button and open the liftgate.
Page 199 of 579

05
5-65
Information
Closing the fuel filler door
1. To install the fuel tank cap, turn it
clockwise until it “clicks” one time.
2. Close the fuel filler door until it is
latched securely.
WARNING
Gasoline is highly flammable and
explosive. Failure to follow these
guidelines may result in SERIOUS
INJURY or DEATH:
Read and follow all warnings posted
at the gas station.
Before refueling, note the location
of the Emergency Fuel Shut-Off, if
available, at the gas station.
Before touching the fuel nozzle, you
should eliminate the potential build-
up of static electricity by touching
a metal part of the vehicle, a safe
distance away from the fuel filler
neck, nozzle, or other gas source,
with your bare hand.
Do not use cellular phones while
refueling. Electric current and/or
electronic interference from cellular
phones can potentially ignite fuel
vapors and cause a fire.
Do not get back into a vehicle
once you have begun refueling.
You can generate a buildup of
static electricity by touching,
rubbing or sliding against any item
or fabric capable of producing
static electricity. Static electricity
discharge can ignite fuel vapors
causing a fire. If you must re-enter
the vehicle, you should once again
eliminate potentially dangerous
static electricity discharge by
touching a metal part of the vehicle,
away from the fuel filler neck, nozzle
or other fuel source, with your bare
hand.
When using an approved portable
fuel container, be sure to place the
container on the ground prior to
refueling. Static electricity discharge
from the container can ignite fuel
vapors causing a fire.
Once refueling has begun, contact
between your bare hand and the
vehicle should be maintained until
the filling is complete.
Use only approved portable plastic
fuel containers designed to carry and
store fuel.
When refueling, always shift the
gear to the P (Park) position, set
the parking brake, and press the
Engine Start/Stop button to the
OFF position. Sparks produced by
electrical components related to the
engine can ignite fuel vapors causing
a fire.
Do not use matches or a lighter and
do not smoke or leave a lit cigarette
in your vehicle while at a gas station,
especially during refueling.
Page 201 of 579

05
5-67
Exterior lights
Lighting control
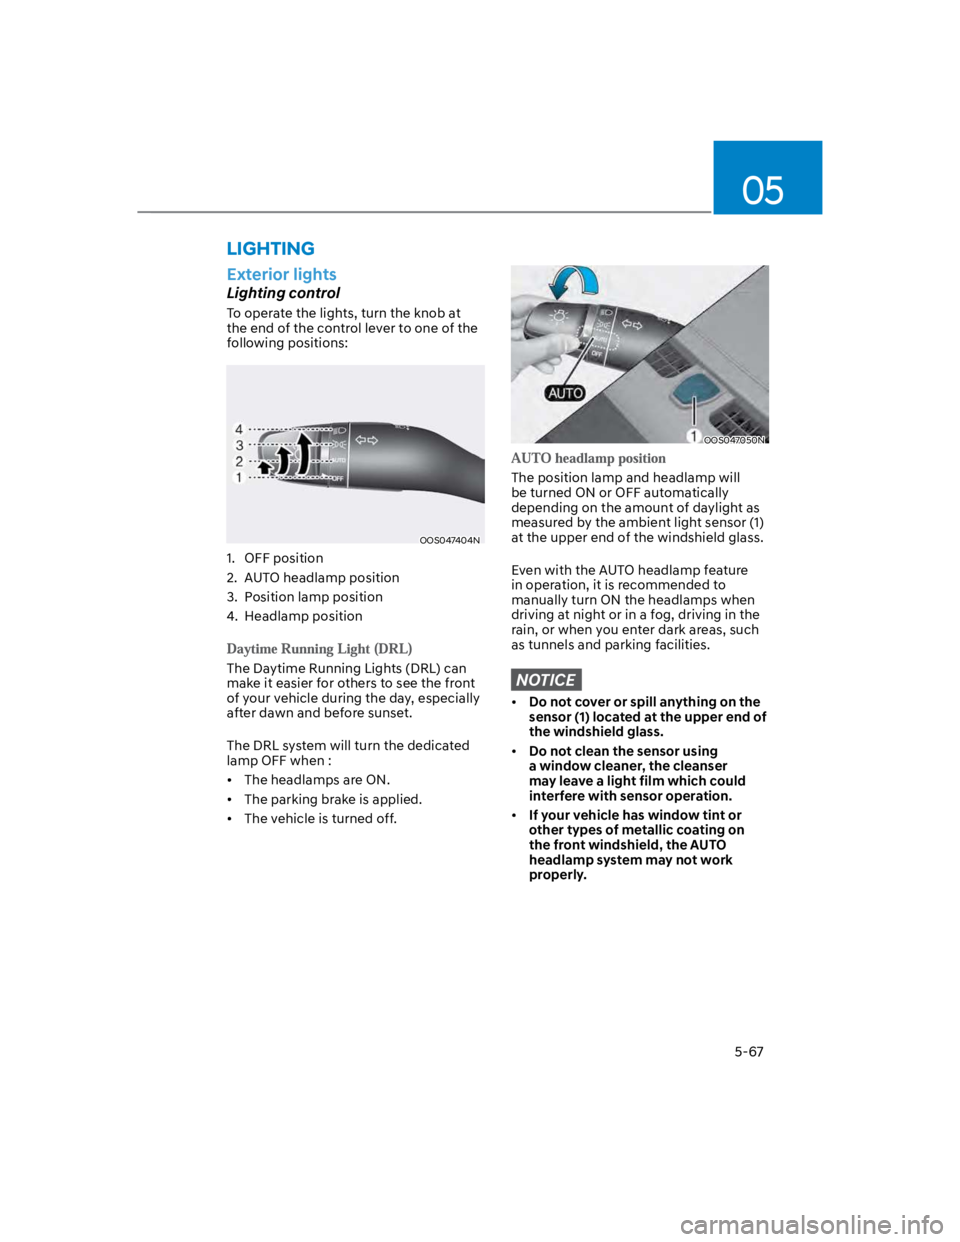
To operate the lights, turn the knob at
the end of the control lever to one of the
following positions:
OOS047404N
1. OFF position
2. AUTO headlamp position
3. Position lamp position
4. Headlamp position
The Daytime Running Lights (DRL) can
make it easier for others to see the front
of your vehicle during the day, especially
after dawn and before sunset.
The DRL system will turn the dedicated
lamp OFF when :
The headlamps are ON.
The parking brake is applied.
The vehicle is turned off.
OOS047050N
The position lamp and headlamp will
be turned ON or OFF automatically
depending on the amount of daylight as
measured by the ambient light sensor (1)
at the upper end of the windshield glass.
Even with the AUTO headlamp feature
in operation, it is recommended to
manually turn ON the headlamps when
driving at night or in a fog, driving in the
rain, or when you enter dark areas, such
as tunnels and parking facilities.
NOTICE
Do not cover or spill anything on the
sensor (1) located at the upper end of
the windshield glass.
Do not clean the sensor using
a window cleaner, the cleanser
may leave a light film which could
interfere with sensor operation.
If your vehicle has window tint or
other types of metallic coating on
the front windshield, the AUTO
headlamp system may not work
properly.
LIGHTING
Page 202 of 579
Convenient features
5-68
OOS047405N
The position lamp, license plate lamp
and instrument panel lamp are turned
ON.
OOS047406N
The headlamp, position lamp, license
plate lamp and instrument panel lamp
are turned ON.
Information
High beam operation
OOS047407N
To turn on the high beam headlamp,
push the lever away from you. The lever
will return to its original position.
The high beam indicator will light when
the headlamp high beams are switched
on.
To turn off the high beam headlamp, pull
the lever towards you. The low beams
will turn on.
WARNING
Do not use high beam when there are
other vehicles approaching you. Using
high beam could obstruct the other
driver’s vision.
OOS047408N
To flash the high beam headlamp, pull
the lever towards you, then release the
lever. The high beams will remain ON as
long as you hold the lever towards you.