2022 HYUNDAI KONA battery
[x] Cancel search: batteryPage 517 of 579

09
9-31
Battery recharging
By battery charger
Your vehicle has a maintenance-free,
calcium-based battery.
Recharge your battery using a modern
automatic regulated battery charger at
the AGM battery setting.
WARNING
Always follow these instructions when
recharging your vehicle’s battery to
avoid the risk of SERIOUS INJURY or
DEATH from explosions or acid burns:
Before performing maintenance or
recharging the battery, turn off all
accessories and stop the engine.
Keep all flames, sparks, or smoking
materials away from the battery.
Always work outdoors or in an area
with plenty of ventilation.
Wear eye protection when checking
the battery during charging.
The battery must be removed from
the vehicle and placed in a well
ventilated area.
The negative battery cable must
be removed first and installed last
when the battery is disconnected.
Disconnect the battery charger in the
following order:
1. Turn off the battery charger main
switch.
2. Unhook the negative clamp from
the negative battery terminal.
3. Unhook the positive clamp from
the positive battery terminal.
We recommend that you use
batteries for replacement from an
authorized HYUNDAI dealer.
NOTICE
AGM battery (if equipped)
Absorbent Glass Matt (AGM)
batteries are maintenance-free
and we recommend that the AGM
battery be serviced by an authorized
HYUNDAI dealer. For charging
your AGM battery, use only fully
automatic battery chargers that
are specially developed for AGM
batteries.
When replacing the AGM battery,
we recommend that you use parts
for replacement from an authorized
HYUNDAI dealer.
Page 518 of 579

Maintenance
9-32
By jump starting
After a jump start from a good battery,
drive the vehicle for 20-30 minutes
before it is shutoff. The vehicle may
not restart if you shut it off before the
battery had a chance to adequately
recharge. See “Jump Starting” in chapter
8 for more information on jump starting
procedures.
Information
Reset items
The following items may need to be reset
after the battery has been discharged or
the battery has been disconnected.
Auto up/down window (see chapter 5)
Sunroof (see chapter 5)
Trip computer (see chapter 5)
Climate control system (see chapter 5)
Clock (see chapter 5)
Infotainment system (see
infotainment system manual)
Page 528 of 579

Maintenance
9-42
Maximum Inflation Pressure
The maximum air pressure to which a
cold tire may be inflated. The maximum
air pressure is molded onto the sidewall.
Maximum Load Rating
The load rating for a tire at the maximum
permissible inflation pressure for that
tire.
Maximum Loaded Vehicle Weight
The sum of curb weight; accessory
weight; vehicle capacity weight; and
production options weight.
Normal Occupant Weight
The number of occupants a vehicle
is designed to seat multiplied by 150
pounds (68 kg).
Occupant Distribution
Designated seating positions.
Outward Facing Sidewall
An asymmetrical tire has a particular
side that faces outward when mounted
on a vehicle. The outward facing
sidewall bears white lettering or bears
manufacturer, brand, and/or model
name molding that is higher or deeper
than the same moldings on the inner
facing sidewall.
Passenger (P-Metric) tire
A tire used on passenger cars and some
light duty trucks and multipurpose
vehicles.
Ply
A layer of rubber-coated parallel cords.
Pneumatic tire
A mechanical device made of rubber,
chemicals, fabric and steel or other
materials, that, when mounted on an
automotive wheel provides the traction
and contains the gas or fluid that
sustains the load.
Pneumatic options weight
The combined weight of installed regular
production options weighing over 5 lb.
(2.3 kg) in excess of the standard items
which they replace, not previously
considered in curb weight or accessory
weight, including heavy duty breaks, ride
levelers, roof rack, heavy duty battery,
and special trim.
Recommended Inflation Pressure
Vehicle manufacturer’s recommended
tire inflation pressure as shown on the
tire placard.
Radial Ply Tire
A pneumatic tire in which the ply cords
that extend to the beads are laid at 90
degrees to the centerline of the tread.
Rim
A metal support for a tire and upon
which the tire beads are seated.
Sidewall
The portion of a tire between the tread
and the bead.
Speed Rating
An alphanumeric code assigned to a tire
indicating the maximum speed at which
a tire can operate.
Page 531 of 579
![HYUNDAI KONA 2022 Owners Manual 09
9-45
FUSES
OLF074075
A
Blade type
Cartridge type
Multi fuse
A
A
B
B
B
B
A
[A] : Normal, [B] : Blown
A vehicle’s electrical system is protected
from electrical overload damage by
fuses.
This veh HYUNDAI KONA 2022 Owners Manual 09
9-45
FUSES
OLF074075
A
Blade type
Cartridge type
Multi fuse
A
A
B
B
B
B
A
[A] : Normal, [B] : Blown
A vehicle’s electrical system is protected
from electrical overload damage by
fuses.
This veh](/manual-img/35/41169/w960_41169-530.png)
09
9-45
FUSES
OLF074075
A
Blade type
Cartridge type
Multi fuse
A
A
B
B
B
B
A
[A] : Normal, [B] : Blown
A vehicle’s electrical system is protected
from electrical overload damage by
fuses.
This vehicle has 5 fuse panels, one
located in the driver’s side panel bolster,
the other in the engine compartment.
If any of your vehicle’s lights,
accessories, or controls do not work,
check the appropriate circuit fuse. If a
fuse has blown, the element inside the
fuse will be melted or broken.
If the electrical system does not work,
first check the driver’s side fuse panel.
Before replacing a blown fuse, turn the
engine and all switches off, and then
disconnect the negative battery cable.
Always replace a blown fuse with one of
the same rating.
If the replacement fuse blows, this
indicates an electrical problem.
Avoid using the system involved. We
recommend that you immediately
consult an authorized HYUNDAI dealer.
WARNING
NEVER replace a fuse with anything but
another fuse of the same rating.
A higher capacity fuse could cause
damage and possibly cause a fire.
Do not install a wire or aluminum
foil instead of the proper fuse -
even as a temporary repair. It may
cause extensive wiring damage and
possibly a fire.
NOTICE
Do not use a screwdriver or any other
metal object to remove fuses because
it may cause a short circuit and damage
the system.
Page 534 of 579

Maintenance
9-48
NOTICE
After checking the fuse panel in the
engine compartment, securely install
the fuse panel cover. You may hear a
clicking sound if the cover is securely
latched. If it is not securely latched,
electrical failure may occur from water
contact.
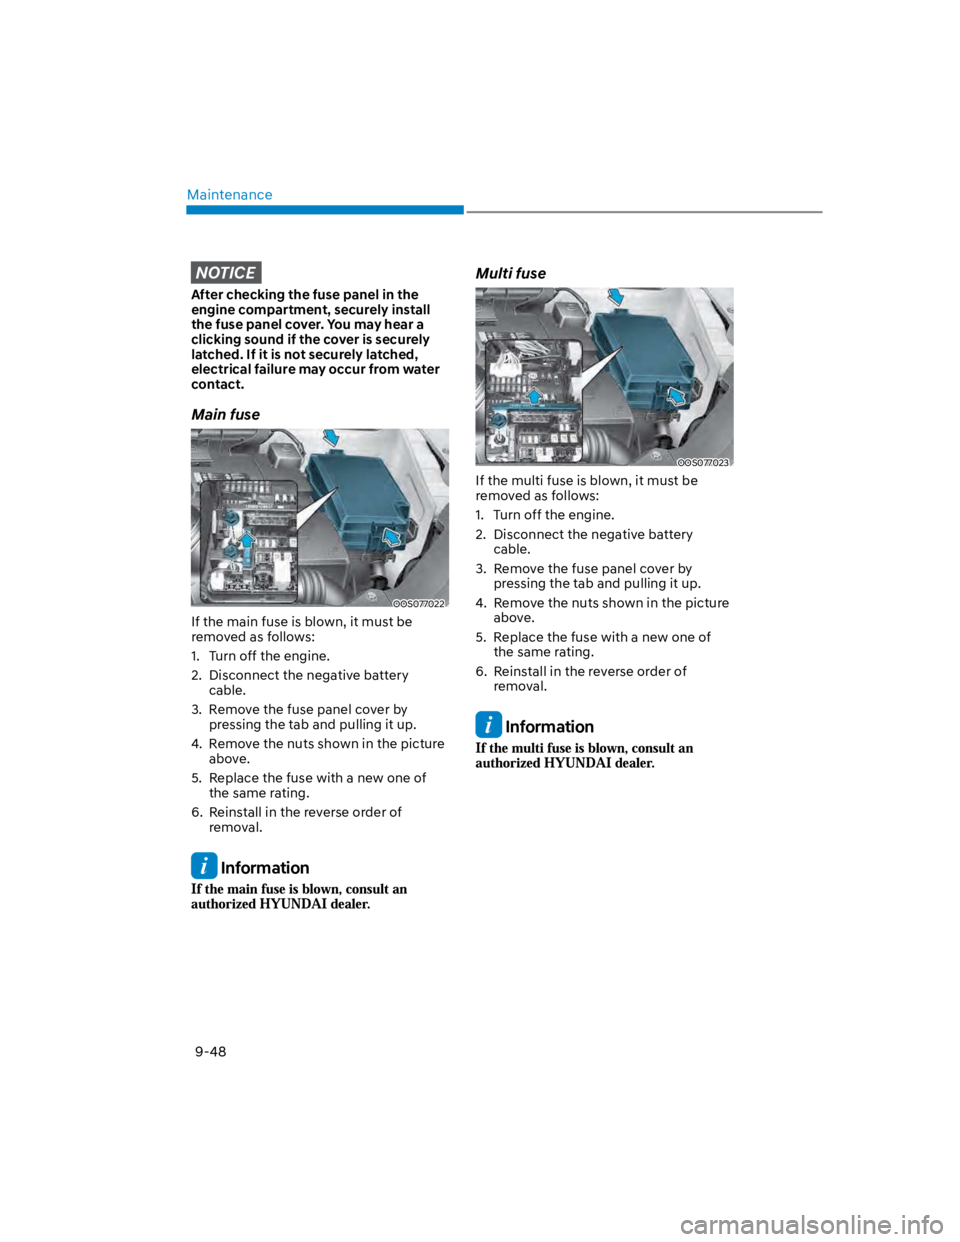
Main fuse
OOS077022
If the main fuse is blown, it must be
removed as follows:
1. Turn off the engine.
2. Disconnect the negative battery
cable.
3. Remove the fuse panel cover by
pressing the tab and pulling it up.
4. Remove the nuts shown in the picture
above.
5. Replace the fuse with a new one of
the same rating.
6. Reinstall in the reverse order of
removal.
Information
Multi fuse
OOS077023
If the multi fuse is blown, it must be
removed as follows:
1. Turn off the engine.
2. Disconnect the negative battery
cable.
3. Remove the fuse panel cover by
pressing the tab and pulling it up.
4. Remove the nuts shown in the picture
above.
5. Replace the fuse with a new one of
the same rating.
6. Reinstall in the reverse order of
removal.
Information
Page 546 of 579

Maintenance
9-60
WARNING
OLMB073042L
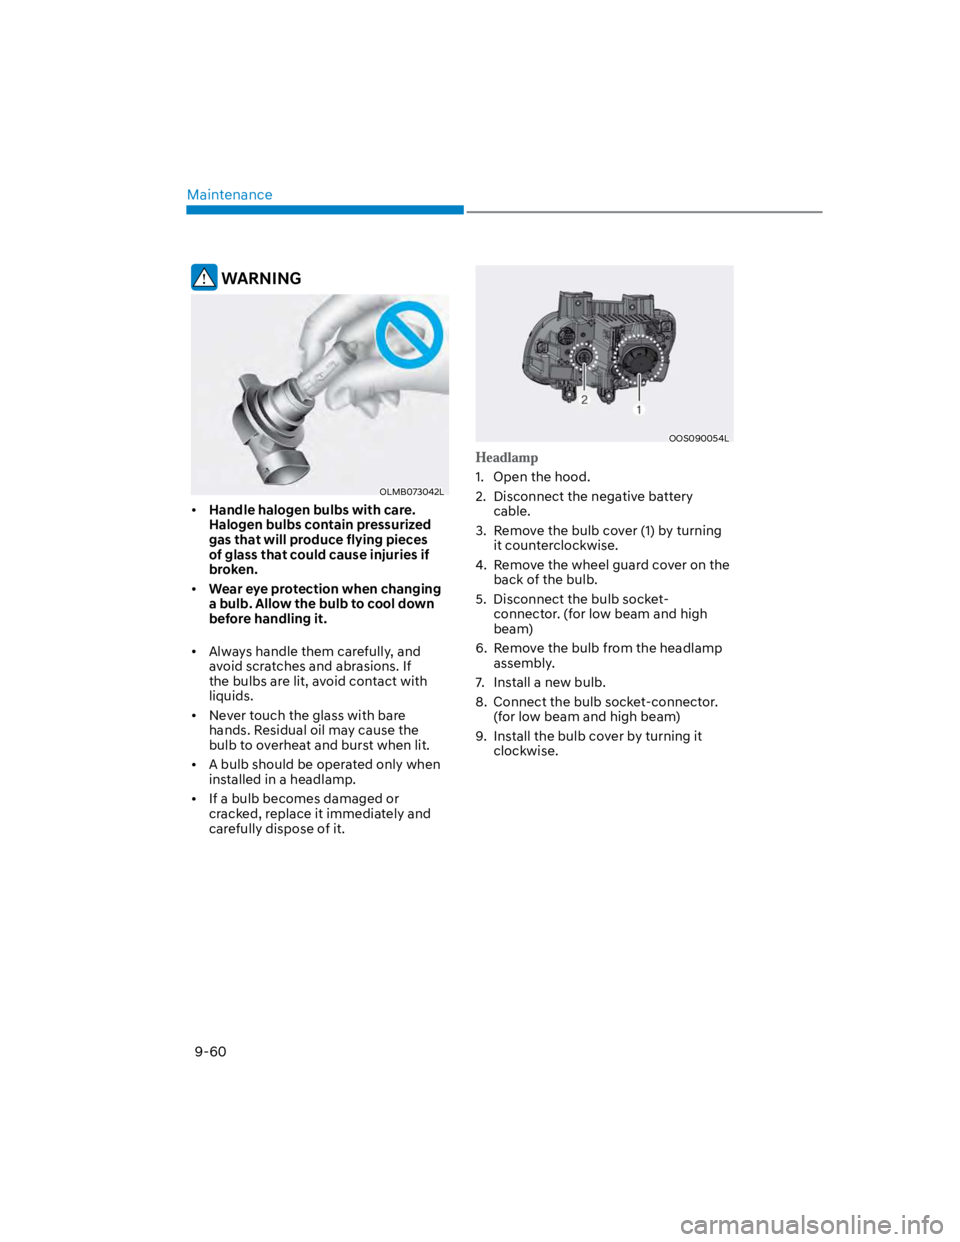
Handle halogen bulbs with care.
Halogen bulbs contain pressurized
gas that will produce flying pieces
of glass that could cause injuries if
broken.
Wear eye protection when changing
a bulb. Allow the bulb to cool down
before handling it.
Always handle them carefully, and
avoid scratches and abrasions. If
the bulbs are lit, avoid contact with
liquids.
Never touch the glass with bare
hands. Residual oil may cause the
bulb to overheat and burst when lit.
A bulb should be operated only when
installed in a headlamp.
If a bulb becomes damaged or
cracked, replace it immediately and
carefully dispose of it.
OOS090054L
1. Open the hood.
2. Disconnect the negative battery
cable.
3. Remove the bulb cover (1) by turning
it counterclockwise.
4. Remove the wheel guard cover on the
back of the bulb.
5. Disconnect the bulb socket-
connector. (for low beam and high
beam)
6. Remove the bulb from the headlamp
assembly.
7. Install a new bulb.
8. Connect the bulb socket-connector.
(for low beam and high beam)
9. Install the bulb cover by turning it
clockwise.
Page 547 of 579

09
9-61
OOS090054L
1. Open the hood.
2. Disconnect the negative battery
cable.
3. Remove the bulb cover (2) by turning
it counterclockwise.
4. Disconnect the bulb socket-
connector.
5. Remove the bulb from the assembly.
6. Install a new bulb.
7. Connect the bulb socket-connector.
8. Install the bulb cover by turning it
clockwise.
If the LED lamp does not operate, have
the vehicle checked by an authorized
HYUNDAI dealer.
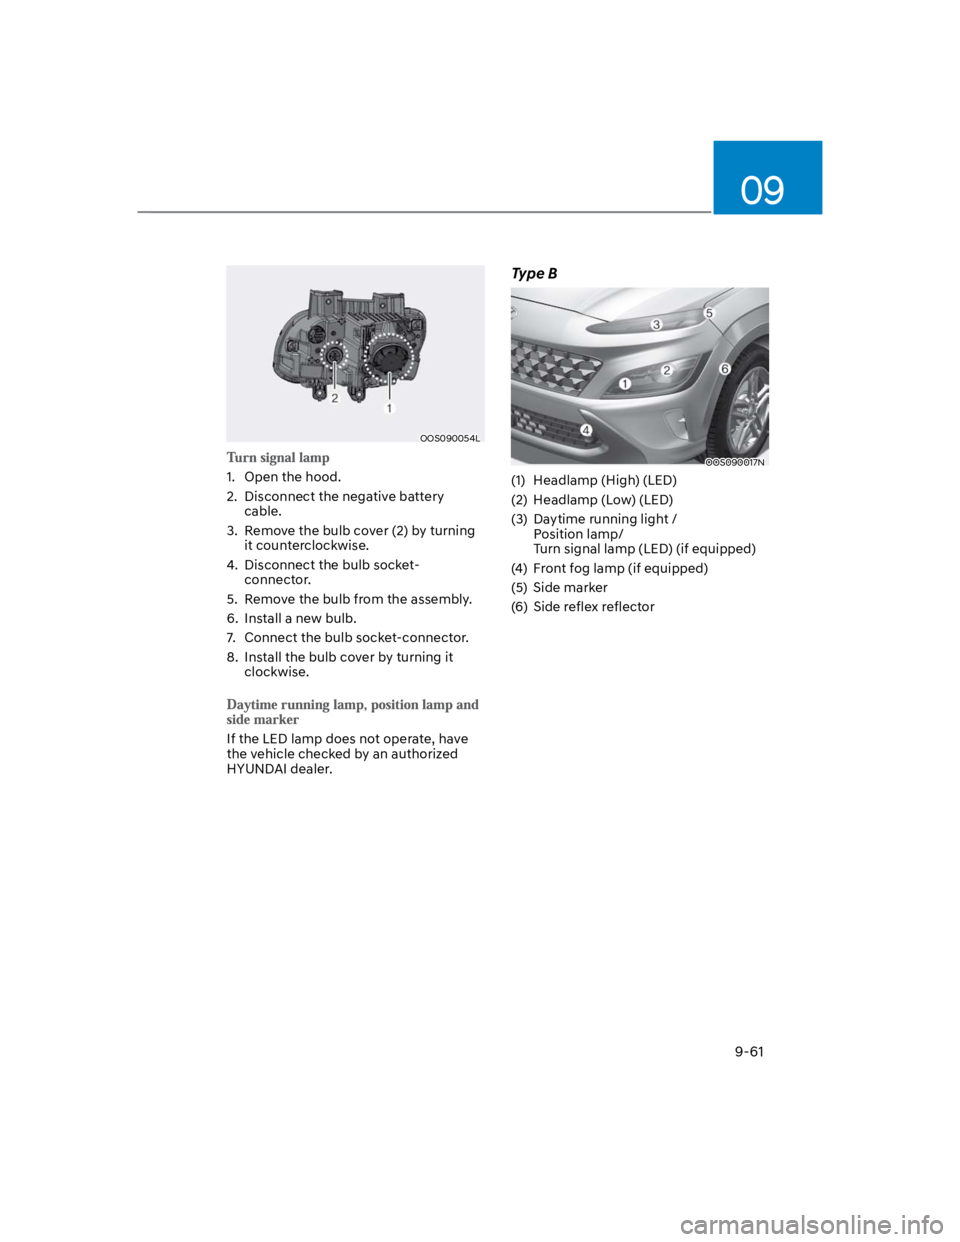
Type B
OOS090017N
(1) Headlamp (High) (LED)
(2) Headlamp (Low) (LED)
(3) Daytime running light /
Position lamp/
Turn signal lamp (LED) (if equipped)
(4) Front fog lamp (if equipped)
(5) Side marker
(6) Side reflex reflector
Page 572 of 579

Index
I-6
G
Guide to hyundai genuine parts ............................................................................. 1-3
H
Hazard warning flasher.......................................................................................... 8-2
High Beam Assist (HBA) .................................................................................... 5-74
High Beam Assist malfunction ........................................................................ 5-75
High Beam Assist setting ................................................................................. 5-74
Operating condition .......................................................................................... 5-75
Highway Driving Assist (HDA) ......................................................................... 7-92
Highway Driving Assist malfunction and limitation........................................ 7-96
Highway Driving Assist operation ................................................................... 7-94
Highway Driving Assist settings ...................................................................... 7-93
How to use this manual ......................................................................................... 1-4
Hyundai Motor America ........................................................................................ 1-2
I
Idle Stop and Go (ISG) system ............................................................................ 6-54
Activating the ISG............................................................................................ 6-54
Condition of ISG system operation .................................................................. 6-56
Deactivating the ISG ........................................................................................ 6-54
ISG Indication .................................................................................................. 6-57
ISG malfunction ............................................................................................... 6-58
The battery sensor deactivation ........................................................................ 6-59
If the engine overheats........................................................................................... 8-7
If the engine will not start ..................................................................................... 8-3
If the Engine Doesn’t Turn Over or Turns Over Slowly ................................... 8-3
If the Engine Turns Over Normally but Doesn’t Start ...................................... 8-3
If you have a flat tire (with spare tire) ................................................................. 8-18
Changing tires .................................................................................................. 8-19
Jack and tools ................................................................................................... 8-18
Jack label .......................................................................................................... 8-24
If you have a flat tire (with Tire Mobility Kit) .................................................... 8-25
Components of the Tire Mobility Kit ............................................................... 8-26
How to adjust tire pressure............................................................................... 8-30
Introduction ...................................................................................................... 8-25
Notes on the safe use of the Tire Mobility Kit ................................................. 8-32
Using the Tire Mobility Kit .............................................................................. 8-27