2022 HYUNDAI KONA EV start stop button
[x] Cancel search: start stop buttonPage 20 of 548
01
1-15
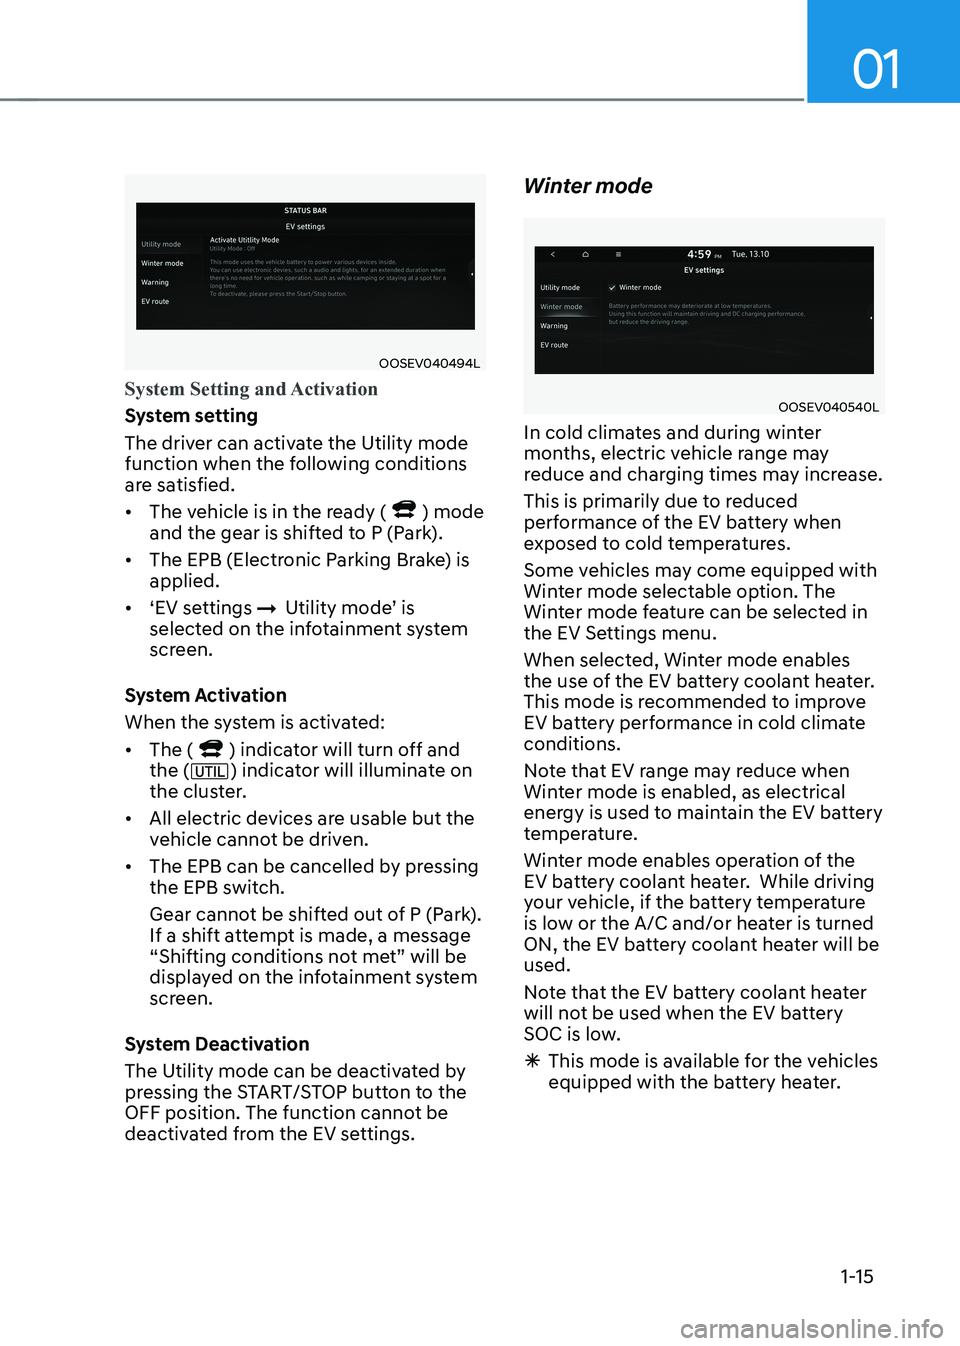
OOSEV040494L
System Setting and Activation
System setting
The driver can activate the Utility mode
function when the following conditions
are satisfied. • The vehicle is in the ready (
) mode
and the gear is shifted to P (Park).
• The EPB (Electronic Parking Brake) is applied.
• ‘EV settings
ÞUtility mode’ is
selected on the infotainment system
screen.
System Activation
When the system is activated:• The (
) indicator will turn off and
the () indicator will illuminate on
the cluster.
• All electric devices are usable but the
vehicle cannot be driven.
• The EPB can be cancelled by pressing
the EPB switch.
Gear cannot be shifted out of P (Park).
If a shift attempt is made, a message
“Shifting conditions not met” will be
displayed on the infotainment system
screen.
System Deactivation
The Utility mode can be deactivated by
pressing the START/STOP button to the
OFF position. The function cannot be
deactivated from the EV settings. Winter mode
OOSEV040540L
In cold climates and during winter
months, electric vehicle range may
reduce and charging times may increase.
This is primarily due to reduced
performance of the EV battery when
exposed to cold temperatures.
Some vehicles may come equipped with
Winter mode selectable option. The
Winter mode feature can be selected in
the EV Settings menu.
When selected, Winter mode enables
the use of the EV battery coolant heater.
This mode is recommended to improve
EV battery performance in cold climate conditions.
Note that EV range may reduce when
Winter mode is enabled, as electrical
energy is used to maintain the EV battery
temperature.
Winter mode enables operation of the
EV battery coolant heater. While driving
your vehicle, if the battery temperature
is low or the A/C and/or heater is turned
ON, the EV battery coolant heater will be used.
Note that the EV battery coolant heater
will not be used when the EV battery
SOC is low.
à This mode is available for the vehicles
equipped with the battery heater.
Page 50 of 548
01
1-45
driVing and operaTing inFormaTion
How to Start the Vehicle
1. Holding the smart key, sit in the driver’s seat.
2. Fasten the seat belt before starting the vehicle.
3. Make sure to engage the parking brake.
4. Turn OFF all electrical devices.
5. Make sure to depress and hold the brake pedal.
6. While depressing the brake pedal, shift to P (Park).
7. Depress and hold the brake pedal
while pressing the Start/Stop button.
8. When the “
” indicator is ON, you
can drive the vehicle. When the “
” indicator is OFF, you
cannot drive the vehicle. Start the
vehicle again.
9. Depress and hold the brake pedal and
shift to the desired position.
Information
While the charging cable is connected, the
gear cannot be shift from P (Park) to any
other gear for safety reasons.
10. Release the parking brake and slowly release the brake pedal. Check if the
vehicle slowly moves forward, then
depress the accelerator pedal.
How to Stop the Vehicle
1. Hold down the brake pedal while the
vehicle is parked.
2. While depressing the brake pedal, shift to P (Park).
3. While depressing the brake pedal, engage the parking brake.
4. While depressing the brake pedal,
press the Start/Stop button and turn
off the vehicle.
5. Check if the “
” indicator is turned
OFF on the instrument cluster. When the “
” indicator is ON and
the gear is in a position other than
P (Park), the driver can accidently
depress the accelerator pedal, causing
the vehicle to move unexpectedly.
Page 54 of 548

01
1-49
Warning and Indicator Lights
(related to electric vehicle)
Ready indicator
This indicator illuminates:
When the vehicle is ready to be driven. - ON : Normal driving is possible.
- OFF : Normal driving is not possible, or a problem has occurred.
- Blinking : Emergency driving.
When the ready indicator goes OFF
or blinks, there is a problem with the
system. In this case, have your vehicle
inspected by an authorized HYUNDAI
dealer.
Service Warning Light
This warning light illuminates:
• When the Start/Stop button is in the ON position.
- It illuminates for approximately 3 seconds and then goes off.
• When there is a problem with related
parts of the electric vehicle control
system, such as sensors, etc.
When the warning light illuminates while
driving, or does not go OFF after starting
the vehicle, have your vehicle inspected
by an authorized HYUNDAI dealer.
Power Down Warning Light
This warning light illuminates :
When the power output from the vehicle
is limited. The vehicle is in fail-safe mode.
Power from the vehicle is limited due to
one of the following reasons: - The state of charge (SOC) of the high voltage battery is very low. Typically
the Power Down Warning Light will
turn ON when the SOC is below 3%.
- The temperature of the EV drive motor or the high voltage battery is either
too high (overheating) or too low
(freezing)
- There is a problem with either the cooling system or a vehicle system
warning has occurred that may
interrupt normal driving
NOTICE
• Do not accelerate or start the vehicle
suddenly when the power down
warning light is ON.
• When the high voltage battery level
is low, the power down warning
illuminates and the power output
from the vehicle is limited. Charge
the battery immediately since your
vehicle may not drive uphill or skid
on a slope with the warning light ON.
Page 59 of 548
Foreword / Electric Vehicle System Overview
1-54
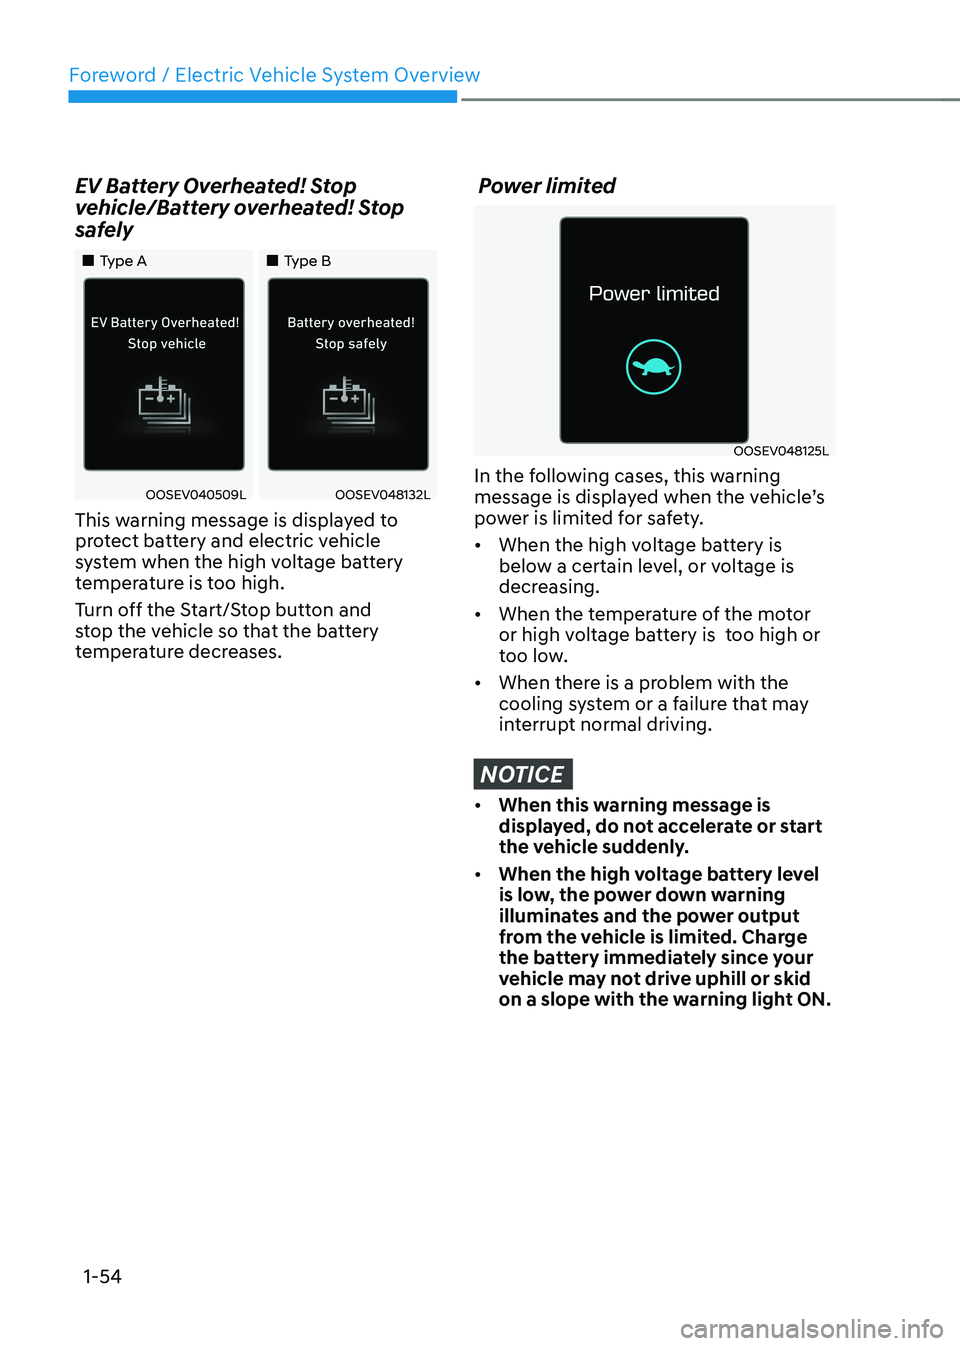
EV Battery Overheated! Stop
vehicle/Battery overheated! Stop
safely
„„Type A
„„Type B
OOSEV040509LOOSEV048132L
This warning message is displayed to
protect battery and electric vehicle
system when the high voltage battery
temperature is too high.
Turn off the Start/Stop button and
stop the vehicle so that the battery
temperature decreases.
Power limited
OOSEV048125L
In the following cases, this warning
message is displayed when the vehicle’s
power is limited for safety. • When the high voltage battery is
below a certain level, or voltage is
decreasing.
• When the temperature of the motor
or high voltage battery is too high or
too low.
• When there is a problem with the
cooling system or a failure that may
interrupt normal driving.
NOTICE
• When this warning message is
displayed, do not accelerate or start
the vehicle suddenly.
• When the high voltage battery level
is low, the power down warning
illuminates and the power output
from the vehicle is limited. Charge
the battery immediately since your
vehicle may not drive uphill or skid
on a slope with the warning light ON.
Page 62 of 548
01
1-57
Aux. Battery Saver+
The Aux. Battery Saver+ is a function that
monitors the charging status of the 12 V
auxiliary battery.
If the auxiliary battery level is low, the
main high voltage battery charges the
auxiliary battery.
Information
The Aux. Battery Saver+ function will
be ON when the vehicle is delivered. If the function is not needed, you may turn it off in the Users Settings mode on the
cluster. For more information, refer to the following page.
Mode • Cycle Mode :
When the Start/Stop button is in
the OFF position with all doors,
hood and tailgate closed, the Aux.
Battery Saver+ periodically activates
according to the auxiliary battery
status.
• Automatic Mode :
When the Start/Stop button is in
the ON position with the charging
connector plugged in, the function
activates according to the auxiliary
battery status to prevent over
discharge of the auxiliary battery.
Information
• The Aux. Battery Saver+ activates
for a maximum of 20 minutes. If the Aux Battery Saver+ function activates
for more than 10 times consecutively in automatic mode, the function will
be disabled. (Note: There may be
a problem with the 12V auxiliary
battery.) If the vehicle is driven normally and
12V battery is able to charge normally,
the Aux. Battery Saver+ function will be enabled again.
• The Aux. Battery Saver+ function
cannot prevent battery discharge if the auxiliary battery is damaged, worn out,
used as a power supply or unauthorized
electronic devices are used.
• If the Aux. Battery Saver+ function was activated, the high voltage battery level
may have decreased.
WARNING
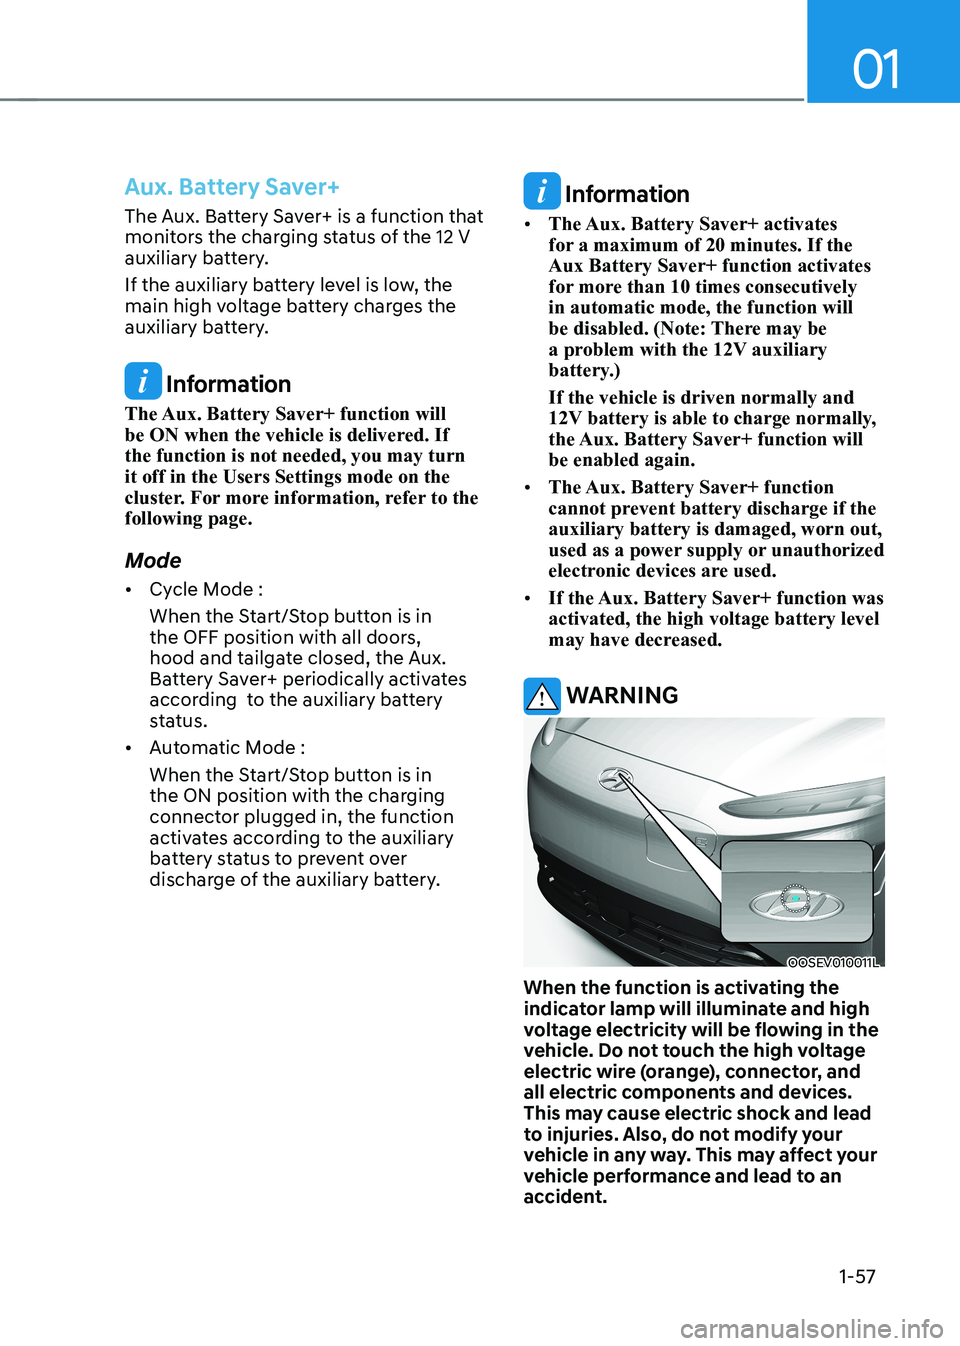
OOSEV010011L
When the function is activating the
indicator lamp will illuminate and high
voltage electricity will be flowing in the
vehicle. Do not touch the high voltage
electric wire (orange), connector, and
all electric components and devices.
This may cause electric shock and lead
to injuries. Also, do not modify your
vehicle in any way. This may affect your
vehicle performance and lead to an
accident.
Page 70 of 548
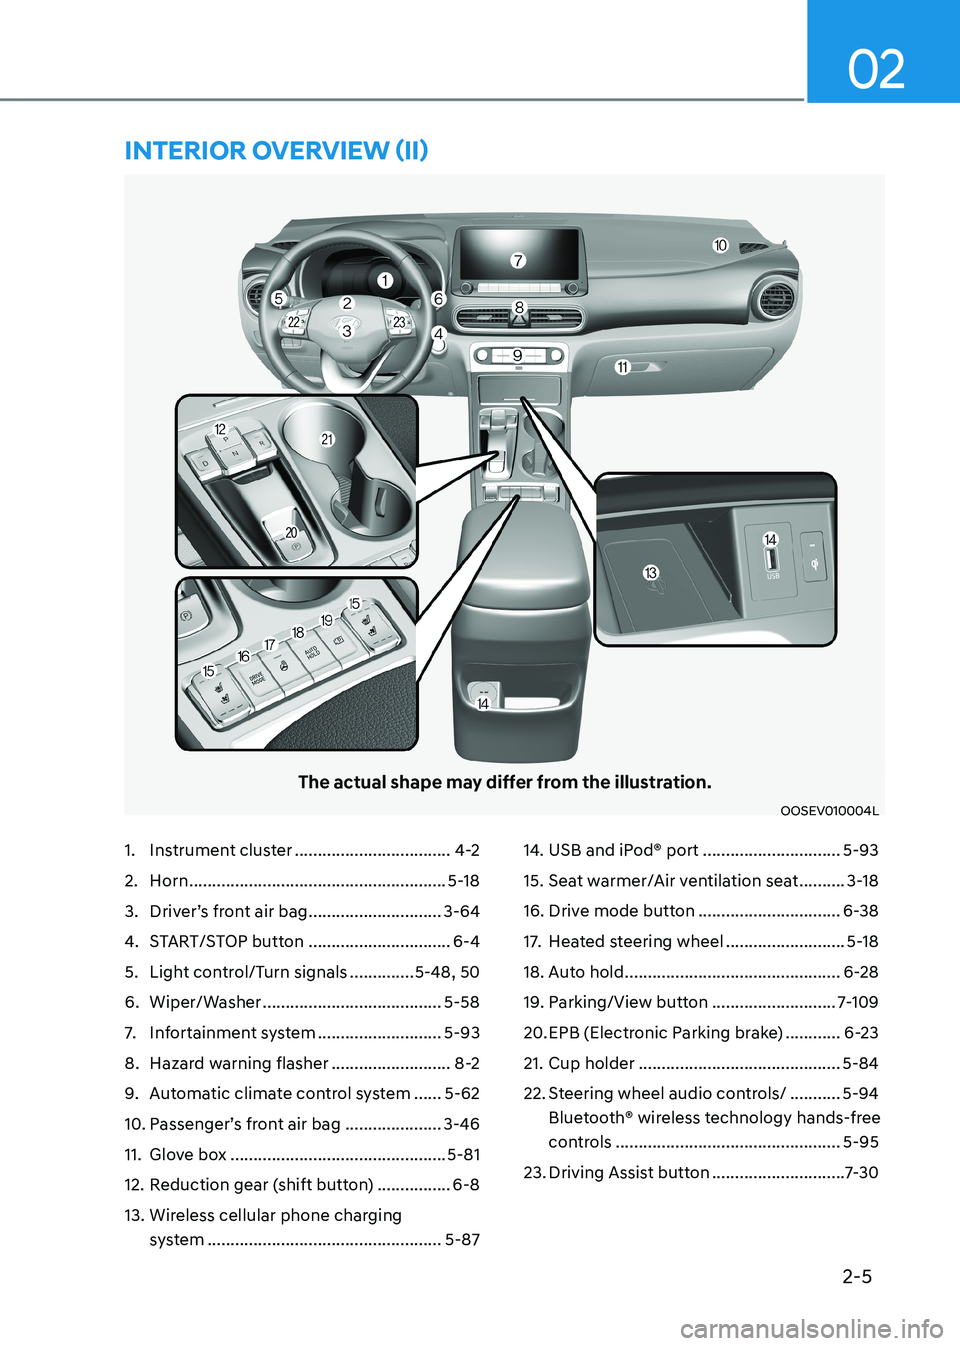
2-5
02
The actual shape may differ from the illustration.
OOSEV010004L
1. Instrument cluster ..................................4-2
2. Horn ........................................................ 5-18
3. Driver’s front air bag .............................3-64
4. START/STOP button ...............................6-4
5. Light control/Turn signals ..............5-48, 50
6. Wiper/Washer ....................................... 5-58
7. Infortainment system ...........................5-93
8. Hazard warning flasher ..........................8-2
9. Automatic climate control system ......5-62
10. Passenger’s front air bag ..................... 3-46
11. Glove box ............................................... 5-81
12. Reduction gear (shift button) ................6-8
13. Wireless cellular phone charging system ................................................... 5-8714. USB and iPod® port
..............................5-93
15. Seat warmer/Air ventilation seat ..........3-18
16. Drive mode button ...............................6-38
17. Heated steering wheel ..........................5-18
18. Auto hold ............................................... 6-28
19. Parking/View button ...........................7-109
20. EPB (Electronic Parking brake) ............6-23
21. Cup holder ............................................ 5-84
22. Steering wheel audio controls/ ...........5-94
Bluetooth® wireless technology hands-free
controls ................................................. 5-95
23. Driving Assist button .............................7-30
intErior ovErviEw (ii)
Page 97 of 548
Safety system
3-18
NOTICE
To prevent damage to the seat warmers
and seats: • Never use a solvent such as paint
thinner, benzene, alcohol or gasoline
to clean the seats.
• Do not place heavy or sharp objects
on seats equipped with seat
warmers.
• Do not change the seat cover. It may
damage the seat warmer.
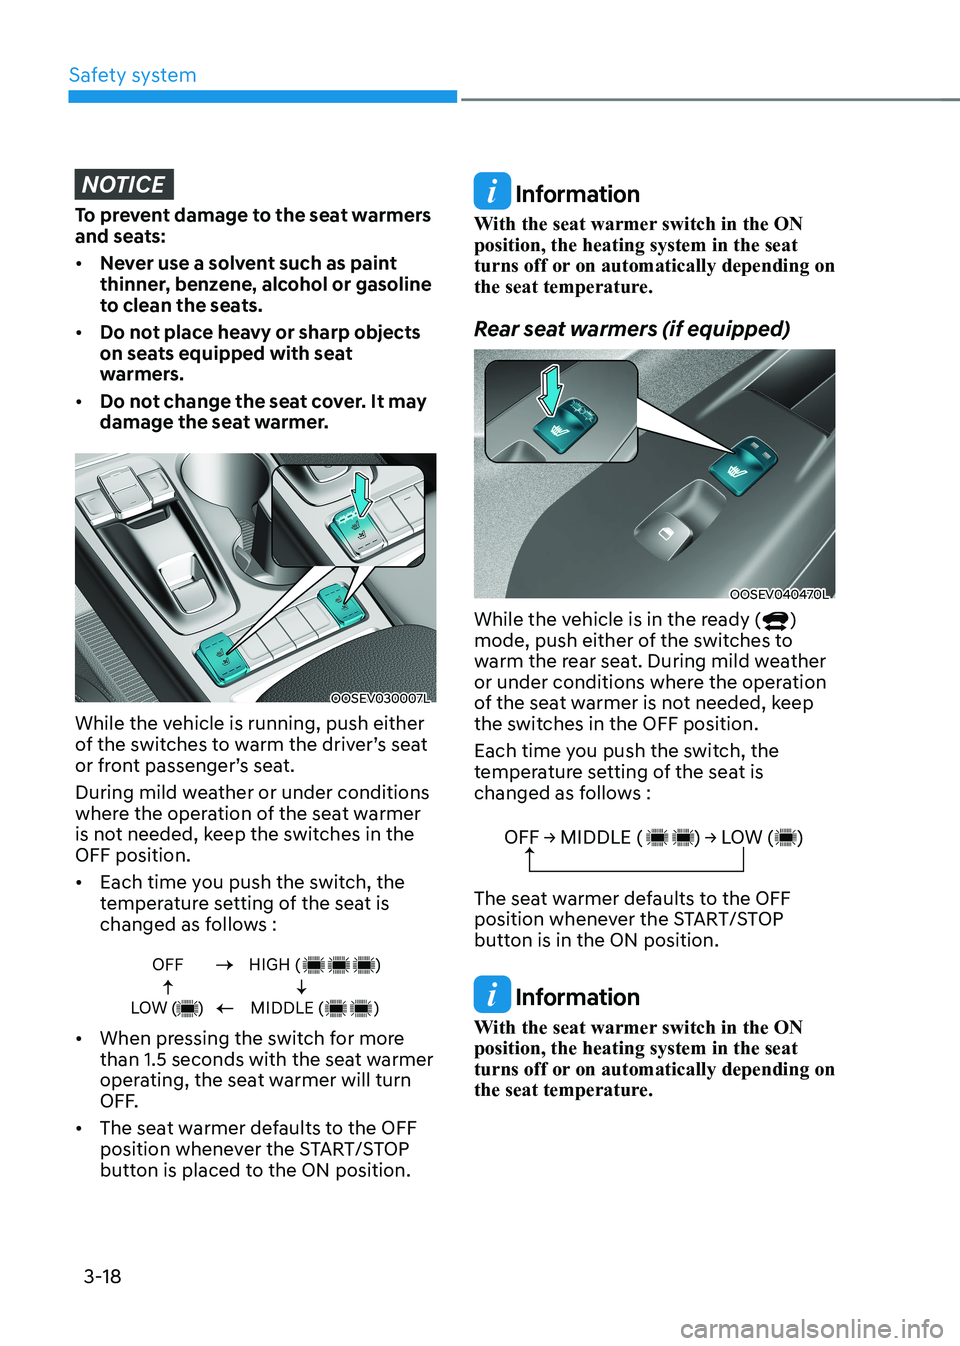
OOSEV030007L
While the vehicle is running, push either
of the switches to warm the driver’s seat
or front passenger’s seat.
During mild weather or under conditions
where the operation of the seat warmer
is not needed, keep the switches in the OFF position. • Each time you push the switch, the
temperature setting of the seat is
changed as follows :
OFF
LOW ( )HIGH ( )
MIDDLE ( )
• When pressing the switch for more
than 1.5 seconds with the seat warmer
operating, the seat warmer will turn
OFF.
• The seat warmer defaults to the OFF
position whenever the START/STOP
button is placed to the ON position.
Information
With the seat warmer switch in the ON position, the heating system in the seat
turns off or on automatically depending on
the seat temperature.
Rear seat warmers (if equipped)
OOSEV040470L
While the vehicle is in the ready (
)
mode, push either of the switches to
warm the rear seat. During mild weather
or under conditions where the operation
of the seat warmer is not needed, keep
the switches in the OFF position.
Each time you push the switch, the
temperature setting of the seat is
changed as follows :
OFF → MIDDLE ( ) → LOW ( )
The seat warmer defaults to the OFF
position whenever the START/STOP
button is in the ON position.
Information
With the seat warmer switch in the ON position, the heating system in the seat
turns off or on automatically depending on
the seat temperature.
Page 98 of 548
03
3-19
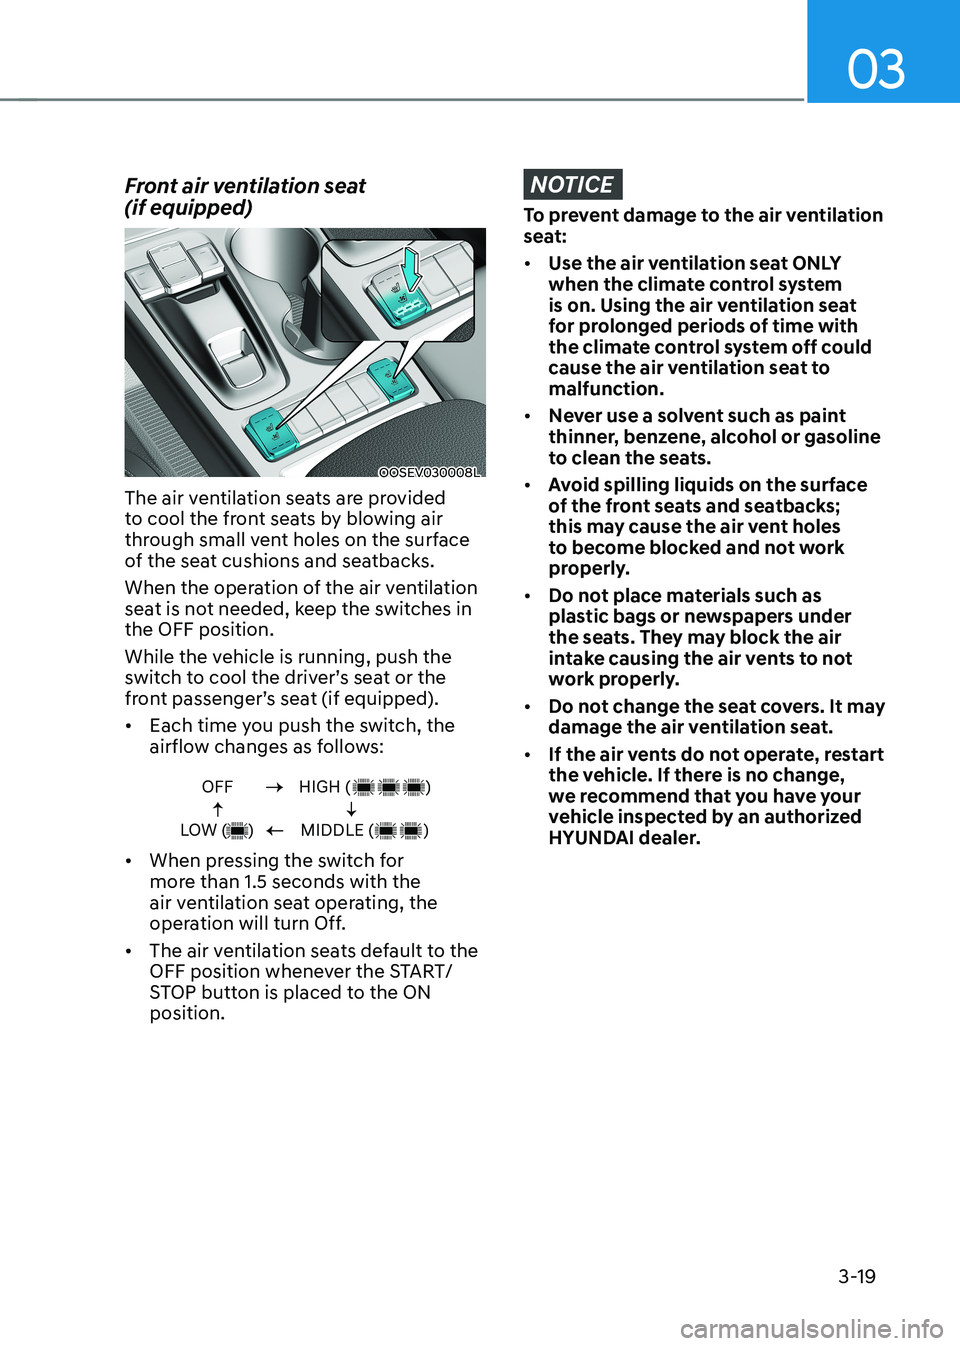
Front air ventilation seat (if equipped)
OOSEV030008L
The air ventilation seats are provided
to cool the front seats by blowing air
through small vent holes on the surface
of the seat cushions and seatbacks.
When the operation of the air ventilation
seat is not needed, keep the switches in the OFF position.
While the vehicle is running, push the
switch to cool the driver’s seat or the
front passenger’s seat (if equipped). • Each time you push the switch, the
airflow changes as follows:
OFF
LOW ( )HIGH ( )
MIDDLE ( )
• When pressing the switch for
more than 1.5 seconds with the
air ventilation seat operating, the
operation will turn Off.
• The air ventilation seats default to the
OFF position whenever the START/
STOP button is placed to the ON position.
NOTICE
To prevent damage to the air ventilation
seat: • Use the air ventilation seat ONLY
when the climate control system
is on. Using the air ventilation seat
for prolonged periods of time with
the climate control system off could
cause the air ventilation seat to malfunction.
• Never use a solvent such as paint
thinner, benzene, alcohol or gasoline
to clean the seats.
• Avoid spilling liquids on the surface
of the front seats and seatbacks;
this may cause the air vent holes
to become blocked and not work
properly.
• Do not place materials such as
plastic bags or newspapers under
the seats. They may block the air
intake causing the air vents to not
work properly.
• Do not change the seat covers. It may
damage the air ventilation seat.
• If the air vents do not operate, restart
the vehicle. If there is no change,
we recommend that you have your
vehicle inspected by an authorized
HYUNDAI dealer.