2022 HYUNDAI KONA EV instrument panel
[x] Cancel search: instrument panelPage 144 of 548
4
Instrument cluster ............................................................................................ 4-2
Instrument cluster control ........................................................................................... 4-3
Instrument panel illumination ................................................................................... 4-3
Gauges and meters ...................................................................................................... 4-3
Speedometer ............................................................................................................. 4-3
Power/Charge gauge................................................................................................. 4-3
State of Charge (SOC) gauge for high voltage battery ..........................................4-4
Outside Temperature Gauge .................................................................................... 4-4
Odometer ................................................................................................................... 4-5
Distance to empty ..................................................................................................... 4-5
Reduction gear shift indicator ................................................................................. 4-6
Regenerative braking level indicator ....................................................................... 4-6
Warning and indicator lights ....................................................................................... 4 -7
LCD display messages ..................................................................................... 4-17
LCD display ....................................................................................................... 4-27
LCD display control .................................................................................................... 4-27
View modes ................................................................................................................ 4-28
Trip computer mode ................................................................................................ 4-29
Turn By Turn (TBT) mode ......................................................................................... 4-29
Driving assist mode ................................................................................................. 4-29
Master warning group ............................................................................................ 4-30
User settings mode .................................................................................................... 4-31
Trip computer .................................................................................................. 4-39
Trip modes ................................................................................................................ 4-39
Drive Info ................................................................................................................. 4-40
After Recharging ..................................................................................................... 4-40
Accumulated info ..................................................................................................... 4-41
Energy flow .............................................................................................................. 4-41
Digital speedometer ................................................................................................ 4-41
4. Instrument cluster
Page 146 of 548

04
4-3
Instrument cluster control
Instrument panel illumination
OOSEV040056L
When the vehicle’s position lights or
headlamps are on, press the illumination
control button to adjust the brightness of
the instrument panel illumination.
When pressing the illumination control
button, the interior switch illumination
intensity is also adjusted.
WARNING
Never adjust the instrument cluster
while driving. This could result in loss
of control and lead to an accident that
may cause death, serious injury, or
vehicle damage.
OCN7040019L
• The brightness of the instrument
panel illumination is displayed.
• If the brightness reaches the
maximum or minimum level, an alarm will sound.
Gauges and meters
Speedometer
OOSEV040472L
The speedometer indicates the speed of
the vehicle and is calibrated in kilometers
per hour (km/h).
Power/Charge gauge
OOSEV040474L
The Power/Charge gauge shows the
energy consumption rate of the vehicle
and the charge/discharge status of the
regenerative brakes. • POWER :
It shows the energy consumption rate
of the vehicle when driving uphill or
accelerating. The more electric energy is
used, the higher the gauge level. • CHARGE :
It shows the charging status of the
battery when it is being charged by the
regenerative brakes (decelerating or
driving on a downhill road). The more
electric energy is charged, the lower the
gauge level.
Page 201 of 548
05
5-17
Tilt steering/Telescopic steering
WARNING
Never adjust the steering wheel while
driving. You may lose steering control
and cause severe personal injury, death
or accidents.
Information
After adjustment, sometimes the lock-
release lever may not lock the steering wheel.
It is not a malfunction. This occurs when
two gears are not engaged correctly. In this case, adjust the steering wheel again and then lock the steering wheel.OOS047006
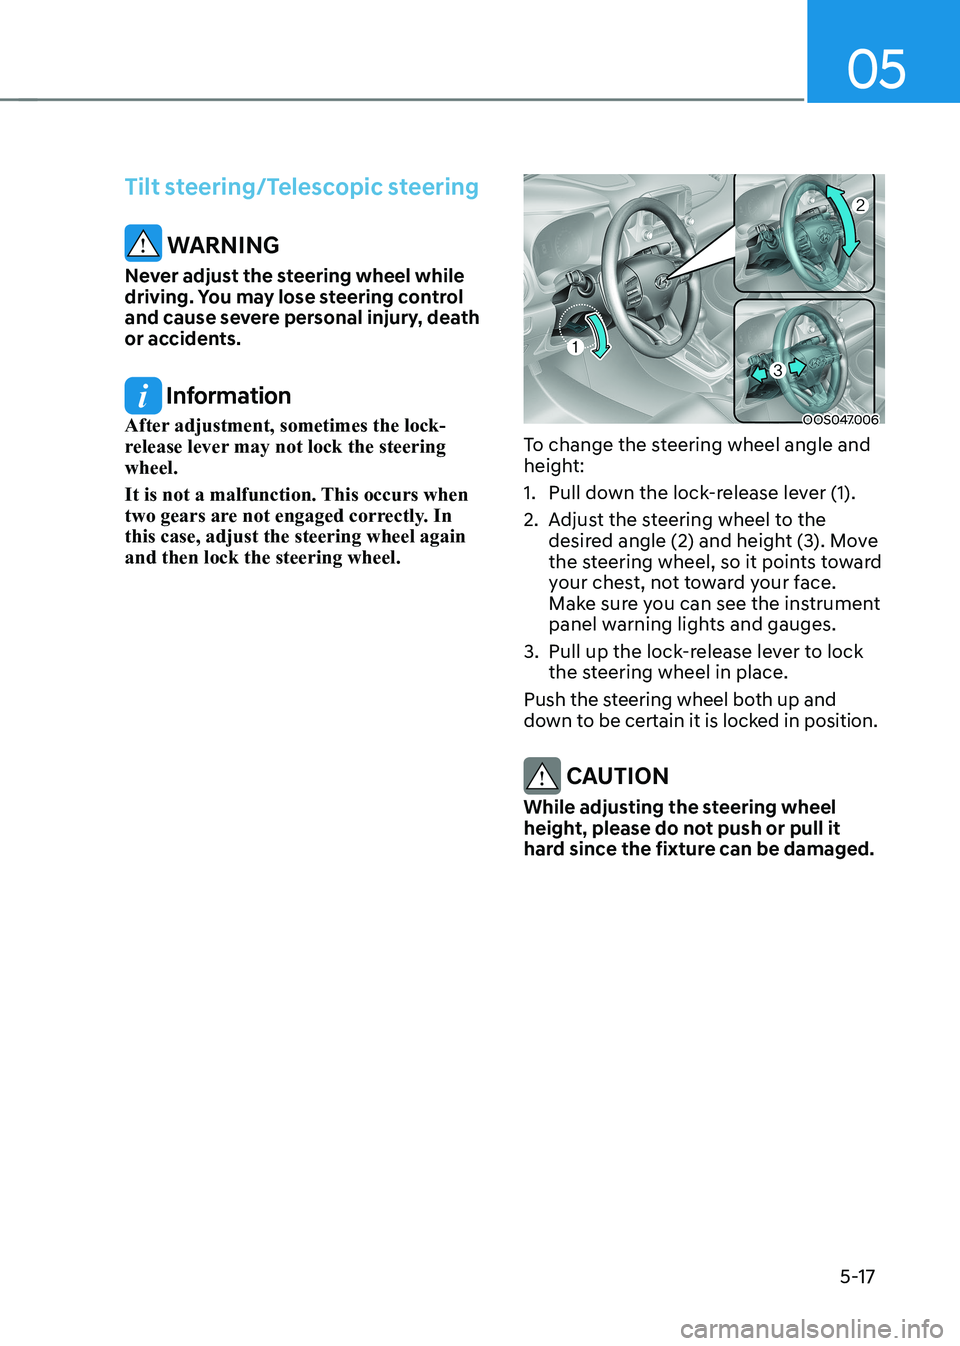
To change the steering wheel angle and
height:
1. Pull down the lock-release lever (1).
2. Adjust the steering wheel to the desired angle (2) and height (3). Move
the steering wheel, so it points toward
your chest, not toward your face.
Make sure you can see the instrument
panel warning lights and gauges.
3. Pull up the lock-release lever to lock the steering wheel in place.
Push the steering wheel both up and
down to be certain it is locked in position.
CAUTION
While adjusting the steering wheel
height, please do not push or pull it
hard since the fixture can be damaged.
Page 232 of 548
Convenient features
5-48
Exterior lights
Lighting control
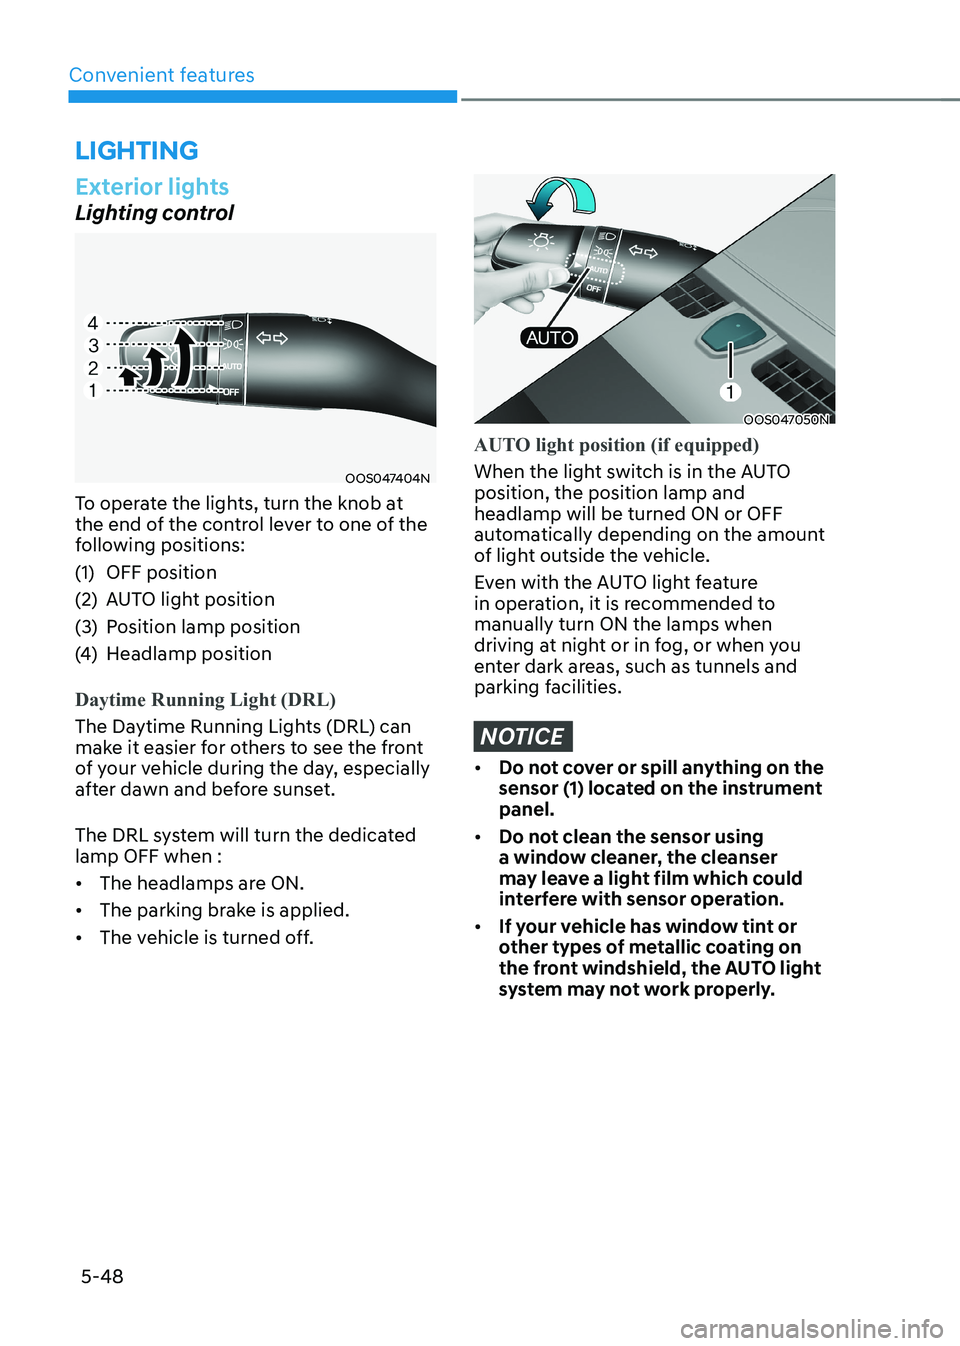
OOS047404N
To operate the lights, turn the knob at
the end of the control lever to one of the
following positions:
(1) OFF position
(2) AUTO light position
(3) Position lamp position
(4) Headlamp position
Daytime Running Light (DRL)
The Daytime Running Lights (DRL) can
make it easier for others to see the front
of your vehicle during the day, especially
after dawn and before sunset.
The DRL system will turn the dedicated lamp OFF when : • The headlamps are ON.
• The parking brake is applied.
• The vehicle is turned off.
OOS047050N
AUTO light position (if equipped)
When the light switch is in the AUTO position, the position lamp and headlamp will be turned ON or OFF
automatically depending on the amount
of light outside the vehicle.
Even with the AUTO light feature
in operation, it is recommended to manually turn ON the lamps when
driving at night or in fog, or when you
enter dark areas, such as tunnels and
parking facilities.
NOTICE
• Do not cover or spill anything on the
sensor (1) located on the instrument panel.
• Do not clean the sensor using
a window cleaner, the cleanser
may leave a light film which could
interfere with sensor operation.
• If your vehicle has window tint or
other types of metallic coating on
the front windshield, the AUTO light
system may not work properly.
lighting
Page 233 of 548
05
5-49
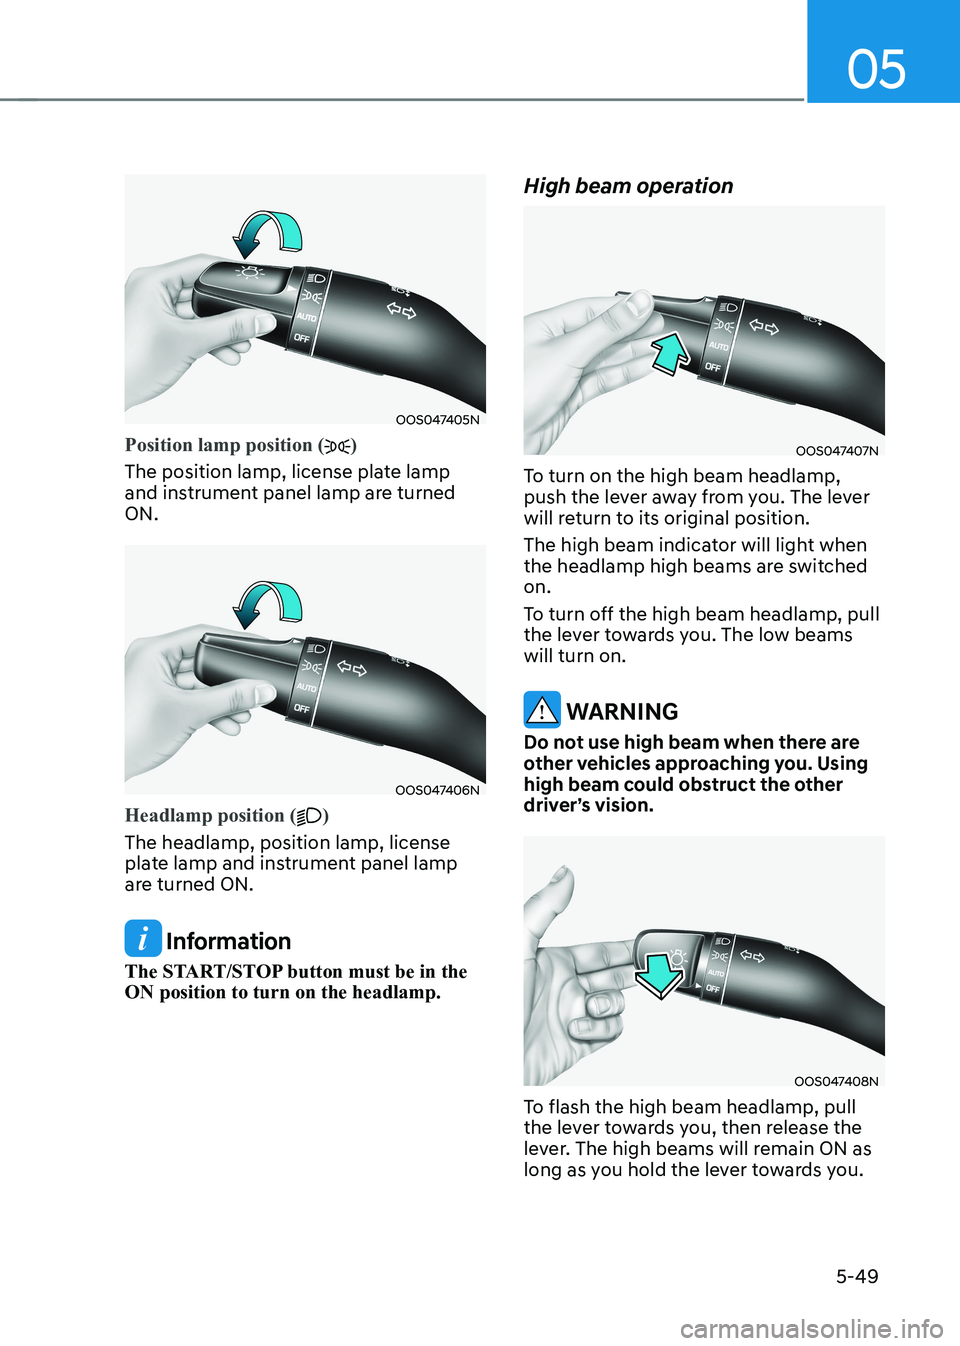
OOS047405N
Position lamp position ()
The position lamp, license plate lamp
and instrument panel lamp are turned ON.
OOS047406N
Headlamp position ()
The headlamp, position lamp, license
plate lamp and instrument panel lamp
are turned ON.
Information
The START/STOP button must be in the ON position to turn on the headlamp. High beam operation
OOS047407N
To turn on the high beam headlamp,
push the lever away from you. The lever
will return to its original position.
The high beam indicator will light when
the headlamp high beams are switched on.
To turn off the high beam headlamp, pull
the lever towards you. The low beams will turn on.
WARNING
Do not use high beam when there are
other vehicles approaching you. Using
high beam could obstruct the other
driver’s vision.
OOS047408N
To flash the high beam headlamp, pull
the lever towards you, then release the
lever. The high beams will remain ON as
long as you hold the lever towards you.
Page 251 of 548
05
5-67
OOSEV040306CZ
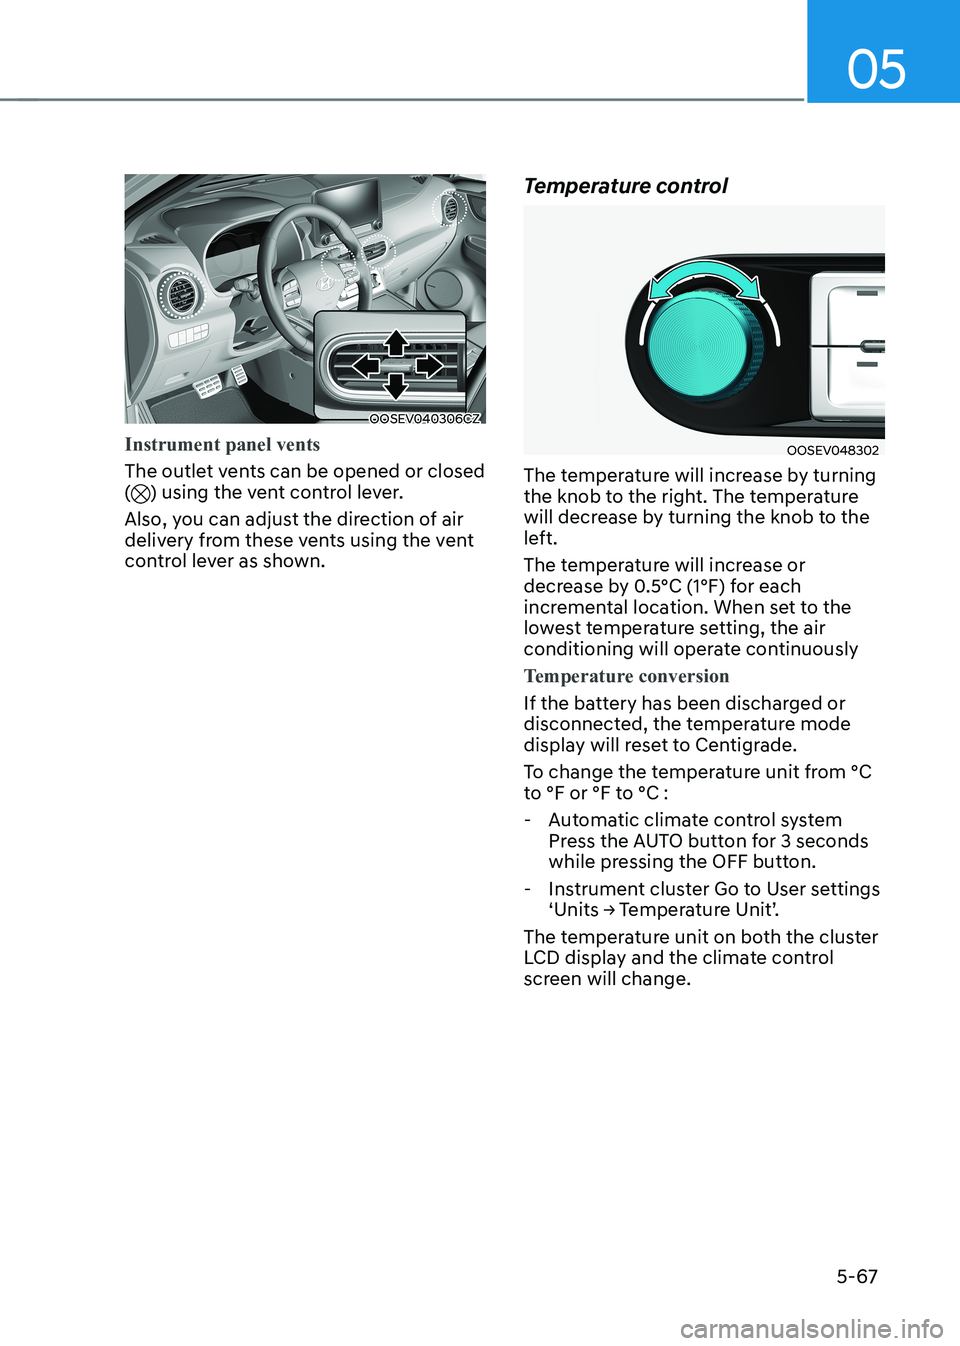
Instrument panel vents
The outlet vents can be opened or closed () using the vent control lever.
Also, you can adjust the direction of air
delivery from these vents using the vent
control lever as shown. Temperature control
OOSEV048302
The temperature will increase by turning
the knob to the right. The temperature
will decrease by turning the knob to the
left.
The temperature will increase or
decrease by 0.5°C (1°F) for each
incremental location. When set to the
lowest temperature setting, the air
conditioning will operate continuously
Temperature conversion
If the battery has been discharged or
disconnected, the temperature mode
display will reset to Centigrade.
To change the temperature unit from °C
to °F or °F to °C :
- Automatic climate control system Press the AUTO button for 3 seconds
while pressing the OFF button.
- Instrument cluster Go to User settings ‘Units → Temperature Unit’.
The temperature unit on both the cluster
LCD display and the climate control
screen will change.
Page 263 of 548
05
5-79
Information
• When the air conditioning is turned
on by Auto defogging system, if you
try to turn off the air conditioning,
the indicator will blink 3 times and
the air conditioning will not be
turned off.
• To maintain the effectiveness and
efficiency of the Auto Defogging
System, do not select Recirculation
mode while the system is operating.
• When the Auto Defogging System is
operating, the fan speed adjustment
knob, the temperature adjustment
knob, and the air intake control
button are all disabled.
NOTICE
Do not remove the sensor cover located
on the top of the windshield glass.
Damage to system parts could occur
and may not be covered by your vehicle
warranty.
Defroster
NOTICE
To prevent damage to the conductors
bonded to the inside surface of the rear
window, never use sharp instruments or
window cleaners containing abrasives
to clean the window.
Information
If you want to defrost and defog the
front windshield, refer to “Windshield
Defrosting and Defogging” in this chapter.
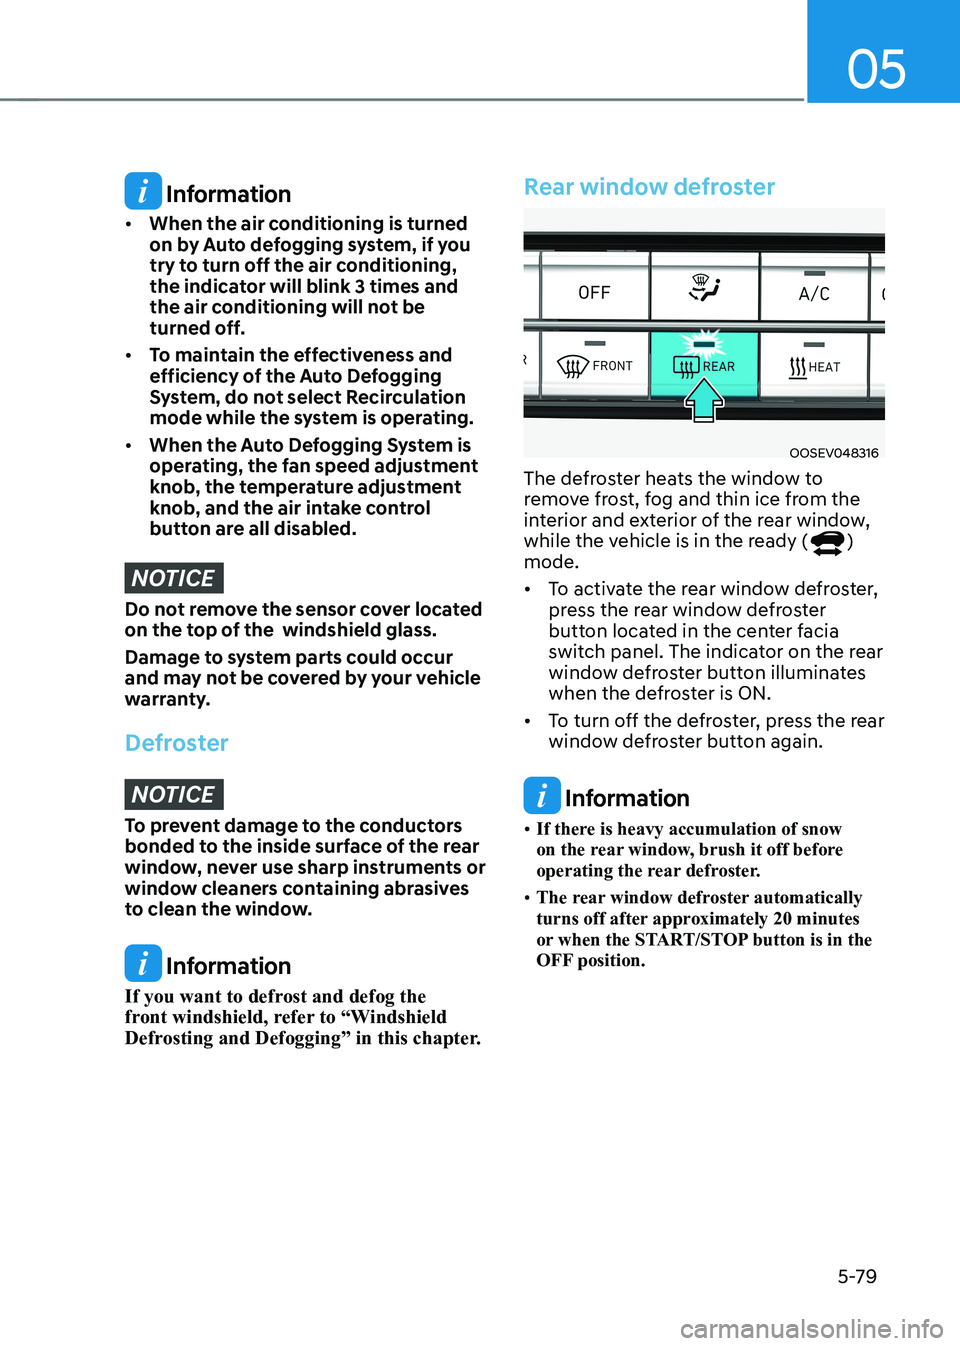
Rear window defroster
OOSEV048316
The defroster heats the window to
remove frost, fog and thin ice from the
interior and exterior of the rear window,
while the vehicle is in the ready (
)
mode. • To activate the rear window defroster,
press the rear window defroster
button located in the center facia
switch panel. The indicator on the rear
window defroster button illuminates
when the defroster is ON.
• To turn off the defroster, press the rear
window defroster button again.
Information
• If there is heavy accumulation of snow
on the rear window, brush it off before
operating the rear defroster.
• The rear window defroster automatically
turns off after approximately 20 minutes
or when the START/STOP button is in the
OFF position.
Page 283 of 548
06
6-3
Before entering the vehicle
• Be sure all windows, outside mirror(s),
and outside lights are clean and
unobstructed.
• Remove frost, snow, or ice.
• Visually check the tires for uneven
wear and damage.
• Check under the vehicle for any sign
of leaks.
• Be sure there are no obstacles behind
you if you intend to back up.
Before starting
• Make sure the hood, the tailgate, and
the doors are securely closed and
locked.
• Adjust the position of the seat and
steering wheel.
• Adjust the inside and outside rearview
mirrors.
• Verify all the lights work.
• Fasten your seat belt. Check that all
passengers have fastened their seat belt.
• Check the gauges and indicators
in the instrument panel and the
messages on the instrument display
when the START/STOP button is in the ON position.
• Check that any items you are carrying
are stored properly or fastened down
securely.
WARNING
To reduce the risk of SERIOUS INJURY or
DEATH, take the following precautions: • ALWAYS wear your seat belt. All
passengers must be properly belted
whenever the vehicle is moving.
For more information, refer to “Seat
Belts” in chapter 3.
• Always drive defensively. Assume
other drivers or pedestrians may be
careless and make mistakes.
• Stay focused on the task of driving.
Driver distraction can cause
accidents.
• Leave plenty of space between you
and the vehicle in front of you.
WARNING
NEVER drink or take drugs and drive. Drinking or taking drugs and driving
is dangerous and may result in an
accident and SERIOUS INJURY or
DEATH. Drunk driving is the number one
contributor to the highway death
toll each year. Even a small amount
of alcohol will affect your reflexes,
perceptions and judgment. Just
one drink can reduce your ability to
respond to changing conditions and
emergencies and your reaction time
gets worse with each additional drink.
Driving while under the influence
of drugs is as dangerous or more
dangerous than driving under the
influence of alcohol.
You are much more likely to have a
serious accident if you drink or take
drugs and drive. If you are drinking or
taking drugs, don’t drive. Do not ride
with a driver who has been drinking
or taking drugs. Choose a designated
driver or call a taxi.
BEFORE DRIVING