2022 HYUNDAI I30 ESP
[x] Cancel search: ESPPage 494 of 659
6-24
What to do in an emergency
It is possible that some tires, espe-
cially with larger punctures or dam-
age to the sidewall, cannot be sealed
completely.
Air pressure loss in the tire may
adversely affect tire performance.
For this reason, you should avoid
abrupt steering or other driving
maneuvers, especially if the vehicle
is heavily loaded or if a trailer is in
use.
The Tire Mobility Kit is not designed
or intended as a permanent tire
repair method and is to be used for
one tire only. This instruction shows
you step by step how to temporarily
seal the puncture simply and reliably.
Read the section "Notes on the safe
use of the Tire Mobility Kit".
Notes on the safe use of the Tire Mobility Kit
Park your car at the side of the
road so that you can work with the
Tire Mobility Kit away from moving
traffic.
To be sure your vehicle will not move, even when you're on fairly
level ground, always set your park-
ing brake.
Only use the Tire Mobility Kit for sealing/inflation passenger car
tires. Only punctured areas located
within the tread region of the tire
can be sealed using the tire mobil-
ity kit.
Do not use on motorcycles, bicy- cles or any other type of tires.
When the tire and wheel are dam- aged, do not use Tire Mobility Kit
for your safety.
Use of the Tire Mobility Kit may not be effective for tire damage larger
than approximately 6 mm (0.24 in).
If the tire cannot be made roadwor-
thy with the Tire Mobility Kit, we
recommend that you contact an
authorized HYUNDAI dealer. Do not use the Tire Mobility Kit if a
tire is severely damaged by driving
run flat or with insufficient air pres-
sure.
Do not remove any foreign objects such as nails or screws that have
penetrated the tire.
Provided the car is outdoors, leave the engine running. Otherwise
operating the compressor may
eventually drain the car battery.
Never leave the Tire Mobility Kit unattended while it is being used.
Do not leave the compressor run- ning for more than 10 min. at a time
or it may overheat.
Do not use the Tire Mobility Kit if the ambient temperature is below
-30°C (-22°F).
Do not use the TMK if a tire is
severely damaged by driving run
flat or with insufficient air pres-
sure.
Only punctured areas located
within the tread region of the tire
can be sealed using the TMK.
WARNING
Page 501 of 659
6-31
What to do in an emergency
Introduction
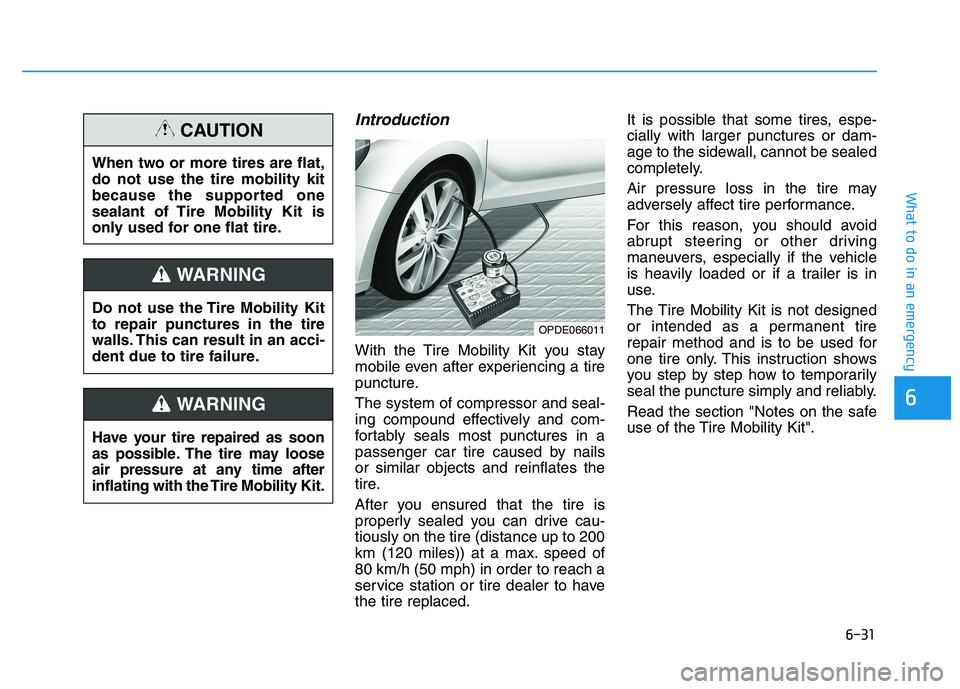
With the Tire Mobility Kit you stay
mobile even after experiencing a tire
puncture.
The system of compressor and seal-
ing compound effectively and com-
fortably seals most punctures in a
passenger car tire caused by nails
or similar objects and reinflates the
tire.
After you ensured that the tire is
properly sealed you can drive cau-
tiously on the tire (distance up to 200
km (120 miles)) at a max. speed of
80 km/h (50 mph) in order to reach a
service station or tire dealer to have
the tire replaced.It is possible that some tires, espe-
cially with larger punctures or dam-
age to the sidewall, cannot be sealed
completely.
Air pressure loss in the tire may
adversely affect tire performance.
For this reason, you should avoid
abrupt steering or other driving
maneuvers, especially if the vehicle
is heavily loaded or if a trailer is in
use.
The Tire Mobility Kit is not designed
or intended as a permanent tire
repair method and is to be used for
one tire only. This instruction shows
you step by step how to temporarily
seal the puncture simply and reliably.
Read the section "Notes on the safe
use of the Tire Mobility Kit".
6
OPDE066011
Do not use the Tire Mobility Kit
to repair punctures in the tire
walls. This can result in an acci-
dent due to tire failure.
WARNING
Have your tire repaired as soon
as possible. The tire may loose
air pressure at any time after
inflating with the Tire Mobility Kit.
WARNING
When two or more tires are flat,
do not use the tire mobility kit
because the supported one
sealant of Tire Mobility Kit is
only used for one flat tire.
CAUTION
Page 513 of 659

6-43
What to do in an emergency
6
Your vehicle is equipped with emer-
gency commodities to help you
respond to emergency situation.
Fire extinguisher
If there is small fire and you know how
to use the fire extinguisher, follow
these steps carefully.
1. Pull out the safety pin at the top ofthe extinguisher that keeps the han-
dle from being accidentally pressed.
2. Aim the nozzle towards the base of the fire.
3. Stand approximately 2.5 m (8 ft) away from the fire and squeeze
the handle to discharge the extin-
guisher. If you release the handle,
the discharge will stop.
4. Sweep the nozzle back and forth at the base of the fire. After the fire
appears to be out, watch carefully
since it may re-ignite.
First aid kit
Supplies for use in giving first aid
such as scissors, bandage and
adhesive tape, etc. are provided.
Triangle reflector
Place the triangle reflector on the
road to warn oncoming vehicles dur-
ing emergencies, such as when the
vehicle is parked by the roadside due
to problems.
Tire pressure gauge
(if equipped)
Tires normally lose some air in day-
to-day use, and you may have to add
a air periodically and usually it is not
a sign of a leaking tire, but of normal
wear. Always check tire pressure
when the tires are cold because tire
pressure increases with temperature. To check the tire pressure, take the
following steps:
1. Unscrew the inflation valve cap
that is located on the rim of the
tire.
2. Press and hold the gauge against the tire valve. Some air will leak as
you begin and more will leak if you
don't press the gauge in firmly.
3. A firm non-leaking push will acti- vate the gauge.
4. Read the tire pressure on the gauge to see whether the tire pressure is
low or high.
5. Adjust the tire pressure to the specified pressure. Refer to “Tires
and Wheels” in chapter 8.
6. Reinstall the inflation valve cap.
E
E M
M E
E R
R G
G E
E N
N C
C Y
Y
C
C O
O M
M M
M O
O D
D I
I T
T Y
Y
(
( I
I F
F
E
E Q
Q U
U I
I P
P P
P E
E D
D )
)
Page 514 of 659
7
Maintenance
7
Maintenance
Engine compartment .............................................7-3
Maintenance services ...........................................7-6
Owner's responsibility ......................................................7-6
Owner maintenance precautions ..................................7-6
Owner maintenance ...............................................7-7
Owner maintenance schedule ........................................7-8
Scheduled maintenance services ......................7-10
Normal Maintenance Schedule
(Gasoline Engine, for Europe)......................................7-11
Maintenance Under Severe Usage and
Low Mileage Conditions
(Gasoline Engine, for Europe)......................................7-14
Normal Maintenance Schedule
(Gasoline Engine, except Europe) ...............................7-16
Maintenance Under Severe Usage and
Low Mileage Conditions
(Gasoline Engine, except Europe) ...............................7-20
Normal Maintenance Schedule
(Diesel Engine, for Europe) ..........................................7-22
Maintenance Under Severe Usage and
Low Mileage Conditions
(Diesel Engine, for Europe) ..........................................7-25
Normal Maintenance Schedule
(Diesel Engine, except Europe)....................................7-27
Maintenance Under Severe Usage and
Low Mileage Conditions
(Diesel Engine, except Europe)....................................7-30
Explanation of scheduled maintenance items .7-32
Engine oil ..............................................................7-35
Checking the engine oil level .......................................7-35
Checking the engine oil and filter ..............................7-36
Engine coolant......................................................7-37
Checking the engine coolant level..............................7-37
Changing the engine coolant .......................................7-39
Brake/clutch fluid ................................................7-40
Checking the brake/clutch fluid level ........................7-40
Washer fluid .........................................................7-41
Checking the washer fluid level ..................................7-41
Parking brake .......................................................7-41
Checking the parking brake .........................................7-41
Fuel Filter (For Diesel)........................................7-42
Draining water from fuel filter ....................................7-42
Fuel filter cartridge replacement ................................7-42
Air cleaner ............................................................7-42
Filter replacement ...........................................................7-42
Climate control air filter .....................................7-44
Filter inspection ...............................................................7-44
Filter replacement ...........................................................7-44
Wiper blades .........................................................7-45
Blade inspection ..............................................................7-45
Blade replacement ..........................................................7-46
7
Page 519 of 659
7-6
Maintenance
M
M A
A I
I N
N T
T E
E N
N A
A N
N C
C E
E
S
S E
E R
R V
V I
I C
C E
E S
S
You should exercise the utmost care
to prevent damage to your vehicle
and injury to yourself whenever per-
forming any maintenance or inspec-
tion procedures.
We recommend you have your vehi-
cle maintained and repaired by an
authorized HYUNDAI dealer. An
authorized HYUNDAI dealer meets
HYUNDAI’s high service quality stan-
dards and receives technical support
from HYUNDAI in order to provide
you with a high level of service satis-
faction.
Owner’s responsibility
Maintenance service and record reten-
tion are the owner’s responsibility.
You should retain documents that show
proper maintenance has been per-
formed on your vehicle in accordance
with the scheduled maintenance serv-
ice charts shown on the following
pages. You need this information to
establish your compliance with the
servicing and maintenance require-
ments of your vehicle warranties. Detailed warranty information is pro-
vided in your Service Passport.
Repairs and adjustments required as
a result of improper maintenance or
a lack of required maintenance are
not covered.
Owner maintenance precautions
Inadequate, incomplete or insufficient
servicing may result in operational
problems with your vehicle that could
lead to vehicle damage, an accident,
or personal injury. This chapter pro-
vides instructions only for the mainte-
nance items that are easy to perform.
Several procedures can be done only
by an authorized HYUNDAI dealer
with special tools.
Your vehicle should not be modified in
any way. Such modifications may
adversely affect the performance,
safety or durability of your vehicle and
may, in addition, violate conditions of
the limited warranties covering the
vehicle.
Improper owner maintenance dur-
ing the warranty period may affect
warranty coverage. For details, read
the separate Service Passport pro-
vided with the vehicle. If you're
unsure about any servicing or main-
tenance procedure, we recommend
that the system be serviced by an
authorized HYUNDAI dealer.
NOTICE
Page 572 of 659
7-59
7
Maintenance
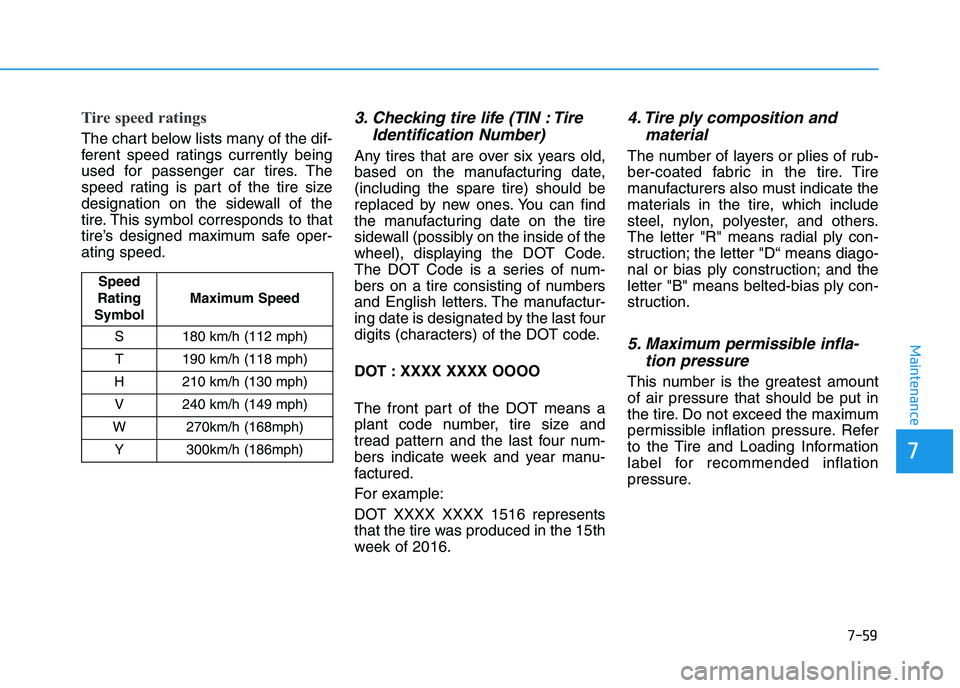
Tire speed ratings
The chart below lists many of the dif-
ferent speed ratings currently being
used for passenger car tires. The
speed rating is part of the tire size
designation on the sidewall of the
tire. This symbol corresponds to that
tire’s designed maximum safe oper-
ating speed.
3. Checking tire life (TIN : TireIdentification Number)
Any tires that are over six years old,
based on the manufacturing date,
(including the spare tire) should be
replaced by new ones. You can find
the manufacturing date on the tire
sidewall (possibly on the inside of the
wheel), displaying the DOT Code.
The DOT Code is a series of num-
bers on a tire consisting of numbers
and English letters. The manufactur-
ing date is designated by the last four
digits (characters) of the DOT code.
DOT : XXXX XXXX OOOO
The front part of the DOT means a
plant code number, tire size and
tread pattern and the last four num-
bers indicate week and year manu-
factured.
For example:
DOT XXXX XXXX 1516 represents
that the tire was produced in the 15th
week of 2016.
4. Tire ply composition andmaterial
The number of layers or plies of rub-
ber-coated fabric in the tire. Tire
manufacturers also must indicate the
materials in the tire, which include
steel, nylon, polyester, and others.
The letter "R" means radial ply con-
struction; the letter "D“ means diago-
nal or bias ply construction; and the
letter "B" means belted-bias ply con-
struction.
5. Maximum permissible infla-tion pressure
This number is the greatest amount
of air pressure that should be put in
the tire. Do not exceed the maximum
permissible inflation pressure. Refer
to the Tire and Loading Information
label for recommended inflation
pressure.
Speed
Rating
Symbol Maximum Speed
S 180 km/h (112 mph) T 190 km/h (118 mph)
H 210 km/h (130 mph) V 240 km/h (149 mph)
W 270km/h (168mph) Y 300km/h (186mph)
Page 573 of 659

7-60
Maintenance
6. Maximum load rating
This number indicates the maximum
load in kilograms and pounds that
can be carried by the tire. When
replacing the tires on the vehicle,
always use a tire that has the same
load rating as the factory installed
tire.
7. Uniform tire quality grading
Quality grades can be found where
applicable on the tire sidewall
between tread shoulder and maxi-
mum section width.
For example:
TREAD wear 200
TRACTION AA
TEMPERATURE A
Tread wear
The tread wear grade is a compara-
tive rating based on the wear rate of
the tire when tested under controlled
conditions on a specified govern-
ment test course. For example, a tire
graded 150 would wear one-and-a-
half times (1½) as well on the gov-
ernment course as a tire graded 100.
The relative performance of tires
depends upon the actual conditions
of their use, however, and may
depart significantly from the norm
due to variations in driving habits,
service practices and differences in
road characteristics and climate.
These grades are molded on the
sidewalls of passenger vehicle tires.
The tires available as standard or
optional equipment on your vehicle
may vary with respect to grade.
Traction - AA, A, B & C
The traction grades, from highest to
lowest, are AA, A, B and C. Those
grades represent the tire’s ability to
stop on wet pavement as measured
under controlled conditions on spec-
ified government test surfaces of
asphalt and concrete. A tire marked
C may have poor traction perform-
ance.The traction grade assigned to
this tire is based on straight-
ahead braking traction tests,
and does not include accelera-
tion, cornering, hydroplaning,
or peak traction characteristics.
WARNING
Page 588 of 659

7-75
7
Maintenance
Engine compartment fuse panel
Fuse No.Fuse NameSymbolFuse RatingCircuit Protected
F23COOLINGFAN 2240ARLY.9, RLY.2 (Gasoline)
F24B+1140AIGPM (Leak Current Autocut Device, Fuse : F21, F24, F27, F33)
F25DCT 1DCT140ATCM
F26DCT 2DCT240ATCM
F27BURGLAR
ALARM HORN10AICM Relay Box (Burglar Alarm Horn Relay)
F29ABS 1140AABS Control Module, ESP Control Module, Multipurpose Check Connector
F30ABS 2230AABS Control Module, ESP Control Module, Multipurpose Check Connector
F33POWER OUT- LET 1POWER
OUTLET140ARLY.14
F34BACK UP
LAMPB/UP
LAMP10ABack-Up Lamp Switch