2022 HYUNDAI GENESIS GV70 drive
[x] Cancel search: drivePage 544 of 647

08
8-11
If you cannot reach a service station or if the tire cannot hold the newly added air, replace the low pressure tire with the spare tire.
The Low Tire Pressure LCD position indicator will remain on and the TPMS Malfunction Indicator may blink for one minute and then remain illuminated until you have the low pressure tire repaired and replaced on the vehicle.
CAUTION
In winter or cold weather, the Low Tire Pressure Telltale may be illuminated if the tire pressure was adjusted to the recommended tire inflation pressure in warm weather. It does not mean your TPMS is malfunctioning because the decreased temperature leads to a proportional lowering of tire pressure.
When you drive your vehicle from a warm area to a cold area or from a cold area to a warm area, or the outside temperature is greatly higher or lower, you should check the tire inflation pressure and adjust the tires to the recommended tire inflation pressure.
WARNING
Low pressure damage
Significantly low tire pressure makes the vehicle unstable and can contribute to loss of vehicle control and increased braking distances.
Continued driving on low pressure tires can cause the tires to overheat and fail.
TPMS (Tire Pressure
Monitoring System)
Malfunction Indicator
The TPMS Malfunction Indicator will illuminate after it blinks for approximately one minute when there is a problem with the Tire Pressure Monitoring System.
Have the system checked by an authorized retailer of Genesis Branded products as soon as possible.
NOTICE
If there is a malfunction with the TPMS, the Low Tire Pressure Position Telltale will not be displayed even though the vehicle has an under-inflated tire.
NOTICE
The TPMS Malfunction Indicator may illuminate after blinking for one minute if the vehicle is near electric power supply cables or radio transmitters such as police stations, government and public offices, broadcasting stations, military installations, airports, transmitting towers, etc.
Additionally, the TPMS Malfunction Indicator may illuminate if snow chains are used or electronic devices such as computers, chargers, remote starters, navigation, etc. This may interfere with normal operation of the TPMS.
Page 545 of 647

Emergency Situations
8-12
Changing a Tire with TPMS
If you have a flat tire, the Low Tire Pressure and Position telltales will come on. Have the flat tire repaired by an authorized retailer of Genesis Branded products as soon as possible or replace the flat tire with the spare tire.
NOTICE
It is recommended that you do not use a puncture-repairing agent not approved by an authorized retailer of Genesis Branded products to repair and/or inflate a low pressure tire. Tire sealant not approved by an authorized retailer of Genesis Branded products may damage the tire pressure sensor.
The spare tire does not come with a tire pressure monitoring sensor. When the low pressure tire or the flat tire is replaced with the spare tire, the Low Tire Pressure LCD position indicator will remain on. Also, the TPMS Malfunction Indicator will illuminate after blinking for one minute if the vehicle is driven at speed above 15.5 mph (25 km/h) for approximately 20 minutes.
Once the original wheel equipped with a tire pressure monitoring sensor is reinflated to the recommended pressure and reinstalled on the vehicle, the Low Tire Pressure Telltale and TPMS Malfunction Indicator will go off within a few minutes of driving.
If the indicators do not extinguish after a few minutes, please visit an authorized retailer of Genesis Branded products.
Each wheel is equipped with a tire pressure sensor mounted inside the tire behind the valve stem (except for the spare tire). You must use TPMS specific wheels. It is recommended that you always have your tires serviced by an authorized retailer of Genesis Branded products.
You may not be able to identify a tire with low pressure by simply looking at it. Always use a good quality tire pressure gauge to measure. Please note that a tire that is hot (from being driven) will have a higher pressure measurement than a tire that is cold.
A cold tire means the vehicle has been sitting for 3 hours and driven for less than 1 mile (1.6 km) in that 3 hour period.
Allow the tire to cool before measuring the inflation pressure. Always be sure the tire is cold before inflating to the recommended pressure.
WARNING
• The TPMS cannot alert you to severe and sudden tire damage caused by external factors such as nails or road debris.
• If you feel any vehicle instability, immediately take your foot off the accelerator, apply the brakes gradually with light force, and slowly move to a safe position off the road.
Page 546 of 647

08
8-13
WARNING
Changing a tire can be dangerous. Follow the instructions in this section when changing a tire to reduce the risk of serious injury or death.
CAUTION
Be careful as you use the jack handle to stay clear of the flat end. The flat end has sharp edges that could cause cuts.
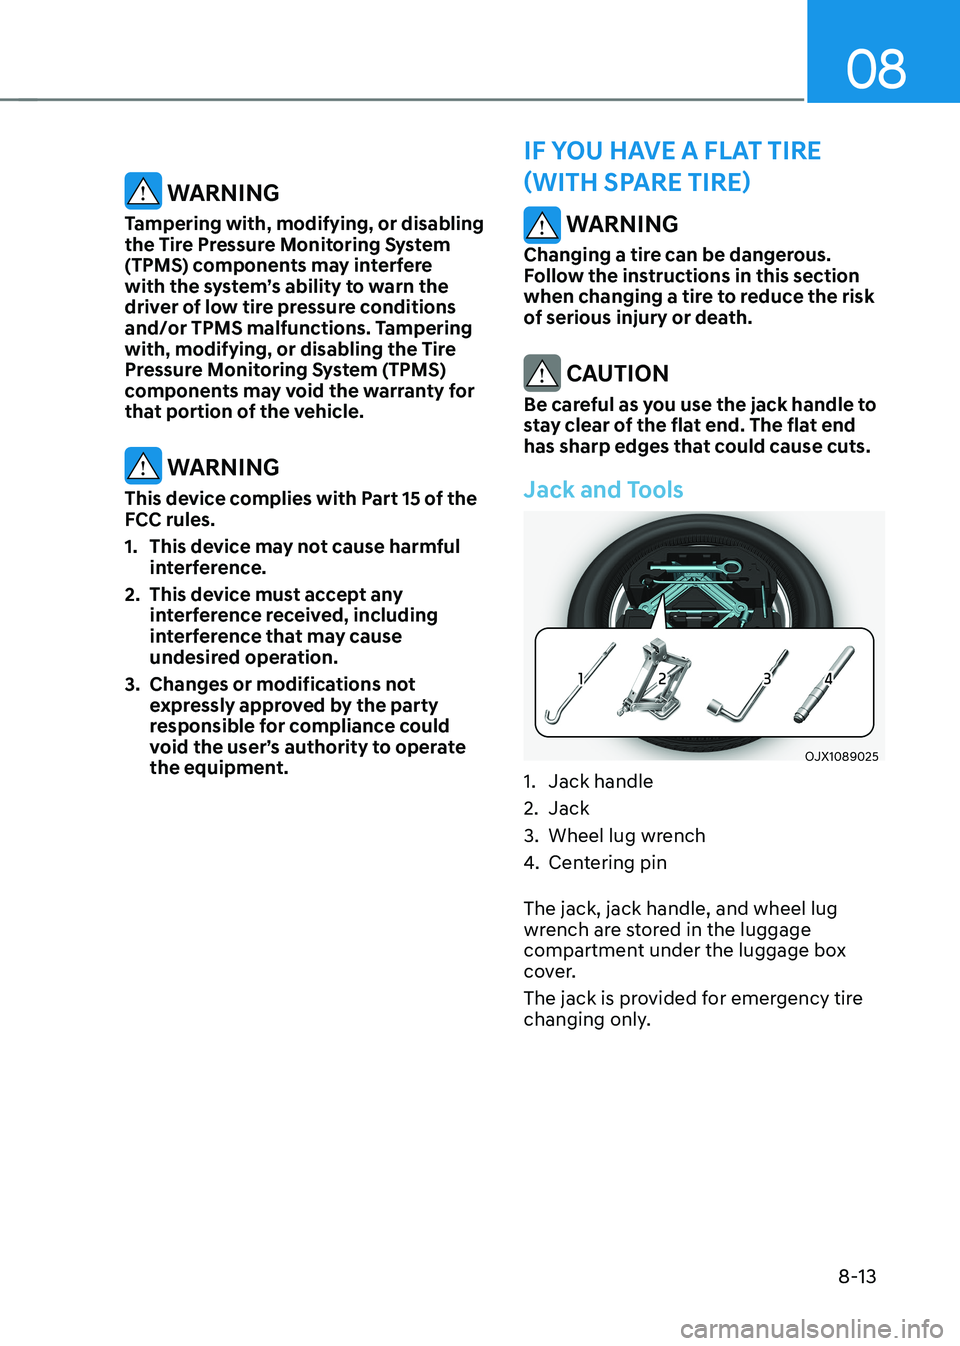
Jack and Tools
OJX1089025OJX1089025
1. Jack handle
2. Jack
3. Wheel lug wrench
4. Centering pin
The jack, jack handle, and wheel lug wrench are stored in the luggage compartment under the luggage box cover.
The jack is provided for emergency tire changing only.
IF YOU HAVE A FLAT TIRE
(WITH SPARE TIRE) WARNING
Tampering with, modifying, or disabling the Tire Pressure Monitoring System (TPMS) components may interfere with the system’s ability to warn the driver of low tire pressure conditions and/or TPMS malfunctions. Tampering with, modifying, or disabling the Tire Pressure Monitoring System (TPMS) components may void the warranty for that portion of the vehicle.
WARNING
This device complies with Part 15 of the FCC rules.
1. This device may not cause harmful interference.
2. This device must accept any interference received, including interference that may cause undesired operation.
3. Changes or modifications not expressly approved by the party responsible for compliance could void the user’s authority to operate the equipment.
Page 550 of 647

08
8-17
OJX1089013OJX1089013
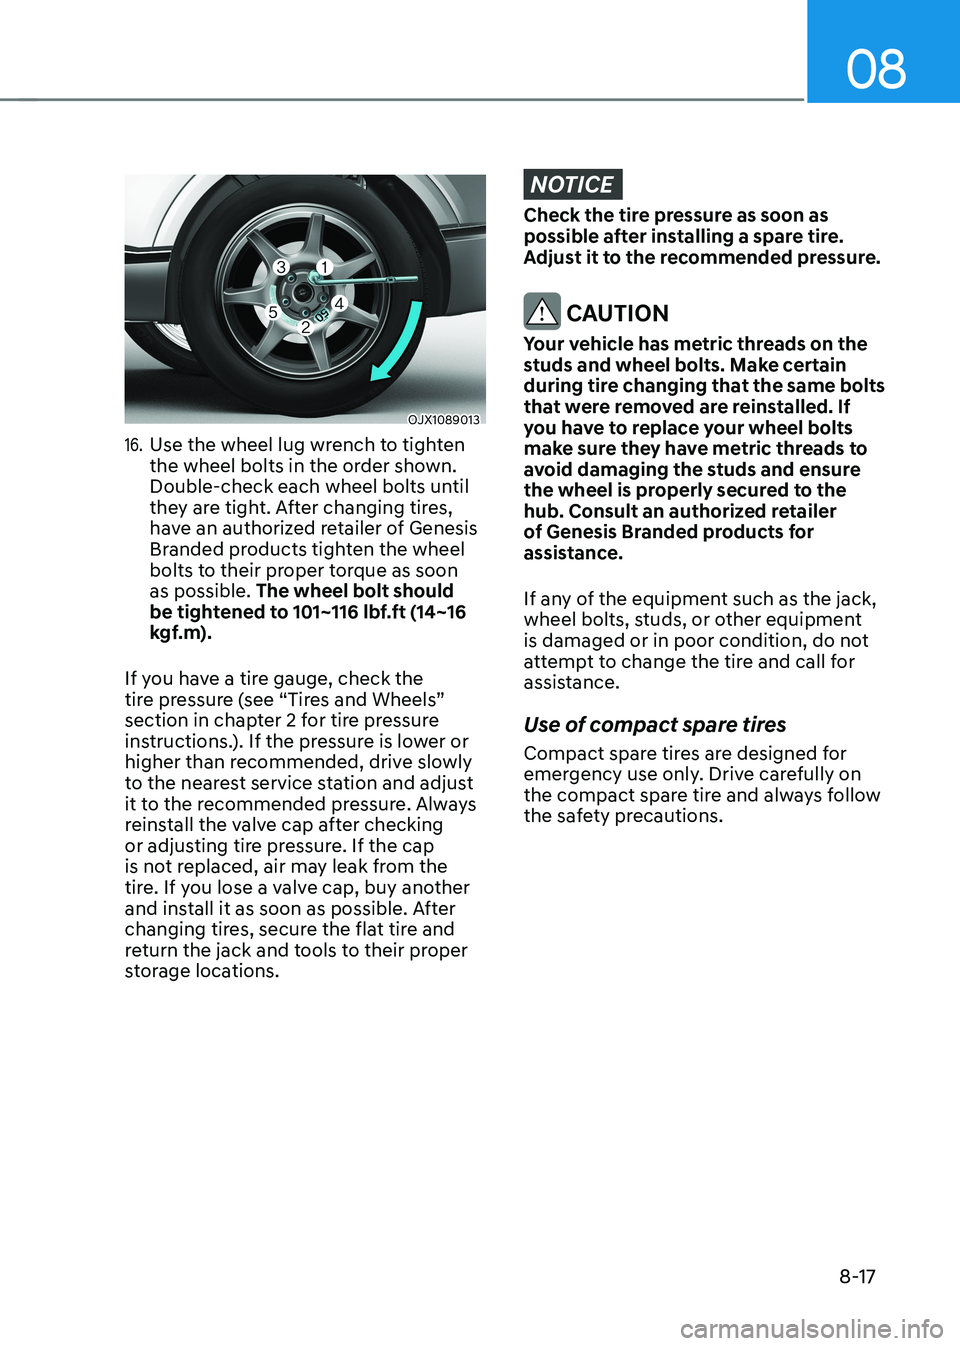
16. Use the wheel lug wrench to tighten the wheel bolts in the order shown. Double-check each wheel bolts until they are tight. After changing tires, have an authorized retailer of Genesis Branded products tighten the wheel bolts to their proper torque as soon as possible. The wheel bolt should be tightened to 101~116 lbf.ft (14~16 kgf.m).
If you have a tire gauge, check the tire pressure (see “Tires and Wheels” section in chapter 2 for tire pressure instructions.). If the pressure is lower or higher than recommended, drive slowly to the nearest service station and adjust it to the recommended pressure. Always reinstall the valve cap after checking or adjusting tire pressure. If the cap is not replaced, air may leak from the tire. If you lose a valve cap, buy another and install it as soon as possible. After changing tires, secure the flat tire and return the jack and tools to their proper storage locations.
NOTICE
Check the tire pressure as soon as possible after installing a spare tire. Adjust it to the recommended pressure.
CAUTION
Your vehicle has metric threads on the studs and wheel bolts. Make certain during tire changing that the same bolts that were removed are reinstalled. If you have to replace your wheel bolts make sure they have metric threads to avoid damaging the studs and ensure the wheel is properly secured to the hub. Consult an authorized retailer of Genesis Branded products for assistance.
If any of the equipment such as the jack, wheel bolts, studs, or other equipment is damaged or in poor condition, do not attempt to change the tire and call for assistance.
Use of compact spare tires
Compact spare tires are designed for emergency use only. Drive carefully on the compact spare tire and always follow the safety precautions.
Page 551 of 647

Emergency Situations
8-18
WARNING
To prevent compact spare tire failure and loss of control possibly resulting in an accident:
• Use the compact spare tire only in an emergency.
• NEVER operate your vehicle over 50 mph (80 km/h).
• Do not exceed the vehicle’s maximum load rating or the load carrying capacity shown on the sidewall of the compact spare tire.
• Do not use the compact spare tire continuously. Repair or replace the original tire as soon as possible to avoid failure of the compact spare tire.
When driving with the compact spare tire mounted to your vehicle:
• Check the tire pressure after installing the compact spare tire. The compact spare tire should be inflated to 60 psi (420 kPa).
• Do not take this vehicle through an automatic car wash while the compact spare tire is installed.
• Do not use the compact spare tire on any other vehicle because this tire has been designed especially for your vehicle.
• The compact spare tire’s tread life is shorter than a regular tire. Inspect your compact spare tire regularly and replace worn compact spare tires with the same size and design, mounted on the same wheel.
• Do not use more than one compact spare tire at a time.
• Do not tow a trailer while the compact spare tire is installed.
Information
When the original tire and wheel are repaired and reinstalled on the vehicle, the wheel bolt torque must be set correctly. The correct wheel bolt tightening torque is 101~116 lbf.ft (14~16 kgf.m).
NOTICE
To prevent damaging the compact spare tire and your vehicle:
• Drive slowly enough for the road conditions to avoid all hazards, such as a potholes or debris.
• Avoid driving over obstacles. The compact spare tire diameter is smaller than the diameter of a conventional tire and reduces the ground clearance approximately 1 inch (25 mm).
• Do not use tire chains on the compact spare tire. Because of the smaller size, a tire chain will not fit properly.
• Do not use the compact spare tire on any other wheels, nor should standard tires, snow tires, wheel covers or trim rings be used with the compact spare wheel.
Page 556 of 647

08
8-23
If towing service is not available in an emergency, your vehicle may be temporarily towed using a cable or chain secured to the emergency towing hook at the front (or rear) of the vehicle.
Use extreme caution when towing the vehicle with a cable or chain. A driver must be in the vehicle to steer it and operate the brakes.
Towing in this manner may be done only on hard-surfaced roads for a short distance and at low speeds. Also, the wheels, axles, power train, steering and brakes must all be in good working condition.
CAUTION
The driver must be in the vehicle for steering and braking operations when the vehicle is being towed. Passengers other than the driver must not be in the vehicle.
Always follow these emergency towing precautions:
• Press the Engine Start/Stop button to the ACC position so the steering wheel is not locked.
• Shift the gear to N (Neutral).
• Release the parking brake.
• Depress the brake pedal with more force than normal as you will have reduced braking performance.
• More steering effort will be required because the power steering system will be disabled.
• Use a vehicle heavier than your own to tow your vehicle.
• The drivers of both vehicles should communicate with each other frequently.
• Before emergency towing, check that the hook is not broken or damaged.
• Fasten the towing cable or chain securely to the hook.
• Do not jerk the hook. Apply steady and even force.
Page 557 of 647

Emergency Situations
8-24
16 feet
OJK081012NOJK081012N
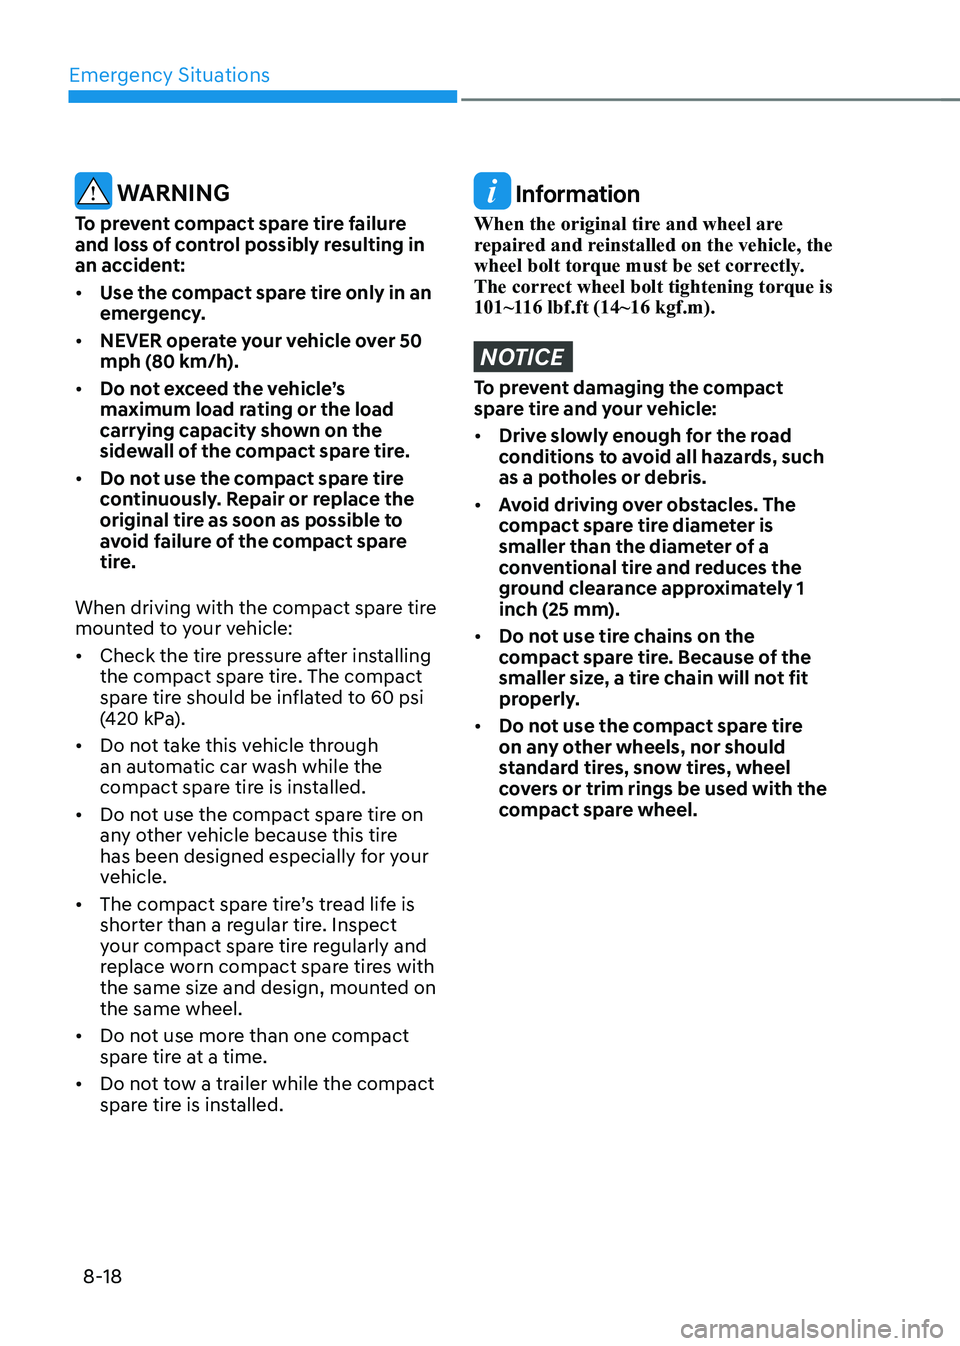
• Use a towing cable or chain less than 16 ft. (5 m) long. Attach a white or red cloth (about 12 in. (30 cm) wide) in the middle of the cable or chain for easy visibility.
• Drive carefully so the towing cable or chain remains tight during towing.
• Before towing, check the automatic transmission for fluid leaks under your vehicle. If the automatic transmission fluid is leaking, flatbed equipment or a towing dolly must be used.
NOTICE
Accelerate or decelerate the vehicle in a slow and gradual manner while maintaining tension on the tow rope or chain to start or drive the vehicle, otherwise tow hooks and the vehicle may be damaged.
NOTICE
To avoid damage to your vehicle and vehicle components when towing:
• Always pull straight ahead when using the towing hooks. Do not pull from the side or at a vertical angle.
• Do not use the towing hooks to pull a vehicle out of mud, sand or other conditions from which the vehicle cannot be driven out under its own power.
• Limit the vehicle speed to 10 mph (15 km/h) and drive less than 1 mile (1.5 km) when towing to avoid serious damage to the automatic transmission.
Page 564 of 647

09
9-7
Follow Normal Maintenance Schedule if the vehicle is usually operated where none of
the following conditions apply. If any of the following conditions apply, you must follow
the Maintenance Under Severe Usage Conditions.
• Repeated driving short distance of less than 5 miles (8 km) in normal temperature or
less than 10 miles (16 km) in freezing temperature
• Extensive engine idling or low speed driving for long distances
• Driving on rough, dusty, muddy, unpaved, graveled or salt-spread roads
• Driving in areas using salt or other corrosive materials or in very cold weather
• Driving in heavy dust conditions
• Driving in heavy traffic area
• Driving on uphill, downhill, or mountain road repeatedly
• Towing a trailer or using a camper, or driving with loads on the roof
• Driving as a patrol car, taxi, other commercial use of vehicle towing
• Frequently driving under high speed or rapid acceleration/deceleration
• Frequently driving in stop-and-go condition
• Engine oil usage which is not recommended (Mineral type, Semi-synthetic, Lower
grade spec, etc.)
If your vehicle is operated under the above conditions, you should inspect, replace or
refill more frequently than the following Normal Maintenance Schedule. After the periods
or distance shown in the chart, continue to follow the prescribed maintenance intervals.
NOTICE
After 10 years or 100,000 miles, we recommend to use severe maintenance schedule.
Information
• As it is normal for engine oil to be consumed during driving, the engine oil level should be
checked on regular basis.
• The engine oil change interval for normal operating conditions is based on the use of the
recommended engine specification. If the recommended engine oil specification is not used, then
replace the engine oil according to the maintenance schedule under severe operating conditions.
• The vehicle may be equipped with the Engine Oil Change Reminder that predicts engine oil life
based on the driver’s driving history and alerts the driver to change engine oil.
-If the deterioration of the engine oil increases depending on the driver’s driving severity,
the remaining oil life alert appears on the instrument cluster before the normal engine oil
replacement interval. Have the engine oil and filter changed by an authorized retailer of
Genesis Branded product.
-Engine Oil Change Reminder works when the recommended engine oil is used. So, if
recommended engine oil is not used, replace the engine oil according to the maintenance
schedule under severe usage condition.
Also, check the amount of engine oil regularly as this system assumes that the engine oil is
being filled normally.
-Always reset the remaining engine oil life whenever the engine oil is changed. Otherwise, the
Engine Oil Change Reminder will not be correct.
To reset the Engine Oil Change Reminder, select ‘RESET’ from the infotainment system
screen. Then, select ‘Yes’ when the message “Changed engine oil? Press [Yes] to reset the oil
life.” appears on the screen.
-If there is no alert until the maximum maintenance interval, have the vehicle checked by an
authorized retailer of Genesis Branded product.
SCHEDULED MAINTENANCE SERVICES