2022 HONDA ODYSSEY timing
[x] Cancel search: timingPage 145 of 782

144
uuGauges and Driver Information Interface uDriver Information Interface
Instrument Panel
Customization flow
Press the (home) button.
ENTER
“Trip B” Reset Timing
Reverse Alert Tone
Fuel Efficiency Backlight
“Trip A” Reset Timing
Language Selection
Adjust Alarm VolumeMeter Setup
ENTERSettings
Arrange Apps
Show Tachometer3
4
3
4
3
4
Vehicle Customization
ENTER
P. 141
P. 142
Rear Seat Reminder
ENTERRoad Departure Mi tigation Setting
Lane Keeping Assist Suspend Beep
ACC Forward Vehicle Detect Beep
Forward Collision Warning Distance
Driver Assist System
Setup3
4
Traffic Sign Recognition System Display Setting
3
4
ENTER3
4
22 US ODYSSEY-31THR6400.book 144 ページ 2020年11月16日 月曜日 午後1時41分
Page 148 of 782
147
uuGauges and Driver Information Interface uDriver Information Interface
Continued
Instrument Panel
*1:Default SettingSetup Group Customizable Features
Description Selectable settings
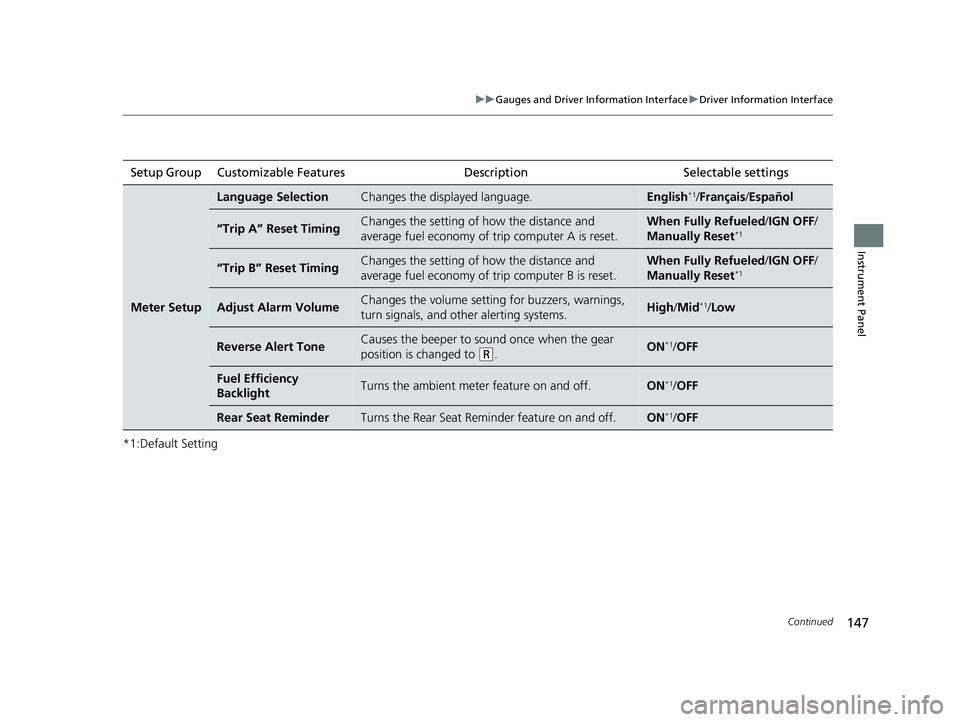
Meter Setup
Language SelectionChanges the displayed language.English*1/Français /Español
“Trip A” Reset TimingChanges the setting of how the distance and
average fuel economy of trip computer A is reset.When Fully Refueled /IGN OFF /
Manually Reset*1
“Trip B” Reset TimingChanges the setting of how the distance and
average fuel economy of trip computer B is reset.When Fully Refueled /IGN OFF /
Manually Reset*1
Adjust Alarm VolumeChanges the volume setting for buzzers, warnings,
turn signals, and other alerting systems.High /Mid*1/Low
Reverse Alert ToneCauses the beeper to sound once when the gear
position is changed to
(R.ON*1/OFF
Fuel Efficiency
BacklightTurns the ambient meter feature on and off.ON*1/OFF
Rear Seat ReminderTurns the Rear Seat Reminder feature on and off.ON*1/OFF
22 US ODYSSEY-31THR6400.book 147 ページ 2020年11月16日 月曜日 午後1時41分
Page 149 of 782
148
uuGauges and Driver Information Interface uDriver Information Interface
Instrument Panel
*1:Default SettingSetup Group Customizable Features Description Selectable settings
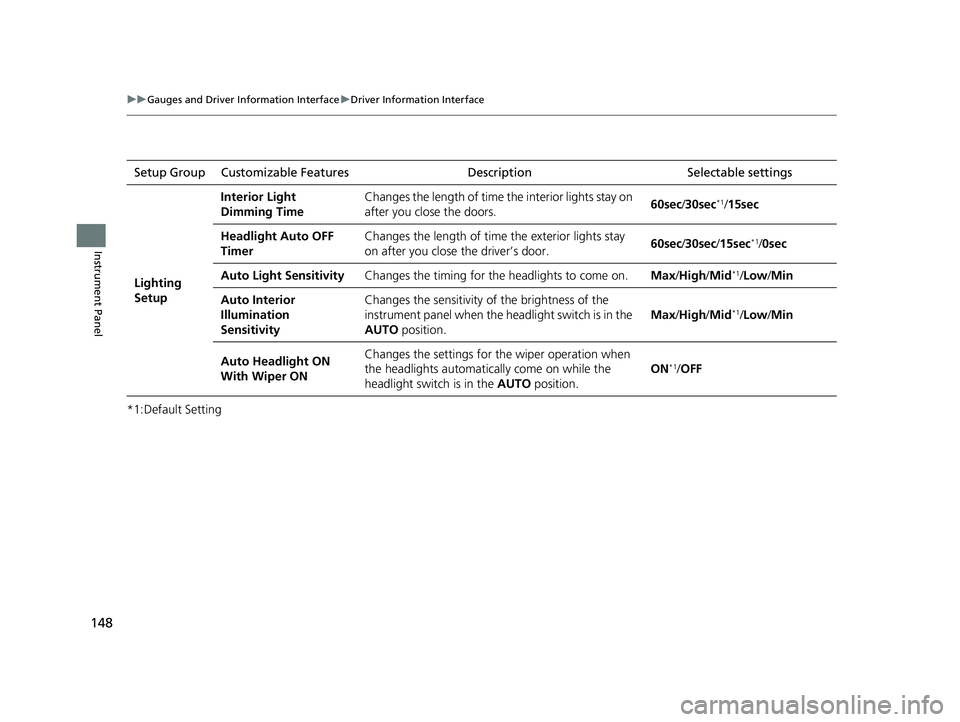
Lighting
Setup
Interior Light
Dimming Time
Changes the length of time the interior lights stay on
after you close the doors.
60sec
/30sec
*1/15sec
Headlight Auto OFF
Timer Changes the length of time the exterior lights stay
on after you close the driver’s door.
60sec
/30sec /15sec
*1/0sec
Auto Light Sensitivity Changes the timing for the headlights to come on. Max/High /Mid
*1/Low/ Min
Auto Interior
Illumination
Sensitivity Changes the sensitivity of the brightness of the
instrument panel when the headlight switch is in the
AUTO
position. Max
/High /Mid
*1/Low/ Min
Auto Headlight ON
With Wiper ON Changes the settings for the wiper operation when
the headlights automatica
lly come on while the
headlight switch is in the AUTO position. ON
*1/
OFF
22 US ODYSSEY-31THR6400.book 148 ページ 2020年11月16日 月曜日 午後1時41分
Page 151 of 782
150
uuGauges and Driver Information Interface uDriver Information Interface
Instrument Panel
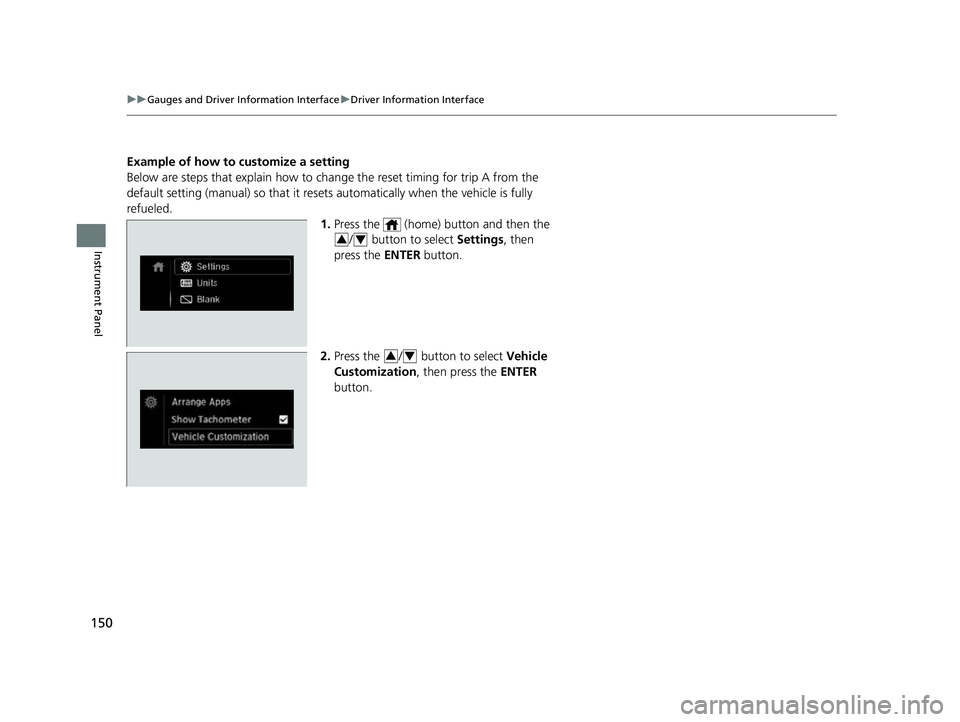
Example of how to customize a setting
Below are steps that explai n how to change the reset timing for trip A from the
default setting (manual) so that it resets automatically when the vehicle is fully
refueled. 1.Press the (home) button and then the
/ button to select Settings , then
press the ENTER button.
2. Press the / button to select Vehicle
Customization , then press the ENTER
button.
34
34
22 US ODYSSEY-31THR6400.book 150 ページ 2020年11月16日 月曜日 午後1時41分
Page 152 of 782
151
uuGauges and Driver Information Interface uDriver Information Interface
Continued
Instrument Panel
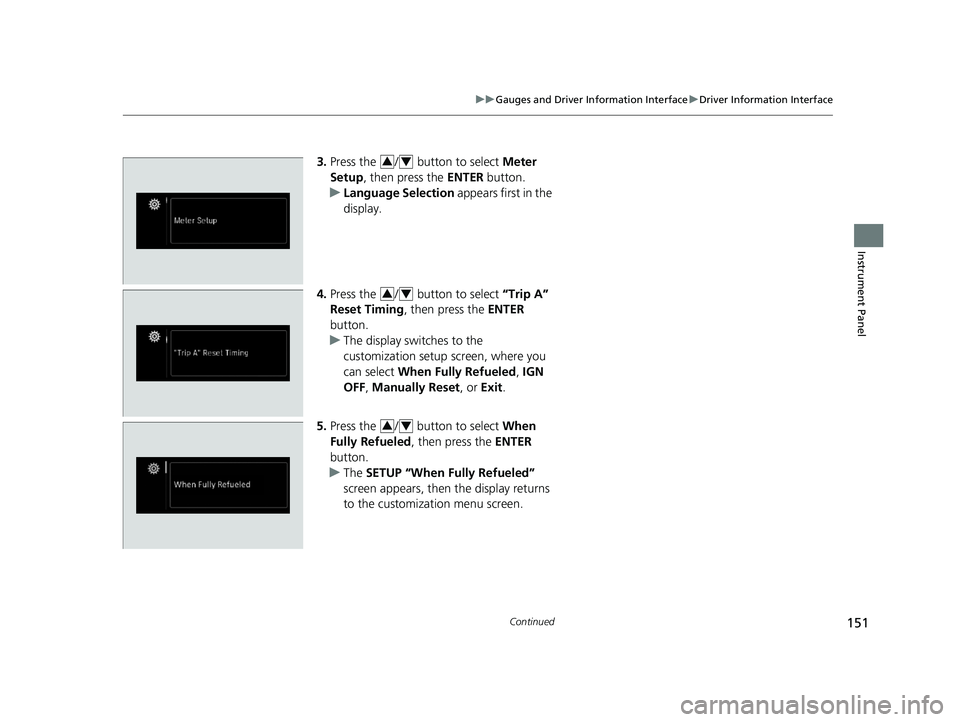
3. Press the / button to select Meter
Setup , then press the ENTER button.
u Language Selection appears first in the
display.
4. Press the / button to select “Trip A”
Reset Timing , then press the ENTER
button.
u The display swit ches to the
customization setup screen, where you
can select When Fully Refueled , IGN
OFF , Manually Reset , or Exit.
5. Press the / button to select When
Fully Refueled, then press the ENTER
button.
u The SETUP “When Fully Refueled”
screen appears, then the display returns
to the customization menu screen.34
34
34
22 US ODYSSEY-31THR6400.book 151 ページ 2020年11月16日 月曜日 午後1時41分
Page 208 of 782
207
uuOperating the Switches Around the Steering Wheel uAuto High-Beam
Continued
Controls
Auto High-Beam
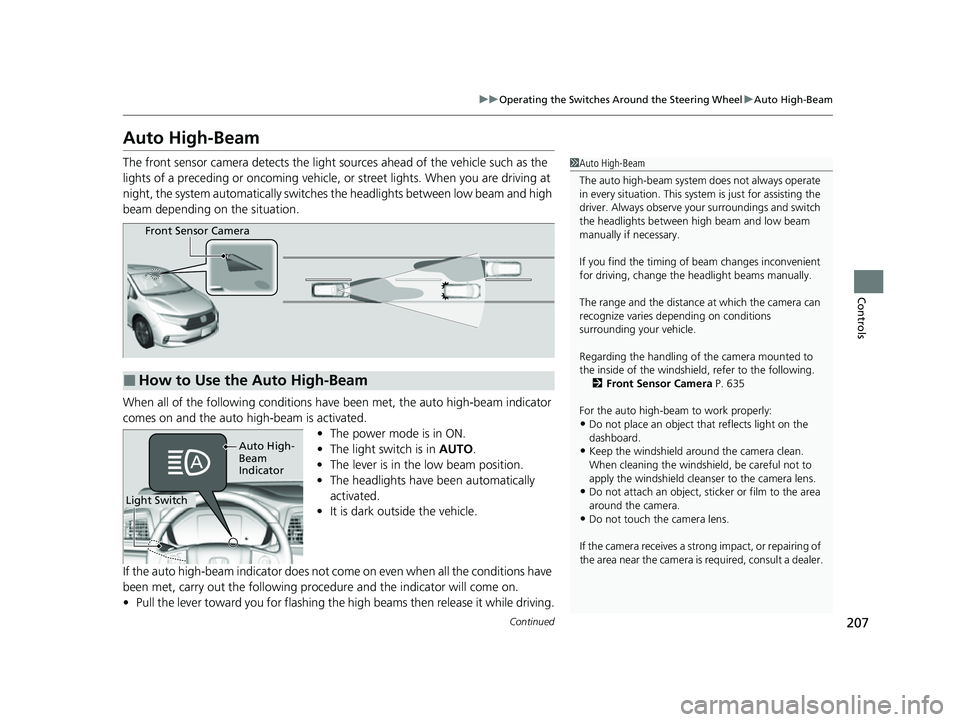
The front sensor camera detects the light sources ahead of the vehicle such as the
lights of a preceding or oncoming vehicle, or street lights. When you are driving at
night, the system automatically switches the headlights between low beam and high
beam depending on the situation.
When all of the following conditions have been met, the auto high-beam indicator
comes on and the auto high-beam is activated.
•The power mode is in ON.
• The light switch is in AUTO.
• The lever is in the low beam position.
• The headlights have been automatically
activated.
• It is dark outside the vehicle.
If the auto high-beam indica tor does not come on even when all the conditions have
been met, carry out the following procedure and the indicator will come on.
• Pull the lever toward you for flashing the high beams then release it while driving.1Auto High-Beam
The auto high-beam system does not always operate
in every situation. This syst em is just for assisting the
driver. Always observe your surroundings and switch
the headlights between high beam and low beam
manually if necessary.
If you find the timing of beam changes inconvenient
for driving, change the headlight beams manually.
The range and the distance at which the camera can
recognize varies de pending on conditions
surrounding your vehicle.
Regarding the handling of the camera mounted to
the inside of the windshiel d, refer to the following.
2 Front Sensor Camera P. 635
For the auto high-beam to work properly:
•Do not place an object that reflects light on the
dashboard.
•Keep the windshield around the camera clean.
When cleaning the windshield, be careful not to
apply the windshield cleans er to the camera lens.
•Do not attach an object, sticker or film to the area
around the camera.
•Do not touch the camera lens.
If the camera receives a st rong impact, or repairing of
the area near the camera is required, consult a dealer.
■How to Use the Auto High-Beam
Front Sensor Camera
Light Switch
Auto High-
Beam
Indicator
22 US ODYSSEY-31THR6400.book 207 ページ 2020年11月16日 月曜日 午後1時41分
Page 209 of 782
uuOperating the Switches Around the Steering Wheel uAuto High-Beam
208
Controls
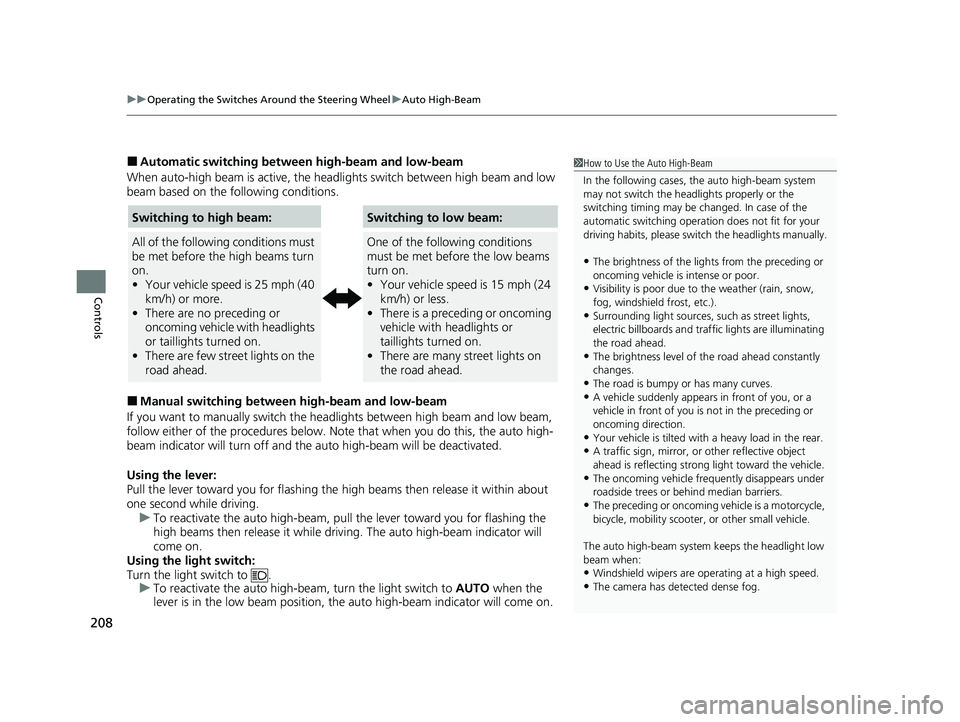
■Automatic switching between high-beam and low-beam
When auto-high beam is active, the head lights switch between high beam and low
beam based on the following conditions.
■Manual switching between high-beam and low-beam
If you want to manually switch the headlights between high beam and low beam,
follow either of the proced ures below. Note that when you do this, the auto high-
beam indicator will turn off and the auto high-beam will be deactivated.
Using the lever:
Pull the lever toward you fo r flashing the high beams then release it within about
one second while driving. u To reactivate the auto high-beam, pull the lever toward you for flashing the
high beams then release it while driving. The auto high-beam indicator will
come on.
Using the light switch:
Turn the light switch to . u To reactivate the auto high-be am, turn the light switch to AUTO when the
lever is in the low beam position, the auto high-beam indicator will come on.
1 How to Use the Auto High-Beam
In the following cases, th e auto high-beam system
may not switch the head lights properly or the
switching timing may be ch anged. In case of the
automatic switching operati on does not fit for your
driving habits, please swit ch the headlights manually.
•The brightness of the lights from the preceding or
oncoming vehicle is intense or poor.
•Visibility is poor due to the weather (rain, snow,
fog, windshield frost, etc.).
•Surrounding light sources, such as street lights,
electric billboards and traf fic lights are illuminating
the road ahead.
•The brightness level of th e road ahead constantly
changes.
•The road is bumpy or has many curves.•A vehicle suddenly appears in front of you, or a
vehicle in front of you is not in the preceding or
oncoming direction.
•Your vehicle is tilted with a heavy load in the rear.•A traffic sign, mirror, or other reflective object
ahead is reflecting strong light toward the vehicle.
•The oncoming vehicle freq uently disappears under
roadside trees or be hind median barriers.
•The preceding or oncoming vehicle is a motorcycle,
bicycle, mobility scooter, or other small vehicle.
The auto high-beam system keeps the headlight low
beam when:
•Windshield wipers are op erating at a high speed.
•The camera has detected dense fog.
Switching to high beam:
All of the following conditions must
be met before the high beams turn
on.
•Your vehicle speed is 25 mph (40
km/h) or more.
• There are no preceding or
oncoming vehicle with headlights
or taillights turned on.
• There are few street lights on the
road ahead.
Switching to low beam:
One of the following conditions
must be met before the low beams
turn on.
•Your vehicle speed is 15 mph (24
km/h) or less.
• There is a preceding or oncoming
vehicle with headlights or
taillights turned on.
• There are many street lights on
the road ahead.
22 US ODYSSEY-31THR6400.book 208 ページ 2020年11月16日 月曜日 午後1時41分
Page 468 of 782

467
uuCustomized Features u
Continued
Features
Vehicle
Driving Position
Setup*Seat Position Movem ent at Entry/Exit
Memory Position Link
Meter SetupAdjust Outside Temp Display
Trip A Reset Timing
Trip B Reset Timing
Reverse Shift Position Beep
Adjust Alarm Volume
Turn by Turn Display
Power Tailgate
Setup*Power Tailgate Keyless Open Mode
Power Tailgate Open by Outer Handle
Keyless Access SetupDoor Unlock Mode
Keyless Access Light Flash
Keyless Access Beep
Remote Start System On/Off
Walk Away Auto Lock
Fuel Efficiency Backlight
Hands Free Access Power Tailgate*
Rear Seat Reminder
* Not available on all models
22 US ODYSSEY-31THR6400.book 467 ページ 2020年11月16日 月曜日 午後1時41分