Page 260 of 657
uuAudio System Basic Operation uAudio/Information Screen
258
Features
■Select wallpaper
1. Select Clock.
2. Select Settings .
3. Select Clock Faces .
4. Select a desired wallpaper.
5. Select Set.
u The display will return to the Clock Faces screen.
■To view wallpaper once it is set
1. Press the button.
2. Select Clock.
■Delete wallpaper
1. Select Clock.
2. Select Settings .
3. Select Clock Faces .
4. Select a desired wallpaper.
5. Select Delete.
6. Select Yes.
u The display will return to the Clock Faces screen.
1Wallpaper Setup
You cannot delete the initial imported wallpapers.
When the file size is large, it takes a while to be
previewed.
Page 360 of 657
358
uuCustomized Features u
Features
■List of customizable options
*1:Default Setting Setup
Group Customizable Features Description Selectable Settings
SystemDay & Time
Set
Date &
Time
Automatic
Date &
TimeSelects
ON to have the GPS automatically adjust
the clock. Select OFF to cancel this function.ON*1/OFF
Set DateAdjusts date.
2 Adjusting the Clock P. 166—
Set TimeAdjusts clock.
2Adjusting the Clock P. 166—
Time
Zone
Automatic
Time Zone*
Sets the navigation system to automatically adjust
the clock when driving through different time
zones.
ON*1/ OFF
(Select time
zone)Changes the time zone manually.—
Auto Daylight Saving
TimeSelect ON to have the GPS automatically adjust the
clock to daylight savings time. Select OFF to cancel
this function.
ON*1/ OFF
Date FormatSets the date format.
MM/DD/YYYY*1/
DD/MM/YYYY /
YYYY/MM/DD
Time FormatSelects the digital clock display from 12H to 24H.12H*1/24H
* Not available on all models
Page 557 of 657

555
uuMaintenance Under the Hood uChanging the Engine Oil and Oil Filter
Continued
Maintenance
Changing the Engine Oil and Oil Filter
You must change the engine oil and oil fi lter regularly in order to maintain the
engine’s lubrication. The engine may be damaged if they are not changed regularly.
Change the oil and filter in accordance with the maintenance message on the driver
information interface. 1.Run the engine until it reaches normal
operating temperature, and then turn the
engine off.
2. Open the hood and remove the engine oil
fill cap.
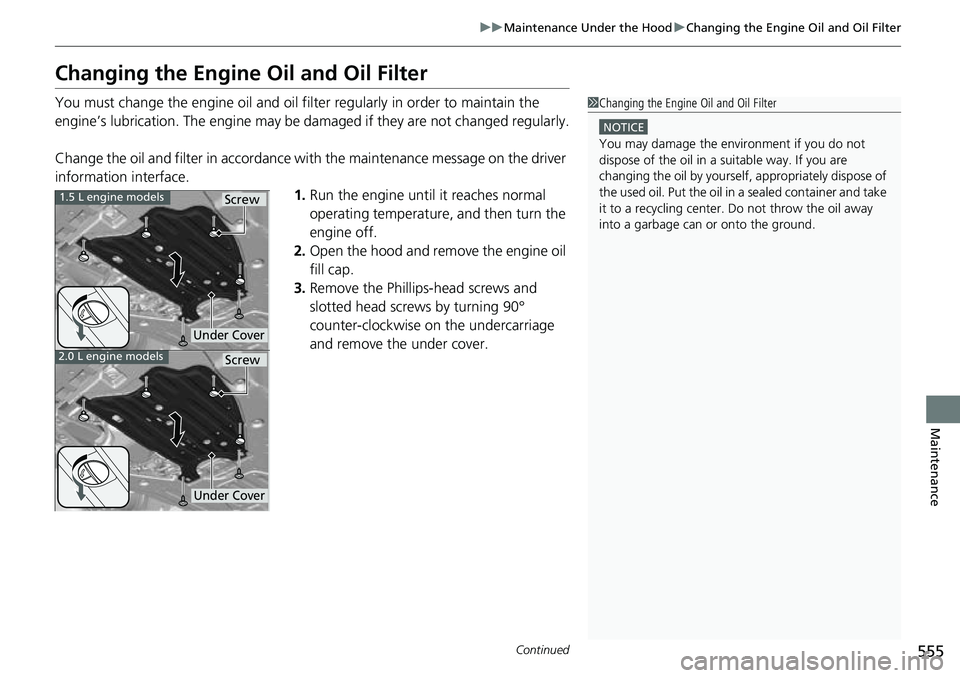
3. Remove the Phillips-head screws and
slotted head screws by turning 90°
counter-clockwise on the undercarriage
and remove the under cover.1Changing the Engine Oil and Oil Filter
NOTICE
You may damage the environment if you do not
dispose of the oil in a suitable way. If you are
changing the oil by yourself , appropriately dispose of
the used oil. Put the oil in a sealed container and take
it to a recycling center. Do not throw the oil away
into a garbage can or onto the ground.
1.5 L engine models
2.0 L engine models
Under Cover
Screw
Under Cover
Screw
Page 562 of 657
uuMaintenance Under the Hood uEngine Coolant
560
Maintenance
1. Make sure the engine and radiator are
cool.
2. Turn the radiator cap 1/8 turn counter-
clockwise and relieve any pressure in the
cooling system.
3. Push down and turn the radiator cap
counter-clockwise to remove it.
4. The coolant level should be up to the base
of the filler neck. Add coolant if it is low.
5. Put the radiator cap back on, and tighten it
fully.
■Radiator1Radiator
NOTICE
Pour the fluid slowly and ca refully so you do not spill
any. Clean up any spills immediately; they can
damage components in the engine compartment.Radiator Cap
Page 567 of 657

565
uuReplacing Light Bulbs uHeadlight Bulbs
Maintenance
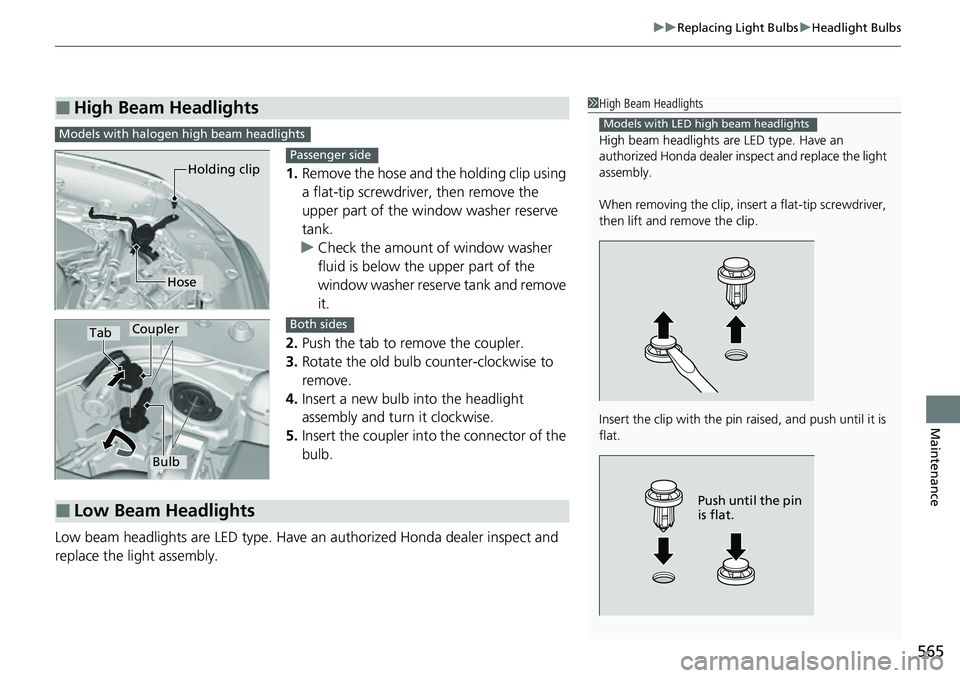
1. Remove the hose and the holding clip using
a flat-tip screwdriver, then remove the
upper part of the window washer reserve
tank.
u Check the amount of window washer
fluid is below the upper part of the
window washer reserve tank and remove
it.
2. Push the tab to remove the coupler.
3. Rotate the old bulb counter-clockwise to
remove.
4. Insert a new bulb into the headlight
assembly and turn it clockwise.
5. Insert the coupler into the connector of the
bulb.
Low beam headlights are LED type. Have an authorized Honda dealer inspect and
replace the light assembly.
■High Beam Headlights1 High Beam Headlights
High beam headlights ar e LED type. Have an
authorized Honda d ealer inspect and replace the light
assembly.
When removing the clip, insert a flat-tip screwdriver,
then lift and remove the clip.
Insert the clip with the pin raised, and push until it is
flat.
Models with LED high beam headlights
Push until the pin
is flat.
Models with halogen high beam headlights
Holding clip
Hose
Passenger side
TabCoupler
Bulb
Both sides
■Low Beam Headlights
Page 570 of 657
568
uuReplacing Light Bulbs uBrake Lights, Taillights, Rear Side Marker Lights and Rear Turn Signal Light Bulbs
Maintenance
4.Turn the socket counter-clockwise and
remove it.
5. Push and turn the old bulb clockwise and
remove it, and insert a new bulb.
Bulb
Socket
Page 571 of 657
569
uuReplacing Light Bulbs uTaillight, Brake Light* and Back-Up Light Bulbs
Continued
Maintenance
Taillight, Brake Light* and Back-Up Light Bulbs
When replacing, use the following bulbs.
1.Remove the holding cl ips using a flat-tip
screwdriver, then pull the lining back.
2. Turn the socket counter-clockwise and
remove it.
3. Remove the old bulb and insert a new bulb.
Taillight: LED
Brake Light*: LED
Back-Up Light: 16 W
1 Taillight, Brake Light* and Back-Up Light Bulbs
Taillights and brake lights
* are LED type. Have an
authorized Honda d ealer inspect and replace the light
assembly.
When removing the clip, insert a flat-tip screwdriver,
then lift and remove the clip.
Insert the clip with the pin raised, and push until it is flat.
Clip
Push until the
pin is flat.
Holding Clip
BulbSocket
Driver side
* Not available on all models
Page 572 of 657
570
uuReplacing Light Bulbs uTaillight, Brake Light* and Back-Up Light Bulbs
Maintenance
2. Turn the socket clockwise and remove it.
3. Remove the old bulb and insert a new bulb.
Bulb
Socket
Passenger side