Page 569 of 657
567
uuReplacing Light Bulbs uBrake Lights, Taillights, Rear Side Marker Lights and Rear Turn Signal Light Bulbs
Continued
Maintenance
Brake Lights, Taillights, Rear Side Marker Lights and
Rear Turn Signal Light Bulbs
When replacing, use the following bulbs.
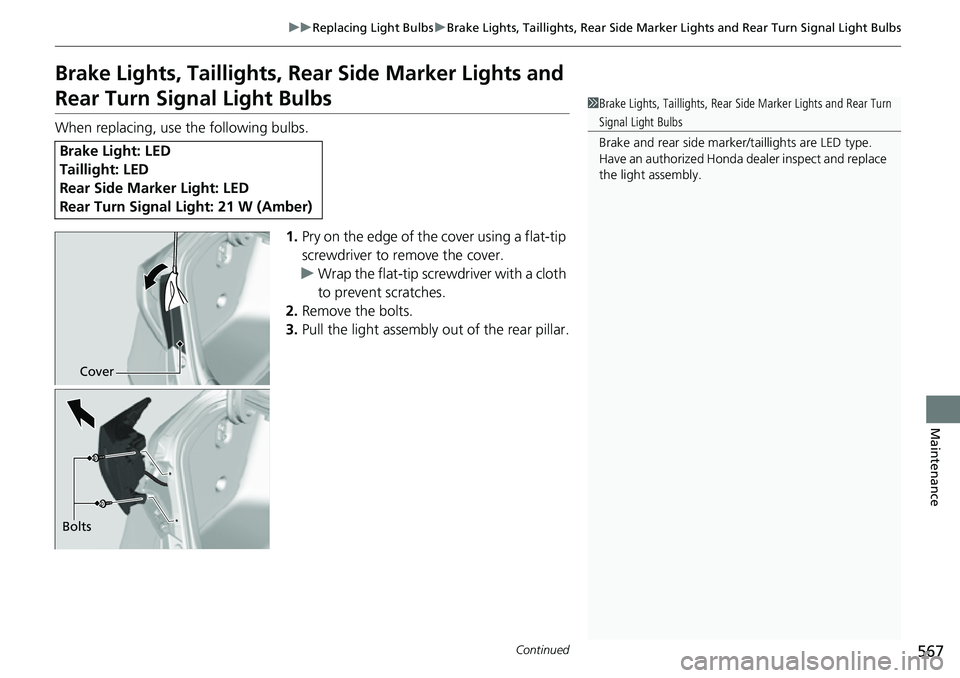
1.Pry on the edge of the cover using a flat-tip
screwdriver to remove the cover.
u Wrap the flat-tip screwdriver with a cloth
to prevent scratches.
2. Remove the bolts.
3. Pull the light assembly out of the rear pillar.
Brake Ligh t: LED
Taillight: LED
Rear Side Marker Light: LED
Rear Turn Signal Light: 21 W (Amber)
1 Brake Lights, Taillights, Rear Side Marker Lights and Rear Turn
Signal Light Bulbs
Brake and rear side marker/taillights are LED type.
Have an authorized Honda dealer inspect and replace
the light assembly.
Cover
Bolts
Page 570 of 657
568
uuReplacing Light Bulbs uBrake Lights, Taillights, Rear Side Marker Lights and Rear Turn Signal Light Bulbs
Maintenance
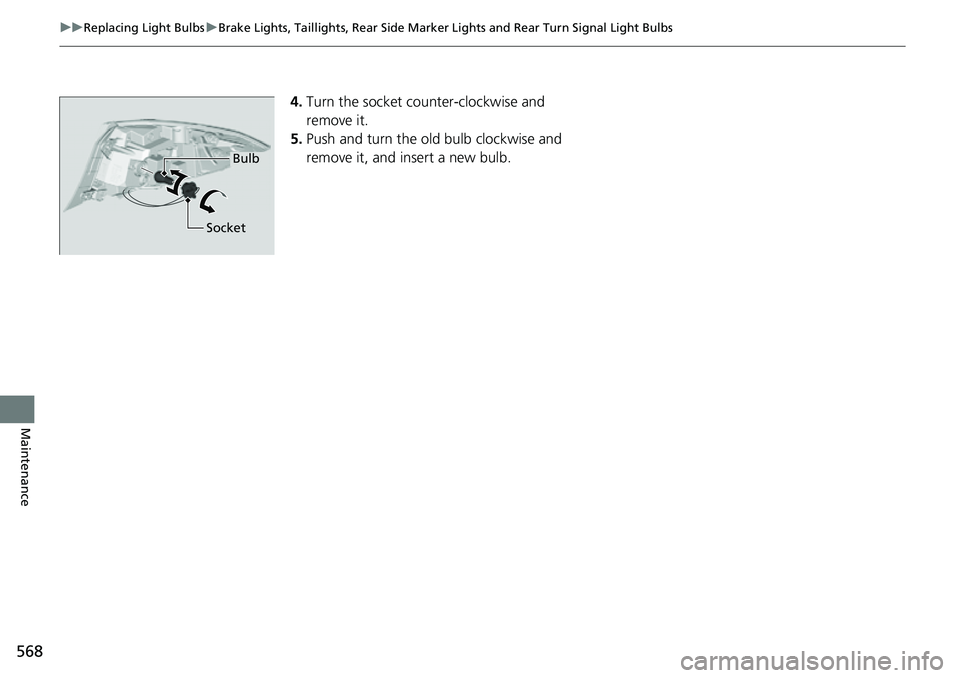
4.Turn the socket counter-clockwise and
remove it.
5. Push and turn the old bulb clockwise and
remove it, and insert a new bulb.
Bulb
Socket
Page 573 of 657
571
uuReplacing Light Bulbs uRear License Plate Light
Maintenance
Rear License Plate Light
Rear license plate light is LED type. Have an authorized Honda dealer inspect and
replace the light assembly.
High-Mount Brake Light
High-mount brake light is LED type. Have an authorized Honda dealer inspect and
replace the light assembly.
Page 578 of 657

576
uuChecking and Maintaining Tires uTire and Loading Information Label
Maintenance
Tire and Loading Information Label
The label attached to the driver’s doorj amb provides necessary tire and loading
information.
Tire Labeling
The tires that came on your vehicle have a
number of markings. Those you should be
aware of are described as shown.
Whenever tires are replaced, they should be replaced with tires of the same size.
1 Tire and Loading Information Label
The tire and loading informat ion label attached to the
driver’s doorjamb contains:
aThe number of people your vehicle can carry.bThe total weight your vehicle can carry. Do not
exceed this weight.
cThe original tire sizes for front, rear, and spare.dThe proper cold tire pressure for front, rear, and
spare.
Label
Example
Example Tire Size
Tire
Identification
Number (TIN)
Maximum
Tire Load
Maximum
Tire Pressure
Tire Size
■Tire Sizes
1 Tire Sizes
Following is an example of tire size with an
explanation of what each component means.
P235/60 R18 102T
P: Vehicle type (P indi cates passenger vehicle).
235: Tire width in millimeters.
60: Aspect ratio (the tire’s section height as a
percentage of its width).
R: Tire construction code (R indicates radial).
18: Rim diameter in inches.
102: Load index (a numerical code associated with
the maximum load the tire can carry).
T: Speed symbol (an alphabe tical code indicating the
maximum speed rating).
Page 582 of 657

580
uuChecking and Maintaining Tires uWear Indicators
Maintenance
Wear Indicators
The groove where the wear indicator is
located is about 1/16 inch (about 1.6 mm)
shallower than elsewhere on the tire. If the
tread has worn so that the indicator is
exposed, replace the tire. Worn out tires
have poor traction on wet roads.
Tire Service Life
The life of your tires is dependent on many factors, including driving habits, road
conditions, vehicle loading, inflation pre ssure, maintenance history, speed, and
environmental conditions (even when the tires are not in use).
In addition to regular inspections and inflation pressure maintenance, it is
recommended that you have annual inspections performed once the tires reach five
years old. All tires, including the spare, should be removed from service after 10
years from the date of manufacture, regardless of their condition or state of wear.
1 Checking Tires
High speed driving
We recommend that you do not drive faster than the
posted speed limits and condi tions allow. If you drive
at sustained high speeds (over 99 mph or 160 km/h),
adjust the cold tire pressures as shown below to
avoid excessive heat buildup and sudden tire failure.
Tire Size225/50R17 94V
Pressure Front: 35 psi (240 kPa, 2.4 kgf/cm2)
Rear: 33 psi (230 kPa, 2.3 kgf/cm2)
Tire Size235/40R19 96V
Pressure Front: 36 psi (250 kPa, 2.5 kgf/cm2)
Rear: 36 psi (250 kPa, 2.5 kgf/cm2)
Models with 225/50R17 tires
Models with 235/40R19 tires
Example of a Wear
Indicator mark
Page 583 of 657
581
uuChecking and Maintaining Tires uTire and Wheel Replacement
Maintenance
Tire and Wheel Replacement
Replace your tires with radials of the same size, load range, speed rating, and
maximum cold tire pressure rating (as shown on the tire’s sidewall). Using tires of a
different size or construction can cause ce rtain vehicle systems such as the ABS and
Vehicle Stability Assist
TM (VSA ®) system to work incorrectly.
It is best to replace all four tires at the same time. If that isn’t possible, replace the
front or rear tires in pairs.
Make sure that the wheel’s specifications match those of the original wheels.
1 Tire and Wheel Replacement
3WARNING
Installing improper tires on your vehicle can
affect handling and stability. This can cause
a crash in which you can be seriously hurt or
killed.
Always use the size and type of tires
recommended in this owner’s manual.
Page 590 of 657

588
Maintenance
Cleaning
Interior Care
Use a damp cloth with a mixture of mild detergent and warm water to remove dirt.
Use a clean cloth to remove detergent residue.
Use a soft brush with a mixture of mild soap and warm water to clean the seat belts.
Let the belts air dry. Wipe the openings of the seat belt anchors using a clean cloth.
Wipe using a glass cleaner.
■Cleaning Seat Belts
1 Interior Care
Do not spill liquids inside the vehicle. Electrical
devices and systems may ma lfunction if liquids are
splashed on them.
Do not use silicone based sprays on electrical devices
such as audio devices and switches. Doing so may
cause the items to malfunction or cause a fire inside
the vehicle. If a silicone based spray is inadvertently
used on electrical devi ces, consult a dealer.
Depending on their compos ition, chemicals and
liquid aromatics may cause discoloration, wrinkles,
and cracking to resin-ba sed parts and textiles.
Do not use alkali solvents or organic solvents such as
benzene or gasoline.
After using chemicals, make su re to gently wipe them
away using a dry cloth.
Do not place used cloths on top of resin based parts
or textiles for long periods of time without washing.
Opening
■Cleaning the Window1Cleaning the Window
Wires are mounted to the in side of the rear window.
Wipe along the same direct ion as the wires with a
soft cloth so as not to damage them.
Be careful not to spill fluids, such as water or glass
cleaner, on or around the co ver of both the front
sensor camera and the rainfall/light sensor
*.
* Not available on all models
Page 591 of 657
589
uuCleaning uInterior Care
Maintenance
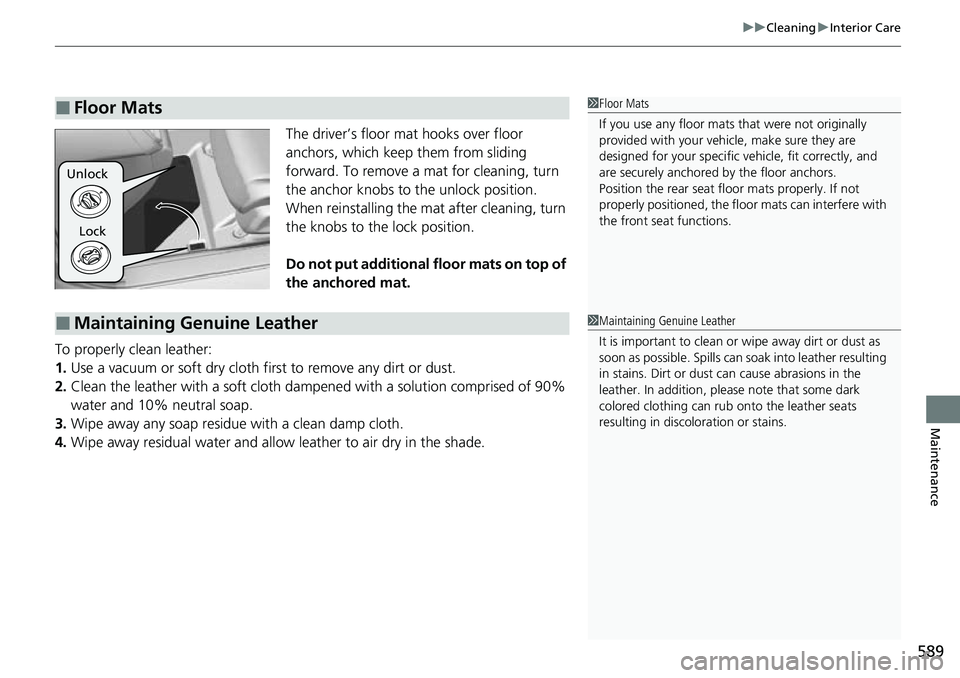
The driver’s floor mat hooks over floor
anchors, which keep them from sliding
forward. To remove a mat for cleaning, turn
the anchor knobs to the unlock position.
When reinstalling the mat after cleaning, turn
the knobs to the lock position.
Do not put additional floor mats on top of
the anchored mat.
To properly clean leather:
1. Use a vacuum or soft dry cloth first to remove any dirt or dust.
2. Clean the leather with a soft cloth dampen ed with a solution comprised of 90%
water and 10% neutral soap.
3. Wipe away any soap residu e with a clean damp cloth.
4. Wipe away residual water and allo w leather to air dry in the shade.
■Floor Mats1Floor Mats
If you use any floor mats that were not originally
provided with your vehicle, make sure they are
designed for your specific ve hicle, fit correctly, and
are securely anchored by the floor anchors.
Position the rear seat floor mats properly. If not
properly positioned, the floor mats can interfere with
the front seat functions.
Lock
Unlock
■Maintaining Genuine Leather1
Maintaining Genuine Leather
It is important to clean or wipe away dirt or dust as
soon as possible. Spills can soak into leather resulting
in stains. Dirt or dust ca n cause abrasions in the
leather. In addition, pl ease note that some dark
colored clothing can rub onto the leather seats
resulting in discol oration or stains.