2022 GMC SIERRA AUX
[x] Cancel search: AUXPage 35 of 474

GMC Sierra/Sierra Denali 1500 Owner Manual (GMNA-Localizing-U.S./
Canada/Mexico-15883563) - 2022 - CRC - 11/19/21
34 Keys, Doors, and Windows
Trailer-Tow Mirrors
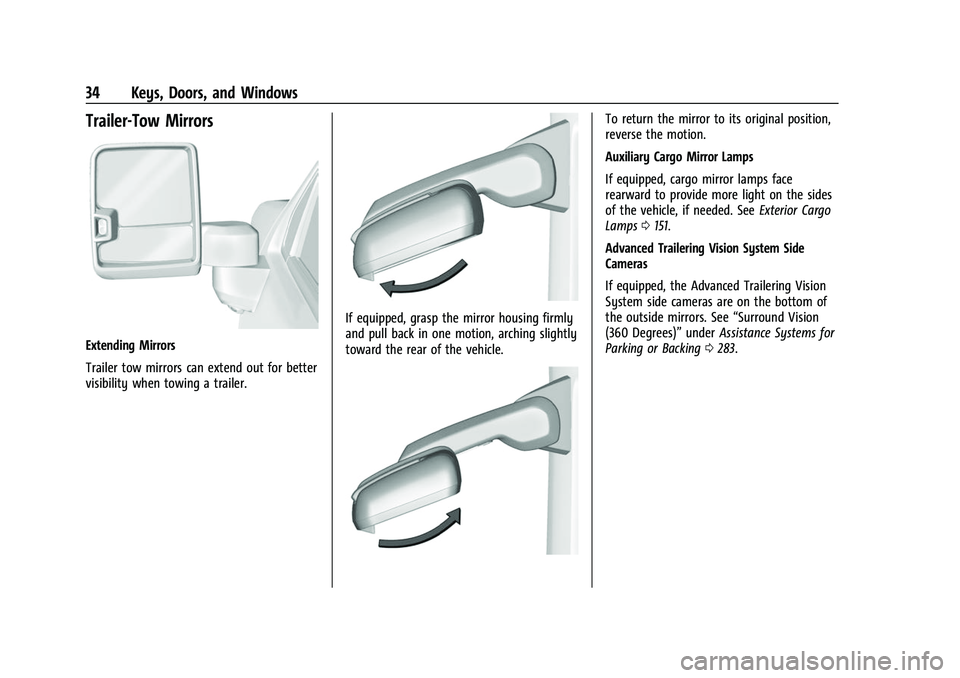
Extending Mirrors
Trailer tow mirrors can extend out for better
visibility when towing a trailer.
If equipped, grasp the mirror housing firmly
and pull back in one motion, arching slightly
toward the rear of the vehicle.
To return the mirror to its original position,
reverse the motion.
Auxiliary Cargo Mirror Lamps
If equipped, cargo mirror lamps face
rearward to provide more light on the sides
of the vehicle, if needed. SeeExterior Cargo
Lamps 0151.
Advanced Trailering Vision System Side
Cameras
If equipped, the Advanced Trailering Vision
System side cameras are on the bottom of
the outside mirrors. See “Surround Vision
(360 Degrees)” underAssistance Systems for
Parking or Backing 0283.
Page 146 of 474

GMC Sierra/Sierra Denali 1500 Owner Manual (GMNA-Localizing-U.S./
Canada/Mexico-15883563) - 2022 - CRC - 11/19/21
Lighting 145
Lighting
Exterior Lighting
Exterior Lamp Controls . . . . . . . . . . . . . . . . 145
Exterior Lamps Off Reminder . . . . . . . . . . 147
Headlamp High/Low-Beam Changer . . . . 147
Flash-to-Pass . . . . . . . . . . . . . . . . . . . . . . . . . . . 147
Daytime Running Lamps (DRL) . . . . . . . . . 147
Automatic Headlamp System . . . . . . . . . . 147
Hazard Warning Flashers . . . . . . . . . . . . . . 148
Turn and Lane-Change Signals . . . . . . . . . 149
Fog Lamps . . . . . . . . . . . . . . . . . . . . . . . . . . . . . 150
Task Lighting . . . . . . . . . . . . . . . . . . . . . . . . . . 150
Auxiliary Roof-Mounted Lamp . . . . . . . . . 150
Exterior Cargo Lamps . . . . . . . . . . . . . . . . . . 151
Interior Lighting
Instrument Panel IlluminationControl . . . . . . . . . . . . . . . . . . . . . . . . . . . . . . . 152
Dome Lamps . . . . . . . . . . . . . . . . . . . . . . . . . . . 152
Reading Lamps . . . . . . . . . . . . . . . . . . . . . . . . . 153
Lighting Features
Entry Lighting . . . . . . . . . . . . . . . . . . . . . . . . . 153
Exit Lighting . . . . . . . . . . . . . . . . . . . . . . . . . . . 153
Battery Load Management . . . . . . . . . . . . 154
Battery Power Protection . . . . . . . . . . . . . . 154
Exterior Lighting Battery Saver . . . . . . . . 154
Exterior Lighting
Exterior Lamp Controls
The exterior lamp control is on the
instrument panel to the left of the steering
wheel.
O: Turns off the automatic headlamps and
Daytime Running Lamps (DRL). Turn the
headlamp control to
Oagain to turn the
automatic headlamps or DRL back on.
For vehicles first sold in Canada, off will only
work when the vehicle is in P (Park). AUTO :
Automatically turns on the
headlamps, parking lamps, taillamps,
instrument panel lights, roof marker lamps
(if equipped), front/rear sidemarker lamps,
and license plate lamps.
;: Turns on the parking lamps including
all lamps, except the headlamps and fog
lamps, if equipped.
For some trim levels and series of trucks
first sold in Canada, the headlamps may
turn on with the parking lamps.
2: Turns on the headlamps together with
the parking lamps, taillamps, instrument
panel lights, roof marker lamps (if
equipped), front/rear sidemarker lamps,
and license plate lamps.
When the headlamps are turned on while
the vehicle is on, the headlamps turn off
automatically 10 minutes after the ignition
is turned off. When the headlamps are
turned on while the vehicle is off, the
headlamps will stay on for 10 minutes
before turning off to prevent the battery
from being drained. Turn the headlamp
control off and then back to the headlamp
on position to make the headlamps stay on
Page 151 of 474

GMC Sierra/Sierra Denali 1500 Owner Manual (GMNA-Localizing-U.S./
Canada/Mexico-15883563) - 2022 - CRC - 11/19/21
150 Lighting
Fog Lamps
If equipped, the fog lamp control is near the
exterior lamp control to the left of the
steering column.
The vehicle must be on for the fog lamps to
come on.
#:Press to turn the fog lamps on or off.
A light will come on in the instrument
cluster.
When the fog lamps are turned on, the
parking lamps automatically turn on.
When the headlamps are changed to high
beam, the fog lamps also go off. When the
high-beam headlamps are turned off, the fog
lamps will come on again. Some localities have laws that require the
headlamps to be on with the fog lamps.
Task Lighting
If equipped, task lighting projects light from
the outside mirrors away from the vehicle.
While the vehicle is parked, press
Kto
select one of the following options:
.Left and Right Task Lights Illuminated
.Left Task Light Illuminated
.Right Task Light Illuminated
.Left and Right Task Lights Off
If the vehicle leaves a parked position, the
lights will immediately turn off. If the vehicle is off, the lights will stay on
for approximately 10 minutes.
If any Task lights are on, if the button has
not been pressed after approximately
5 seconds, pressing it again will turn off all
Task Lights.
Auxiliary Roof-Mounted Lamp
If equipped, this button includes wiring
provisions for a dealer or a qualified service
center to install an auxiliary roof lamp.
Work Truck
Page 160 of 474

GMC Sierra/Sierra Denali 1500 Owner Manual (GMNA-Localizing-U.S./
Canada/Mexico-15883563) - 2022 - CRC - 11/19/21
Infotainment System 159
The favorites and volume switches are on
the back of the steering wheel.1. Favorite: When on a radio source, press to select the next or previous audio
broadcast favorite. When listening to a
media device, press to select the next or
previous track.
2. Volume: Press to increase or decrease the volume.
Using the System
Audio
Touch the Audio icon to display the active
audio source page. Examples of available
sources may include AM, FM, SXM (if
equipped), USB, AUX, and Bluetooth.
Phone
Touch the Phone icon to display the Phone
main page. See Bluetooth (Overview) 0174
or Bluetooth (Pairing and Using a Phone for
Uplevel Radio) 0178 orBluetooth (Pairing
and Using a Phone for Base Radio) 0175.
Maps
If equipped, touch the Maps icon to display
the navigation map. See Using the
Navigation System 0169.
Google Assistant
If equipped, touch the Google Assistant icon
to open the Google Assistant app. See Voice
Recognition 0172.
Google Play
If equipped, touch to download some of
your favorite apps in your vehicle.
Downloading apps on Google Play require
you to sign into a Google Account with an
active service plan with data. Some
third-party apps require a separate account
and, in some cases, a paid subscription for
in-vehicle access.
Settings
Touch the Settings icon to display the
Settings menu. See Settings (Uplevel Radio)
0 187 or]Settings (Base Radio) 0185.
Apple CarPlay
If equipped, touch the Apple CarPlay icon to
activate Apple CarPlay after a supported
device is connected. See Apple CarPlay and
Android Auto (Uplevel Radio) 0183 or
Apple CarPlay and Android Auto (Base
Radio) 0182.
Android Auto
If equipped, touch the Android Auto icon to
activate Android Auto after a supported
device is connected. See Apple CarPlay and
Android Auto (Uplevel Radio) 0183 or
Apple CarPlay and Android Auto (Base
Radio) 0182.
Camera
If equipped, touch the Camera icon to access
the camera application. See Assistance
Systems for Parking or Backing 0283.
Page 162 of 474

GMC Sierra/Sierra Denali 1500 Owner Manual (GMNA-Localizing-U.S./
Canada/Mexico-15883563) - 2022 - CRC - 11/19/21
Infotainment System 161
Fling or swipe is used to scroll through a
list, pan the map, or change page views. Do
this by placing a finger on the display then
moving it rapidly up and down or right
and left.
Spread
Spread is used to zoom in on a map, certain
images, or a web page. Place finger and
thumb together on the display, then move
them apart.Pinch
Pinch is used to zoom out on a map, certain
images, or a web page. Place finger and
thumb apart on the display, then move
them together.
Cleaning High Gloss Surfaces and Vehicle
Information and Radio Displays
For vehicles with high gloss surfaces or
vehicle displays, use a microfiber cloth to
wipe surfaces. Before wiping the surface
with the microfiber cloth, use a soft bristle
brush to remove dirt that could scratch the
surface. Then use the microfiber cloth by
gently rubbing to clean. Never use window
cleaners or solvents. Periodically hand wash
the microfiber cloth separately, using mild
soap. Do not use bleach or fabric softener.
Rinse thoroughly and air dry before
next use.
Software Updates
Over-the-Air Software Updates
If equipped, see
“Updates”underSettings
(Uplevel Radio) 0187 or
Settings (Base Radio) 0185 for details on
software updates.
Radio
AM-FM Radio (Base Radio)
Playing the Radio
From the Home Page, touch the Audio icon
to display the active audio source page.
Choose from a list of the three most
recently used sources listed at the left side
of the screen. Choose More to display a list
of available Sources. Examples of available
sources are AM, FM, SiriusXM (if equipped),
MyMedia, USB, AUX (if equipped), and
Bluetooth.
Infotainment System Sound Menu
From any of the audio source main pages,
touch Sound to display the following:
Equalizer : Touch to adjust Bass, Midrange,
and Treble using the controls on the
infotainment display.
Page 228 of 474

GMC Sierra/Sierra Denali 1500 Owner Manual (GMNA-Localizing-U.S./
Canada/Mexico-15883563) - 2022 - CRC - 11/19/21
Driving and Operating 227
Retained Accessory Power (RAP)
When the ignition is turned from on to off,
the following features (if equipped) will
continue to function for up to 10 minutes,
or until the driver door is opened. These
features will also work when the ignition is
in RUN or ACC/ACCESSORY:
.Infotainment System
.Power Windows (during RAP this
functionality will be lost when any door
is opened)
.Sunroof (during RAP this functionality will
be lost when any door is opened)
.Auxiliary Power Outlet
.Audio System
.OnStar System
Shifting Into Park (Mechanical
Shifter)
{Warning
It can be dangerous to get out of the
vehicle if the shift lever is not fully in
P (Park) with the parking brake firmly set.
The vehicle can roll. If you have left the
engine running, the vehicle can move(Continued)
Warning (Continued)
suddenly. You or others could be injured.
To be sure the vehicle will not move,
even when you are on fairly level ground,
use the steps that follow. With
four-wheel drive, if the transfer case is in
N (Neutral), the vehicle will be free to
roll, even if the shift lever is in P (Park).
Be sure the transfer case is in a drive
gear. If towing a trailer, seeDriving
Characteristics and Towing Tips 0309.
1. Hold the brake pedal down, then set the parking brake. See Electric Parking Brake
0 245.
2. Move the shift lever into P (Park) by pulling the shift lever toward you and
moving it up as far as it will go.
3. Be sure the transfer case, if equipped, is in a drive gear, not in N (Neutral).
4. Turn the vehicle off.
5. Take the remote key with you.
Leaving the Vehicle with the Engine
Running
{Warning
It can be dangerous to leave the vehicle
with the engine running. The vehicle
could move suddenly if the shift lever is
not fully in P (Park) with the parking
brake firmly set.
If you have four-wheel drive and the
transfer case is in N (Neutral), the vehicle
will be free to roll, even if the shift lever
is in P (Park). So be sure the transfer case
is in a drive gear –not in N (Neutral).
And, if you leave the vehicle with the
engine running, it could overheat and
even catch fire. You or others could be
injured. Do not leave the vehicle with the
engine running unless you have to.
If you have to leave the vehicle with the
engine running, be sure the vehicle is in
P (Park) and the parking brake is firmly set
before you leave it. After moving the shift
lever into P (Park), hold the regular brake
pedal down. Then, see if you can move the
shift lever away from P (Park) without first
Page 322 of 474

GMC Sierra/Sierra Denali 1500 Owner Manual (GMNA-Localizing-U.S./
Canada/Mexico-15883563) - 2022 - CRC - 11/19/21
Driving and Operating 321
Trailer Brakes
Loaded trailers over 900 kg (2,000 lb) must
be equipped with brake systems and with
brakes for each axle. Trailer braking
equipment conforming to Canadian
Standards Association (CSA) requirement
CAN3-D313, or its equivalent, is
recommended.
State or local regulations may require
trailers to have their own braking system if
the loaded weight of the trailer exceeds
certain minimums that can vary from state
to state. Read and follow the instructions for
the trailer brakes so they are installed,
adjusted, and maintained properly.
{Warning
Never attempt to tamper with the
hydraulic brake system for your trailer
brakes. Do not connect a trailer's
hydraulic brake system directly to your
vehicle's hydraulic brake system. If you
do, both the vehicle antilock brakes and
the trailer brakes may not function,
which could result in a crash.
Auxiliary Battery
If equipped, the vehicle's auxiliary battery
can be used to supply electrical power to
additional equipment that may be added,
such as a slide-in camper.
Locate the auxiliary battery connector under
the hood on the driver side of the vehicle,
next to the engine compartment fuse block.
Follow the proper installation instructions
included with any electrical equipment that
is installed.
Caution
To prevent draining the auxiliary battery,
always turn off electrical equipment
when not in use and do not use any
equipment that may exceed the
maximum amperage rating of 30 amps.
Trailer Wiring Harness
Basic Trailer Wiring
If the vehicle is not equipped with a trailer
connector on the rear bumper, a 7-wire
trailering harness is tied to the vehicles
frame. The harness requires the installation
of a trailer connector, which is available
through your dealer.Use only a round, seven-wire connector with
flat blade terminals meeting SAE J2863
specifications for proper electrical
connectivity.
The seven-wire harness contains the
following trailer circuits:
Stop/Turn
Signal Left Yellow/Blue
Stop/Turn Signal
Right Green/Violet
Tail/Parking Lamps Gray/Brown
Reverse Lamps White/Green
Battery Feed Red/Green
Ground White
Electric Trailer Brake Blue
If equipped, the trailer wiring harness, with
a 7-pin connector and a 4-pin connector, is
mounted on the vehicle's rear bumper.
Page 323 of 474

GMC Sierra/Sierra Denali 1500 Owner Manual (GMNA-Localizing-U.S./
Canada/Mexico-15883563) - 2022 - CRC - 11/19/21
322 Driving and Operating
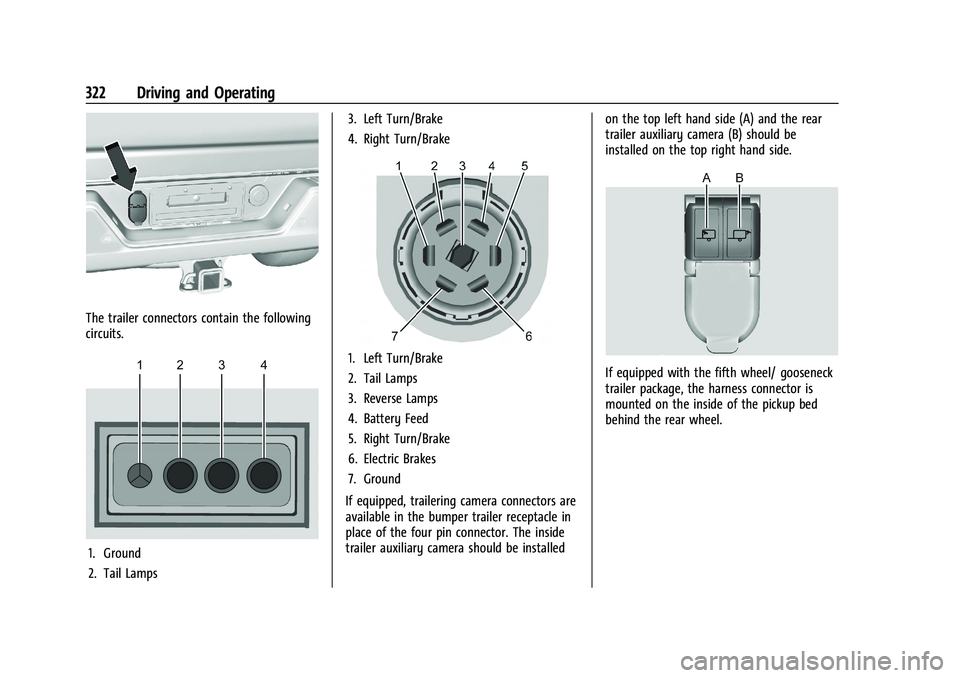
The trailer connectors contain the following
circuits.
1. Ground
2. Tail Lamps3. Left Turn/Brake
4. Right Turn/Brake
1. Left Turn/Brake
2. Tail Lamps
3. Reverse Lamps
4. Battery Feed
5. Right Turn/Brake
6. Electric Brakes
7. Ground
If equipped, trailering camera connectors are
available in the bumper trailer receptacle in
place of the four pin connector. The inside
trailer auxiliary camera should be installed on the top left hand side (A) and the rear
trailer auxiliary camera (B) should be
installed on the top right hand side.If equipped with the fifth wheel/ gooseneck
trailer package, the harness connector is
mounted on the inside of the pickup bed
behind the rear wheel.