2022 GMC SIERRA infotainment
[x] Cancel search: infotainmentPage 228 of 474
GMC Sierra/Sierra Denali 1500 Owner Manual (GMNA-Localizing-U.S./
Canada/Mexico-15883563) - 2022 - CRC - 11/19/21
Driving and Operating 227
Retained Accessory Power (RAP)
When the ignition is turned from on to off,
the following features (if equipped) will
continue to function for up to 10 minutes,
or until the driver door is opened. These
features will also work when the ignition is
in RUN or ACC/ACCESSORY:
.Infotainment System
.Power Windows (during RAP this
functionality will be lost when any door
is opened)
.Sunroof (during RAP this functionality will
be lost when any door is opened)
.Auxiliary Power Outlet
.Audio System
.OnStar System
Shifting Into Park (Mechanical
Shifter)
{Warning
It can be dangerous to get out of the
vehicle if the shift lever is not fully in
P (Park) with the parking brake firmly set.
The vehicle can roll. If you have left the
engine running, the vehicle can move(Continued)
Warning (Continued)
suddenly. You or others could be injured.
To be sure the vehicle will not move,
even when you are on fairly level ground,
use the steps that follow. With
four-wheel drive, if the transfer case is in
N (Neutral), the vehicle will be free to
roll, even if the shift lever is in P (Park).
Be sure the transfer case is in a drive
gear. If towing a trailer, seeDriving
Characteristics and Towing Tips 0309.
1. Hold the brake pedal down, then set the parking brake. See Electric Parking Brake
0 245.
2. Move the shift lever into P (Park) by pulling the shift lever toward you and
moving it up as far as it will go.
3. Be sure the transfer case, if equipped, is in a drive gear, not in N (Neutral).
4. Turn the vehicle off.
5. Take the remote key with you.
Leaving the Vehicle with the Engine
Running
{Warning
It can be dangerous to leave the vehicle
with the engine running. The vehicle
could move suddenly if the shift lever is
not fully in P (Park) with the parking
brake firmly set.
If you have four-wheel drive and the
transfer case is in N (Neutral), the vehicle
will be free to roll, even if the shift lever
is in P (Park). So be sure the transfer case
is in a drive gear –not in N (Neutral).
And, if you leave the vehicle with the
engine running, it could overheat and
even catch fire. You or others could be
injured. Do not leave the vehicle with the
engine running unless you have to.
If you have to leave the vehicle with the
engine running, be sure the vehicle is in
P (Park) and the parking brake is firmly set
before you leave it. After moving the shift
lever into P (Park), hold the regular brake
pedal down. Then, see if you can move the
shift lever away from P (Park) without first
Page 284 of 474
GMC Sierra/Sierra Denali 1500 Owner Manual (GMNA-Localizing-U.S./
Canada/Mexico-15883563) - 2022 - CRC - 11/19/21
Driving and Operating 283
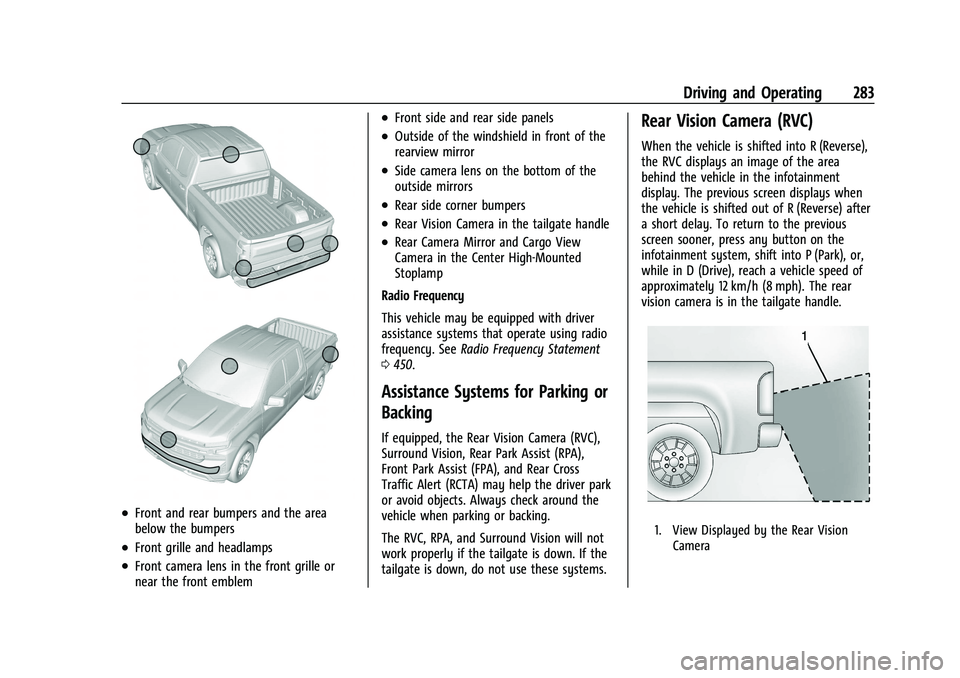
.Front and rear bumpers and the area
below the bumpers
.Front grille and headlamps
.Front camera lens in the front grille or
near the front emblem
.Front side and rear side panels
.Outside of the windshield in front of the
rearview mirror
.Side camera lens on the bottom of the
outside mirrors
.Rear side corner bumpers
.Rear Vision Camera in the tailgate handle
.Rear Camera Mirror and Cargo View
Camera in the Center High-Mounted
Stoplamp
Radio Frequency
This vehicle may be equipped with driver
assistance systems that operate using radio
frequency. See Radio Frequency Statement
0 450.
Assistance Systems for Parking or
Backing
If equipped, the Rear Vision Camera (RVC),
Surround Vision, Rear Park Assist (RPA),
Front Park Assist (FPA), and Rear Cross
Traffic Alert (RCTA) may help the driver park
or avoid objects. Always check around the
vehicle when parking or backing.
The RVC, RPA, and Surround Vision will not
work properly if the tailgate is down. If the
tailgate is down, do not use these systems.
Rear Vision Camera (RVC)
When the vehicle is shifted into R (Reverse),
the RVC displays an image of the area
behind the vehicle in the infotainment
display. The previous screen displays when
the vehicle is shifted out of R (Reverse) after
a short delay. To return to the previous
screen sooner, press any button on the
infotainment system, shift into P (Park), or,
while in D (Drive), reach a vehicle speed of
approximately 12 km/h (8 mph). The rear
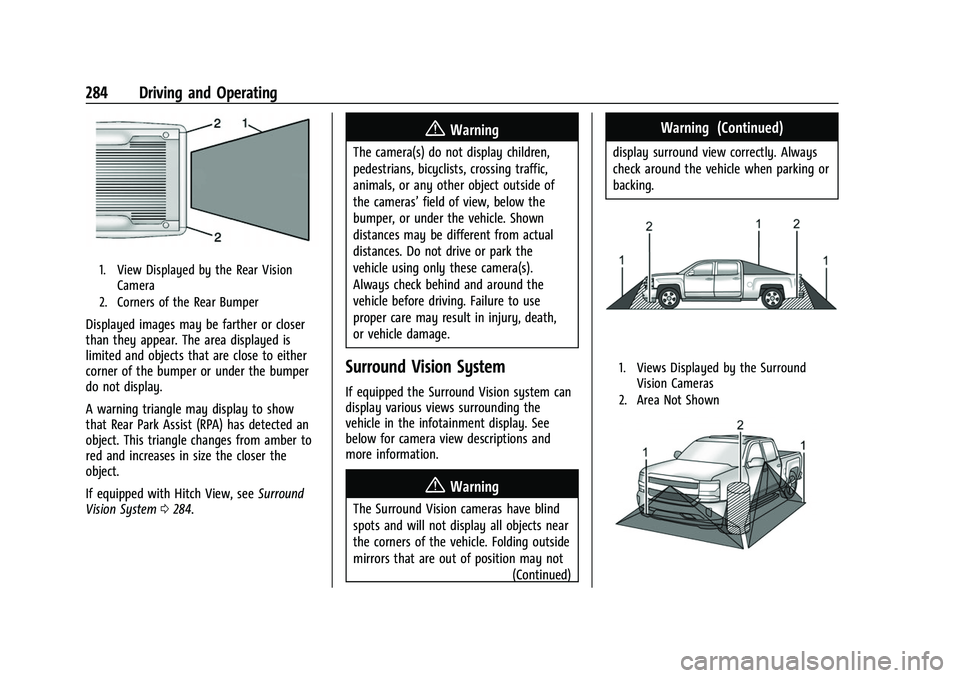
vision camera is in the tailgate handle.
1. View Displayed by the Rear Vision
Camera
Page 285 of 474
GMC Sierra/Sierra Denali 1500 Owner Manual (GMNA-Localizing-U.S./
Canada/Mexico-15883563) - 2022 - CRC - 11/19/21
284 Driving and Operating
1. View Displayed by the Rear VisionCamera
2. Corners of the Rear Bumper
Displayed images may be farther or closer
than they appear. The area displayed is
limited and objects that are close to either
corner of the bumper or under the bumper
do not display.
A warning triangle may display to show
that Rear Park Assist (RPA) has detected an
object. This triangle changes from amber to
red and increases in size the closer the
object.
If equipped with Hitch View, see Surround
Vision System 0284.
{Warning
The camera(s) do not display children,
pedestrians, bicyclists, crossing traffic,
animals, or any other object outside of
the cameras’ field of view, below the
bumper, or under the vehicle. Shown
distances may be different from actual
distances. Do not drive or park the
vehicle using only these camera(s).
Always check behind and around the
vehicle before driving. Failure to use
proper care may result in injury, death,
or vehicle damage.
Surround Vision System
If equipped the Surround Vision system can
display various views surrounding the
vehicle in the infotainment display. See
below for camera view descriptions and
more information.
{Warning
The Surround Vision cameras have blind
spots and will not display all objects near
the corners of the vehicle. Folding outside
mirrors that are out of position may not (Continued)
Warning (Continued)
display surround view correctly. Always
check around the vehicle when parking or
backing.
1. Views Displayed by the SurroundVision Cameras
2. Area Not Shown
Page 286 of 474
GMC Sierra/Sierra Denali 1500 Owner Manual (GMNA-Localizing-U.S./
Canada/Mexico-15883563) - 2022 - CRC - 11/19/21
Driving and Operating 285
1. Views Displayed by the SurroundVision Cameras
2. Area Not Shown
{Warning
The camera(s) do not display children,
pedestrians, bicyclists, crossing traffic,
animals, or any other object outside of
the cameras’ field of view, below the
bumper, or under the vehicle. Shown
distances may be different from actual
distances. Do not drive or park the
vehicle using only these camera(s).
Always check behind and around the
vehicle before driving. Failure to use
proper care may result in injury, death,
or vehicle damage. Camera Views
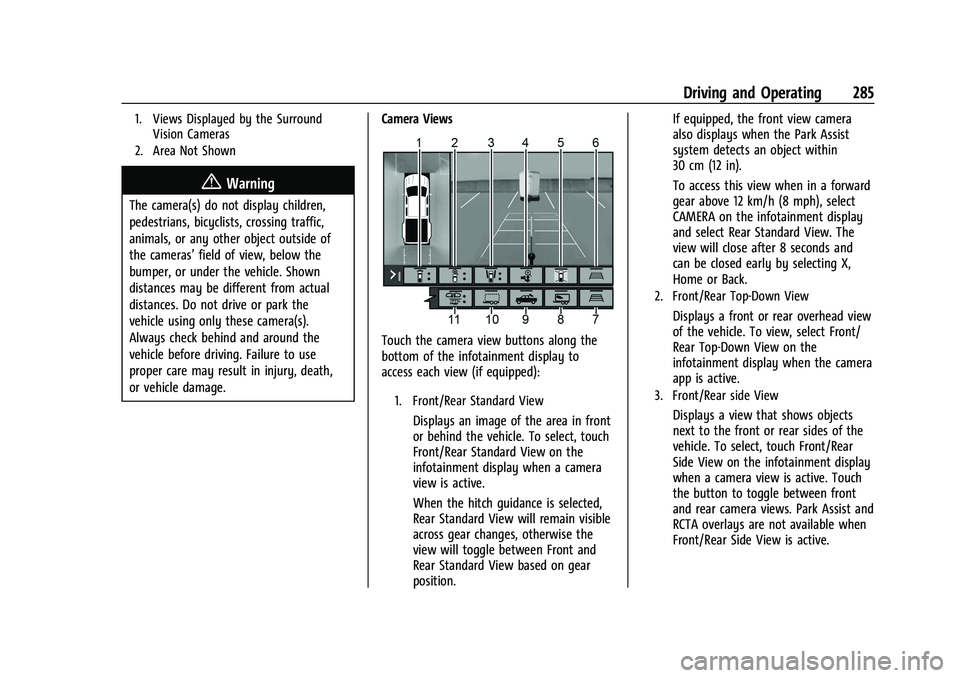
Touch the camera view buttons along the
bottom of the infotainment display to
access each view (if equipped):
1. Front/Rear Standard View
Displays an image of the area in front
or behind the vehicle. To select, touch
Front/Rear Standard View on the
infotainment display when a camera
view is active.
When the hitch guidance is selected,
Rear Standard View will remain visible
across gear changes, otherwise the
view will toggle between Front and
Rear Standard View based on gear
position. If equipped, the front view camera
also displays when the Park Assist
system detects an object within
30 cm (12 in).
To access this view when in a forward
gear above 12 km/h (8 mph), select
CAMERA on the infotainment display
and select Rear Standard View. The
view will close after 8 seconds and
can be closed early by selecting X,
Home or Back.
2. Front/Rear Top-Down View
Displays a front or rear overhead view
of the vehicle. To view, select Front/
Rear Top-Down View on the
infotainment display when the camera
app is active.
3. Front/Rear side View
Displays a view that shows objects
next to the front or rear sides of the
vehicle. To select, touch Front/Rear
Side View on the infotainment display
when a camera view is active. Touch
the button to toggle between front
and rear camera views. Park Assist and
RCTA overlays are not available when
Front/Rear Side View is active.
Page 287 of 474
GMC Sierra/Sierra Denali 1500 Owner Manual (GMNA-Localizing-U.S./
Canada/Mexico-15883563) - 2022 - CRC - 11/19/21
286 Driving and Operating
4. Hitch View
Displays a zoomed-in view of the hitch
area to assist with aligning the
vehicle’s hitch ball with the trailer
coupler and monitoring the trailer
connection. To view, select Hitch View
on the infotainment display when the
Camera App is active. To access this
view when in a forward gear above
12 km/h (8 mph), select CAMERA on
the infotainment display and select
Hitch View. The view will close after
eight seconds and can be closed early
by selecting X, Home or Back. Shifting
into P (Park) while in this view will
automatically engage the Electric
Parking Brake (EPB).
5. Surround View
Displays an image of the area
surrounding the vehicle. Surround
View is displayed alongside the
currently selected view when below
12 km/h (8 mph). Surround View is
disabled when above 12 km/h (8 mph).
6. Camera App Guidance Lines
The Camera App supports three
possible guidance modes: No
Guidance, Vehicle Guidance and
Trailering Guidance. To changeguidance mode, select the appropriate
guidance icon. Depending on the
guidance mode and view selected,
different guidance lines may appear.
A grayed-out icon indicates that
guidance lines are not available.
Certain views do not support Guidance
lines.
.Standard Guidance Lines are
available in Front/Rear Standard
Views, Front/Rear Top-Down Views
and Surround View when the
vehicle guidance mode is selected.
Standard Guidance Lines show
current and intended vehicle path.
.Hitch Guidance Line is available in
Rear Standard View or Cargo Bed
View when the Trailering Guidance
mode is selected. Hitch Guidance
displays a single centered guidance
line on the infotainment display to
assist with aligning the vehicle’s
hitch with a trailer coupler. Align
the Hitch Guidance Line with the
trailer coupler by continuously
steering the vehicle to keep the
guidance line centered on the
coupler when backing. Park Assist
overlays will not display when the
Hitch Guidance Line is active.
.Rear Trailer Guidance Lines are
available in the Rear Trailer View
when the Trailering Guidance
mode is selected and the rear
trailer camera calibration has been
successfully completed. Rear Trailer
Guidance Lines show the intended
path (yellow) and the current path
(blue) of the trailer. The current
path guidance lines will converge
with the intended path guidance
lines.
7. Camera App Guidance Lines
Duplicate of item 6.
8. Interior Trailer View
Displays a view of the interior of the
trailer. The feature is available when a
trailer is connected. The feature
requires user installation of an
accessory trailer camera on the
interior of the trailer per the accessory
trailer camera installation instructions
(see your dealer for accessory trailer
camera(s) and information). To view,
select Interior Trailer View on the
infotainment display when the Camera
App is active. To access this view
when in a forward gear above
12 km/h (8 mph), select CAMERA on
the infotainment display and select
Page 288 of 474

GMC Sierra/Sierra Denali 1500 Owner Manual (GMNA-Localizing-U.S./
Canada/Mexico-15883563) - 2022 - CRC - 11/19/21
Driving and Operating 287
Interior Trailer View. The view will
close after 8 seconds and can be
closed early by selecting X, Home
or Back.
9. Cargo Bed View/Bed Hitch View
Use the plus and minus icons on the
infotainment display to zoom in
or out.
.Cargo Bed View
Displays a view of the truck bed
and the area behind the vehicle to
assist in cargo or hitch monitoring
or hitching to a fifth wheel or
gooseneck trailer. To view, select
Cargo Bed View on the
infotainment display when the
Camera App is active. To access
this view when in a forward gear
above 12 km/h (8 mph), select
CAMERA on the infotainment
display and select Cargo Bed View.
The view will close after 8 seconds
and can be closed early by
selecting X, Home or Back. When
the Cargo Bed View is selected
when not in Drive the cargo bed
lighting is turned on automatically.The feature can be enabled or
disabled. See
Vehicle
Personalization 0137.
.Bed Hitch View
Displays a zoomed-in view of the
bed hitch area to assist with
aligning the vehicle’s hitch with
the trailer coupler and monitoring
the trailer connection. To view,
select Bed Hitch View on the
infotainment display when the
Camera App is active. To access
this view when in a forward gear
above 12 km/h (8 mph), select
CAMERA on the infotainment
display and select Bed Hitch View.
The view will close after 8 seconds
and can be closed early by
selecting X, Home or Back. When
the Bed Hitch View is selected
when not in Drive the cargo bed
lighting is turned on automatically.
The feature can be enabled or
disabled. See Vehicle
Personalization 0137.
10. Transparent Trailer View
Displays a view that allows the driver
to virtually “see through” the trailer.
The feature is available when a compatible trailer is connected, a valid
profile is selected and the vehicle is
not in Reverse. The feature requires
user installation of an accessory trailer
camera on the rear exterior surface of
the trailer per the accessory trailer
camera installation instructions (see
your dealer for accessory trailer
camera(s) and information). To view,
select Transparent Trailer View on the
infotainment display when the Camera
App is active. To access this view
when in a forward gear above
12 km/h (8 mph), select CAMERA on
the infotainment display and select
Transparent Trailer View. The view can
be closed by selecting X, Home
or Back.
When the system is calibrated and
trailer position is known one of three
views will be shown; Transparent
Trailer View, Left Transparent Trailer
View or Right Transparent Trailer
View. The Transparent Trailer View is
shown when the position of the trailer
is relatively straight behind the
vehicle. The Left or Right Transparent
Trailer view is shown when the
position of the trailer is too far to the
left or right. When the system is not
Page 289 of 474

GMC Sierra/Sierra Denali 1500 Owner Manual (GMNA-Localizing-U.S./
Canada/Mexico-15883563) - 2022 - CRC - 11/19/21
288 Driving and Operating
calibrated or trailer position is not
known the Transparent Trailer
Picture-in-Picture View will be shown.
11. Rear Trailer Views
.Rear Trailer View
Displays a view of the area behind
the trailer when a trailer is
connected. The feature requires
user installation of an accessory
trailer camera on the rear exterior
surface of the trailer per the
accessory trailer camera
installation instructions (see your
dealer for accessory trailer
camera(s) and information). To
view, select Rear Trailer View on
the infotainment display when the
Camera App is active. To access
this view when in a forward gear
above 12 km/h (8 mph), select
CAMERA on the infotainment
display and select Rear Trailer
View. The view can be closed by
selecting X, Home or Back.
.Rear Side View with Available
Articulation Functionality
Displays a rearward split view of
the left and right sides of the
vehicle and trailer, when a trailer isconnected. The view will
automatically pan to show more of
the left or right side based on the
position of the trailer when a
compatible profile is configured
and selected via the Trailering App.
To view, select Rear Side View with
Available Articulation Functionality
on the infotainment display when
the Camera App is active. To access
this view when in a forward gear
above 12 km/h (8 mph), select
CAMERA on the infotainment
display and select Rear Side View
with Available Articulation
Functionality. The view can be
closed by selecting X, Home
or Back.
.Picture-in-Picture Side View
Displays a rearward split view of
the left and right sides of the
vehicle and trailer with an overlay
view of the area behind the trailer
when a trailer is connected. The
feature requires user installation of
an accessory trailer camera on the
rear exterior surface of the trailer
per the accessory trailer camera
installation instructions (see your
dealer for accessory trailercamera(s) and information). To
view, select Picture-in-Picture Side
View on the infotainment display
when the Camera App is active. To
access this view when in a forward
gear above 12 km/h (8 mph), select
CAMERA on the infotainment
display and select Picture-in-Picture
Side View. The view can be closed
by selecting X, Home or Back.
Additional Views and Alerts
.Turn Signal Activated Views
Displays a rearward view of the left or
right side of the vehicle and trailer when
a trailer is connected. Views are provided
based on turn signal activation with the
right-side view being shown when the
right turn signal is active and the left side
view being shown when the left turn
signal is active. The feature can be
enabled or disabled. See Vehicle
Personalization 0137. The view can be
closed early by selecting X, Home or Back.
A Trailer Length Indicator Overlay is
available in the Turn Signal Activated
Views when the trailer is relatively
straight behind the vehicle and a
compatible profile is configured and
selected via the Trailering App. The
Page 290 of 474
GMC Sierra/Sierra Denali 1500 Owner Manual (GMNA-Localizing-U.S./
Canada/Mexico-15883563) - 2022 - CRC - 11/19/21
Driving and Operating 289
overlay will not be visible when the
position of the trailer is too far to the left
or right. The overlay can be enabled or
disabled. SeeVehicle Personalization
0 137.
.Jack-Knife Detection and Alert
The vehicle may be equipped with
Jack-Knife Detection. The system will track
the position of the trailer relative to the
vehicle. As the front of the trailer
approaches the rear of the vehicle, a
warning or an alert will be displayed.
A warning indicates to the driver to
proceed with caution, an alert indicates
that a collision is imminent. Based on
vehicle equipment and user settings, the
visual warning or alert may be
accompanied by audible or safety alert
seat notifications. See Vehicle
Personalization 0137.
.Trailer Angle Indicator
The vehicle may be equipped with a
Trailer Angle Indicator. The Trailer Angle
Indicator gives the driver a visual
representation of the trailer’s position
relative to the vehicle. (Available only in
Reverse, Guidelines On, Rear Trailering
Views).
{Warning
Use Hitch Guidance only to help back the
vehicle to a trailer hitch or, when
traveling above 12 km/h (8 mph), to
briefly check the status of your trailer. Do
not use for any other purpose, such as
making lane change decisions. Before
making a lane change, always check the
mirrors and glance over your shoulder.
Improper use could result in serious
injury to you or others.
HD Surround Vision with Trailer Camera
Provisions
If equipped, this feature provides additional
views to aid in trailering/towing. The
system shows multiple views in the
infotainment display using five cameras
mounted around the vehicle and up to two
additional accessory cameras that can be
mounted on or in a trailer. The front camera
is in the grille under the front emblem, the
side cameras are on the bottom of the
outside mirrors, the rear camera is in the
tailgate handle and the bed camera is
mounted on the rear of the cab.
Additionally, up to two accessory cameras
can be mounted to the rear and/or interior of the trailer. See your dealer for accessory
trailer cameras. To access, touch CAMERA on
the infotainment display or shift to
R (Reverse). To return to the previous screen
when not in reverse, touch the Home or
Back buttons on the infotainment display.
Certain trailer views require a compatible
trailer profile be configured and selected.
A compatible trailer is a box type trailer
(cargo, camper, etc.) with a conventional
hitch.
Available camera views:
.Front/Rear Standard View
.Front/Rear Top-Down View
.Rear Bowl View
.Front/Rear Side View
.Hitch View
.Bed View
.Rear trailer View
.Rear Side view with a available
articulation functionality
.Picture-in-Picture Side View
.Interior Trailer View
.Transparent trailer View
.Surround View
.Guidance Lines
.Hitch Guidance