2022 GMC SIERRA ECU
[x] Cancel search: ECUPage 363 of 474

GMC Sierra/Sierra Denali 1500 Owner Manual (GMNA-Localizing-U.S./
Canada/Mexico-15883563) - 2022 - CRC - 11/19/21
362 Vehicle Care
Caution
If the battery is disconnected with the
ignition on or the vehicle in Retained
Accessory Power (RAP), the OnStar
back-up battery will be permanently
discharged and will need to be replaced.
1. Make sure the lamps, features, and accessories are turned off.
2. Turn the ignition off and remove the key, if equipped.
For vehicles equipped with the Stop/Start
system:
1. Loosen and remove the negative battery cable nut (1) at the battery sensor
connection.
2. Remove the negative battery cable (2) from the battery sensor stud.
3. Cover the negative battery cable terminal, battery sensor stud, and
negative battery post with a
non-conductive material to prevent any
contact with the negative battery cable.
For vehicles not equipped with the Stop/
Start system:
1. Loosen the negative battery cable nut (1).
2. Remove the negative battery cable clamp (2) from the negative battery post. 3. Cover the negative battery cable clamp,
and negative battery post with a
non-conductive material to prevent any
contact with the negative battery cable.
Negative Battery Cable Reconnection
Caution
When reconnecting the battery:
.Use the original nut from the vehicle
to secure the negative battery cable.
Do not use a different nut. If you
need a replacement nut, see your
dealer.
.Tighten the nut with a hand tool. Do
not use an impact wrench or power
tools to tighten the nut.
The vehicle could be damaged if these
guidelines are not followed.
Caution
Do not use paints, lubricants, or corrosion
inhibitors on the nut that secures the
negative battery cable to the vehicle. This
could damage the vehicle.
Page 396 of 474
GMC Sierra/Sierra Denali 1500 Owner Manual (GMNA-Localizing-U.S./
Canada/Mexico-15883563) - 2022 - CRC - 11/19/21
Vehicle Care 395
Warning (Continued)
It could fail suddenly and cause a crash.
When replacing wheels, use a new GM
original equipment wheel.
Caution
The wrong wheel can also cause
problems with bearing life, brake cooling,
speedometer or odometer calibration,
headlamp aim, bumper height, vehicle
ground clearance, and tire or tire chain
clearance to the body and chassis.
Tire Chains
{Warning
If the vehicle has 275/50R22, 275/60R20,
LT265/60R20, LT265/70R17, LT275/65R18,
or LT275/70R18 size tires, do not use tire
chains. There is not enough clearance.
Tire chains used on a vehicle without the
proper amount of clearance can cause
damage to the brakes, suspension,(Continued)
Warning (Continued)
or other vehicle parts. The area damaged
by the tire chains could cause loss of
control and a crash.
Use another type of traction device only
if its manufacturer recommends it for the
vehicle's tire size combination and road
conditions. Follow that manufacturer's
instructions. To avoid vehicle damage,
drive slow and readjust or remove the
traction device if it contacts the vehicle.
Do not spin the wheels.
If traction devices are used, install them
on the rear tires.
Caution
If the vehicle is equipped with a tire size
other than 275/50R22, 275/60R20,
LT265/60R20, LT265/70R17, LT275/65R18,
or LT275/70R18 use tire chains only where
legal and only when necessary. Use
chains that are the proper size for the
tires. Install them on the tires of the rear
axle. Do not use chains on the tires of
the front axle. Tighten them as tightly as
(Continued)
Caution (Continued)
possible with the ends securely fastened.
Drive slowly and follow the chain
manufacturer's instructions. If the chains
contact the vehicle, stop and retighten
them. If the contact continues, slow
down until it stops. Driving too fast or
spinning the wheels with chains on will
damage the vehicle.
If a Tire Goes Flat
It is unusual for a tire to blow out while
driving, especially if the tires are maintained
properly. If air goes out of a tire, it is much
more likely to leak out slowly. But if there
ever is a blowout, here are a few tips about
what to expect and what to do:
If a front tire fails, the flat tire creates a
drag that pulls the vehicle toward that side.
Take your foot off the accelerator pedal and
grip the steering wheel firmly. Steer to
maintain lane position, and then gently
brake to a stop, well off the road,
if possible.
A rear blowout, particularly on a curve, acts
much like a skid and may require the same
correction as used in a skid. Stop pressing
Page 404 of 474
GMC Sierra/Sierra Denali 1500 Owner Manual (GMNA-Localizing-U.S./
Canada/Mexico-15883563) - 2022 - CRC - 11/19/21
Vehicle Care 403
Storing a Flat or Spare Tire and Tools
{Warning
Storing a jack, a tire, or other equipment
in the passenger compartment of the
vehicle could cause injury. In a sudden
stop or collision, loose equipment could
strike someone. Store all these in the
proper place.
{Warning
Failure to follow these tire storage
instructions carefully could result in
personal injury or property damage if the
hoist cable fails or if the tire comes loose.
Make sure the tire is stored securely
before driving.
Caution
Storing an aluminum wheel with a flat
tire under your vehicle for an extended
period of time or with the valve stem
pointing up can damage the wheel.
Always stow the wheel with the valve
stem pointing down and have the wheel/
tire repaired as soon as possible.
Caution
The tire hoist can be damaged if there is
no tension on the cable when using it. To
have the necessary tension, the spare or
road tire and wheel assembly must be
installed on the tire hoist to use it.
{Warning
An improperly stored spare tire could
come loose and cause a crash. To avoid
personal injury or property damage,
always store the spare tire when the
vehicle is parked on a level surface.
Store the tire under the rear of the vehicle
in the spare tire carrier.
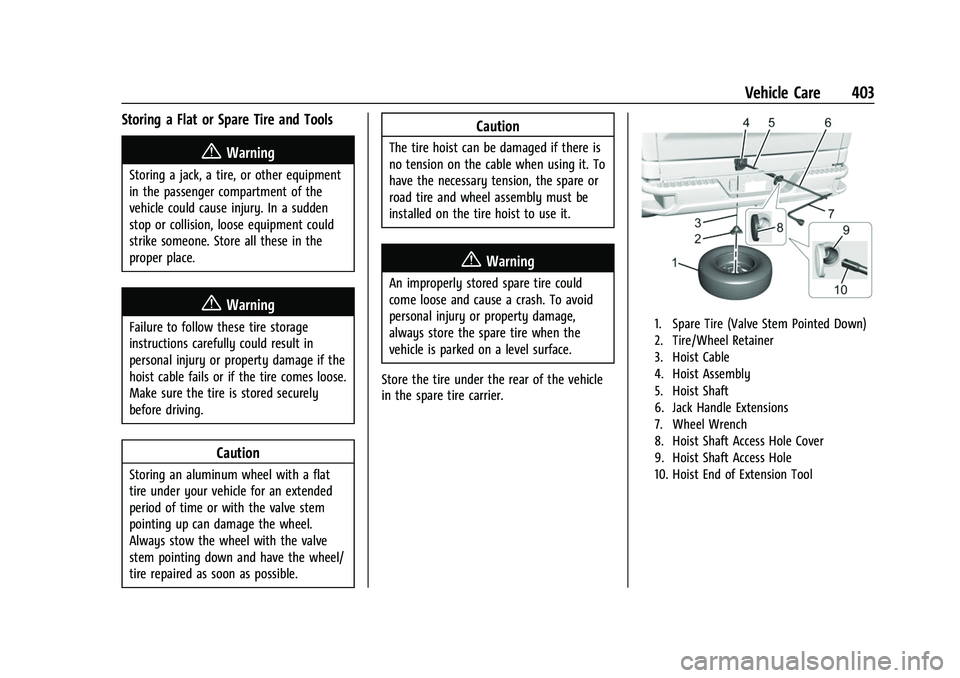
1. Spare Tire (Valve Stem Pointed Down)
2. Tire/Wheel Retainer
3. Hoist Cable
4. Hoist Assembly
5. Hoist Shaft
6. Jack Handle Extensions
7. Wheel Wrench
8. Hoist Shaft Access Hole Cover
9. Hoist Shaft Access Hole
10. Hoist End of Extension Tool
Page 406 of 474
GMC Sierra/Sierra Denali 1500 Owner Manual (GMNA-Localizing-U.S./
Canada/Mexico-15883563) - 2022 - CRC - 11/19/21
Vehicle Care 405
7. If equipped with a spare tire cable, orientthe cable by rotating the spare tire so
that the cable is by the frame
attachment location.
8. Raise the tire fully against the underside of the vehicle by turning the wheel
wrench clockwise until you hear two
clicks or feel it skip twice. You cannot
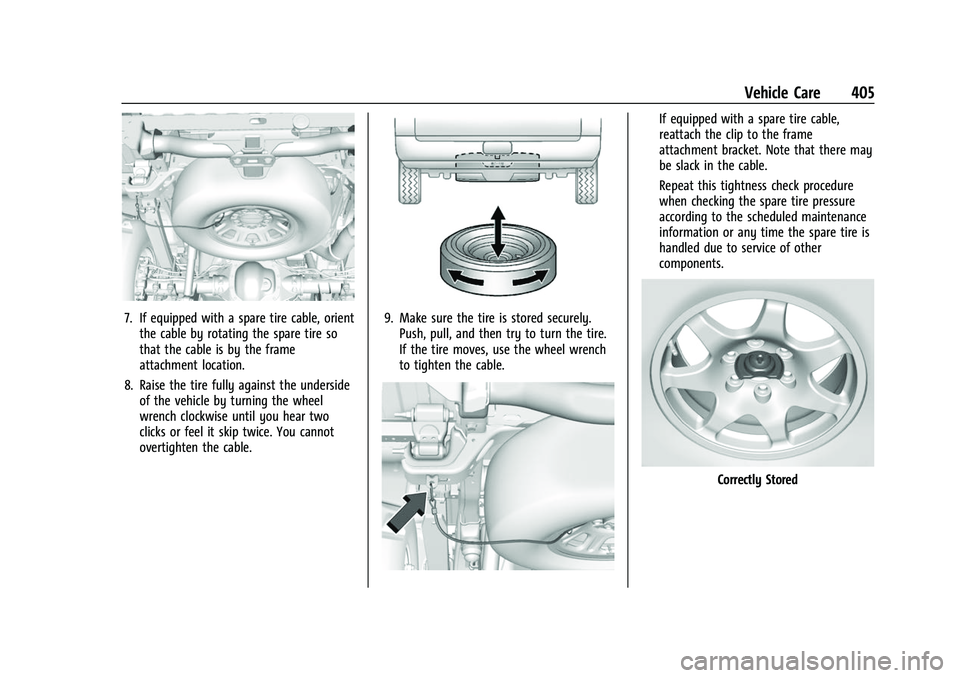
overtighten the cable.9. Make sure the tire is stored securely.Push, pull, and then try to turn the tire.
If the tire moves, use the wheel wrench
to tighten the cable.
If equipped with a spare tire cable,
reattach the clip to the frame
attachment bracket. Note that there may
be slack in the cable.
Repeat this tightness check procedure
when checking the spare tire pressure
according to the scheduled maintenance
information or any time the spare tire is
handled due to service of other
components.
Correctly Stored
Page 410 of 474

GMC Sierra/Sierra Denali 1500 Owner Manual (GMNA-Localizing-U.S./
Canada/Mexico-15883563) - 2022 - CRC - 11/19/21
Vehicle Care 409
{Warning
Fans or other moving engine parts can
injure you badly. Keep your hands away
from moving parts once the engine is
running.
6. Check that the jumper cables do not have loose or missing insulation. If they
do, you could get a shock. The vehicles
could be damaged too.
Before you connect the cables, here are
some basic things you should know.
Positive (+) will go to positive (+) or to a
remote positive (+) terminal if the
vehicle has one. Negative (−) will go to a
heavy, unpainted metal engine part or to
a remote negative (−) terminal if the
vehicle has one.
Do not connect positive (+) to negative
(−) or you will get a short that would
damage the battery and maybe other
parts too. And do not connect the
negative (−) cable to the negative (−)
terminal on the dead battery because
this can cause sparks.
7. Connect one end of the red positive (+) cable to the discharged battery
positive (+) terminal. 8. Do not let the other end touch metal.
Connect the other end of the positive (+)
cable to the good battery positive (+)
terminal. Use a remote positive (+)
terminal if the vehicle has one.
9. Connect one end of the black negative (−) cable to the good battery negative
(−) terminal. Use a remote negative (−)
terminal if the vehicle has one.
Do not let the other end touch anything
until the next step.
10. Connect the other end of the negative (−) cable to the discharged battery
negative (−) grounding point.
11. Start the vehicle with the good battery and run the engine for a while.
12. Try to start the vehicle that had the dead battery. If it will not start after a
few tries, it probably needs service.
Caution
If the jumper cables are connected or
removed in the wrong order, electrical
shorting may occur and damage the
vehicle. The repairs would not be covered
by the vehicle warranty. Always connect
(Continued)
Caution (Continued)
and remove the jumper cables in the
correct order, making sure that the cables
do not touch each other or other metal.
Jumper Cable Removal
Reverse the sequence exactly when
removing the jumper cables.
After starting the disabled vehicle and
removing the jumper cables, allow it to idle
for several minutes.
Towing the Vehicle
Caution
Incorrectly transporting a disabled vehicle
may cause damage to the vehicle. Use
proper tire straps to secure the vehicle to
the flatbed tow truck. Do not strap or
hook to any frame, underbody,
or suspension component not specified
below. Do not move vehicles with drive
axle tires on the ground. Damage is not
covered by the vehicle warranty.
Page 413 of 474
GMC Sierra/Sierra Denali 1500 Owner Manual (GMNA-Localizing-U.S./
Canada/Mexico-15883563) - 2022 - CRC - 11/19/21
412 Vehicle Care
Caution
If a vehicle with two-wheel drive or a
single-speed transfer case is towed with
all four wheels on the ground, the
drivetrain components could be damaged.
The repairs would not be covered by the
vehicle warranty.
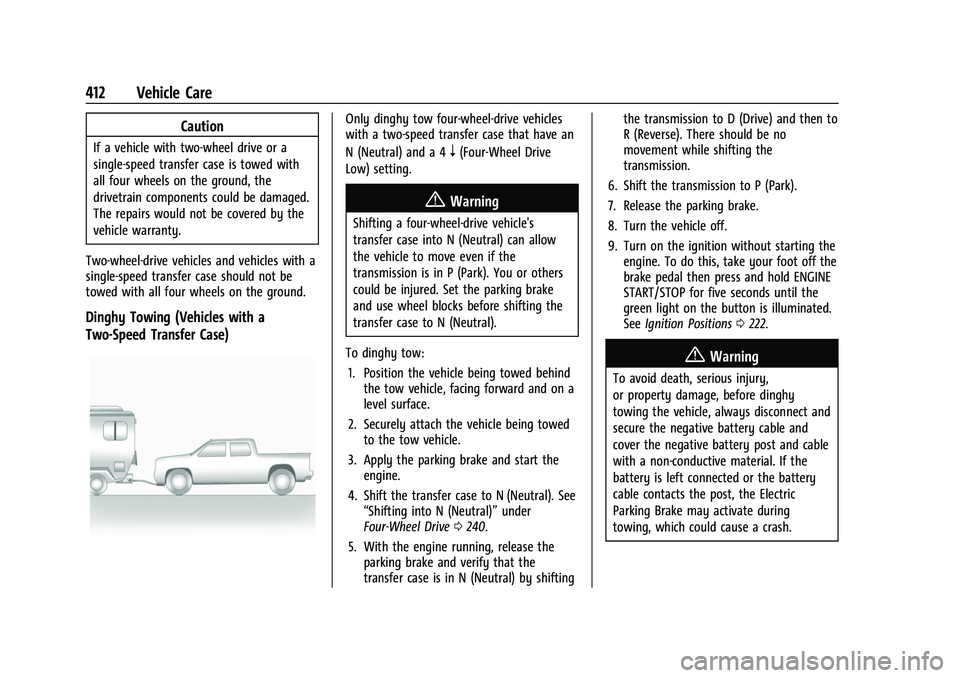
Two-wheel-drive vehicles and vehicles with a
single-speed transfer case should not be
towed with all four wheels on the ground.
Dinghy Towing (Vehicles with a
Two-Speed Transfer Case)
Only dinghy tow four-wheel-drive vehicles
with a two-speed transfer case that have an
N (Neutral) and a 4
n(Four-Wheel Drive
Low) setting.
{Warning
Shifting a four-wheel-drive vehicle's
transfer case into N (Neutral) can allow
the vehicle to move even if the
transmission is in P (Park). You or others
could be injured. Set the parking brake
and use wheel blocks before shifting the
transfer case to N (Neutral).
To dinghy tow: 1. Position the vehicle being towed behind the tow vehicle, facing forward and on a
level surface.
2. Securely attach the vehicle being towed to the tow vehicle.
3. Apply the parking brake and start the engine.
4. Shift the transfer case to N (Neutral). See “Shifting into N (Neutral)” under
Four-Wheel Drive 0240.
5. With the engine running, release the parking brake and verify that the
transfer case is in N (Neutral) by shifting the transmission to D (Drive) and then to
R (Reverse). There should be no
movement while shifting the
transmission.
6. Shift the transmission to P (Park).
7. Release the parking brake.
8. Turn the vehicle off.
9. Turn on the ignition without starting the engine. To do this, take your foot off the
brake pedal then press and hold ENGINE
START/STOP for five seconds until the
green light on the button is illuminated.
See Ignition Positions 0222.
{Warning
To avoid death, serious injury,
or property damage, before dinghy
towing the vehicle, always disconnect and
secure the negative battery cable and
cover the negative battery post and cable
with a non-conductive material. If the
battery is left connected or the battery
cable contacts the post, the Electric
Parking Brake may activate during
towing, which could cause a crash.
Page 414 of 474

GMC Sierra/Sierra Denali 1500 Owner Manual (GMNA-Localizing-U.S./
Canada/Mexico-15883563) - 2022 - CRC - 11/19/21
Vehicle Care 413
10. Disconnect the negative (–) batterycable. See “Negative Battery Cable
Disconnection” inBattery - North
America 0361.
Caution
If the steering column is locked, vehicle
damage may occur.
11. Move the steering wheel to make sure the steering column is unlocked.
12. For column shift transmissions, verify the transmission is in P (Park). Failing to put
the transmission into Park before flat
towing can damage the transmission.
13. Keep the RKE transmitter outside of the vehicle and manually lock the doors.
Access the vehicle by using the key in
the door lock. See Door Locks021.
Disconnecting the Towed Vehicle
Before disconnecting from the tow vehicle: 1. Park on a level surface. Secure the vehicle with wheel blocks.
2. Re-connect the negative (–) battery. See Battery - North America 0361. 3. Turn on the ignition without starting the
engine. With your foot off the brake
pedal, press and hold ENGINE START/
STOP for five seconds until the green
light comes on the button is illuminated.
See Ignition Positions 0222.
4. Set the parking brake. See Electric
Parking Brake 0245.
5. Disconnect from the tow vehicle.
6. Start the engine.
7. Shift the transmission to N (Neutral).
8. Shift the transfer case to 2
m(Two-Wheel
Drive High). When the shift to 2
m
(Two-Wheel Drive High) is complete, the
light in the instrument cluster will stop
flashing and stay lit. See
Four-Wheel-Drive Light 0122.
9. Check that the vehicle is in 2
m
(Two-Wheel Drive High) by starting the
engine and shifting the transmission to
D (Drive) and then to R (Reverse). There
should be movement of the vehicle while
shifting.
10. Shift the transmission to P (Park) and turn off the ignition.
11. Release the parking brake and remove the wheel blocks. 12. Reset any lost presets.
The outside temperature display will
default to 0 °C (32 °F) but will reset with
normal usage.
Dolly Towing
Page 423 of 474
GMC Sierra/Sierra Denali 1500 Owner Manual (GMNA-Localizing-U.S./
Canada/Mexico-15883563) - 2022 - CRC - 11/19/21
422 Vehicle Care
Care of Seat Belts
Keep belts clean and dry.
{Warning
Do not bleach or dye seat belt webbing.
It may severely weaken the webbing. In
a crash, they might not be able to
provide adequate protection. Clean and
rinse seat belt webbing only with mild
soap and lukewarm water. Allow the
webbing to dry.
Floor Mats
{Warning
If a floor mat, a liner, or a liner insert is
the wrong size or is not properly
installed, it can interfere with the pedals.
Interference with the pedals can cause
unintended acceleration and/or increased
stopping distance, which can cause a
crash and injury. Make sure the floor
mat, liner, or liner insert does not
interfere with the pedals.Use the following guidelines for proper floor
mat/liner use:
.The original equipment floor mats are
designed for your vehicle. If the floor
mats need to be replaced, it is
recommended that GM-certified floor
mats are purchased. Non-GM floor mats
may not fit properly and may interfere
with the pedals. Always check that the
floor mats do not interfere with the
pedals.
.Do not use a floor mat/liner if the vehicle
is not equipped with a floor mat retainer
on the driver side floor.
.Use the floor mat/liner insert with the
correct side up. Do not turn it over.
.Do not place anything on top of the
driver side floor mat/liner.
.Use only a single floor mat/liner on the
driver side.
.Do not place one floor mat/liner on top
of another.
Removing and Replacing the Floor Mats/
Liners
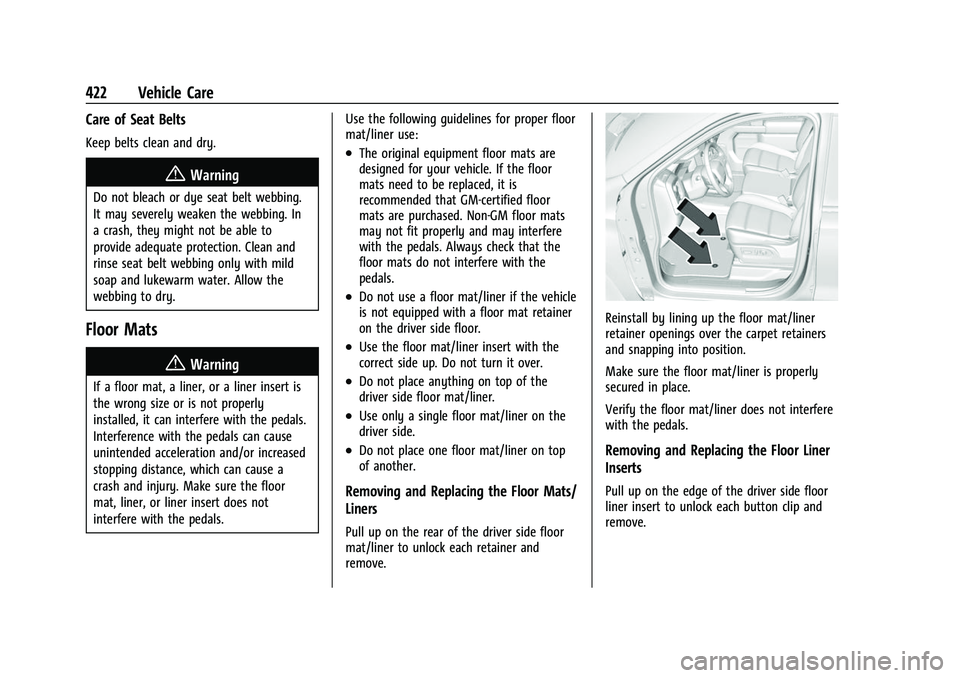
Pull up on the rear of the driver side floor
mat/liner to unlock each retainer and
remove.
Reinstall by lining up the floor mat/liner
retainer openings over the carpet retainers
and snapping into position.
Make sure the floor mat/liner is properly
secured in place.
Verify the floor mat/liner does not interfere
with the pedals.
Removing and Replacing the Floor Liner
Inserts
Pull up on the edge of the driver side floor
liner insert to unlock each button clip and
remove.