2022 GMC SIERRA instrument panel
[x] Cancel search: instrument panelPage 342 of 474

GMC Sierra/Sierra Denali 1500 Owner Manual (GMNA-Localizing-U.S./
Canada/Mexico-15883563) - 2022 - CRC - 11/19/21
Vehicle Care 341
Vehicle Care
General Information
General Information . . . . . . . . . . . . . . . . . . . 342
California Perchlorate MaterialsRequirements . . . . . . . . . . . . . . . . . . . . . . . . 342
Accessories and Modifications . . . . . . . . . 342
Vehicle Checks
Doing Your Own Service Work . . . . . . . . 343
Hood . . . . . . . . . . . . . . . . . . . . . . . . . . . . . . . . . . 343
Engine Compartment Overview . . . . . . . . 345
Engine Oil . . . . . . . . . . . . . . . . . . . . . . . . . . . . . 348
Engine Oil Life System . . . . . . . . . . . . . . . . 350
Automatic Transmission Fluid . . . . . . . . . 350
Engine Air Filter Life System . . . . . . . . . . . 351
Engine Air Cleaner/Filter . . . . . . . . . . . . . . . 351
Cooling System . . . . . . . . . . . . . . . . . . . . . . . . 352
Engine Overheating . . . . . . . . . . . . . . . . . . . 356
Overheated Engine Protection Operating Mode . . . . . . . . . . . . . . . . . . . . . 357
Engine Fan . . . . . . . . . . . . . . . . . . . . . . . . . . . . 358
Washer Fluid . . . . . . . . . . . . . . . . . . . . . . . . . . 358
Brakes . . . . . . . . . . . . . . . . . . . . . . . . . . . . . . . . . 358
Brake Pad Life System . . . . . . . . . . . . . . . . . 359
Brake Fluid . . . . . . . . . . . . . . . . . . . . . . . . . . . . 360
Battery - North America . . . . . . . . . . . . . . . 361
Four-Wheel Drive . . . . . . . . . . . . . . . . . . . . . . 363
Front Axle . . . . . . . . . . . . . . . . . . . . . . . . . . . . . 363
Rear Axle . . . . . . . . . . . . . . . . . . . . . . . . . . . . . . 363 Automatic Transmission Shift Lock
Control Function Check (Mechanical
Shifter) . . . . . . . . . . . . . . . . . . . . . . . . . . . . . . 364
Park Brake and P (Park) Mechanism Check . . . . . . . . . . . . . . . . . . . . . . . . . . . . . . . 364
Wiper Blade Replacement . . . . . . . . . . . . . 364
Glass Replacement . . . . . . . . . . . . . . . . . . . . 365
Windshield Replacement . . . . . . . . . . . . . . 365
Gas Strut(s) . . . . . . . . . . . . . . . . . . . . . . . . . . . 365Headlamp Aiming
Front Headlamp Aiming . . . . . . . . . . . . . . . 366
Bulb Replacement
Bulb Replacement . . . . . . . . . . . . . . . . . . . . . 366
Halogen Bulbs . . . . . . . . . . . . . . . . . . . . . . . . 366
LED Lighting . . . . . . . . . . . . . . . . . . . . . . . . . . 366
Taillamps, Turn Signal, Stoplamps, and Back-Up Lamps . . . . . . . . . . . . . . . . . . . . . . 367
Center High-Mounted Stoplamp (CHMSL) and Cargo Lamp . . . . . . . . . . . . 367
License Plate Lamp . . . . . . . . . . . . . . . . . . . . 368
Electrical System
Electrical System Overload . . . . . . . . . . . . 368
Fuses and Circuit Breakers . . . . . . . . . . . . . 370
Engine Compartment Fuse Block . . . . . . 370
Instrument Panel Fuse Block (Left) . . . . . 373
Instrument Panel Fuse Block (Right) . . . 375
Wheels and Tires
Tires . . . . . . . . . . . . . . . . . . . . . . . . . . . . . . . . . . . 377
All-Season Tires . . . . . . . . . . . . . . . . . . . . . . . . 378
Winter Tires . . . . . . . . . . . . . . . . . . . . . . . . . . . 378
All-Terrain Tires . . . . . . . . . . . . . . . . . . . . . . . . 378
Tire Sidewall Labeling . . . . . . . . . . . . . . . . . 379
Tire Designations . . . . . . . . . . . . . . . . . . . . . . 380
Tire Terminology and Definitions . . . . . . 382
Tire Pressure . . . . . . . . . . . . . . . . . . . . . . . . . . 384
Tire Pressure Monitor System . . . . . . . . . 385
Tire Pressure Monitor Operation . . . . . . 385
Tire Inspection . . . . . . . . . . . . . . . . . . . . . . . . 389
Tire Rotation . . . . . . . . . . . . . . . . . . . . . . . . . . 390
When It Is Time for New Tires . . . . . . . . 391
Buying New Tires . . . . . . . . . . . . . . . . . . . . . . 391
Different Size Tires and Wheels . . . . . . . 392
Uniform Tire Quality Grading . . . . . . . . . 393
Wheel Alignment and Tire Balance . . . . 394
Wheel Replacement . . . . . . . . . . . . . . . . . . . 394
Tire Chains . . . . . . . . . . . . . . . . . . . . . . . . . . . . 395
If a Tire Goes Flat . . . . . . . . . . . . . . . . . . . . . 395
Tire Changing . . . . . . . . . . . . . . . . . . . . . . . . . 397
Full-Size Spare Tire . . . . . . . . . . . . . . . . . . . . 406
Jump Starting
Jump Starting - North America . . . . . . . . 407
Towing the Vehicle
Towing the Vehicle . . . . . . . . . . . . . . . . . . . 409
Recreational Vehicle Towing . . . . . . . . . . . 411
Page 345 of 474

GMC Sierra/Sierra Denali 1500 Owner Manual (GMNA-Localizing-U.S./
Canada/Mexico-15883563) - 2022 - CRC - 11/19/21
344 Vehicle Care
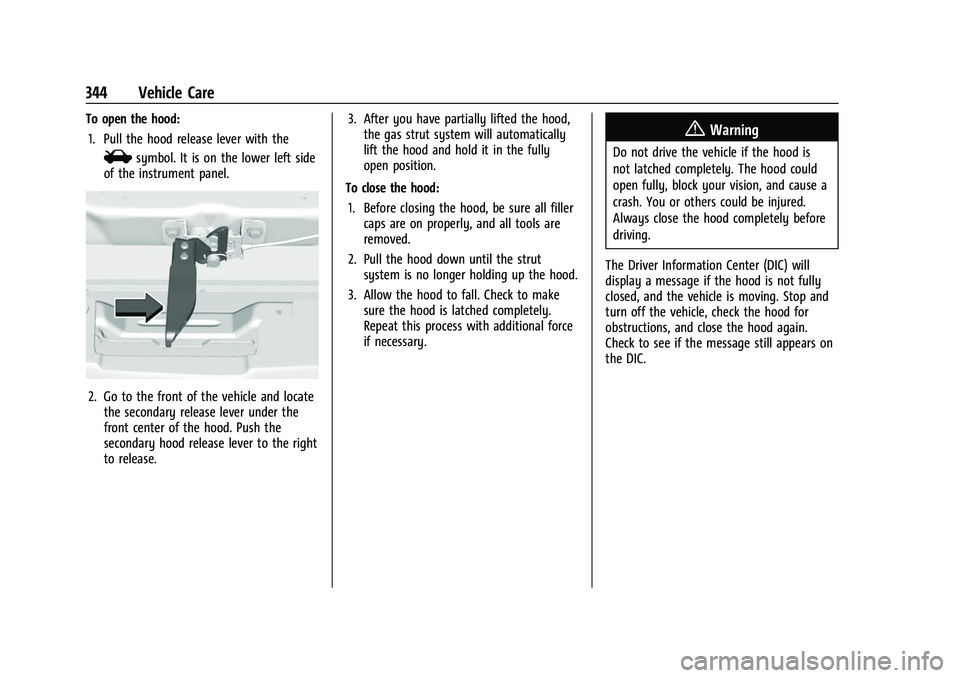
To open the hood:1. Pull the hood release lever with the
isymbol. It is on the lower left side
of the instrument panel.
2. Go to the front of the vehicle and locate the secondary release lever under the
front center of the hood. Push the
secondary hood release lever to the right
to release. 3. After you have partially lifted the hood,
the gas strut system will automatically
lift the hood and hold it in the fully
open position.
To close the hood: 1. Before closing the hood, be sure all filler caps are on properly, and all tools are
removed.
2. Pull the hood down until the strut system is no longer holding up the hood.
3. Allow the hood to fall. Check to make sure the hood is latched completely.
Repeat this process with additional force
if necessary.
{Warning
Do not drive the vehicle if the hood is
not latched completely. The hood could
open fully, block your vision, and cause a
crash. You or others could be injured.
Always close the hood completely before
driving.
The Driver Information Center (DIC) will
display a message if the hood is not fully
closed, and the vehicle is moving. Stop and
turn off the vehicle, check the hood for
obstructions, and close the hood again.
Check to see if the message still appears on
the DIC.
Page 370 of 474

GMC Sierra/Sierra Denali 1500 Owner Manual (GMNA-Localizing-U.S./
Canada/Mexico-15883563) - 2022 - CRC - 11/19/21
Vehicle Care 369
Replacing a Blown Fuse
1. Turn off the vehicle.
2. Locate the fuse puller on the instrumentpanel end cap. See the Instrument Panel
Fuse Block (Left) 0373 or
Instrument Panel Fuse Block (Right)
0 375.
3. Use the fuse puller to remove the fuse
from the top or side, as shown above. 4. If the fuse must be replaced
immediately, spare fuses are also
provided on the instrument panel end
cap or borrow a replacement fuse with
the same amperage from the fuse block.
Choose a vehicle feature that is not
needed to safely operate the vehicle.
Repeat Steps 2-3.
5. Insert the replacement fuse into the empty slot of the blown fuse.
At the next opportunity, see your dealer to
replace the blown fuse.
Headlamp Wiring
An electrical overload may cause the lamps
to go on and off, or in some cases to
remain off. Have the headlamp wiring
checked right away if the lamps go on and
off or remain off.
Windshield Wipers
If the wiper motor overheats due to heavy
snow or ice, the windshield wipers will stop
until the motor cools and will then restart.
Although the circuit is protected from
electrical overload, overload due to heavy
snow or ice may cause wiper linkage
Page 371 of 474

GMC Sierra/Sierra Denali 1500 Owner Manual (GMNA-Localizing-U.S./
Canada/Mexico-15883563) - 2022 - CRC - 11/19/21
370 Vehicle Care
damage. Always clear ice and heavy snow
from the windshield before using the
windshield wipers.
If the overload is caused by an electrical
problem and not snow or ice, be sure to get
it fixed.
Fuses and Circuit Breakers
The wiring circuits in the vehicle are
protected from short circuits by a
combination of fuses and circuit breakers.
This greatly reduces the chance of damage
caused by electrical problems.
{Danger
Fuses and circuit breakers are marked
with their ampere rating. Do not exceed
the specified amperage rating when
replacing fuses and circuit breakers. Use
of an oversized fuse or circuit breaker can
result in a vehicle fire. You and others
could be seriously injured or killed.
{Warning
Installation or use of fuses that do not
meet GM’s original fuse specifications is
dangerous. The fuses could fail, and result
in a fire. You or others could be injured
or killed, and the vehicle could be
damaged.
See Accessories and Modifications 0342 and
General Information 0342.
To check or replace a blown fuse, see
Electrical System Overload 0368.
Engine Compartment Fuse Block
If the vehicle has a diesel engine, see the
Duramax diesel supplement.
The engine compartment fuse block is in the
engine compartment, on the passenger side
of the vehicle.
Lift the cover to access the fuse block.
Caution
Spilling liquid on any electrical
component on the vehicle may damage
it. Always keep the covers on any
electrical component.
A fuse puller is available in the left
instrument panel end cap.
The vehicle may not be equipped with all of
the fuses, relays, and features shown.
Page 374 of 474

GMC Sierra/Sierra Denali 1500 Owner Manual (GMNA-Localizing-U.S./
Canada/Mexico-15883563) - 2022 - CRC - 11/19/21
Vehicle Care 373
FusesUsage
76 Electric Running Board
78 Engine Control Module
79 Cabin Coll Pump
80 Powertrain Sensor 1 81 Trailer Stop/Turn Lamp Right
82 Trailer Interface Module 1
83 FTZM –Fuel Tank Zone
Module
84 Trailer Battery 85 –
86 Engine Control Module 87 Injector B Even
88 O2 B Sensor
89 O2 A sensor
90 Injector A Odd 91 –
92 Aeroshutter Relays
Usage
5 Rear Defog
18 DC/AC Inverter
23 Fuel Heater
35 Park Lamp/Front Grille Lamp
36 Run/Crank
43 Secondary Axle Motor
59 A/C Clutch
64 Starter Motor 70 Starter Motor 77 PowertrainInstrument Panel Fuse Block (Left)
The left instrument panel fuse block access
door is on the driver side edge of the
instrument panel.
The vehicle may not be equipped with all of
the fuses, relays, and features shown.
Pull off the cover to access the fuse block.
A fuse puller is available in the left
instrument panel end cap.
Page 376 of 474

GMC Sierra/Sierra Denali 1500 Owner Manual (GMNA-Localizing-U.S./
Canada/Mexico-15883563) - 2022 - CRC - 11/19/21
Vehicle Care 375
RelaysUsage
K7 –
K8 –
Instrument Panel Fuse Block
(Right)
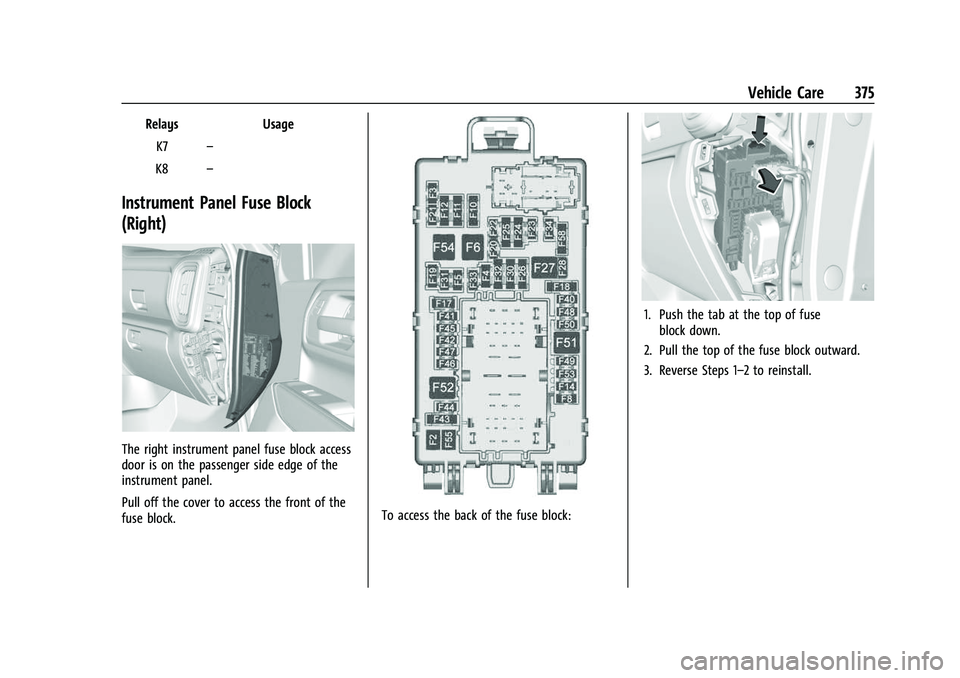
The right instrument panel fuse block access
door is on the passenger side edge of the
instrument panel.
Pull off the cover to access the front of the
fuse block.
To access the back of the fuse block:
1. Push the tab at the top of fuse
block down.
2. Pull the top of the fuse block outward.
3. Reverse Steps 1–2 to reinstall.
Page 377 of 474

GMC Sierra/Sierra Denali 1500 Owner Manual (GMNA-Localizing-U.S./
Canada/Mexico-15883563) - 2022 - CRC - 11/19/21
376 Vehicle Care
Back
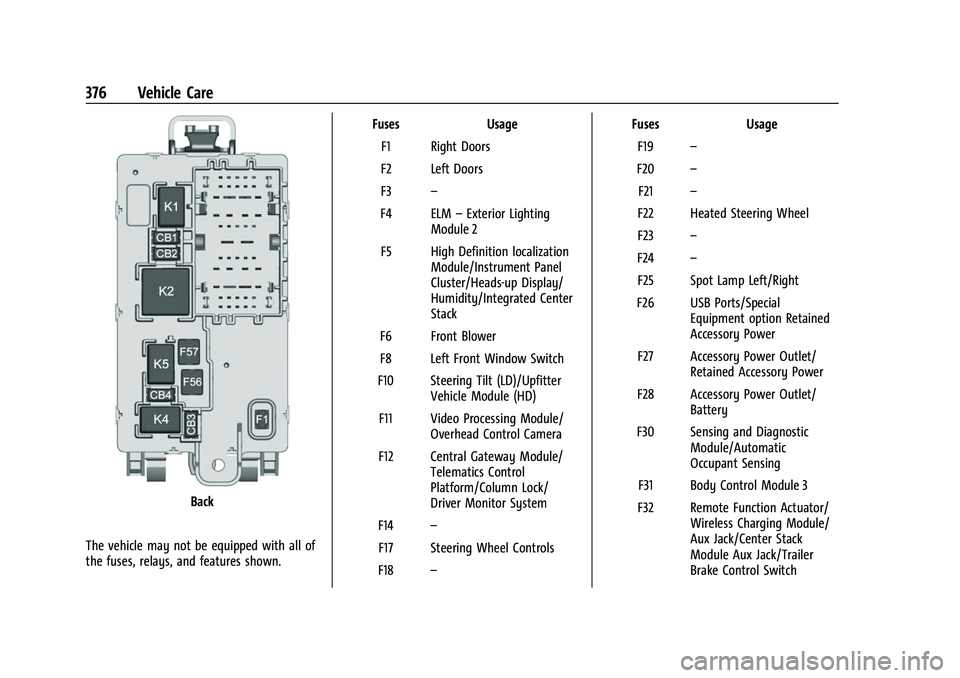
The vehicle may not be equipped with all of
the fuses, relays, and features shown. Fuses Usage
F1 Right Doors
F2 Left Doors
F3 –
F4 ELM –Exterior Lighting
Module 2
F5 High Definition localization Module/Instrument Panel
Cluster/Heads-up Display/
Humidity/Integrated Center
Stack
F6 Front Blower
F8 Left Front Window Switch
F10 Steering Tilt (LD)/Upfitter Vehicle Module (HD)
F11 Video Processing Module/ Overhead Control Camera
F12 Central Gateway Module/ Telematics Control
Platform/Column Lock/
Driver Monitor System
F14 –
F17 Steering Wheel Controls
F18 – Fuses
Usage
F19 –
F20 –
F21 –
F22 Heated Steering Wheel
F23 –
F24 –
F25 Spot Lamp Left/Right
F26 USB Ports/Special Equipment option Retained
Accessory Power
F27 Accessory Power Outlet/ Retained Accessory Power
F28 Accessory Power Outlet/ Battery
F30 Sensing and Diagnostic Module/Automatic
Occupant Sensing
F31 Body Control Module 3
F32 Remote Function Actuator/ Wireless Charging Module/
Aux Jack/Center Stack
Module Aux Jack/Trailer
Brake Control Switch
Page 422 of 474

GMC Sierra/Sierra Denali 1500 Owner Manual (GMNA-Localizing-U.S./
Canada/Mexico-15883563) - 2022 - CRC - 11/19/21
Vehicle Care 421
3. Start on the outside edge of the soil andgently rub toward the center. Fold the
cleaning cloth to a clean area frequently
to prevent forcing the soil into the
fabric.
4. Continue gently rubbing the soiled area until there is no longer any color
transfer from the soil to the cleaning
cloth.
5. If the soil is not completely removed, use a mild soap solution followed only
by plain water.
If the soil is not completely removed, it may
be necessary to use a commercial upholstery
cleaner or spot lifter. Test a small hidden
area for colorfastness before using a
commercial upholstery cleaner or spot lifter.
If ring formation occurs, clean the entire
fabric or carpet.
After cleaning, use a paper towel to blot
excess moisture.
Cleaning High Gloss Surfaces and Vehicle
Information and Radio Displays
Use a microfiber cloth on high gloss surfaces
or vehicle displays. First, use a soft bristle
brush to remove dirt that can scratch the
surface. Then gently clean by rubbing with a
microfiber cloth. Never use window cleaners or solvents. Periodically hand wash the
microfiber cloth separately, using mild soap.
Do not use bleach or fabric softener. Rinse
thoroughly and air dry before next use.
Caution
Do not attach a device with a suction cup
to the display. This may cause damage
and would not be covered by the vehicle
warranty.
Instrument Panel, Leather, Vinyl, Other
Plastic Surfaces, Low Gloss Paint
Surfaces, and Natural Open Pore Wood
Surfaces
Use a soft bristle brush to remove dust from
knobs and crevices on the instrument
cluster. Use a soft microfiber cloth
dampened with water to remove dust and
loose dirt. For a more thorough cleaning,
use a soft microfiber cloth dampened with a
mild soap and water solution.
Caution
Soaking or saturating leather, especially
perforated leather, as well as other
interior surfaces, may cause permanent
damage. Wipe excess moisture from
(Continued)
Caution (Continued)
these surfaces after cleaning and allow
them to dry naturally. Never use heat,
steam, or spot removers. Do not use
liquids that contain alcohol or solvents on
leather seats. Do not use cleaners that
contain silicone or wax-based products.
Cleaners containing these solvents can
permanently change the appearance and
feel of leather or soft trim, and are not
recommended.
Do not use cleaners that increase gloss,
especially on the instrument panel. Reflected
glare can decrease visibility through the
windshield under certain conditions.
Caution
Use of air fresheners may cause
permanent damage to plastics and
painted surfaces. If an air freshener
comes in contact with any plastic or
painted surface in the vehicle, blot
immediately and clean with a soft cloth
dampened with a mild soap solution.
Damage caused by air fresheners would
not be covered by the vehicle warranty.