2022 GMC SIERRA tire pressure
[x] Cancel search: tire pressurePage 210 of 474

GMC Sierra/Sierra Denali 1500 Owner Manual (GMNA-Localizing-U.S./
Canada/Mexico-15883563) - 2022 - CRC - 11/19/21
Driving and Operating 209
{Warning
When driving off-road, bouncing and
quick changes in direction can easily
throw you out of position. This could
cause you to lose control and crash. You
and your passengers should always wear
seat belts.
Before Driving Off-Road
.Have all necessary maintenance and
service work completed.
.Fuel the vehicle, fill fluid levels, and check
inflation pressure in all tires, including the
spare, if equipped.
.Read all the information about
four-wheel-drive vehicles in this manual.
.Remove any underbody air deflector,
if equipped. Re-attach the air deflector
after off-road driving.
.Know the local laws that apply to off-road
driving.
To gain more ground clearance if needed, it
may be necessary to remove the front fascia
lower air dam, if equipped. However, driving
without the air dam reduces fuel economy.
Caution
Operating the vehicle for extended
periods without the front fascia lower air
dam installed can cause improper airflow
to the engine. Reattach the front fascia
air dam after off-road driving.
Loading the Vehicle for Off-Road Driving
{Warning
.Unsecured cargo on the load floor can
be tossed about when driving over
rough terrain. You or your passengers
can be struck by flying objects. Secure
the cargo properly.
.Keep cargo in the cargo area as far
forward and as low as possible. The
heaviest things should be on the floor,
forward of the rear axle.
.Heavy loads on the roof raise the
vehicle's center of gravity, making it
more likely to roll over. You can be
seriously or fatally injured if the
vehicle rolls over. Put heavy loads
inside the cargo area, not on the roof. For more information about loading the
vehicle, see
Vehicle Load Limits 0215 and
Tires 0377.
Environmental Concerns
.Always use established trails, roads, and
areas that have been set aside for public
off-road recreational driving and obey all
posted regulations.
.Do not damage shrubs, flowers, trees,
or grasses or disturb wildlife.
.Do not park over things that burn. See
Parking over Things That Burn 0230.
Driving on Hills
Driving safely on hills requires good
judgment and an understanding of what the
vehicle can and cannot do.
{Warning
Many hills are simply too steep for any
vehicle. Driving up hills can cause the
vehicle to stall. Driving down hills can
cause loss of control. Driving across hills
can cause a rollover. You could be injured
or killed. Do not drive on steep hills.
Page 217 of 474

GMC Sierra/Sierra Denali 1500 Owner Manual (GMNA-Localizing-U.S./
Canada/Mexico-15883563) - 2022 - CRC - 11/19/21
216 Driving and Operating
occupants, cargo, and all
nonfactory-installed options. Two labels
on the vehicle may show how much
weight it was designed to carry: the
Tire and Loading Information label and
the Certification/Tire label.
{Warning
Do not load the vehicle any heavier
than the Gross Vehicle Weight Rating
(GVWR), or either the maximum
front or rear Gross Axle Weight
Rating (GAWR). This can cause
systems to break and change the
way the vehicle handles. This could
cause loss of control and a crash.
Overloading can also reduce stopping
performance, damage the tires, and
shorten the life of the vehicle.
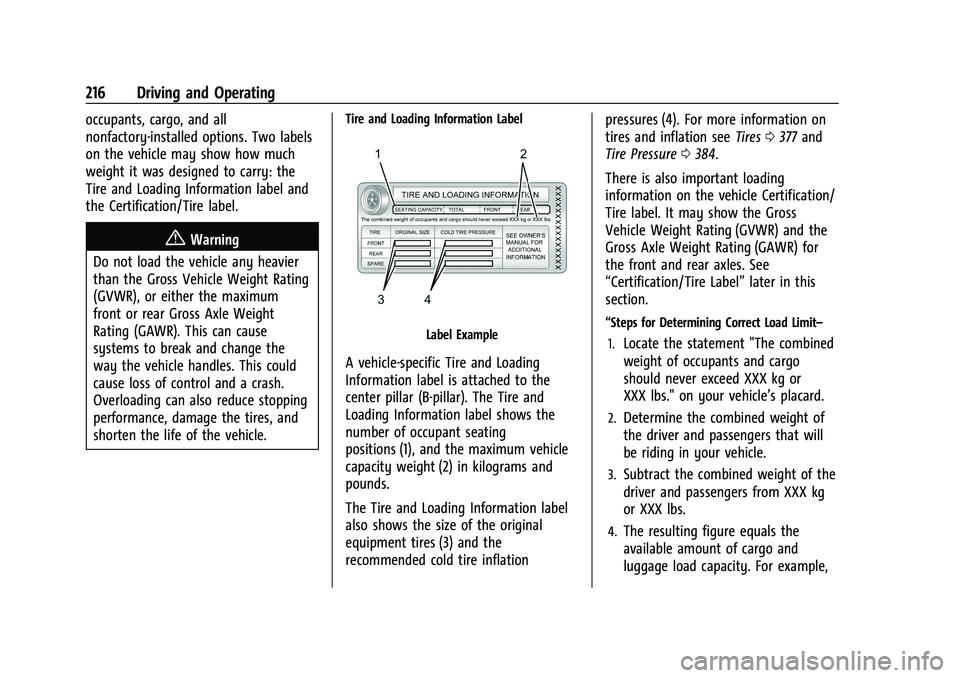
Tire and Loading Information Label
Label Example
A vehicle-specific Tire and Loading
Information label is attached to the
center pillar (B-pillar). The Tire and
Loading Information label shows the
number of occupant seating
positions (1), and the maximum vehicle
capacity weight (2) in kilograms and
pounds.
The Tire and Loading Information label
also shows the size of the original
equipment tires (3) and the
recommended cold tire inflation pressures (4). For more information on
tires and inflation see
Tires0377 and
Tire Pressure 0384.
There is also important loading
information on the vehicle Certification/
Tire label. It may show the Gross
Vehicle Weight Rating (GVWR) and the
Gross Axle Weight Rating (GAWR) for
the front and rear axles. See
“Certification/Tire Label” later in this
section.
“Steps for Determining Correct Load Limit–
1.
Locate the statement "The combined
weight of occupants and cargo
should never exceed XXX kg or
XXX lbs." on your vehicle’s placard.
2.Determine the combined weight of
the driver and passengers that will
be riding in your vehicle.
3.Subtract the combined weight of the
driver and passengers from XXX kg
or XXX lbs.
4.The resulting figure equals the
available amount of cargo and
luggage load capacity. For example,
Page 219 of 474

GMC Sierra/Sierra Denali 1500 Owner Manual (GMNA-Localizing-U.S./
Canada/Mexico-15883563) - 2022 - CRC - 11/19/21
218 Driving and Operating
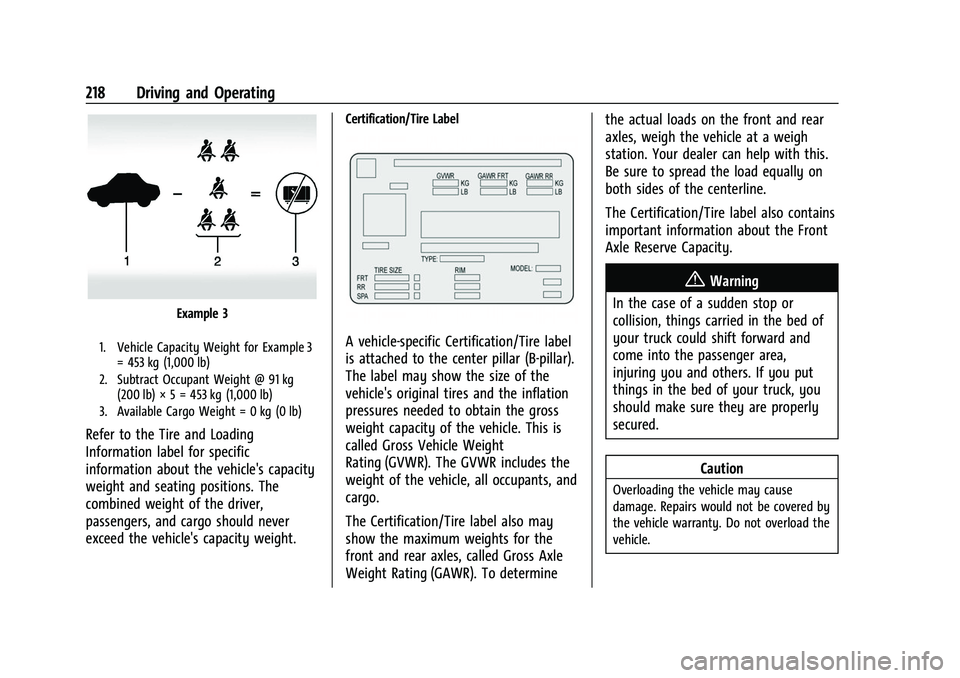
Example 3
1. Vehicle Capacity Weight for Example 3= 453 kg (1,000 lb)
2. Subtract Occupant Weight @ 91 kg (200 lb) × 5 = 453 kg (1,000 lb)
3. Available Cargo Weight = 0 kg (0 lb)
Refer to the Tire and Loading
Information label for specific
information about the vehicle's capacity
weight and seating positions. The
combined weight of the driver,
passengers, and cargo should never
exceed the vehicle's capacity weight.
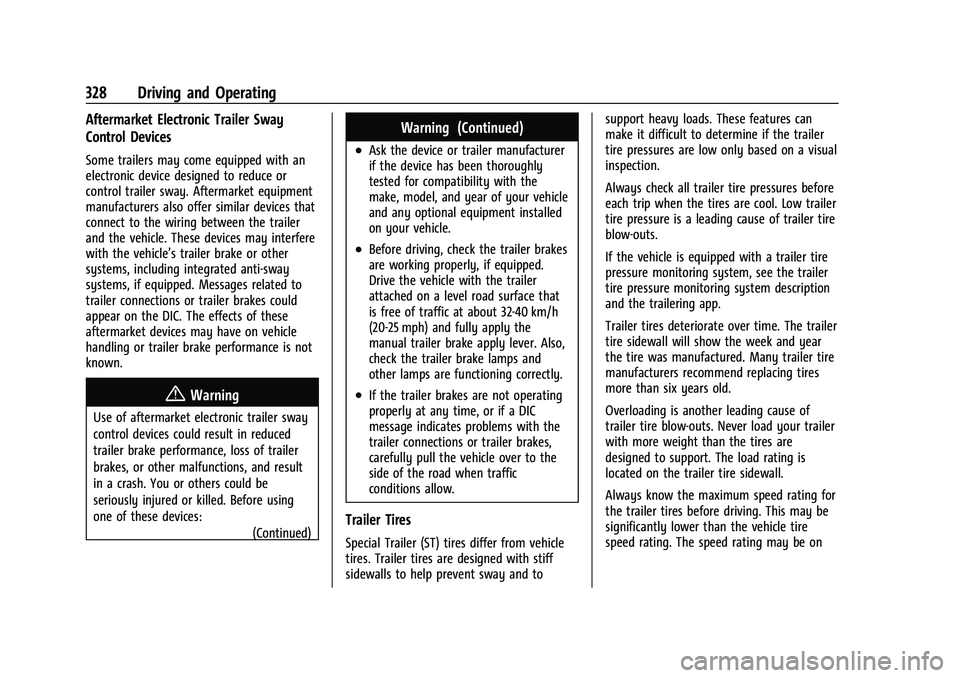
Certification/Tire Label
A vehicle-specific Certification/Tire label
is attached to the center pillar (B-pillar).
The label may show the size of the
vehicle's original tires and the inflation
pressures needed to obtain the gross
weight capacity of the vehicle. This is
called Gross Vehicle Weight
Rating (GVWR). The GVWR includes the
weight of the vehicle, all occupants, and
cargo.
The Certification/Tire label also may
show the maximum weights for the
front and rear axles, called Gross Axle
Weight Rating (GAWR). To determine the actual loads on the front and rear
axles, weigh the vehicle at a weigh
station. Your dealer can help with this.
Be sure to spread the load equally on
both sides of the centerline.
The Certification/Tire label also contains
important information about the Front
Axle Reserve Capacity.
{Warning
In the case of a sudden stop or
collision, things carried in the bed of
your truck could shift forward and
come into the passenger area,
injuring you and others. If you put
things in the bed of your truck, you
should make sure they are properly
secured.
Caution
Overloading the vehicle may cause
damage. Repairs would not be covered by
the vehicle warranty. Do not overload the
vehicle.
Page 329 of 474

GMC Sierra/Sierra Denali 1500 Owner Manual (GMNA-Localizing-U.S./
Canada/Mexico-15883563) - 2022 - CRC - 11/19/21
328 Driving and Operating
Aftermarket Electronic Trailer Sway
Control Devices
Some trailers may come equipped with an
electronic device designed to reduce or
control trailer sway. Aftermarket equipment
manufacturers also offer similar devices that
connect to the wiring between the trailer
and the vehicle. These devices may interfere
with the vehicle’s trailer brake or other
systems, including integrated anti-sway
systems, if equipped. Messages related to
trailer connections or trailer brakes could
appear on the DIC. The effects of these
aftermarket devices may have on vehicle
handling or trailer brake performance is not
known.
{Warning
Use of aftermarket electronic trailer sway
control devices could result in reduced
trailer brake performance, loss of trailer
brakes, or other malfunctions, and result
in a crash. You or others could be
seriously injured or killed. Before using
one of these devices:(Continued)
Warning (Continued)
.Ask the device or trailer manufacturer
if the device has been thoroughly
tested for compatibility with the
make, model, and year of your vehicle
and any optional equipment installed
on your vehicle.
.Before driving, check the trailer brakes
are working properly, if equipped.
Drive the vehicle with the trailer
attached on a level road surface that
is free of traffic at about 32-40 km/h
(20-25 mph) and fully apply the
manual trailer brake apply lever. Also,
check the trailer brake lamps and
other lamps are functioning correctly.
.If the trailer brakes are not operating
properly at any time, or if a DIC
message indicates problems with the
trailer connections or trailer brakes,
carefully pull the vehicle over to the
side of the road when traffic
conditions allow.
Trailer Tires
Special Trailer (ST) tires differ from vehicle
tires. Trailer tires are designed with stiff
sidewalls to help prevent sway and to support heavy loads. These features can
make it difficult to determine if the trailer
tire pressures are low only based on a visual
inspection.
Always check all trailer tire pressures before
each trip when the tires are cool. Low trailer
tire pressure is a leading cause of trailer tire
blow-outs.
If the vehicle is equipped with a trailer tire
pressure monitoring system, see the trailer
tire pressure monitoring system description
and the trailering app.
Trailer tires deteriorate over time. The trailer
tire sidewall will show the week and year
the tire was manufactured. Many trailer tire
manufacturers recommend replacing tires
more than six years old.
Overloading is another leading cause of
trailer tire blow-outs. Never load your trailer
with more weight than the tires are
designed to support. The load rating is
located on the trailer tire sidewall.
Always know the maximum speed rating for
the trailer tires before driving. This may be
significantly lower than the vehicle tire
speed rating. The speed rating may be on
Page 330 of 474

GMC Sierra/Sierra Denali 1500 Owner Manual (GMNA-Localizing-U.S./
Canada/Mexico-15883563) - 2022 - CRC - 11/19/21
Driving and Operating 329
the trailer tire sidewall. If the speed rating is
not shown, the default trailer tire speed
rating is 105 km/h (65 mph).
Trailering App
Trailer Lights App
If equipped, the Trailer Lights App is on the
infotainment home screen.
Touch Start to cycle the trailer lamps on and
off to determine if they are working. The
test follows this sequence:1. The running lights turn on first and remain on throughout the sequence.
2. The brake lights turn on for about two seconds.
3. The left turn signal light flashes three times.
4. The right turn signal light flashes three times.
5. The reverse lights turn on for about two seconds.
6. Steps 2–5 repeat for approximately one minute and 45 seconds, or until the
test deactivates.
Touch Stop to stop the test. The test
automatically ends after one minute and
45 seconds. The sequence also deactivates when any of
the following occur:
.The vehicle is turned off.
.The transmission is shifted out of P (Park).
.The brake pedal is pressed.
.The turn signal is activated.
.The hazard warning lights are activated.
Trailering App
If equipped, the Trailering App is on the
infotainment home screen.
If equipped this feature allows profiles for
connected trailers to be created to view
status, to store and track trailer usage
information, and to set up towing assist
features.
The Trailering App welcome page appears
when the Trailering App is opened for the
first time from the infotainment home
screen.
When a trailer is electrically connected and
a trailer profile has not been created, there
will be an option to create a profile, use a
guest profile, or select Accessory/No trailer.
When a trailer is electrically connected and
after a Trailer Profile has been created, the
trailer detection pop-up appears with a list
of all of the custom Trailer Profiles made onthe vehicle. To load an existing Trailer
Profile, select one of the Trailer Profiles
listed, or load the Guest Trailer Profile by
selecting GUEST TRAILER. Touching
Accessory/No trailer will select Accessory/No
trailer as the active Trailer Profile and will
dismiss the pop- up. Shifting the vehicle
from P (Park) will select Guest Trailer as the
active Trailer Profile and will dismiss the
pop-up.
Create a Trailer Profile
Touch Add Trailer on the trailer detection
pop-up or touch + Add Trailer in the
Trailering App.
Follow on-screen instructions to set up
profile.
After a profile is created, set up for
additional features may become available,
such as Tow/Haul Mode reminder, Trailer
Tire Pressure Monitoring System (TTPMS),
maintenance reminders, or towing assist.
Import a Trailer Profile
Touch Import on the trailer detection pop-up
or touch Import in the Trailering App.
Follow on-screen instructions to import a
profile.
Page 331 of 474

GMC Sierra/Sierra Denali 1500 Owner Manual (GMNA-Localizing-U.S./
Canada/Mexico-15883563) - 2022 - CRC - 11/19/21
330 Driving and Operating
After a profile is imported, it can be selected
from the trailer list. The Tow/Haul Mode
reminder, Brake Gain Setting and Trailer Tire
Pressure sensor learning, if equipped, do not
import.
Trailer Feature Setup
Tow/Haul Mode Reminder
To turn the Tow/Haul Mode Reminder
setting on, touch Yes. To turn it off,
touch No.
Trailer Tire Pressure Setup
If the Trailer TTPMS is detected, touch the
Tire Pressure Monitoring icon to set up tire
pressure monitoring.
The trailer tire pressure sensors can transmit
up to 7 m (23 feet) from the hitch receiver of
the vehicle.
A trailer must be electrically connected to
the vehicle before starting the
sensor-to-vehicle learn process.
After selecting Start from the Learn Sensors
screen, use the Tool Method or the Manual
Method (described below) to learn each tire
sensor, during which the current tire number
will be highlighted.Each sensor has a maximum of two minutes
to learn. After a sensor is learned, a
checkmark appears next to the tire, the
vehicle horn sounds, the vehicle brake lamps
flash, and all working trailer lamps flash.
It then moves to the next sensor.
Touch Stop to cancel the process.
The recommended tire pressure must be
entered for the trailer tires. This allows the
vehicle to alert when the tire pressure is
high or low.
TTPMS must learn the location of the
installed tire sensors to show correct air
pressure and temperature for each tire. To
set up, use one of the following options or
see a tire or trailer dealer for service. The
learning process must be repeated when the
trailer tires are rotated or replaced.
Tool Method: A TTPMS activation tool can
be purchased separately to learn the sensor
locations.
Manual Method: Without the tool, the air
pressure can be increased or decreased in
each tire for 10 seconds. Do not exceed the
maximum inflation pressure found on the
tire sidewalls. Make sure to readjust tire
pressure to the recommended level when
the process is complete.Sensor Learning Steps
To complete the sensor-to-vehicle learn
process:
1. Touch Start on the Learn Sensors screen. The horn chirps twice and the Learning
Active screen appears on the
infotainment screen.
2. Start with the driver side front trailer tire.
3. Activate the tool near the valve stem or adjust the air pressure of this tire until
the horn chirps and all working vehicle
and trailer lights flash.
The process stops without saving the
sensor locations if this step takes more
than two minutes.
4. Move to the next tire and repeat Step 3 for each sensor. The horn chirps twice
when all sensors are completed.
5. Return to the vehicle to complete the setup.
Maintenance Reminders
To set up maintenance reminders, touch the
Trailer Maintenance icon. Follow the
onscreen prompts. The maximum number of
reminders is 50.
Page 334 of 474

GMC Sierra/Sierra Denali 1500 Owner Manual (GMNA-Localizing-U.S./
Canada/Mexico-15883563) - 2022 - CRC - 11/19/21
Driving and Operating 333
If a connected trailer becomes disconnected,
a message about the trailer disconnect will
appear on the Driver Information Center
(DIC) immediately (if vehicle is on) or the
next time the vehicle is turned on (if trailer
was disconnected while vehicle is off). Check
your trailer connection if needed.
Connection Problem
If any of the trailer connections are lost, a
message about the connection issue appears
on the DIC. The infotainment screen will also
show the connection issue in the Lights
Status view.
Connection Trailer Lighting Faults Detected
The Trailering App System monitors for
electrical faults on the trailer lights.
A message about the lighting issue appears
on the DIC. The infotainment screen will also
show the lighting issue in the Lights Status
view. Repair your trailer lights if needed.
A trailer lighting issue is not covered by
your GM warranty.
The Running Lights connection may not
detect partial outages. Activate the light test
to check all trailer lamps. See“Light Test”
following. Light Test
Touch Start Light Test to cycle the trailer
lights on and off to determine if they are
working. The test follows this sequence:
1. The running lights turn on first and remain on throughout the sequence.
2. The brake lights turn on for about two seconds.
3. The left turn signal light flashes three times.
4. The right turn signal light flashes three times.
5. The reverse lights turn on for about two seconds.
6. Steps 2-5 repeat for approximately on minute and 45 seconds, or until the test
deactivates.
Touch Stop to stop the test. The test will
automatically end after one minute and
45 seconds.
The sequence also deactivates when any of
the following occur:
.The vehicle is turned off.
.The transmission is shifted out of
P (Park).
.The brake pedal is pressed.
.The turn signal is activated.
.The hazard warning lights are activated.
Tires
Tire Pressure and Temperature
If the TTPMS sensor-to-vehicle learn process
was completed, the status view will display
the current tire pressure and temperature of
the trailer tires related to the active Trailer
Profile. If a tire’s pressure is low or high, the
color of the pressure value will be amber.
If a sensor malfunctions, the values are
dashed lines. If the screen displays “Service
Tire Pressure Monitoring System,” the
vehicle needs to be taken to a dealer for
service.
Touch to set up the TTPMS for the Trailer
Profile. See “Trailer Tire Pressure Setup”
previously in this section for details on the
setup. Also, touch Sensor Setup if the trailer
Page 335 of 474

GMC Sierra/Sierra Denali 1500 Owner Manual (GMNA-Localizing-U.S./
Canada/Mexico-15883563) - 2022 - CRC - 11/19/21
334 Driving and Operating
tires were rotated or if the tire pressure
sensors in the tires were replaced for this
Trailer Profile. The vehicle will need to
relearn the tire sensors and their locations.
See“Trailer Tire Pressure Setup” previously
in this section.
Touch Edit Target Pressure to change the
recommended tire pressure for the trailer
tires. This will change the number at which
the vehicle displays alerts related to trailer
tire pressure.
Maintenance
Touch to view a list of maintenance
reminders for the Trailer Profile.
The Maintenance Status view displays
reminders for the Trailer Profile. Touch a
reminder to view, reset, delete, or edit it. Resetting a reminder will reset the time and
mileage values for the reminder. The
progress bar turns yellow when the
maintenance item reaches 90% complete.
The progress bar turns red when the
maintenance item reaches 100% complete.
Touch New Reminder to add a new
maintenance reminder.
Suggested reminders that were previously
set will not appear. Suggested reminders
that have not been set have empty boxes
next to them. The maximum number of
reminders is 50.
Maintenance Notifications
Touch Reset to reset time and mileage
values for the reminder.
Touch Remind Me Later to delay the
reminder.
If an Upcoming Alert (90%) is dismissed, it
will not appear again.
If a Maintenance Due Alert (100%) is
dismissed, it will appear when the vehicle is
turned off and back on again.
Always follow all of the maintenance
instructions that came with your trailer.
Cameras
This view shows a preview of the selected
camera view. Touch X to exit the preview.
Touch the camera icon to open the
camera app.
Checklist View
This view shows the recommended steps to
take before towing a trailer.