2022 GMC SIERRA ABS
[x] Cancel search: ABSPage 246 of 474
GMC Sierra/Sierra Denali 1500 Owner Manual (GMNA-Localizing-U.S./
Canada/Mexico-15883563) - 2022 - CRC - 11/19/21
Driving and Operating 245
Once the 4x4 shift has completed, the DIC
message disappears, the 4x4 graphic stops
flashing, and the current setting is indicated.
The actual 4x4 shift request is only made
after the button is released. The 4x4 graphic
will remain flashing until the shift request
has completed.
A DIC message displays. Once the 4x4 shift
has completed, the DIC message disappears,
the 4x4 graphic stops flashing, and the
current setting is indicated.
Brakes
Electric Brake Boost
Vehicles equipped with electric brake boost
have hydraulic brake circuits that are
electronically controlled when the brake
pedal is applied during normal operation.
The system performs routine tests and turns
off within a few minutes after the vehicle is
turned off. Noise may be heard during this
time. If the brake pedal is pressed during
the tests or when the electric brake boost
system is off, a noticeable change in pedal
force and travel may be felt. This is normal.
Antilock Brake System (ABS)
The Antilock Brake System (ABS) helps
prevent a braking skid and maintain steering
while braking hard.
ABS performs a system check when the
vehicle is first driven. A momentary motor
or clicking noise may be heard while this
test is going on, and the brake pedal may
move slightly. This is normal.
If there is a problem with ABS, this warning
light stays on. SeeAntilock Brake System
(ABS) Warning Light 0122.
ABS does not change the time needed to
get a foot on the brake pedal and does not
always decrease stopping distance. If you
get too close to the vehicle ahead, there will
not be enough time to apply the brakes if
that vehicle suddenly slows or stops. Always
leave enough room ahead to stop, even
with ABS.
Using ABS
Do not pump the brakes. Just hold the brake
pedal down firmly. Hearing or feeling ABS
operate is normal.
Braking in Emergencies
ABS allows steering and braking at the same
time. In many emergencies, steering can
help even more than braking.
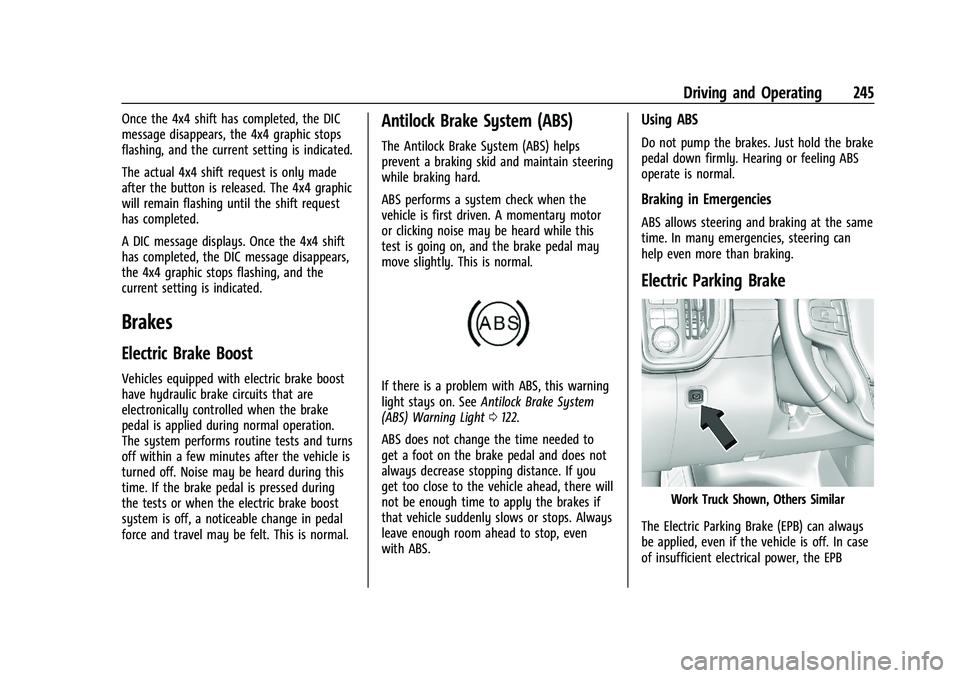
Electric Parking Brake
Work Truck Shown, Others Similar
The Electric Parking Brake (EPB) can always
be applied, even if the vehicle is off. In case
of insufficient electrical power, the EPB
Page 248 of 474

GMC Sierra/Sierra Denali 1500 Owner Manual (GMNA-Localizing-U.S./
Canada/Mexico-15883563) - 2022 - CRC - 11/19/21
Driving and Operating 247
Brake Assist
Brake Assist detects rapid brake pedal
applications due to emergency braking
situations and provides additional braking to
activate the Antilock Brake System (ABS) if
the brake pedal is not pushed hard enough
to activate ABS normally. Minor noise, brake
pedal pulsation, and/or pedal movement
during this time may occur. Continue to
apply the brake pedal as the driving
situation dictates. Brake Assist disengages
when the brake pedal is released.
Hill Start Assist (HSA)
{Warning
Do not rely on the HSA feature. HSA does
not replace the need to pay attention
and drive safely. You may not hear or
feel alerts or warnings provided by this
system. Failure to use proper care when
driving may result in injury, death,
or vehicle damage. SeeDefensive Driving
0 206.
When the vehicle is stopped on a grade, Hill
Start Assist (HSA) prevents the vehicle from
rolling in an unintended direction during the
transition from brake pedal release to accelerator pedal apply. The brakes release
when the accelerator pedal is applied. If the
accelerator pedal is not applied within a few
minutes, the Electric Parking Brake will
apply. The brakes may also release under
other conditions. Do not rely on HSA to hold
the vehicle.
HSA is available when the vehicle is facing
uphill in a forward gear, or when facing
downhill in R (Reverse). The vehicle must
come to a complete stop on a grade for HSA
to activate.
Ride Control Systems
Traction Control/Electronic
Stability Control
System Operation
The vehicle has a Traction Control System
(TCS) and StabiliTrak/Electronic Stability
Control (ESC), an electronic stability control
system. These systems help limit wheel spin
and assist the driver in maintaining control,
especially on slippery road conditions.
TCS activates if it senses that any of the
drive wheels are spinning or beginning to
lose traction. When this happens, TCS
applies the brakes to the spinning wheels
and reduces engine power to limit
wheel spin.
StabiliTrak/ESC activates when the vehicle
senses a difference between the intended
path and the direction the vehicle is actually
traveling. StabiliTrak/ESC selectively applies
braking pressure to any one of the vehicle
wheel brakes to assist the driver in keeping
the vehicle on the intended path.
If cruise control is being used and TCS or
StabiliTrak/ESC begins to limit wheel spin,
cruise control will disengage. Cruise control
may be turned back on when road
conditions allow.
Both systems come on automatically when
the vehicle is started and begins to move.
The systems may be heard or felt while
they are operating or while performing
diagnostic checks. This is normal and does
not mean there is a problem with the
vehicle.
It is recommended to leave both systems on
for normal driving conditions, but it may be
necessary to turn TCS off if the vehicle gets
stuck in sand, mud, ice, or snow. See
If the
Vehicle Is Stuck 0214 and “Turning the
Systems Off and On” later in this section.
Page 251 of 474
GMC Sierra/Sierra Denali 1500 Owner Manual (GMNA-Localizing-U.S./
Canada/Mexico-15883563) - 2022 - CRC - 11/19/21
250 Driving and Operating
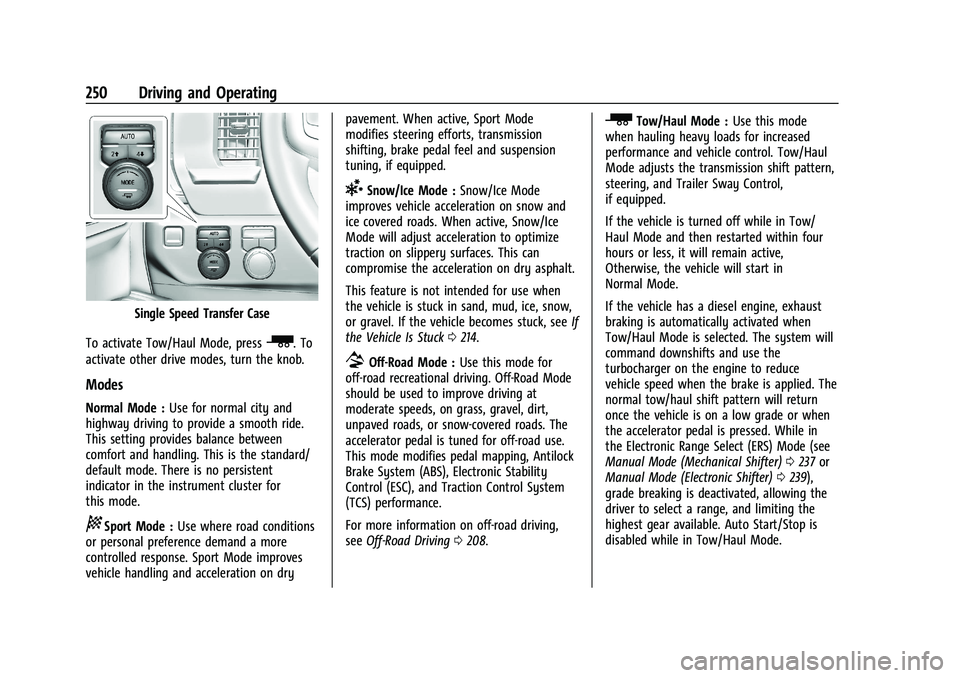
Single Speed Transfer Case
To activate Tow/Haul Mode, press
_. To
activate other drive modes, turn the knob.
Modes
Normal Mode : Use for normal city and
highway driving to provide a smooth ride.
This setting provides balance between
comfort and handling. This is the standard/
default mode. There is no persistent
indicator in the instrument cluster for
this mode.
8Sport Mode : Use where road conditions
or personal preference demand a more
controlled response. Sport Mode improves
vehicle handling and acceleration on dry pavement. When active, Sport Mode
modifies steering efforts, transmission
shifting, brake pedal feel and suspension
tuning, if equipped.
6Snow/Ice Mode :
Snow/Ice Mode
improves vehicle acceleration on snow and
ice covered roads. When active, Snow/Ice
Mode will adjust acceleration to optimize
traction on slippery surfaces. This can
compromise the acceleration on dry asphalt.
This feature is not intended for use when
the vehicle is stuck in sand, mud, ice, snow,
or gravel. If the vehicle becomes stuck, see If
the Vehicle Is Stuck 0214.
7Off-Road Mode : Use this mode for
off-road recreational driving. Off-Road Mode
should be used to improve driving at
moderate speeds, on grass, gravel, dirt,
unpaved roads, or snow-covered roads. The
accelerator pedal is tuned for off-road use.
This mode modifies pedal mapping, Antilock
Brake System (ABS), Electronic Stability
Control (ESC), and Traction Control System
(TCS) performance.
For more information on off-road driving,
see Off-Road Driving 0208.
_Tow/Haul Mode : Use this mode
when hauling heavy loads for increased
performance and vehicle control. Tow/Haul
Mode adjusts the transmission shift pattern,
steering, and Trailer Sway Control,
if equipped.
If the vehicle is turned off while in Tow/
Haul Mode and then restarted within four
hours or less, it will remain active,
Otherwise, the vehicle will start in
Normal Mode.
If the vehicle has a diesel engine, exhaust
braking is automatically activated when
Tow/Haul Mode is selected. The system will
command downshifts and use the
turbocharger on the engine to reduce
vehicle speed when the brake is applied. The
normal tow/haul shift pattern will return
once the vehicle is on a low grade or when
the accelerator pedal is pressed. While in
the Electronic Range Select (ERS) Mode (see
Manual Mode (Mechanical Shifter) 0237 or
Manual Mode (Electronic Shifter) 0239),
grade breaking is deactivated, allowing the
driver to select a range, and limiting the
highest gear available. Auto Start/Stop is
disabled while in Tow/Haul Mode.
Page 255 of 474
GMC Sierra/Sierra Denali 1500 Owner Manual (GMNA-Localizing-U.S./
Canada/Mexico-15883563) - 2022 - CRC - 11/19/21
254 Driving and Operating
Caution
Do not lock the axle while the tires are
spinning. The vehicle drivetrain could be
damaged. The repairs would not be
covered by the vehicle warranty.
Caution
If the vehicle’s axle is locked while driving
on pavement, the drivetrain could be
damaged. Repairs would not be covered
by the vehicle warranty. Do not use the
locking axle on pavement.
Before the front axle can be locked, the
transfer case must be in 4
n. The front axle cannot be locked
independently of the rear axle.
To lock the front and rear axles:
1. Place the transfer case in 4
n. This is the
only mode that allows the front axle to
lock. See Four-Wheel Drive 0240 for
more information regarding the transfer
case and four-wheel drive low operation.
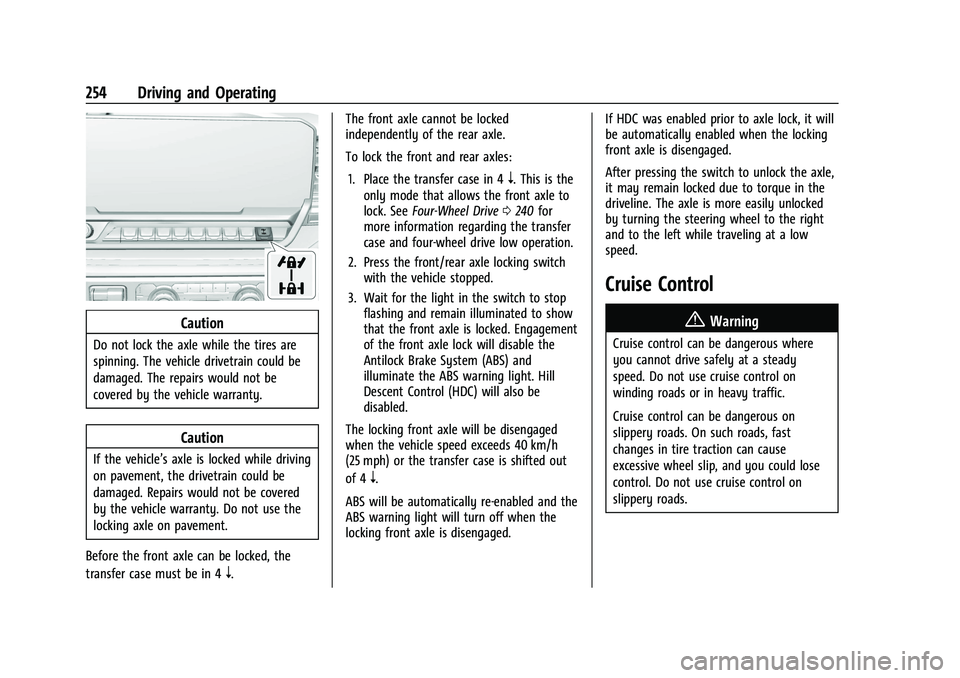
2. Press the front/rear axle locking switch with the vehicle stopped.
3. Wait for the light in the switch to stop flashing and remain illuminated to show
that the front axle is locked. Engagement
of the front axle lock will disable the
Antilock Brake System (ABS) and
illuminate the ABS warning light. Hill
Descent Control (HDC) will also be
disabled.
The locking front axle will be disengaged
when the vehicle speed exceeds 40 km/h
(25 mph) or the transfer case is shifted out
of 4
n.
ABS will be automatically re-enabled and the
ABS warning light will turn off when the
locking front axle is disengaged. If HDC was enabled prior to axle lock, it will
be automatically enabled when the locking
front axle is disengaged.
After pressing the switch to unlock the axle,
it may remain locked due to torque in the
driveline. The axle is more easily unlocked
by turning the steering wheel to the right
and to the left while traveling at a low
speed.
Cruise Control
{
Warning
Cruise control can be dangerous where
you cannot drive safely at a steady
speed. Do not use cruise control on
winding roads or in heavy traffic.
Cruise control can be dangerous on
slippery roads. On such roads, fast
changes in tire traction can cause
excessive wheel slip, and you could lose
control. Do not use cruise control on
slippery roads.
Page 313 of 474
GMC Sierra/Sierra Denali 1500 Owner Manual (GMNA-Localizing-U.S./
Canada/Mexico-15883563) - 2022 - CRC - 11/19/21
312 Driving and Operating
When parking your vehicle and your trailer
on a hill:1. Press the brake pedal, but do not shift into P (Park) yet. Turn the wheels into
the curb if facing downhill or into traffic
if facing uphill.
2. Have someone place chocks under the trailer wheels.
3. Gradually release the brake pedal to allow the chocks to absorb the load of
the trailer.
4. Reapply the brake pedal. Then apply the parking brake and shift into P (Park).
5. Release the brake pedal.
Leaving After Parking on a Hill
1. Apply and hold the brake pedal.
.Start the engine.
.Shift into a gear.
.Release the parking brake.
2. Let up on the brake pedal.
3. Drive slowly until the trailer is clear of the chocks.
4. Stop and have someone pick up and store the chocks.
Launching and Retrieving a Boat
Backing the Trailer into the Water
{Warning
.Have all passengers get out of the
vehicle before backing onto the sloped
part of the ramp. Lower the driver and
passenger side windows before
backing onto the ramp. This will
provide a means of escape in the
unlikely event the vehicle slides into
the water.
.If the boat launch surface is slippery,
have the driver remain in the vehicle
with the brake pedal applied while the
boat is being launched. The boat
launch can be especially slippery at
low tide when part of the ramp was
previously submerged at high tide. Do
not back onto the ramp to launch the
boat if you are not sure the vehicle
can maintain traction.
.Do not move the vehicle if someone is
in the path of the trailer. Some parts
of the trailer might be underwater and
not visible to people who are assisting
in launching the boat. Disconnect the wiring to the trailer before
backing the trailer into the water to prevent
damage to the electrical circuits on the
trailer. Reconnect the wiring to the trailer
after removing the trailer from the water.
If the trailer has electric brakes that can
function when the trailer is submerged, it
might help to leave the electrical trailer
connector attached to maintain trailer brake
functionality while on the boat ramp.
To back the trailer into the water:
1. If equipped, place the vehicle in four-wheel-drive high.
2. Slowly back down the boat ramp until the boat is floating, but no further than
necessary.
3. Press and hold the brake pedal, but do not shift into P (Park) yet.
4. Have someone place chocks under the front wheels of the vehicle.
5. Gradually release the brake pedal to allow the chocks to absorb the load of
the trailer.
6. Reapply the brake pedal. Then apply the parking brake and shift into P (Park).
7. Release the brake pedal.
Page 361 of 474

GMC Sierra/Sierra Denali 1500 Owner Manual (GMNA-Localizing-U.S./
Canada/Mexico-15883563) - 2022 - CRC - 11/19/21
360 Vehicle Care
3. Select YES on the confirmation message,or press the trip odometer reset stem on
a base level DIC. Repeat for pads on the
other axle if they were also replaced.
How to Disable the Brake Pad Life
System
The brake pad life system can be turned off.
This may be necessary if aftermarket brake
pads without wear sensors are installed.
When the system is turned off, the front
and rear brake pad life percentages will not
display. However, the built-in wear
indicators that make a high-pitched warning
sound when the brake pads are worn can
still determine when the pads should be
replaced. See Brakes0358.
To turn off the brake pad life system: 1. Display Brake Pad Life on the DIC. See Driver Information Center (DIC) (Base
Level) 0128 or
Driver Information Center (DIC) (Uplevel)
0 130.
2. Select DISABLE.
To turn the brake pad life system back on,
follow the above steps but select ENABLE in
Step 2.
Brake Fluid
The brake master cylinder reservoir is filled
with GM approved DOT 4 brake fluid as
indicated on the reservoir cap. See Engine
Compartment Overview 0345 for the
location of the reservoir.
Checking Brake Fluid
With the vehicle in P (Park) on a level
surface, the brake fluid level should be
between the minimum and maximum marks
on the brake fluid reservoir.
There are only two reasons why the brake
fluid level in the reservoir may go down:
.Normal brake lining wear. When new
linings are installed, the fluid level goes
back up.
.A fluid leak in the brake hydraulic system.
Have the brake hydraulic system fixed.
With a leak, the brakes will not
work well. Always clean the brake fluid reservoir cap
and the area around the cap before
removing it.
Do not top off the brake fluid. Adding fluid
does not correct a leak. If fluid is added
when the linings are worn, there will be too
much fluid when new brake linings are
installed. Add or remove fluid, as necessary,
only when work is done on the brake
hydraulic system.
{Warning
If too much brake fluid is added, it can
spill on the engine and burn, if the
engine is hot enough. You or others could
be burned, and the vehicle could be
damaged. Add brake fluid only when
work is done on the brake hydraulic
system.
When the brake fluid falls to a low level,
the brake warning light comes on. See Brake
System Warning Light 0121.
Brake fluid absorbs water over time which
degrades the effectiveness of the brake fluid.
Replace brake fluid at the specified intervals
to prevent increased stopping distance. See
Maintenance Schedule 0425.
Page 362 of 474

GMC Sierra/Sierra Denali 1500 Owner Manual (GMNA-Localizing-U.S./
Canada/Mexico-15883563) - 2022 - CRC - 11/19/21
Vehicle Care 361
What to Add
Use only GM approved DOT 4 brake fluid
from a clean, sealed container. See
Recommended Fluids and Lubricants0434.
{Warning
The wrong or contaminated brake fluid
could result in damage to the brake
system. This could result in the loss of
braking leading to a possible injury.
Always use the proper GM approved
brake fluid.
Caution
If brake fluid is spilled on the vehicle's
painted surfaces, the paint finish can be
damaged. Immediately wash off any
painted surface.
Battery - North America
The original equipment battery is
maintenance free. Do not remove the cap
and do not add fluid.
Refer to the replacement number shown on
the original battery label when a new
battery is needed. See Engine Compartment
Overview 0345 for battery location. Stop/Start System
Vehicles equipped with a 2.7L L3B, , 5.3L L84
or 6.2L L87 are equipped with a Stop/Start
system to shut off the engine to help
conserve fuel. See
Stop/Start System 0225.
Vehicles with the Stop/Start system have an
Absorbed Glass Mat (AGM) 12-volt battery.
Installation of a standard 12-volt battery will
result in reduced 12-volt battery life. When
using a 12-volt battery charger on the 12-volt
AGM battery, some chargers have an AGM
battery setting on the charger. If available,
use the AGM setting on the charger to limit
charge voltage to 14.8 volts. Follow the
charger manufacturer’s instructions.
{Warning
WARNING: Battery posts, terminals and
related accessories can expose you to
chemicals including lead and lead
compounds, which are known to the
State of California to cause cancer and
birth defects or other reproductive harm.
Wash hands after handling. For more
information go to
www.P65Warnings.ca.gov.
See the warning on the back cover.
Vehicle Storage
{Warning
Batteries have acid that can burn you and
gas that can explode. You can be badly
hurt if you are not careful. Always wear
eye protection. See Jump Starting - North
America 0407 for tips on working
around a battery without getting hurt.
Infrequent Usage: Remove the black,
negative (−) cable from the battery to keep
the battery from running down.
Extended Storage: Remove the black,
negative (−) cable from the battery or use a
battery trickle charger.
Negative Battery Cable Disconnection
{Warning
Before disconnecting the negative battery
cable, turn off all features, turn the
ignition off, and remove the key,
if equipped, from the vehicle. If this is
not done, you or others could be injured,
and the vehicle could be damaged.
Page 401 of 474
GMC Sierra/Sierra Denali 1500 Owner Manual (GMNA-Localizing-U.S./
Canada/Mexico-15883563) - 2022 - CRC - 11/19/21
400 Vehicle Care
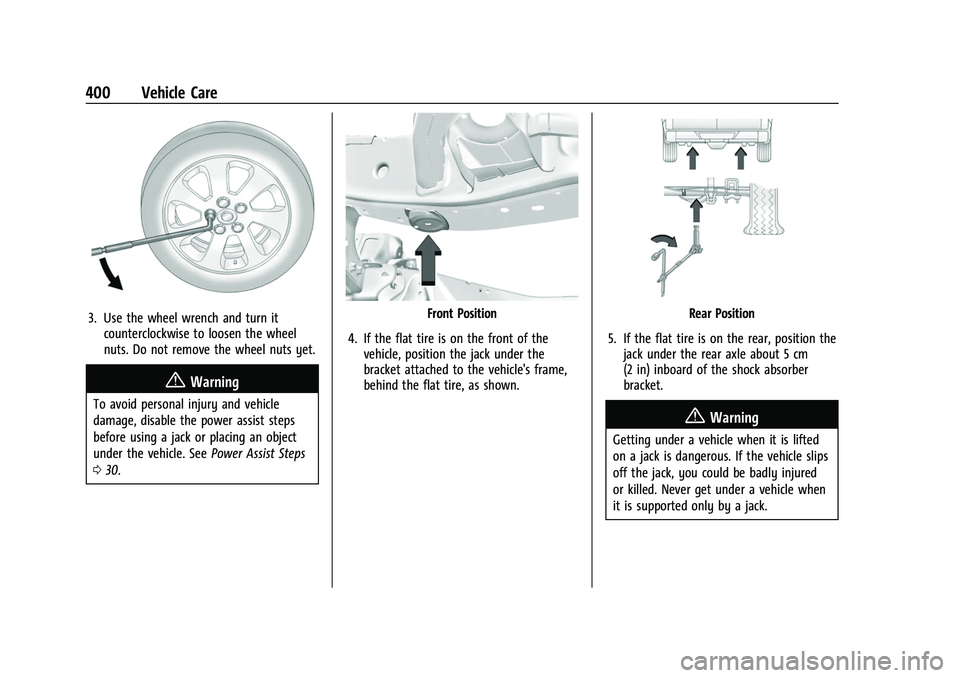
3. Use the wheel wrench and turn itcounterclockwise to loosen the wheel
nuts. Do not remove the wheel nuts yet.
{Warning
To avoid personal injury and vehicle
damage, disable the power assist steps
before using a jack or placing an object
under the vehicle. See Power Assist Steps
0 30.
Front Position
4. If the flat tire is on the front of the vehicle, position the jack under the
bracket attached to the vehicle's frame,
behind the flat tire, as shown.Rear Position
5. If the flat tire is on the rear, position the jack under the rear axle about 5 cm
(2 in) inboard of the shock absorber
bracket.
{Warning
Getting under a vehicle when it is lifted
on a jack is dangerous. If the vehicle slips
off the jack, you could be badly injured
or killed. Never get under a vehicle when
it is supported only by a jack.