2022 GMC SIERRA lock
[x] Cancel search: lockPage 370 of 474

GMC Sierra/Sierra Denali 1500 Owner Manual (GMNA-Localizing-U.S./
Canada/Mexico-15883563) - 2022 - CRC - 11/19/21
Vehicle Care 369
Replacing a Blown Fuse
1. Turn off the vehicle.
2. Locate the fuse puller on the instrumentpanel end cap. See the Instrument Panel
Fuse Block (Left) 0373 or
Instrument Panel Fuse Block (Right)
0 375.
3. Use the fuse puller to remove the fuse
from the top or side, as shown above. 4. If the fuse must be replaced
immediately, spare fuses are also
provided on the instrument panel end
cap or borrow a replacement fuse with
the same amperage from the fuse block.
Choose a vehicle feature that is not
needed to safely operate the vehicle.
Repeat Steps 2-3.
5. Insert the replacement fuse into the empty slot of the blown fuse.
At the next opportunity, see your dealer to
replace the blown fuse.
Headlamp Wiring
An electrical overload may cause the lamps
to go on and off, or in some cases to
remain off. Have the headlamp wiring
checked right away if the lamps go on and
off or remain off.
Windshield Wipers
If the wiper motor overheats due to heavy
snow or ice, the windshield wipers will stop
until the motor cools and will then restart.
Although the circuit is protected from
electrical overload, overload due to heavy
snow or ice may cause wiper linkage
Page 371 of 474

GMC Sierra/Sierra Denali 1500 Owner Manual (GMNA-Localizing-U.S./
Canada/Mexico-15883563) - 2022 - CRC - 11/19/21
370 Vehicle Care
damage. Always clear ice and heavy snow
from the windshield before using the
windshield wipers.
If the overload is caused by an electrical
problem and not snow or ice, be sure to get
it fixed.
Fuses and Circuit Breakers
The wiring circuits in the vehicle are
protected from short circuits by a
combination of fuses and circuit breakers.
This greatly reduces the chance of damage
caused by electrical problems.
{Danger
Fuses and circuit breakers are marked
with their ampere rating. Do not exceed
the specified amperage rating when
replacing fuses and circuit breakers. Use
of an oversized fuse or circuit breaker can
result in a vehicle fire. You and others
could be seriously injured or killed.
{Warning
Installation or use of fuses that do not
meet GM’s original fuse specifications is
dangerous. The fuses could fail, and result
in a fire. You or others could be injured
or killed, and the vehicle could be
damaged.
See Accessories and Modifications 0342 and
General Information 0342.
To check or replace a blown fuse, see
Electrical System Overload 0368.
Engine Compartment Fuse Block
If the vehicle has a diesel engine, see the
Duramax diesel supplement.
The engine compartment fuse block is in the
engine compartment, on the passenger side
of the vehicle.
Lift the cover to access the fuse block.
Caution
Spilling liquid on any electrical
component on the vehicle may damage
it. Always keep the covers on any
electrical component.
A fuse puller is available in the left
instrument panel end cap.
The vehicle may not be equipped with all of
the fuses, relays, and features shown.
Page 374 of 474

GMC Sierra/Sierra Denali 1500 Owner Manual (GMNA-Localizing-U.S./
Canada/Mexico-15883563) - 2022 - CRC - 11/19/21
Vehicle Care 373
FusesUsage
76 Electric Running Board
78 Engine Control Module
79 Cabin Coll Pump
80 Powertrain Sensor 1 81 Trailer Stop/Turn Lamp Right
82 Trailer Interface Module 1
83 FTZM –Fuel Tank Zone
Module
84 Trailer Battery 85 –
86 Engine Control Module 87 Injector B Even
88 O2 B Sensor
89 O2 A sensor
90 Injector A Odd 91 –
92 Aeroshutter Relays
Usage
5 Rear Defog
18 DC/AC Inverter
23 Fuel Heater
35 Park Lamp/Front Grille Lamp
36 Run/Crank
43 Secondary Axle Motor
59 A/C Clutch
64 Starter Motor 70 Starter Motor 77 PowertrainInstrument Panel Fuse Block (Left)
The left instrument panel fuse block access
door is on the driver side edge of the
instrument panel.
The vehicle may not be equipped with all of
the fuses, relays, and features shown.
Pull off the cover to access the fuse block.
A fuse puller is available in the left
instrument panel end cap.
Page 376 of 474
GMC Sierra/Sierra Denali 1500 Owner Manual (GMNA-Localizing-U.S./
Canada/Mexico-15883563) - 2022 - CRC - 11/19/21
Vehicle Care 375
RelaysUsage
K7 –
K8 –
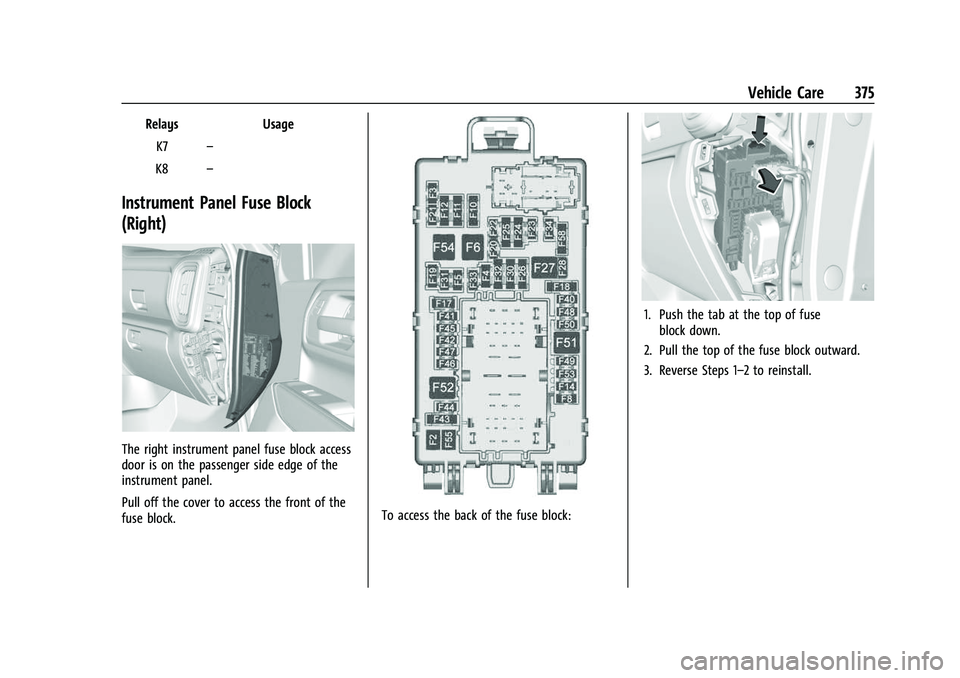
Instrument Panel Fuse Block
(Right)
The right instrument panel fuse block access
door is on the passenger side edge of the
instrument panel.
Pull off the cover to access the front of the
fuse block.
To access the back of the fuse block:
1. Push the tab at the top of fuse
block down.
2. Pull the top of the fuse block outward.
3. Reverse Steps 1–2 to reinstall.
Page 377 of 474
GMC Sierra/Sierra Denali 1500 Owner Manual (GMNA-Localizing-U.S./
Canada/Mexico-15883563) - 2022 - CRC - 11/19/21
376 Vehicle Care
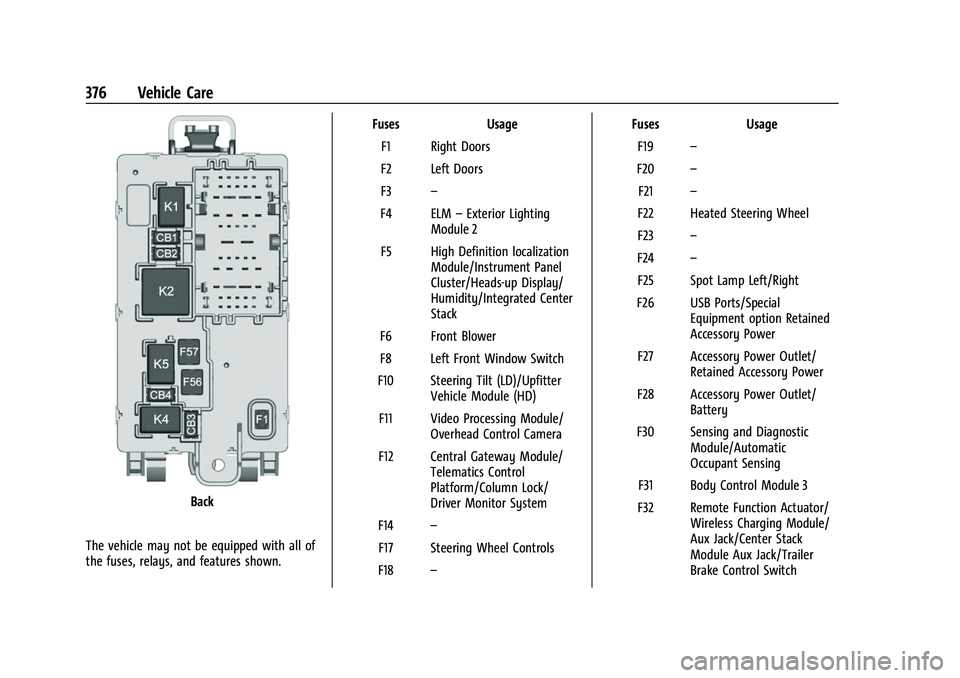
Back
The vehicle may not be equipped with all of
the fuses, relays, and features shown. Fuses Usage
F1 Right Doors
F2 Left Doors
F3 –
F4 ELM –Exterior Lighting
Module 2
F5 High Definition localization Module/Instrument Panel
Cluster/Heads-up Display/
Humidity/Integrated Center
Stack
F6 Front Blower
F8 Left Front Window Switch
F10 Steering Tilt (LD)/Upfitter Vehicle Module (HD)
F11 Video Processing Module/ Overhead Control Camera
F12 Central Gateway Module/ Telematics Control
Platform/Column Lock/
Driver Monitor System
F14 –
F17 Steering Wheel Controls
F18 – Fuses
Usage
F19 –
F20 –
F21 –
F22 Heated Steering Wheel
F23 –
F24 –
F25 Spot Lamp Left/Right
F26 USB Ports/Special Equipment option Retained
Accessory Power
F27 Accessory Power Outlet/ Retained Accessory Power
F28 Accessory Power Outlet/ Battery
F30 Sensing and Diagnostic Module/Automatic
Occupant Sensing
F31 Body Control Module 3
F32 Remote Function Actuator/ Wireless Charging Module/
Aux Jack/Center Stack
Module Aux Jack/Trailer
Brake Control Switch
Page 393 of 474
GMC Sierra/Sierra Denali 1500 Owner Manual (GMNA-Localizing-U.S./
Canada/Mexico-15883563) - 2022 - CRC - 11/19/21
392 Vehicle Care
TPC Spec number is molded onto the
tire's sidewall near the tire size. If the
tires have an all-season tread design,
the TPC Spec number will be followed
by MS for mud and snow. SeeTire
Sidewall Labeling 0379 for additional
information.
GM recommends replacing worn tires in
complete sets of four. Uniform tread
depth on all tires will help to maintain
the performance of the vehicle. Braking
and handling performance may be
adversely affected if all the tires are not
replaced at the same time. If proper
rotation and maintenance have been
done, all four tires should wear out at
about the same time. However, if it is
necessary to replace only one axle set
of worn tires, place the new tires on
the rear axle. See Tire Rotation0390.
{Warning
Tires could explode during improper
service. Attempting to mount or
dismount a tire could cause injury or
(Continued)
Warning (Continued)
death. Only your dealer or authorized
tire service center should mount or
dismount the tires.
{Warning
Mixing tires of different sizes (other
than those originally installed on the
vehicle), brands, tread patterns,
or types may cause loss of vehicle
control, resulting in a crash or other
vehicle damage. Use the correct size,
brand, and type of tire on all wheels.
{Warning
Using bias-ply tires on the vehicle
may cause the wheel rim flanges to
develop cracks after many miles of
driving. A tire and/or wheel could fail
suddenly and cause a crash. Use only
radial-ply tires with the wheels on
the vehicle. Winter tires with the same speed rating
as the original equipment tires may not
be available for H, V, W, Y and ZR
speed rated tires. Never exceed the
winter tires’
maximum speed capability
when using winter tires with a lower
speed rating.
If the vehicle tires must be replaced
with a tire that does not have a TPC
Spec number, make sure they are the
same size, load range, speed rating, and
construction (radial) as the original
tires.
The Tire and Loading Information label
indicates the original equipment tires
on the vehicle. See Vehicle Load Limits
0 215.
Different Size Tires and Wheels
If wheels or tires are installed that are a
different size than the original equipment
wheels and tires, vehicle performance,
including its braking, ride and handling
characteristics, stability, and resistance to
rollover may be affected. If the vehicle has
electronic systems such as antilock brakes,
rollover airbags, traction control, electronic
Page 397 of 474
GMC Sierra/Sierra Denali 1500 Owner Manual (GMNA-Localizing-U.S./
Canada/Mexico-15883563) - 2022 - CRC - 11/19/21
396 Vehicle Care
the accelerator pedal and steer to straighten
the vehicle. It may be very bumpy and
noisy. Gently brake to a stop, well off the
road, if possible.
{Warning
Driving on a flat tire will cause
permanent damage to the tire.
Re-inflating a tire after it has been driven
on while severely underinflated or flat
may cause a blowout and a serious crash.
Never attempt to re-inflate a tire that has
been driven on while severely
underinflated or flat. Have your dealer or
an authorized tire service center repair or
replace the flat tire as soon as possible.
{Warning
Lifting a vehicle and getting under it to
do maintenance or repairs is dangerous
without the appropriate safety equipment
and training. If a jack is provided with
the vehicle, it is designed only for
changing a flat tire. If it is used for
anything else, you or others could be
badly injured or killed if the vehicle slips(Continued)
Warning (Continued)
off the jack. If a jack is provided with the
vehicle, only use it for changing a
flat tire.
If a tire goes flat, avoid further tire and
wheel damage by driving slowly to a level
place, well off the road, if possible. Turn on
the hazard warning flashers. See Hazard
Warning Flashers 0148.
{Warning
Changing a tire can be dangerous. The
vehicle can slip off the jack and roll over
or fall causing injury or death. Find a
level place to change the tire. To help
prevent the vehicle from moving:
1. Set the parking brake firmly.
2. Shift the vehicle to P (Park).
3. For vehicles with four-wheel drive with an N (Neutral) transfer case
position, be sure the transfer case is
in a drive gear —not in N (Neutral).
4. Turn off the engine and do not restart while the vehicle is raised.
(Continued)
Warning (Continued)
5. Do not allow passengers to remainin the vehicle.
6. Place wheel blocks, if equipped, on both sides of the tire at the opposite
corner of the tire being changed.
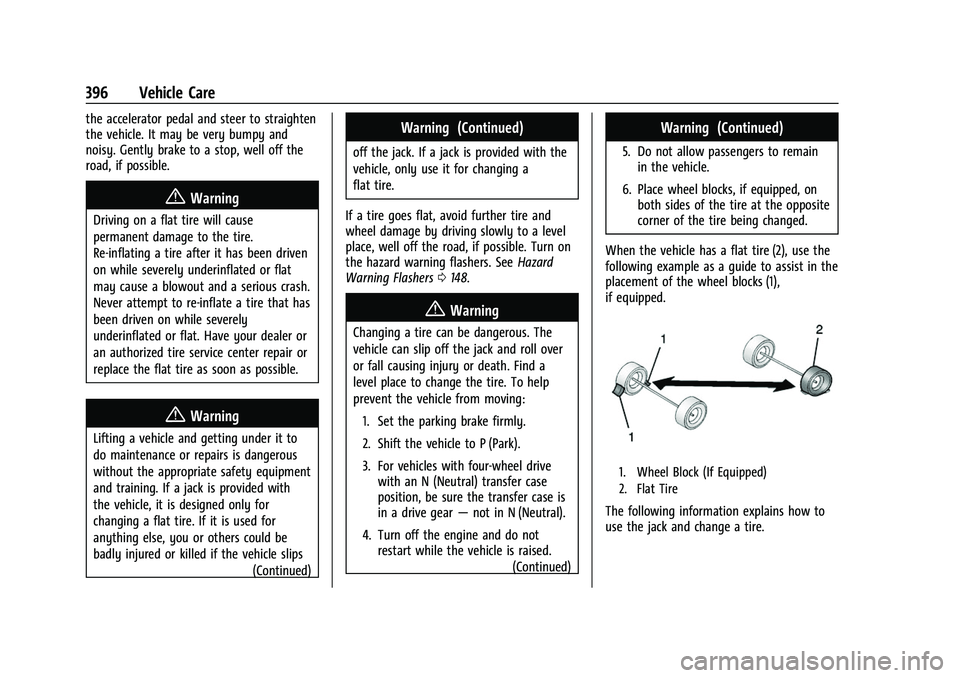
When the vehicle has a flat tire (2), use the
following example as a guide to assist in the
placement of the wheel blocks (1),
if equipped.
1. Wheel Block (If Equipped)
2. Flat Tire
The following information explains how to
use the jack and change a tire.
Page 398 of 474
GMC Sierra/Sierra Denali 1500 Owner Manual (GMNA-Localizing-U.S./
Canada/Mexico-15883563) - 2022 - CRC - 11/19/21
Vehicle Care 397
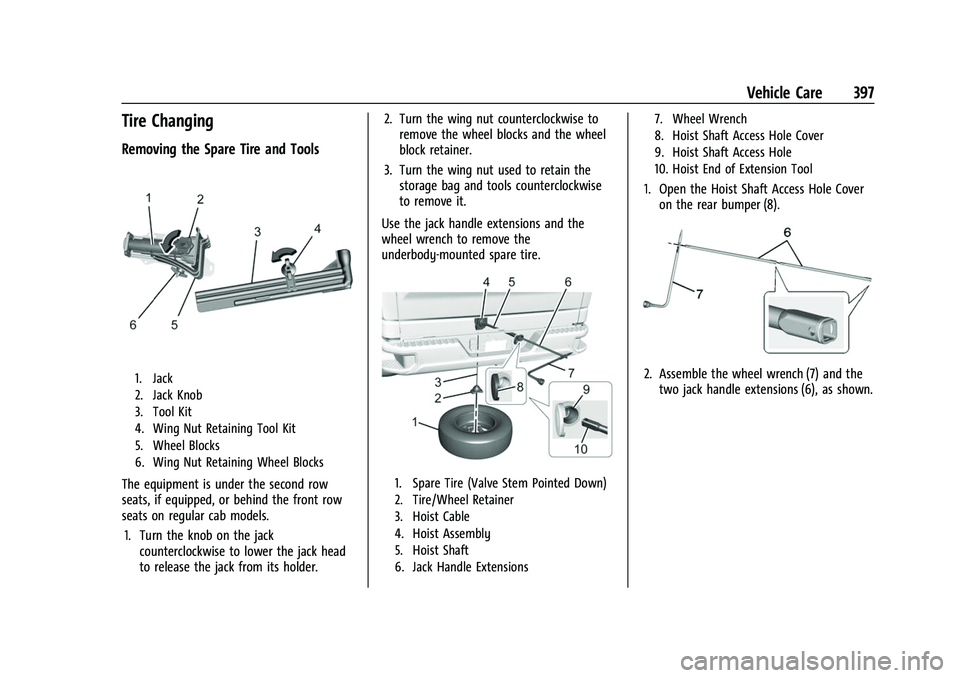
Tire Changing
Removing the Spare Tire and Tools
1. Jack
2. Jack Knob
3. Tool Kit
4. Wing Nut Retaining Tool Kit
5. Wheel Blocks
6. Wing Nut Retaining Wheel Blocks
The equipment is under the second row
seats, if equipped, or behind the front row
seats on regular cab models.1. Turn the knob on the jack counterclockwise to lower the jack head
to release the jack from its holder. 2. Turn the wing nut counterclockwise to
remove the wheel blocks and the wheel
block retainer.
3. Turn the wing nut used to retain the storage bag and tools counterclockwise
to remove it.
Use the jack handle extensions and the
wheel wrench to remove the
underbody-mounted spare tire.1. Spare Tire (Valve Stem Pointed Down)
2. Tire/Wheel Retainer
3. Hoist Cable
4. Hoist Assembly
5. Hoist Shaft
6. Jack Handle Extensions 7. Wheel Wrench
8. Hoist Shaft Access Hole Cover
9. Hoist Shaft Access Hole
10. Hoist End of Extension Tool
1. Open the Hoist Shaft Access Hole Cover
on the rear bumper (8).
2. Assemble the wheel wrench (7) and thetwo jack handle extensions (6), as shown.