2022 FORD MAVERICK manual transmission
[x] Cancel search: manual transmissionPage 9 of 533
Engine Block Heater
...................................159
Stopping the Engine ..................................
160
Automatic Engine Stop ..............................
161
Starting and Stopping the Engine – Troubleshooting .......................................
162
Hybrid Electric Vehicle Information - Hybrid Electric
Vehicle (HEV)
What is a Hybrid Electric Vehicle ..........
166
How Does a Hybrid Electric Vehicle Work ........................................................................\
166
Hybrid Electric Vehicle Driving Characteristics .........................................
166
Hybrid Electric Vehicle Indicators .........
166
Hybrid Electric Vehicle Information – Troubleshooting .......................................
167
Auto-Start-Stop - Gasoline
What Is Auto-Start-Stop .........................
168
Auto-Start-Stop Precautions .................
168
Switching Auto-Start-Stop On and Off ........................................................................\
168
Stopping the Engine ..................................
168
Restarting the Engine ................................
168
Auto-Start-Stop Indicators .....................
168
Auto-Start-Stop – Troubleshooting ........................................................................\
169
Fuel and Refueling
Fuel and Refueling Precautions ..............
171
Fuel Quality ....................................................
172
Locating the Fuel Filler Funnel ................
172
Running Out of Fuel ....................................
173
Refueling .........................................................
174
Fuel Tank Capacity ......................................
178
Fuel and Refueling – Troubleshooting ........................................................................\
.
179
Catalytic Converter
What Is the Catalytic Converter ..............
181Catalytic Converter Precautions
.............
181
Catalytic Converter – Troubleshooting ........................................................................\
..
181
High Voltage Battery
What Is the High Voltage Battery ..........
182
High Voltage Battery Precautions .........
182
Automatic Transmission
Automatic Transmission Precautions ........................................................................\
.
183
Automatic Transmission Positions .......
183
Shifting Your Vehicle Into Gear ..............
184
Automatic Transmission Position Indicators ....................................................
184
Temporary Neutral Mode .........................
185
Automatic Return to Park (P) ................
185
Grade Assist - Hybrid Electric Vehicle (HEV) ...........................................................
186
Manual Park Release - Gasoline ...........
186
Automatic Transmission Audible Warnings ....................................................
188
Automatic Transmission – Troubleshooting ......................................
188
All-Wheel Drive
How Does All-Wheel Drive Work - Excluding: FX4 Off Road ......................
189
How Does All-Wheel Drive Work - FX4 Off Road .....................................................
189
All-Wheel Drive Precautions ..................
189
All-Wheel Drive Limitations ....................
189
All-Wheel Drive – Troubleshooting ......
190
Brakes
Brake Precautions ........................................
191
Anti-Lock Braking System .........................
191
Brake Over Accelerator ...............................
191
Locating the Brake Fluid Reservoir ........
192
Checking the Brake Fluid ..........................
192
Brake Fluid Specification ..........................
192
6
2022 Maverick (CFE) Canada/United States of America, enUSA, Edition date: 202106, First-Printing Table of Contents
Page 98 of 533
EXTERIOR LAMPS
SWITCHING THE TURN SIGNAL
LAMPS ON AND OFF
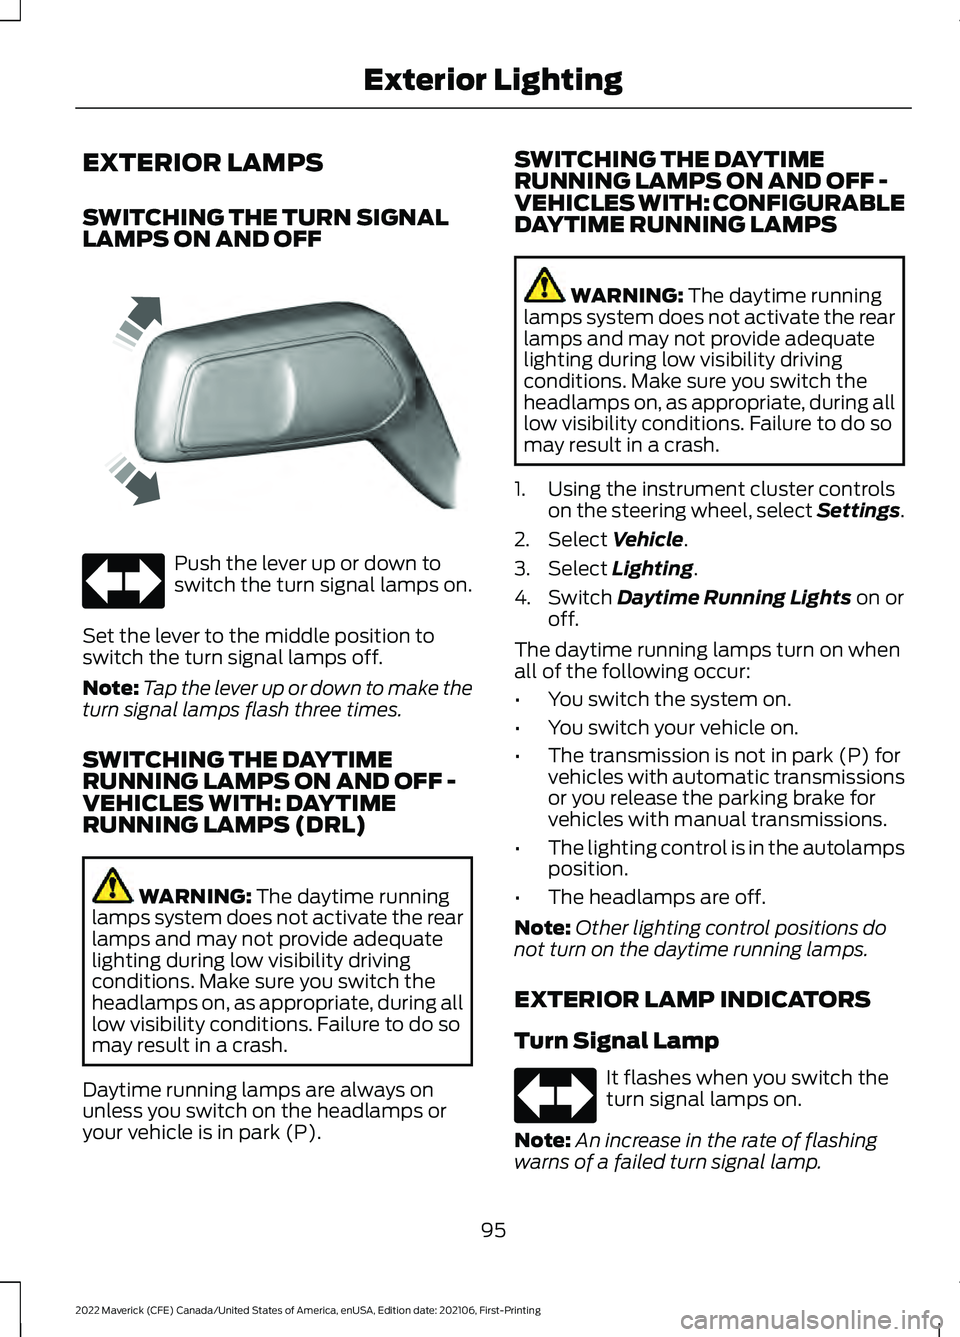
Push the lever up or down to
switch the turn signal lamps on.
Set the lever to the middle position to
switch the turn signal lamps off.
Note: Tap the lever up or down to make the
turn signal lamps flash three times.
SWITCHING THE DAYTIME
RUNNING LAMPS ON AND OFF -
VEHICLES WITH: DAYTIME
RUNNING LAMPS (DRL) WARNING: The daytime running
lamps system does not activate the rear
lamps and may not provide adequate
lighting during low visibility driving
conditions. Make sure you switch the
headlamps on, as appropriate, during all
low visibility conditions. Failure to do so
may result in a crash.
Daytime running lamps are always on
unless you switch on the headlamps or
your vehicle is in park (P). SWITCHING THE DAYTIME
RUNNING LAMPS ON AND OFF -
VEHICLES WITH: CONFIGURABLE
DAYTIME RUNNING LAMPS WARNING:
The daytime running
lamps system does not activate the rear
lamps and may not provide adequate
lighting during low visibility driving
conditions. Make sure you switch the
headlamps on, as appropriate, during all
low visibility conditions. Failure to do so
may result in a crash.
1. Using the instrument cluster controls on the steering wheel, select Settings.
2. Select
Vehicle.
3. Select
Lighting.
4. Switch
Daytime Running Lights on or
off.
The daytime running lamps turn on when
all of the following occur:
• You switch the system on.
• You switch your vehicle on.
• The transmission is not in park (P) for
vehicles with automatic transmissions
or you release the parking brake for
vehicles with manual transmissions.
• The lighting control is in the autolamps
position.
• The headlamps are off.
Note: Other lighting control positions do
not turn on the daytime running lamps.
EXTERIOR LAMP INDICATORS
Turn Signal Lamp It flashes when you switch the
turn signal lamps on.
Note: An increase in the rate of flashing
warns of a failed turn signal lamp.
95
2022 Maverick (CFE) Canada/United States of America, enUSA, Edition date: 202106, First-Printing Exterior LightingE242676
Page 181 of 533
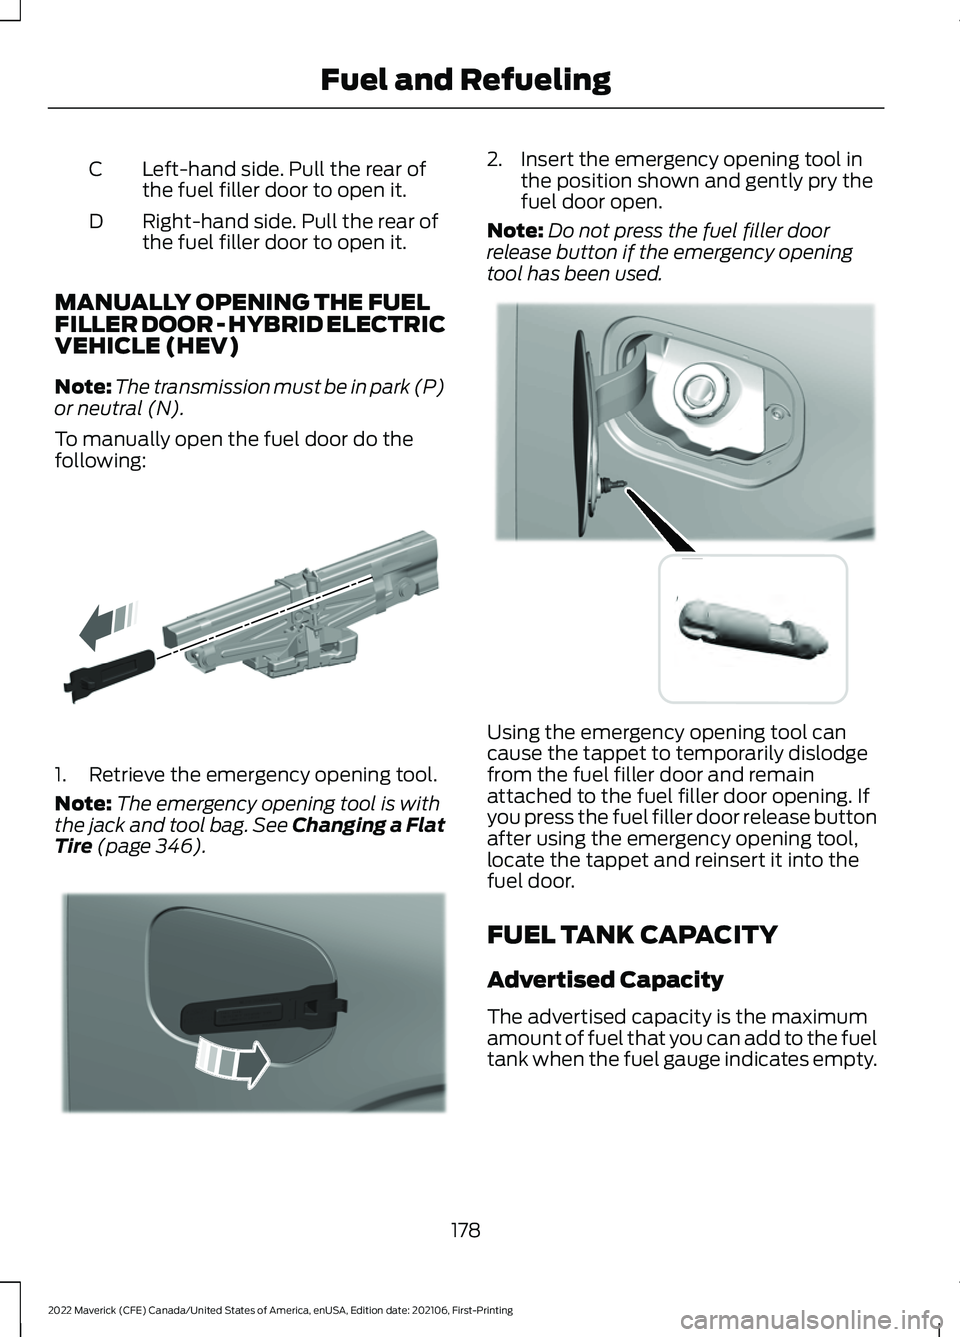
Left-hand side. Pull the rear of
the fuel filler door to open it.
C
Right-hand side. Pull the rear of
the fuel filler door to open it.
D
MANUALLY OPENING THE FUEL
FILLER DOOR - HYBRID ELECTRIC
VEHICLE (HEV)
Note: The transmission must be in park (P)
or neutral (N).
To manually open the fuel door do the
following: 1. Retrieve the emergency opening tool.
Note:
The emergency opening tool is with
the jack and tool bag. See Changing a Flat
Tire (page 346). 2. Insert the emergency opening tool in
the position shown and gently pry the
fuel door open.
Note: Do not press the fuel filler door
release button if the emergency opening
tool has been used. Using the emergency opening tool can
cause the tappet to temporarily dislodge
from the fuel filler door and remain
attached to the fuel filler door opening. If
you press the fuel filler door release button
after using the emergency opening tool,
locate the tappet and reinsert it into the
fuel door.
FUEL TANK CAPACITY
Advertised Capacity
The advertised capacity is the maximum
amount of fuel that you can add to the fuel
tank when the fuel gauge indicates empty.
178
2022 Maverick (CFE) Canada/United States of America, enUSA, Edition date: 202106, First-Printing Fuel and RefuelingE333731 E333736 E333737
Page 189 of 533
HOW DOES AUTOMATIC RETURN
TO PARK (P) WORK
Your vehicle shifts into park (P) when your
vehicle is stationary and any of the
following occur:
•
You switch the vehicle off.
• You open the driver door with your
seatbelt unlatched.
• You unlatch the driver seatbelt when
the driver door is open.
Note: Do not use automatic return to park
(P) when your vehicle is moving, except in
an emergency. See Stopping the Engine
When Your Vehicle is Moving (page 161).
AUTOMATIC RETURN TO PARK
(P) LIMITATIONS
Automatic return to park may not work if
the door ajar switch is malfunctioning.
See an authorized dealer if any of the
following occur:
• Door ajar indicator does not illuminate
with the driver door open.
• Door ajar indicator illuminates with the
driver door closed.
• Transmission not in park message
appears with the driver door closed,
after you shift out of park (P).
GRADE ASSIST - HYBRID
ELECTRIC VEHICLE (HEV)
WHAT IS GRADE ASSIST
Provides additional grade braking with a
combination of engine motoring and
high-voltage battery charging to help
maintain vehicle speed when descending
a grade. MANUAL PARK RELEASE -
GASOLINE
(IF EQUIPPED)
WHAT IS MANUAL PARK RELEASE
Manual park release is used to move your
transmission from the park (P) position in
the event of an electrical malfunction or
emergency.
MANUAL PARK RELEASE
PRECAUTIONS WARNING:
When doing this
procedure, you need to take the
transmission out of park (P) which
means your vehicle can roll freely. To
avoid unwanted vehicle movement,
always fully apply the parking brake prior
to doing this procedure. Use wheel
chocks if appropriate. WARNING:
If the parking brake is
fully released, but the brake warning
lamp remains illuminated, the brakes
may not be working properly. Have your
vehicle checked as soon as possible. WARNING:
Do not drive your
vehicle until you verify that the
stoplamps are working.
USING MANUAL PARK RELEASE
Activating the Manual Park
Release Cable
1. Apply the parking brake. See Electric
Parking Brake
(page 194).
Note: If the vehicle battery is dead, for
example, no electrical power available, you
could need an external power source to
apply the parking brake.
186
2022 Maverick (CFE) Canada/United States of America, enUSA, Edition date: 202106, First-Printing Automatic Transmission
Page 190 of 533
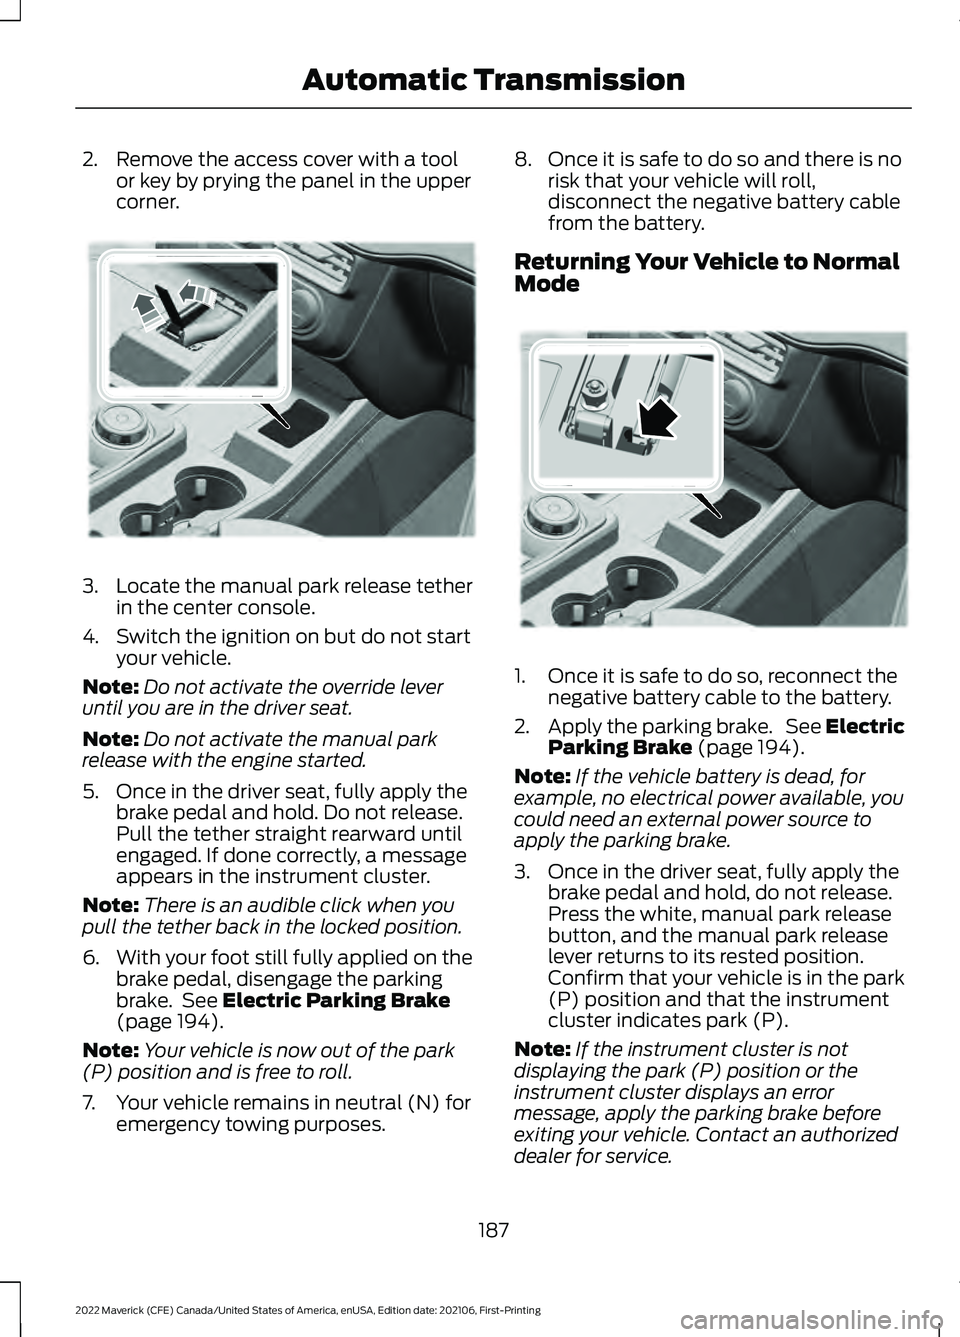
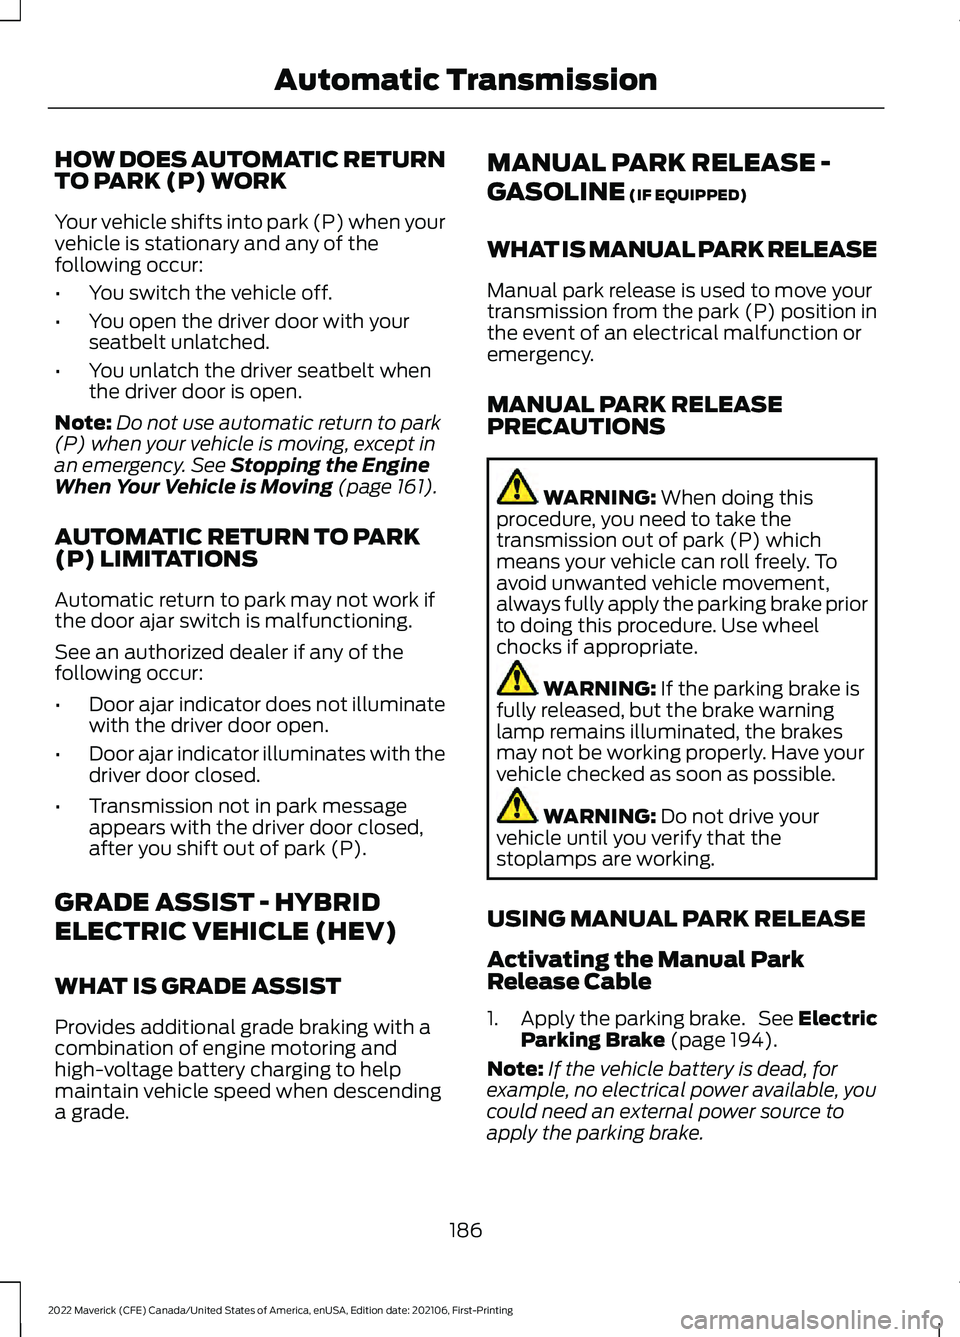
2. Remove the access cover with a tool
or key by prying the panel in the upper
corner. 3.
Locate the manual park release tether
in the center console.
4. Switch the ignition on but do not start your vehicle.
Note: Do not activate the override lever
until you are in the driver seat.
Note: Do not activate the manual park
release with the engine started.
5. Once in the driver seat, fully apply the brake pedal and hold. Do not release.
Pull the tether straight rearward until
engaged. If done correctly, a message
appears in the instrument cluster.
Note: There is an audible click when you
pull the tether back in the locked position.
6. With your foot still fully applied on the
brake pedal, disengage the parking
brake. See Electric Parking Brake
(page 194).
Note: Your vehicle is now out of the park
(P) position and is free to roll.
7. Your vehicle remains in neutral (N) for emergency towing purposes. 8. Once it is safe to do so and there is no
risk that your vehicle will roll,
disconnect the negative battery cable
from the battery.
Returning Your Vehicle to Normal
Mode 1. Once it is safe to do so, reconnect the
negative battery cable to the battery.
2. Apply the parking brake. See Electric
Parking Brake
(page 194).
Note: If the vehicle battery is dead, for
example, no electrical power available, you
could need an external power source to
apply the parking brake.
3. Once in the driver seat, fully apply the brake pedal and hold, do not release.
Press the white, manual park release
button, and the manual park release
lever returns to its rested position.
Confirm that your vehicle is in the park
(P) position and that the instrument
cluster indicates park (P).
Note: If the instrument cluster is not
displaying the park (P) position or the
instrument cluster displays an error
message, apply the parking brake before
exiting your vehicle. Contact an authorized
dealer for service.
187
2022 Maverick (CFE) Canada/United States of America, enUSA, Edition date: 202106, First-Printing Automatic TransmissionE356795 E356796
Page 206 of 533
WHAT IS HILL DESCENT
CONTROL
Hill descent control allows the driver to set
and maintain vehicle speed while
descending steep slopes in various surface
conditions.
HOW DOES HILL DESCENT
CONTROL WORK
Hill descent control can maintain vehicle
speeds on downhill slopes between
2
– 20 mph (3– 32 km/h). Above 20 mph
(32 km/h), the system remains on but the
descent speed cannot be set or
maintained.
Note: The system does not function below
2 mph (3 km/h)
.
The system requires a cool down interval
after a period of sustained use. Hill descent
control provides a warning in the message
center and a tone sounds when the system
is about to disengage for cooling. At this
time, manually apply the brakes as needed
to maintain descent speed.
Note: The amount of time that the system
can remain active before cooling varies with
conditions.
HILL DESCENT CONTROL
PRECAUTIONS WARNING:
The system does not
control speed in low traction conditions
or extremely steep slopes. The system
is designed to be an aid and does not
relieve you of your responsibility to drive
with due care and attention. Failure to
follow this instruction could result in
personal injury. WARNING:
Hill descent control
cannot control descent in all surface
conditions and circumstances, such as
ice or extremely steep grades. Hill
descent control is a driver assist system
and cannot substitute for good judgment
by the driver. Failure to do so may result
in loss of vehicle control, crash or serious
injury. WARNING:
The system does not
replace the parking brake. When you
leave your vehicle, always apply the
parking brake and shift the transmission
into park (P) for automatic transmission
or first gear for manual transmission.
SWITCHING HILL DESCENT
CONTROL ON AND OFF Press the button on the center
console. A light illuminates and
a tone sounds when the system
is active.
SETTING THE HILL DESCENT
SPEED
To increase or decrease the descent speed,
press the accelerator or brake pedal, or use
the SET
+ and SET - buttons on the
steering wheel. Once you reach the
preferred speed remove your feet from the
pedals.
HILL DESCENT CONTROL
INDICATOR Illuminates when you switch hill
descent control on.
203
2022 Maverick (CFE) Canada/United States of America, enUSA, Edition date: 202106, First-Printing Hill Descent Control
(If Equipped)E163171 E163171
Page 214 of 533
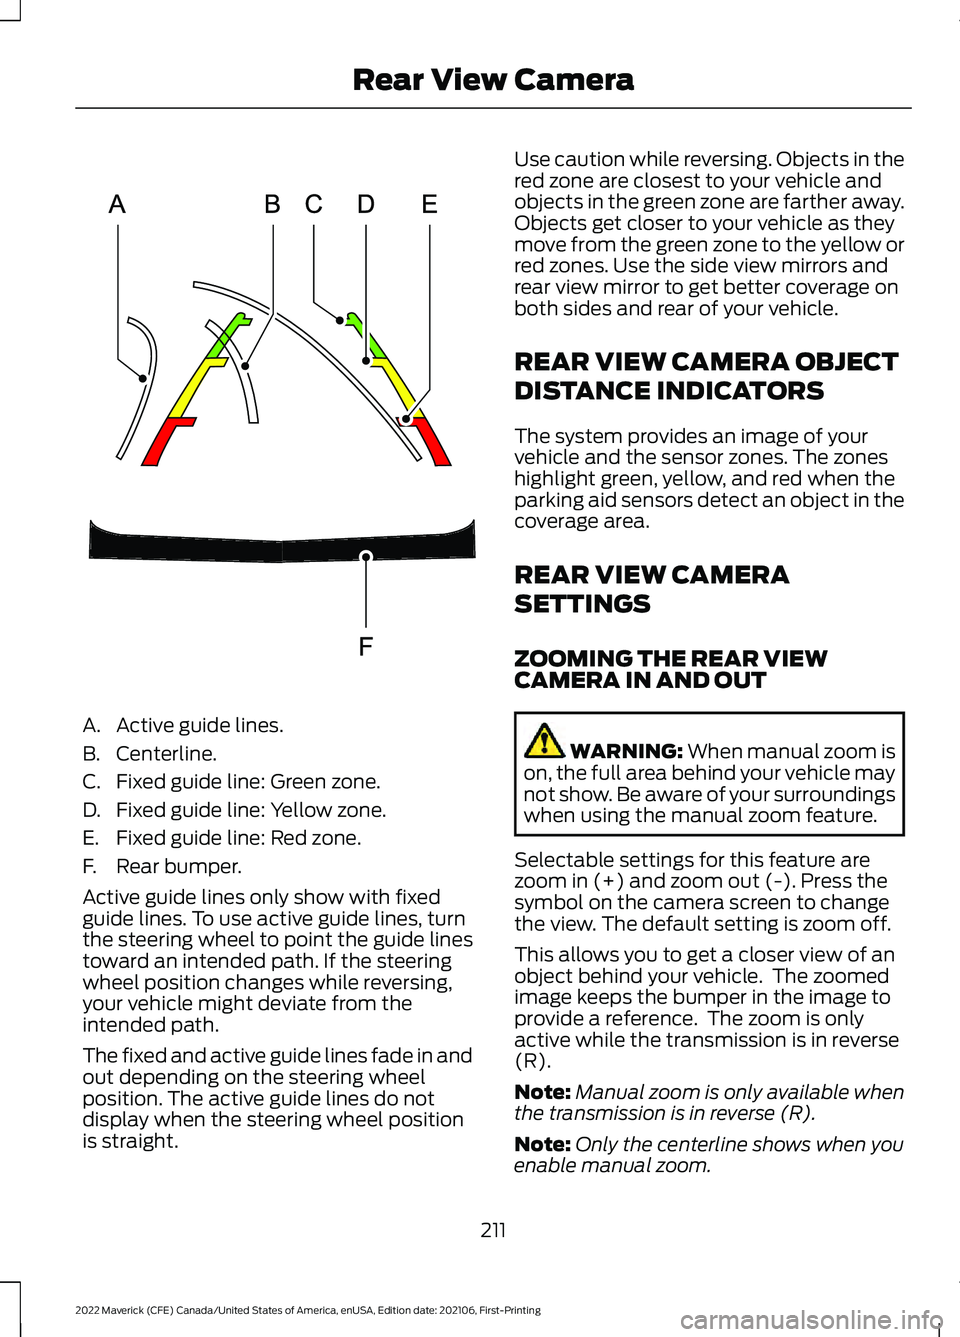
A. Active guide lines.
B. Centerline.
C. Fixed guide line: Green zone.
D. Fixed guide line: Yellow zone.
E. Fixed guide line: Red zone.
F. Rear bumper.
Active guide lines only show with fixed
guide lines. To use active guide lines, turn
the steering wheel to point the guide lines
toward an intended path. If the steering
wheel position changes while reversing,
your vehicle might deviate from the
intended path.
The fixed and active guide lines fade in and
out depending on the steering wheel
position. The active guide lines do not
display when the steering wheel position
is straight. Use caution while reversing. Objects in the
red zone are closest to your vehicle and
objects in the green zone are farther away.
Objects get closer to your vehicle as they
move from the green zone to the yellow or
red zones. Use the side view mirrors and
rear view mirror to get better coverage on
both sides and rear of your vehicle.
REAR VIEW CAMERA OBJECT
DISTANCE INDICATORS
The system provides an image of your
vehicle and the sensor zones. The zones
highlight green, yellow, and red when the
parking aid sensors detect an object in the
coverage area.
REAR VIEW CAMERA
SETTINGS
ZOOMING THE REAR VIEW
CAMERA IN AND OUT
WARNING: When manual zoom is
on, the full area behind your vehicle may
not show. Be aware of your surroundings
when using the manual zoom feature.
Selectable settings for this feature are
zoom in (+) and zoom out (-). Press the
symbol on the camera screen to change
the view. The default setting is zoom off.
This allows you to get a closer view of an
object behind your vehicle. The zoomed
image keeps the bumper in the image to
provide a reference. The zoom is only
active while the transmission is in reverse
(R).
Note: Manual zoom is only available when
the transmission is in reverse (R).
Note: Only the centerline shows when you
enable manual zoom.
211
2022 Maverick (CFE) Canada/United States of America, enUSA, Edition date: 202106, First-Printing Rear View CameraE306774
Page 266 of 533
TOWING A TRAILER
PRECAUTIONS
WARNING: Do not exceed
the GVWR or the GAWR
specified on the certification
label. WARNING:
Towing trailers
beyond the maximum
recommended gross trailer
weight exceeds the limit of your
vehicle and could result in engine
damage, transmission damage,
structural damage, loss of
vehicle control, vehicle rollover
and personal injury. WARNING:
Do not exceed
the lowest rating capacity for
your vehicle or trailer hitch.
Overloading your vehicle or
trailer hitch can impair your
vehicle stability and handling.
Failure to follow this instruction
could result in the loss of control
of your vehicle, personal injury or
death. WARNING: Make sure that
the vertical load on the tow ball
is between the minimum and
maximum recommended weight
at all times. Failure to follow this
instruction could result in the
loss of control of your vehicle,
personal injury or death. WARNING:
Do not cut,
drill, weld or modify the trailer
hitch. Modifying the trailer hitch
could reduce the hitch rating. WARNING:
The anti-lock
brake system does not control
the trailer brakes.
TRAILER BRAKE
PRECAUTIONS WARNING:
Do not connect a
trailer's hydraulic brake system directly
to your vehicle's brake system. Your
vehicle may not have enough braking
power and your chances of having a
collision greatly increase. WARNING:
Do not tow a trailer
fitted with electric trailer brakes unless
your vehicle is fitted with a compatible
aftermarket electronic trailer brake
controller. Failure to follow this
instruction could result in the loss of
control of your vehicle, personal injury or
death. For additional information and
assistance, we recommend that you
contact an authorized dealer.
Electric brakes and manual, automatic or
surge-type trailer brakes are safe if you
install them properly and adjust them to
the manufacturer's specifications. The
trailer brakes must meet local and federal
regulations.
The rating for the tow vehicle's braking
system operation is at the gross vehicle
weight rating, not the gross combined
weight rating.
263
2022 Maverick (CFE) Canada/United States of America, enUSA, Edition date: 202106, First-Printing Towing a Trailer