2022 FORD MAVERICK ECU
[x] Cancel search: ECUPage 349 of 533

CHANGING A FLAT TIRE
WARNING: If the tire pressure
monitor sensor becomes damaged it
may not function.
Note: The use of tire sealant may damage
your tire pressure monitoring system and
should only be used in roadside
emergencies.
Note: The tire pressure monitoring system
indicator light illuminates when the spare
tire is in use. To restore the full function of
the monitoring system, all road wheels
equipped with tire pressure monitoring
sensors must be mounted on this vehicle.
If you get a flat tire when driving, do not
apply the brake heavily. Instead, gradually
decrease your speed. Hold the steering
wheel firmly and slowly move to a safe
place on the side of the road.
Have a flat serviced by an authorized
dealer to prevent damage to the system
sensors.
See Tire Pressure Monitoring
System Precautions (page 343). Replace
the spare tire with a road tire as soon as
possible. During repairing or replacing the
flat tire, have the authorized dealer inspect
the system sensor for damage. WARNING:
Never place anything
between the vehicle jack and the ground. WARNING:
Never place anything
between the vehicle jack and your
vehicle. WARNING:
To help prevent your
vehicle from moving when changing a
wheel, shift the transmission into park
(P), set the parking brake and use an
appropriate block or wheel chock to
secure the wheel diagonally opposite to
the wheel being changed. For example,
when changing the front left wheel,
place an appropriate block or wheel
chock on the right rear wheel. WARNING: It is recommended that
the wheels of the vehicle be chocked,
and that no person should remain in a
vehicle that is being jacked. WARNING:
Always use the jack
provided as original equipment with your
vehicle. If using a jack other than the one
provided, make sure the jack capacity is
adequate for the vehicle weight,
including any vehicle cargo or
modifications. If you are unsure if the jack
capacity is adequate, contact the
authorized dealer. WARNING:
The jack supplied with
this vehicle is only intended for changing
wheels. Do not use the vehicle jack other
than when you are changing a wheel in
an emergency. WARNING: Check that the vehicle
jack is not damaged or deformed and
the thread is lubricated and clean. WARNING:
The jack should be
used on level firm ground wherever
possible. WARNING:
Use only the specified
jacking points. If you use other locations,
you could damage the body, steering,
suspension, engine, braking system or
the fuel lines.
346
2022 Maverick (CFE) Canada/United States of America, enUSA, Edition date: 202106, First-Printing Changing a Road Wheel
Page 354 of 533
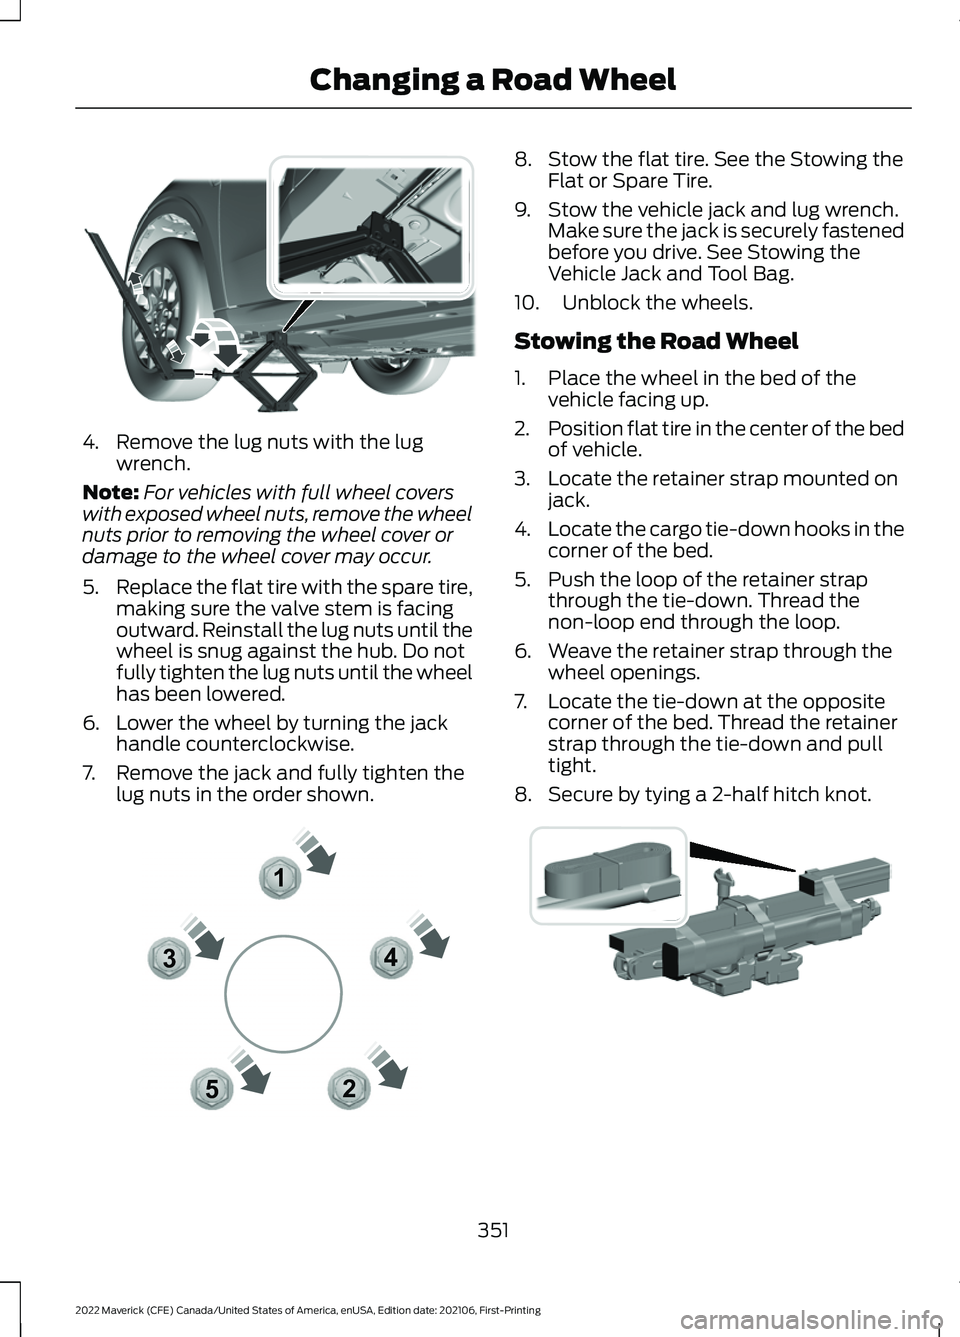
4. Remove the lug nuts with the lug
wrench.
Note: For vehicles with full wheel covers
with exposed wheel nuts, remove the wheel
nuts prior to removing the wheel cover or
damage to the wheel cover may occur.
5. Replace the flat tire with the spare tire,
making sure the valve stem is facing
outward. Reinstall the lug nuts until the
wheel is snug against the hub. Do not
fully tighten the lug nuts until the wheel
has been lowered.
6. Lower the wheel by turning the jack handle counterclockwise.
7. Remove the jack and fully tighten the lug nuts in the order shown. 8. Stow the flat tire. See the Stowing the
Flat or Spare Tire.
9. Stow the vehicle jack and lug wrench. Make sure the jack is securely fastened
before you drive. See Stowing the
Vehicle Jack and Tool Bag.
10. Unblock the wheels.
Stowing the Road Wheel
1. Place the wheel in the bed of the vehicle facing up.
2. Position flat tire in the center of the bed
of vehicle.
3. Locate the retainer strap mounted on jack.
4. Locate the cargo tie-down hooks in the
corner of the bed.
5. Push the loop of the retainer strap through the tie-down. Thread the
non-loop end through the loop.
6. Weave the retainer strap through the wheel openings.
7. Locate the tie-down at the opposite corner of the bed. Thread the retainer
strap through the tie-down and pull
tight.
8. Secure by tying a 2-half hitch knot. 351
2022 Maverick (CFE) Canada/United States of America, enUSA, Edition date: 202106, First-Printing Changing a Road WheelE352182 12
3
4
5E306781 E355266
Page 356 of 533
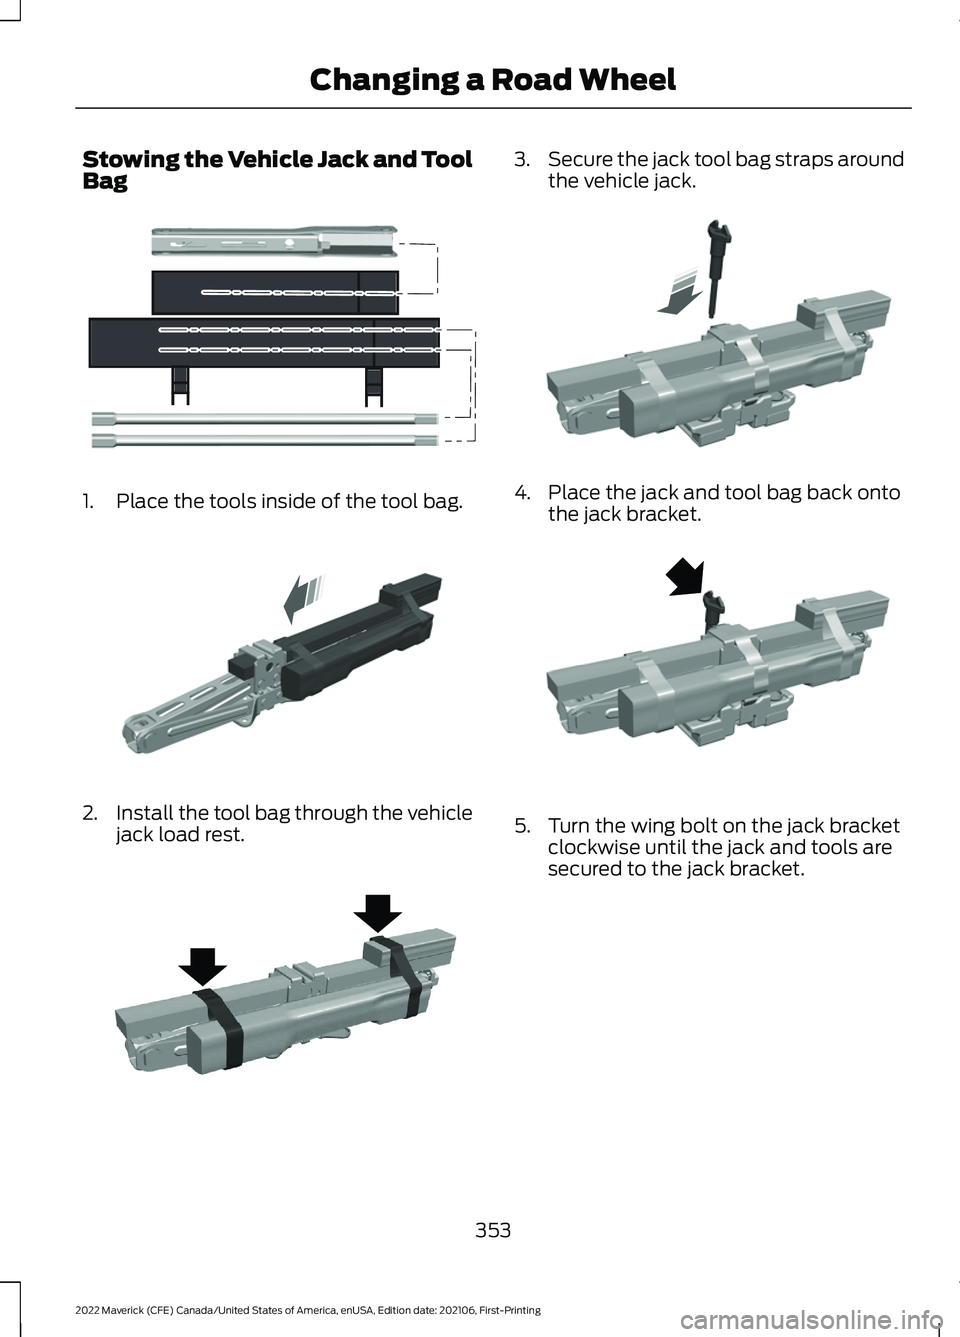
Stowing the Vehicle Jack and Tool
Bag
1. Place the tools inside of the tool bag.
2.
Install the tool bag through the vehicle
jack load rest. 3.
Secure the jack tool bag straps around
the vehicle jack. 4. Place the jack and tool bag back onto
the jack bracket. 5. Turn the wing bolt on the jack bracket
clockwise until the jack and tools are
secured to the jack bracket.
353
2022 Maverick (CFE) Canada/United States of America, enUSA, Edition date: 202106, First-Printing Changing a Road WheelE352149 E352034 E352022 E352027 E352026
Page 357 of 533
WHEEL NUTS
WARNING: When you install a wheel, always remove any corrosion, dirt or foreign
materials present on the mounting surfaces of the wheel or the surface of the wheel
hub, brake drum or brake disc that contacts the wheel. Make sure to secure any fasteners
that attach the rotor to the hub so they do not interfere with the mounting surfaces of
the wheel. Installing wheels without correct metal-to-metal contact at the wheel
mounting surfaces can cause the wheel nuts to loosen and the wheel to come off while
your vehicle is in motion, resulting in loss of vehicle control, personal injury or death. lb.ft (Nm)
Bolt size
148 lb.ft (200 Nm)
M14 x 1.5
* Torque specifications are for nut and bolt threads free of dirt and rust. Use only Ford
recommended replacement fasteners.
Retighten the lug nuts to the specified torque within 100 mi (160 km) after any wheel
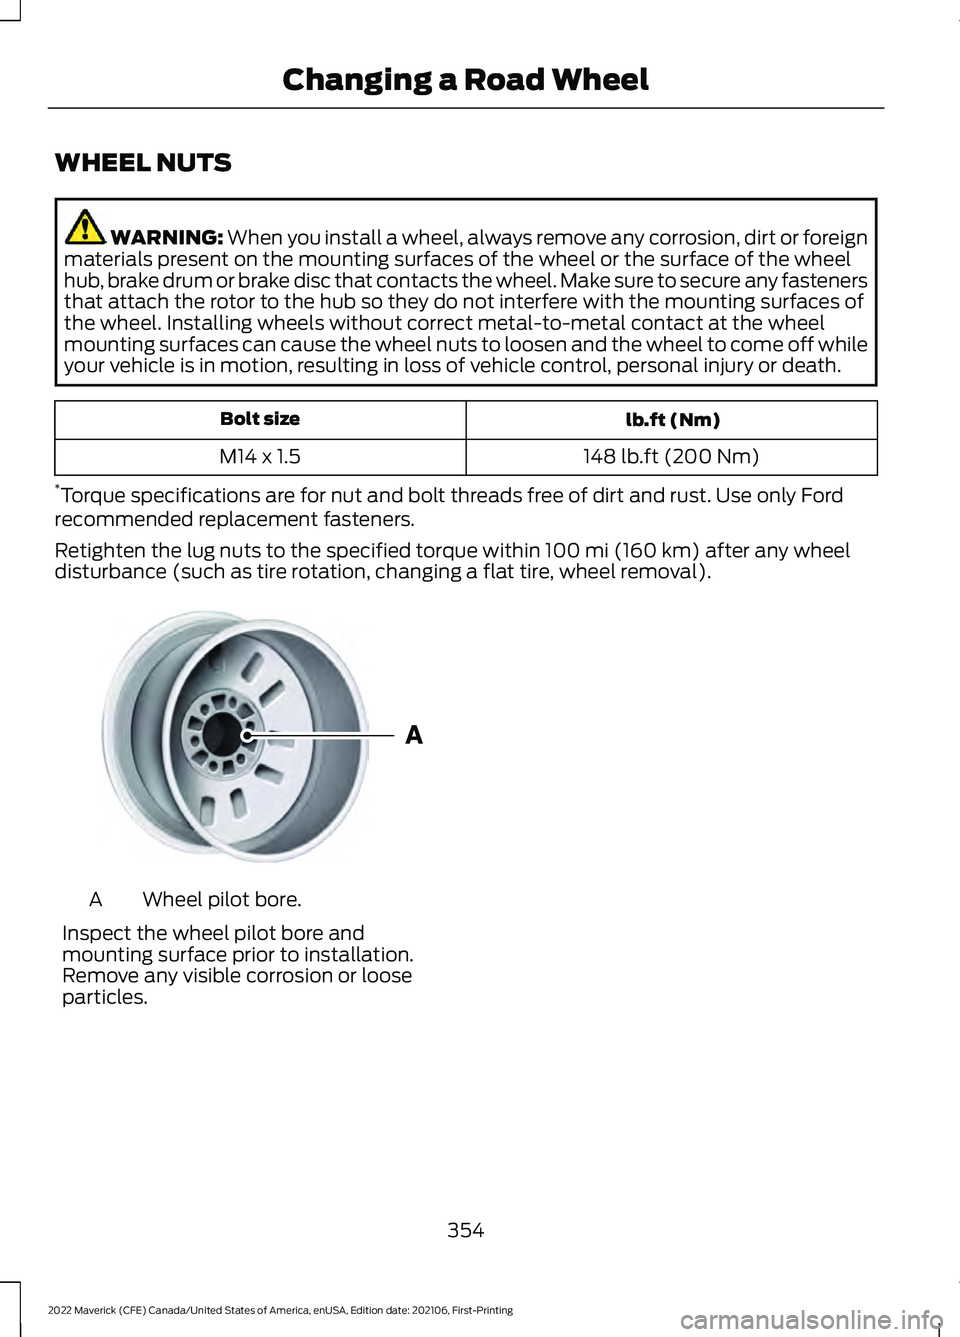
disturbance (such as tire rotation, changing a flat tire, wheel removal). Wheel pilot bore.
A
Inspect the wheel pilot bore and
mounting surface prior to installation.
Remove any visible corrosion or loose
particles.
354
2022 Maverick (CFE) Canada/United States of America, enUSA, Edition date: 202106, First-Printing Changing a Road WheelE145950
Page 372 of 533
WHAT IS A CONNECTED
VEHICLE
A connected vehicle has technology that
allows your vehicle to connect to a mobile
network and for you to access a range of
features. When used in conjunction with
the FordPass app, it could allow you to
monitor and control your vehicle further,
for example checking the tire pressures,
and the vehicle location. For additional
information, refer to the local Ford website.
CONNECTED VEHICLE
REQUIREMENTS
Connected service and related feature
functionality requires a compatible vehicle
network.
Some remote features require additional
service activation. Log in to your Ford
account for details. Some restrictions, third
party terms and message or data rates
may apply.
CONNECTED VEHICLE
LIMITATIONS
Evolving technology, cellular networks, or
regulations could affect functionality and
availability, or continued provision of some
features. These changes could even stop
some features from functioning.
CONNECTING THE VEHICLE TO
A MOBILE NETWORK
WHAT IS THE MODEM
The modem allows access to a
range of features built into your
vehicle. ENABLING AND DISABLING THE
MODEM - VEHICLES WITH: SYNC
3
1. Press Settings.
2. Press
FordPass Connect.
3. Press
Connectivity Settings.
4. Switch connectivity features on or off.
CONNECTING FORDPASS TO THE
MODEM
1. Make sure that the modem is enabled using the vehicle settings menu.
2. Open the FordPass app on your device
and log in.
3. Add your vehicle or select your vehicle if already added.
4. Select the option to activate your vehicle.
5. Make sure that the name on the screen
matches the name shown in your
FordPass account.
6. Confirm that FordPass account is connected to the modem.
CONNECTING THE VEHICLE TO
A WI-FI NETWORK
1. Press
Settings.
2. Press
Wi-Fi.
3. Switch
Wi-Fi on.
4. Press
View Available Networks.
5. Select an available Wi-Fi network.
Note: Enter the network password to
connect to a secure network.
369
2022 Maverick (CFE) Canada/United States of America, enUSA, Edition date: 202106, First-Printing Connected Vehicle
Page 376 of 533
CREATING A VEHICLE WI-FI
HOTSPOT - VEHICLES WITH:
SYNC 3
You can create a Wi-Fi hotspot in your
vehicle and allow devices to connect to it
for access to the Internet.
Press the button to enter the
settings menu.
1. Select FordPass Connect.
2. Select
Vehicle Hotspot.
Note: The vehicle hotspot default setting
is on.
3. Select
Settings.
4. Make sure that you have Wi-Fi visibility
switched on.
Note: The Wi-Fi Visibility default setting is
on.
Finding the Wi-Fi Hotspot Name
and Password Press the button to enter the
settings menu.
1. Select
FordPass Connect.
2. Select
Vehicle Hotspot.
3. Select
Settings.
Note: The SSID is the hotspot name.
4. Scroll to
Hide password.
5. Uncheck the box.
Connecting a Device to the Wi-Fi
Hotspot
1. On your device, switch on Wi-Fi and select the hotspot from the list of
available Wi-Fi networks.
2. When prompted, enter the password. Purchasing a Data Plan
1. Connect a device to the hotspot.
Note:
The vehicle network carrier ’s portal
opens on your device.
2. If the portal does not open on your device, open a website and it redirects
to the vehicle network carrier ’s portal.
Note: Secure websites do not redirect.
Note: If you have an active plan, the system
does not redirect to the vehicle network
carrier ’s portal when you connect a device.
Visit the vehicle network carrier ’s website
to purchase more data.
Note: If data usage information is available
in the vehicle hotspot menu, it is
approximate.
Note: If you carry out a master reset, the
system does not remove your vehicle from
your vehicle network carrier ’s account. To
remove your vehicle from the account,
contact your vehicle network carrier.
Note: The vehicle network carrier provides
Vehicle Hotspot services, subject to your
vehicle network carrier agreement, coverage
and availability.
CHANGING THE VEHICLE WI-
FI HOTSPOT NAME OR
PASSWORD Press the button to enter the
settings menu.
1. Select
FordPass Connect.
2. Select
Vehicle Hotspot.
3. Select
Settings.
4. Select
SSID: ___.
5. Enter your required SSID.
6. Select
Done.
7. Select
Password: ___.
373
2022 Maverick (CFE) Canada/United States of America, enUSA, Edition date: 202106, First-Printing Vehicle Wi-Fi Hotspot
Page 393 of 533

Automatic crash notification
system off.
Cell phone network signal
strength.
Vehicle data sharing on.
Vehicle location sharing on.
Vehicle data and vehicle location
sharing on.
Wireless charger active.
Feature Bar Select to use the radio, a USB, a
media player or a Bluetooth®
device. See Entertainment
(page 398). Select to adjust climate settings
Select to make calls and access
the phonebook on your cell
phone. See Phone (page 408).
Select to use the navigation
system.
See Navigation (page
410). Select to search for and use
compatible apps on your iOS or
Android device. See Apps (page
416
). Select to adjust system settings.
See
Settings (page 418).
Cleaning the Touchscreen
See
Cleaning Displays and Screens
(page 322). Updating the System
Updating the System Using a USB Drive
Downloading an Update
1. Go to the SYNC update page on the
local Ford website.
2. Download the update.
Note: The website notifies you if an update
is available.
3. Insert a USB drive into your computer.
Note: The USB drive needs to be empty and
meet the minimum requirements detailed
on the website.
4. Follow the instructions provided to download the update to the USB drive.
Installing an Update
Note: You can use the system when an
installation is in progress.
1. Disconnect all other USB devices from
the USB ports.
2. Connect the USB drive with the update
to a USB port.
Note: Installation starts automatically
within 10 minutes.
Updating the System Using a Wi-Fi
Network Connection
Connecting to a Wi-Fi Network Select the settings option on the
feature bar.
1. Select
Automatic Updates.
2. Select
System Wi-Fi.
3. Switch
System Wi-Fi on.
4. Select
Available Wi-Fi Networks.
5. Select an available Wi-Fi network.
Note: Enter the network password to
connect to a secure network.
390
2022 Maverick (CFE) Canada/United States of America, enUSA, Edition date: 202106, First-Printing SYNC™ 3
(If Equipped) E100027 E283811 E280315 E280315
Page 425 of 533
Possible Cause and Resolution
Symptom
–Incorrect device settings.
•Make sure that your device does not have an auto-
install program or active security settings.
• Check that your device is not set only to charge.
– Device lock screen enabled.
•Unlock your device before connecting it.
The system does not recog-
nize my device. –
Device limitation.
•Do not leave your device in your vehicle during very
hot or very cold weather conditions.
– Cable connection issue.
•Correctly connect the cable to your device and the
vehicle USB port.
– Incompatible cable.
•Use the cable recommended by the manufacturer
of your device.
The system does not under-
stand the name of a track or
artist. –
Device limitation. Bluetooth® does not support voice
commands.
• Connect your device to a USB port.
• If you have an iOS device, press and hold the voice
control button on the steering wheel to use Siri to
play specific tracks.
I cannot stream audio from
my
Bluetooth® device. –
Incompatible device.
•Check the compatibility of your device on our
website.
– Device not connected.
•Pair your device. See
Phone (page 408).
– Media player not running.
•Start the media player on your device.
The system does not recog-
nize the music on my device. –
Missing or incorrect audio file metadata, for example
artist, song title, album or genre.
•Repair the files on your device.
– Corrupt files.
•Repair the files on your device.
422
2022 Maverick (CFE) Canada/United States of America, enUSA, Edition date: 202106, First-Printing SYNC™ 3
(If Equipped)