2022 FORD F-550 height
[x] Cancel search: heightPage 55 of 740
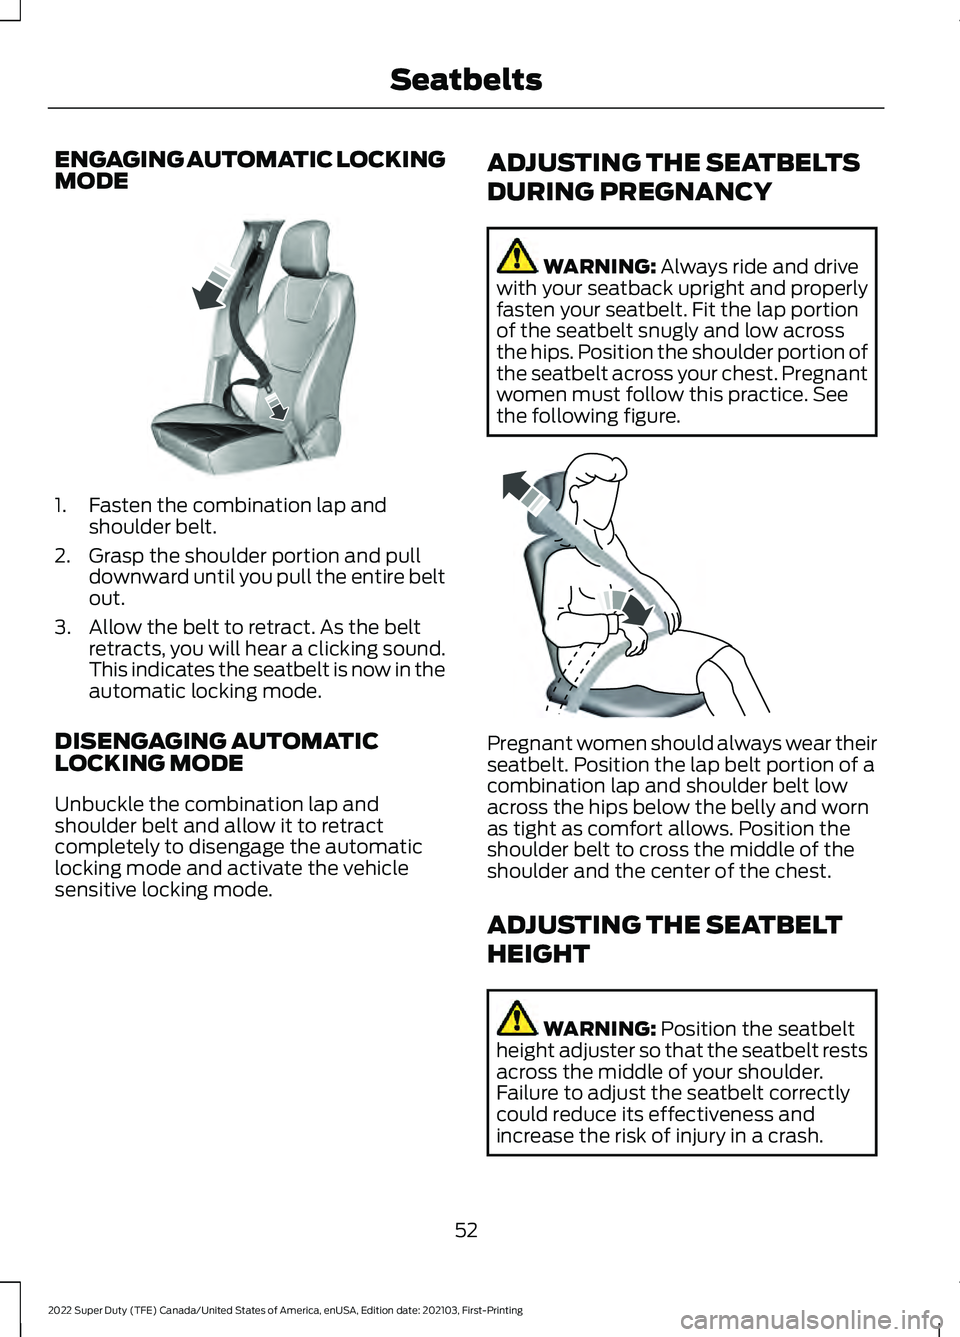
ENGAGING AUTOMATIC LOCKING
MODE
1. Fasten the combination lap and
shoulder belt.
2. Grasp the shoulder portion and pull downward until you pull the entire belt
out.
3. Allow the belt to retract. As the belt retracts, you will hear a clicking sound.
This indicates the seatbelt is now in the
automatic locking mode.
DISENGAGING AUTOMATIC
LOCKING MODE
Unbuckle the combination lap and
shoulder belt and allow it to retract
completely to disengage the automatic
locking mode and activate the vehicle
sensitive locking mode. ADJUSTING THE SEATBELTS
DURING PREGNANCY WARNING: Always ride and drive
with your seatback upright and properly
fasten your seatbelt. Fit the lap portion
of the seatbelt snugly and low across
the hips. Position the shoulder portion of
the seatbelt across your chest. Pregnant
women must follow this practice. See
the following figure. Pregnant women should always wear their
seatbelt. Position the lap belt portion of a
combination lap and shoulder belt low
across the hips below the belly and worn
as tight as comfort allows. Position the
shoulder belt to cross the middle of the
shoulder and the center of the chest.
ADJUSTING THE SEATBELT
HEIGHT
WARNING:
Position the seatbelt
height adjuster so that the seatbelt rests
across the middle of your shoulder.
Failure to adjust the seatbelt correctly
could reduce its effectiveness and
increase the risk of injury in a crash.
52
2022 Super Duty (TFE) Canada/United States of America, enUSA, Edition date: 202103, First-Printing SeatbeltsE142591 E142590
Page 56 of 740

1. Pull the button and slide the height
adjuster up or down.
2. Release the button and pull down on the height adjuster to make sure it is
locked in place.
ADJUSTING THE SEATBELT
LENGTH 1.
Pull some seatbelt webbing out of the
shoulder belt retractor.
2. While holding the webbing below the tongue, grasp the metal tip of the
tongue so that it is parallel to the
webbing and slide the tongue up.
3. Provide enough lap belt length so that
the tongue can reach the buckle.
SEATBELT REMINDER
HOW DOES THE SEATBELT
REMINDER WORK
This feature supplements the seatbelt
warning function. It provides additional
reminders by intermittently sounding a
tone and illuminating the seatbelt warning
light when you are in the driver seat and a
seatbelt is unbuckled.
53
2022 Super Duty (TFE) Canada/United States of America, enUSA, Edition date: 202103, First-Printing SeatbeltsE145664 E162708
Page 59 of 740
•
Shoulder belt height adjusters.
• Shoulder belt guide on seat backrest.
• Child restraint LATCH and tether
anchors.
• Attaching hardware.
Read the child restraint manufacturer's
instructions for additional inspection and
maintenance information specific to the
child restraint.
We recommend that all seatbelt
assemblies in use in vehicles involved in a
crash be replaced. However, if the crash
was minor and an authorized dealer finds
that the belts do not show damage and
continue to operate properly, they do not
need to be replaced. Seatbelt assemblies
not in use during a crash should also be
checked and replaced if either damage or
improper operation is noted.
Properly care for seatbelts. See Cleaning
Seatbelts (page 426).
SEATBELT EXTENSIONS WARNING:
Persons who fit into
the vehicle's seatbelt should not use an
extension. Unnecessary use could result
in serious personal injury in the event of
a crash. WARNING:
Only use extensions
provided free of charge by our dealers.
The dealer will provide an extension
designed specifically for this vehicle,
model year and seating position. The use
of an extension intended for another
vehicle, model year or seating position
may not offer you the full protection of
your vehicle's seatbelt restraint system. WARNING:
Never use seatbelt
extensions to install child restraints. WARNING:
Do not use extensions
to change the way the seatbelt fits
across the torso, over the lap or to make
the seatbelt buckle easier to reach.
If, because of body size or driving position,
it is not possible to properly fasten the
seatbelt over your lap and shoulder, an
extension that is compatible with the
seatbelts is available free of charge from
our dealers. Only use our seatbelt
extensions made by the original equipment
seatbelt manufacturer with our seatbelts.
Ask your authorized dealer if your extension
is compatible with your vehicle restraint
system.
56
2022 Super Duty (TFE) Canada/United States of America, enUSA, Edition date: 202103, First-Printing Seatbelts
Page 166 of 740
INSTALLING THE HEAD
RESTRAINT
Align the steel stems into the guide sleeves
and push the head restraint down until it
locks.
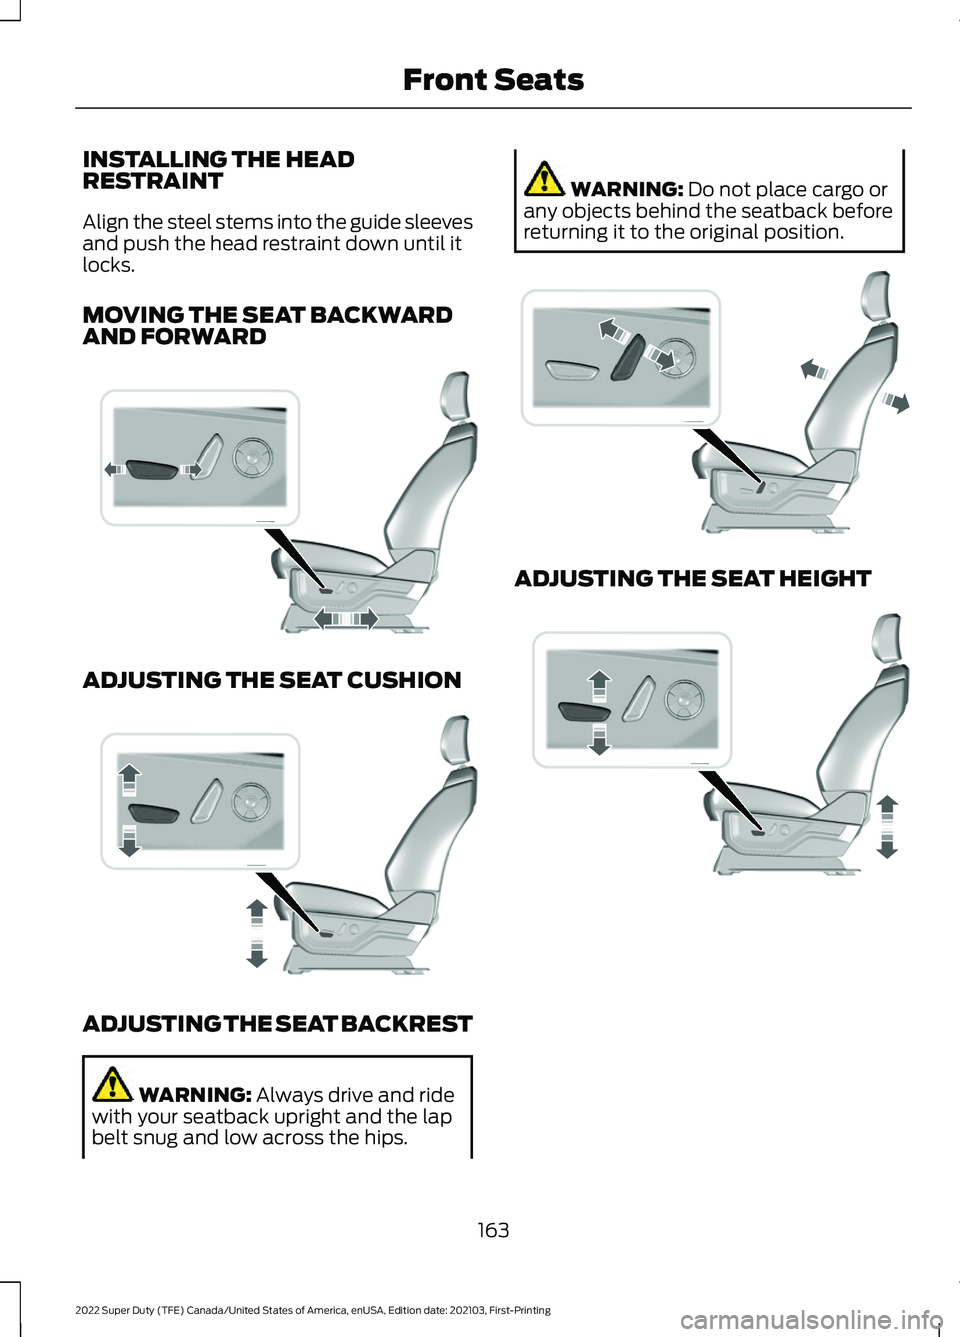
MOVING THE SEAT BACKWARD
AND FORWARD
ADJUSTING THE SEAT CUSHION
ADJUSTING THE SEAT BACKREST
WARNING: Always drive and ride
with your seatback upright and the lap
belt snug and low across the hips. WARNING:
Do not place cargo or
any objects behind the seatback before
returning it to the original position. ADJUSTING THE SEAT HEIGHT
163
2022 Super Duty (TFE) Canada/United States of America, enUSA, Edition date: 202103, First-Printing Front SeatsE308339 E308336 E308338 E308337
Page 355 of 740
TRAILER BACKUP ASSISTANCE
– FREQUENTLY ASKED
QUESTIONS
What does it mean if Measurement A
has reached its maximum or minimum
value?
The system is designed to work with
drawbars that have a license plate to
hitch ball center measurement of
9–20 in (23–52 cm) when installed.
Do not attempt to use drawbars that
have a length outside this range as the
system performance degrades and
could cause improper system function.
Make sure that the measurement
being made is the horizontal distance
only from the license plate to the hitch
ball center. A straight line distance
that includes any vertical rise or drop
increases the measurement and
makes it inaccurate. Inaccurate
measurements degrade system
performance and could cause
improper system function. See
Applying the Trailer Reversing Aid
Sticker
(page 341).
What does it mean if Measurement B
has reached its maximum or minimum
value? Make sure that the sticker is properly
placed. Stickers placed outside the
allowed zone adversely affects the
system performance and could cause
improper feature function. Make sure
that the measurement being made is
the horizontal distance only from
center of the sticker to the hitch ball
center. A straight line distance that
includes any vertical rise or drop
increases the measurement and
causes an inaccurate value to be
entered into the system. See
Applying the Trailer Reversing Aid
Sticker
(page 341). What does it mean if Measurement C
has reached its maximum or minimum
value?
Make sure you follow the sticker
placement instructions. Stickers
placed outside the allowed zone
adversely affect the system
performance and could cause
improper feature function. If you have
met all the criteria for sticker
placement and you see this message,
the sticker is either too far below or too
close to the camera to properly
recognize the sticker. For the system
to correctly operate, lower the sticker
height if you receive the minimum
warning or raise the sticker height if
you receive the maximum warning.
Only one sticker can be placed on the
trailer for correct system function. The
previous sticker must be removed or
covered so only one sticker is visible
to the camera. Measurement B and C
must be measured again if a new
sticker is placed on the trailer. See
Applying the Trailer Reversing Aid
Sticker
(page 341).
What does it mean if Measurement D
has reached its maximum or minimum
value? Make sure that the measurement
being made is the horizontal distance
only from tailgate to the center of the
single axle or the center of all the axles
on the trailer. The system does not
support trailer lengths outside the
range allowed by the information
display. See
Applying the Trailer
Reversing Aid Sticker (page 341).
352
2022 Super Duty (TFE) Canada/United States of America, enUSA, Edition date: 202103, First-Printing Trailer Backup Assistance
(If Equipped)
Page 369 of 740
TRAILER REVERSE GUIDANCE –
FREQUENTLY ASKED QUESTIONS
What does it mean if Measurement A
has reached maximum or minimum
value?
The system is designed to work with
drawbars that have a license plate to
hitch ball center measurement of
9–20 in (23–52 cm) when installed.
Do not attempt to use drawbars that
have a length outside this range as the
system performance degrades and
could cause improper system function.
Make sure that the measurement
being made is the horizontal distance
only from the license plate to the hitch
ball center. A straight line distance
that includes any vertical rise or drop
increases the measurement and
makes it inaccurate. Inaccurate
measurements degrade system
performance and could cause
improper system function. See
Applying the Trailer Reverse Aid
Sticker
(page 359).
What does it mean if Measurement B
has reached its maximum or minimum
value? Make sure that the sticker is properly
placed. Stickers placed outside the
allowed zone adversely affects the
system performance and could cause
improper feature function. Make sure
that the measurement being made is
the horizontal distance only from
center of the sticker to the hitch ball
center. A straight line distance that
includes any vertical rise or drop
increases the measurement and
causes an inaccurate value to be
entered into the system. See
Applying the Trailer Reverse Aid
Sticker
(page 359). What does it mean if Measurement C
has reached its maximum or minimum
value?
Make sure you follow the sticker
placement instructions. Stickers
placed outside the allowed zone
adversely affect the system
performance and could cause
improper feature function. If you have
met all the criteria for sticker
placement and you see this message,
the sticker is either too far below or too
close to the camera to properly
recognize the sticker. For the system
to correctly operate, lower the sticker
height if you receive the minimum
warning or raise the sticker height if
you receive the maximum warning.
Only one sticker can be placed on the
trailer for correct system function. The
previous sticker must be removed or
covered so only one sticker is visible
to the camera. Measurement B and C
must be measured again if a new
sticker is placed on the trailer. See
Applying the Trailer Reverse Aid
Sticker
(page 359).
What does it mean if Measurement D
has reached its maximum or minimum
value? Make sure that the measurement
being made is the horizontal distance
only from tailgate to the center of the
single axle or the center of all the axles
on the trailer. The system does not
support trailer lengths outside the
range allowed by the information
display. See
Applying the Trailer
Reverse Aid Sticker (page 359).
366
2022 Super Duty (TFE) Canada/United States of America, enUSA, Edition date: 202103, First-Printing Trailer Reverse Guidance
(If Equipped)
Page 414 of 740

•
Audio unit.
• Navigation system.
A message may appear in the information
display to alert you that battery protection
actions are active.
After battery replacement, or in some
cases after charging the battery with an
external charger, the battery management
system requires eight hours of vehicle sleep
time to relearn the battery state of charge.
During this time your vehicle must remain
fully locked with the ignition off.
Note: If you add electrical accessories or
components to the vehicle, it may adversely
affect battery performance and durability.
This may also affect the performance of
other electrical systems in the vehicle.
Battery Disposal Make sure that you dispose of
old batteries in an
environmentally friendly way.
Seek advice from your local authority
about recycling old batteries.
ADJUSTING THE HEADLAMPS
Vertical Aim Adjustment
The headlamps on your vehicle are
properly aimed at the assembly plant. If
your vehicle has been in an accident, have
your vehicle checked as soon as possible. Headlamp Aiming Target 8 ft (2.4 m).
A
Center height of lamp to ground.
B
25 ft (7.6 m).
C
Horizontal reference line.
D
1. Park your vehicle directly in front of a wall or screen on a level surface,
approximately 25 ft (7.6 m) away.
2. Measure the height from the center of your headlamp, indicated by a 3
millimeter circle on the lens, to the
ground and mark an
8 ft (2.4 m)
horizontal reference line on the vertical
wall or screen at this height, a piece of
masking tape works well.
3. Switch on the low beam headlamps to
illuminate the wall or screen and open
the hood. Cover one of the headlamps
so no light hits the wall.
411
2022 Super Duty (TFE) Canada/United States of America, enUSA, Edition date: 202103, First-Printing MaintenanceE107998 E142592
Page 415 of 740

4. On the wall or screen, observe a light
pattern with a distinct horizontal edge
toward the right. If this edge is not at
the horizontal reference line, adjust the
beam so the edge is at the same height
as the horizontal reference line. 5. Locate the vertical adjuster on each
headlamp. Using a Phillips #2
screwdriver, turn the adjuster either
clockwise or counterclockwise in order
to adjust the vertical aim of the
headlamp.
Note: A. LED headlamp.
B. Halogen headlamp.
6. Repeat steps 3 thru 5 to adjust the other headlamp.
7. Close the hood and turn off the lamps.
Horizontal Aim Adjustment
Horizontal aim is not required for this
vehicle and is not adjustable.
EXTERIOR BULBS
EXTERIOR BULB SPECIFICATION
CHART
Replacement bulbs are specified in the
chart below. Headlamp bulbs must be
marked with an authorized D.O.T. marking
for North America to make sure they have
the proper lamp performance, light
brightness, light pattern and safe visibility.
The correct bulbs will not damage the
lamp assembly or void the lamp assembly
warranty and will provide quality bulb
illumination time. Power (Watt)
Specification
Lamp
60/55
H13/9008
Headlamp.
LED
LED
Headlamp.
5
W5W
Front side marker lamp.
40
9140
Front fog lamp.
LED
LED
Front fog lamp. 3
412
2022 Super Duty (TFE) Canada/United States of America, enUSA, Edition date: 202103, First-Printing MaintenanceE167358 A
BE223774