2022 FORD F-350 remove seats
[x] Cancel search: remove seatsPage 165 of 740

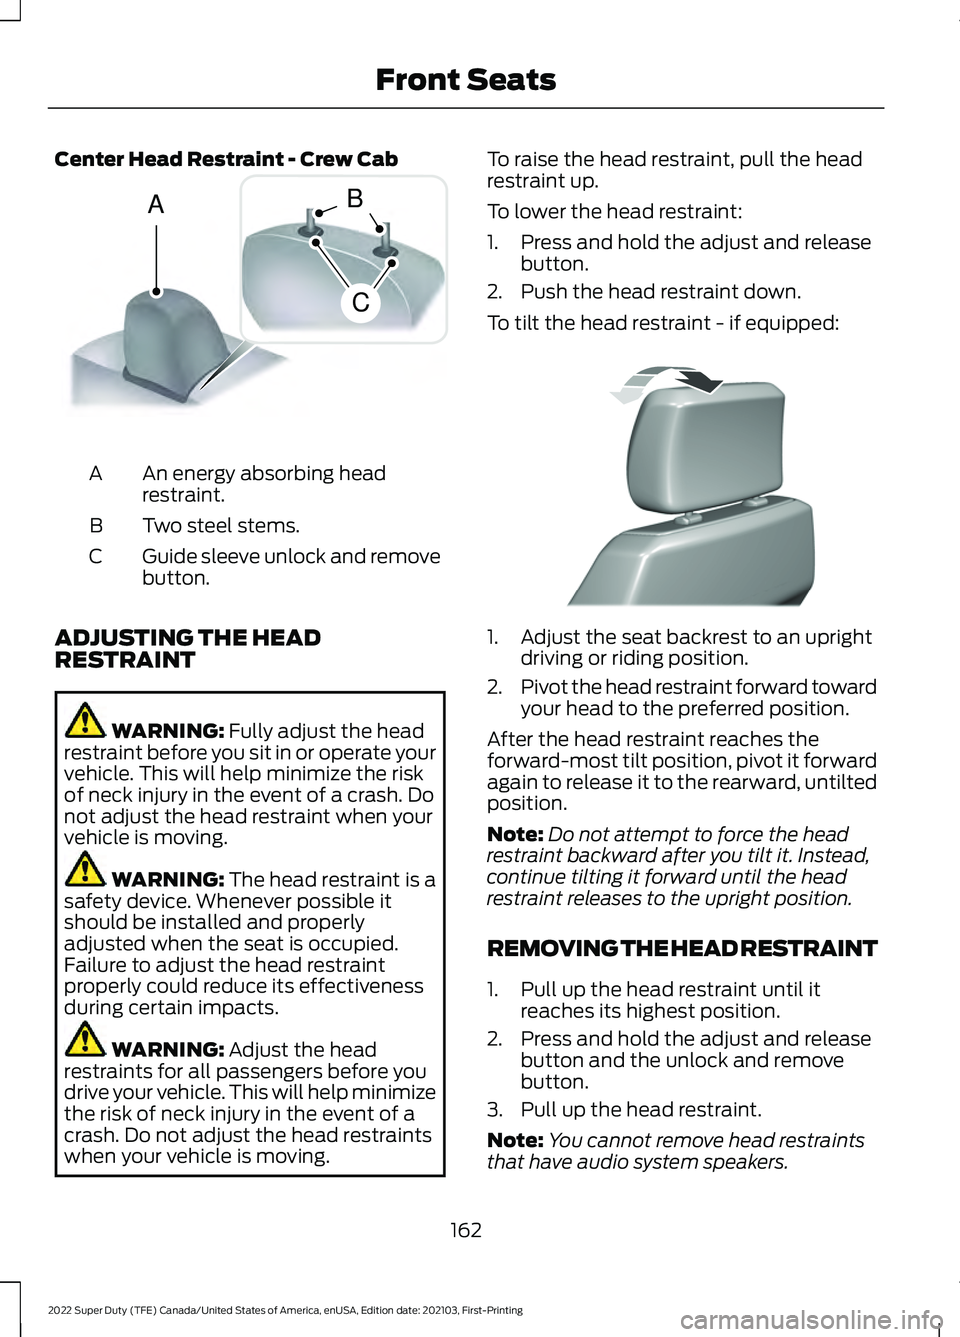
Center Head Restraint - Crew Cab
An energy absorbing head
restraint.
A
Two steel stems.
B
Guide sleeve unlock and remove
button.
C
ADJUSTING THE HEAD
RESTRAINT WARNING: Fully adjust the head
restraint before you sit in or operate your
vehicle. This will help minimize the risk
of neck injury in the event of a crash. Do
not adjust the head restraint when your
vehicle is moving. WARNING:
The head restraint is a
safety device. Whenever possible it
should be installed and properly
adjusted when the seat is occupied.
Failure to adjust the head restraint
properly could reduce its effectiveness
during certain impacts. WARNING:
Adjust the head
restraints for all passengers before you
drive your vehicle. This will help minimize
the risk of neck injury in the event of a
crash. Do not adjust the head restraints
when your vehicle is moving. To raise the head restraint, pull the head
restraint up.
To lower the head restraint:
1. Press and hold the adjust and release
button.
2. Push the head restraint down.
To tilt the head restraint - if equipped: 1. Adjust the seat backrest to an upright
driving or riding position.
2. Pivot the head restraint forward toward
your head to the preferred position.
After the head restraint reaches the
forward-most tilt position, pivot it forward
again to release it to the rearward, untilted
position.
Note: Do not attempt to force the head
restraint backward after you tilt it. Instead,
continue tilting it forward until the head
restraint releases to the upright position.
REMOVING THE HEAD RESTRAINT
1. Pull up the head restraint until it reaches its highest position.
2. Press and hold the adjust and release button and the unlock and remove
button.
3. Pull up the head restraint.
Note: You cannot remove head restraints
that have audio system speakers.
162
2022 Super Duty (TFE) Canada/United States of America, enUSA, Edition date: 202103, First-Printing Front SeatsA
C
B E162872 E327919
Page 170 of 740

MANUAL SEATS
HEAD RESTRAINT COMPONENTS
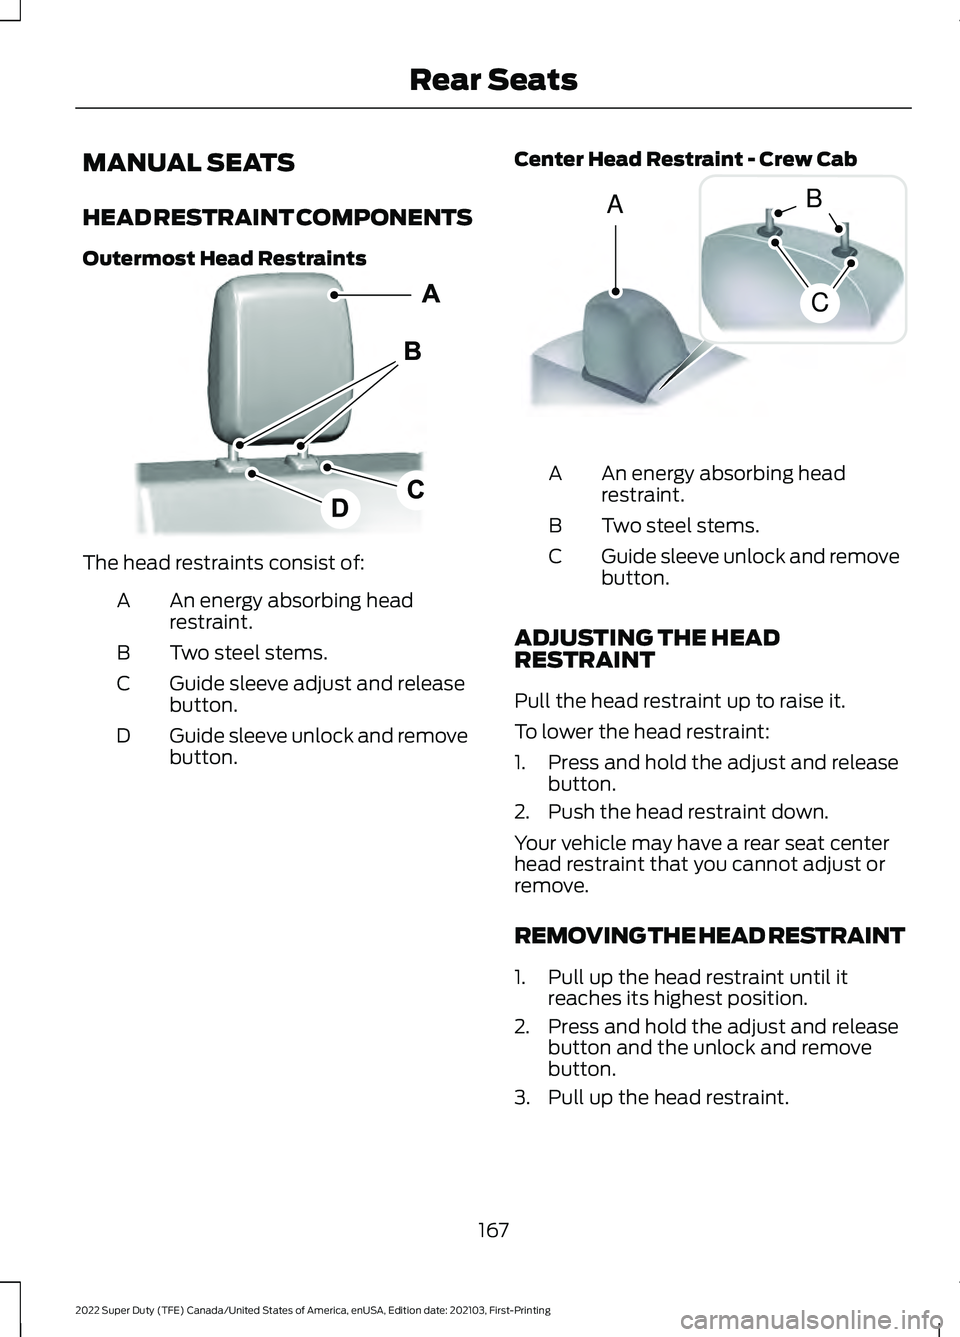
Outermost Head Restraints
The head restraints consist of:
An energy absorbing head
restraint.
A
Two steel stems.
B
Guide sleeve adjust and release
button.
C
Guide sleeve unlock and remove
button.
D Center Head Restraint - Crew Cab An energy absorbing head
restraint.
A
Two steel stems.
B
Guide sleeve unlock and remove
button.
C
ADJUSTING THE HEAD
RESTRAINT
Pull the head restraint up to raise it.
To lower the head restraint:
1. Press and hold the adjust and release button.
2. Push the head restraint down.
Your vehicle may have a rear seat center
head restraint that you cannot adjust or
remove.
REMOVING THE HEAD RESTRAINT
1. Pull up the head restraint until it reaches its highest position.
2. Press and hold the adjust and release button and the unlock and remove
button.
3. Pull up the head restraint.
167
2022 Super Duty (TFE) Canada/United States of America, enUSA, Edition date: 202103, First-Printing Rear SeatsE308301 A
C
B E162872
Page 172 of 740

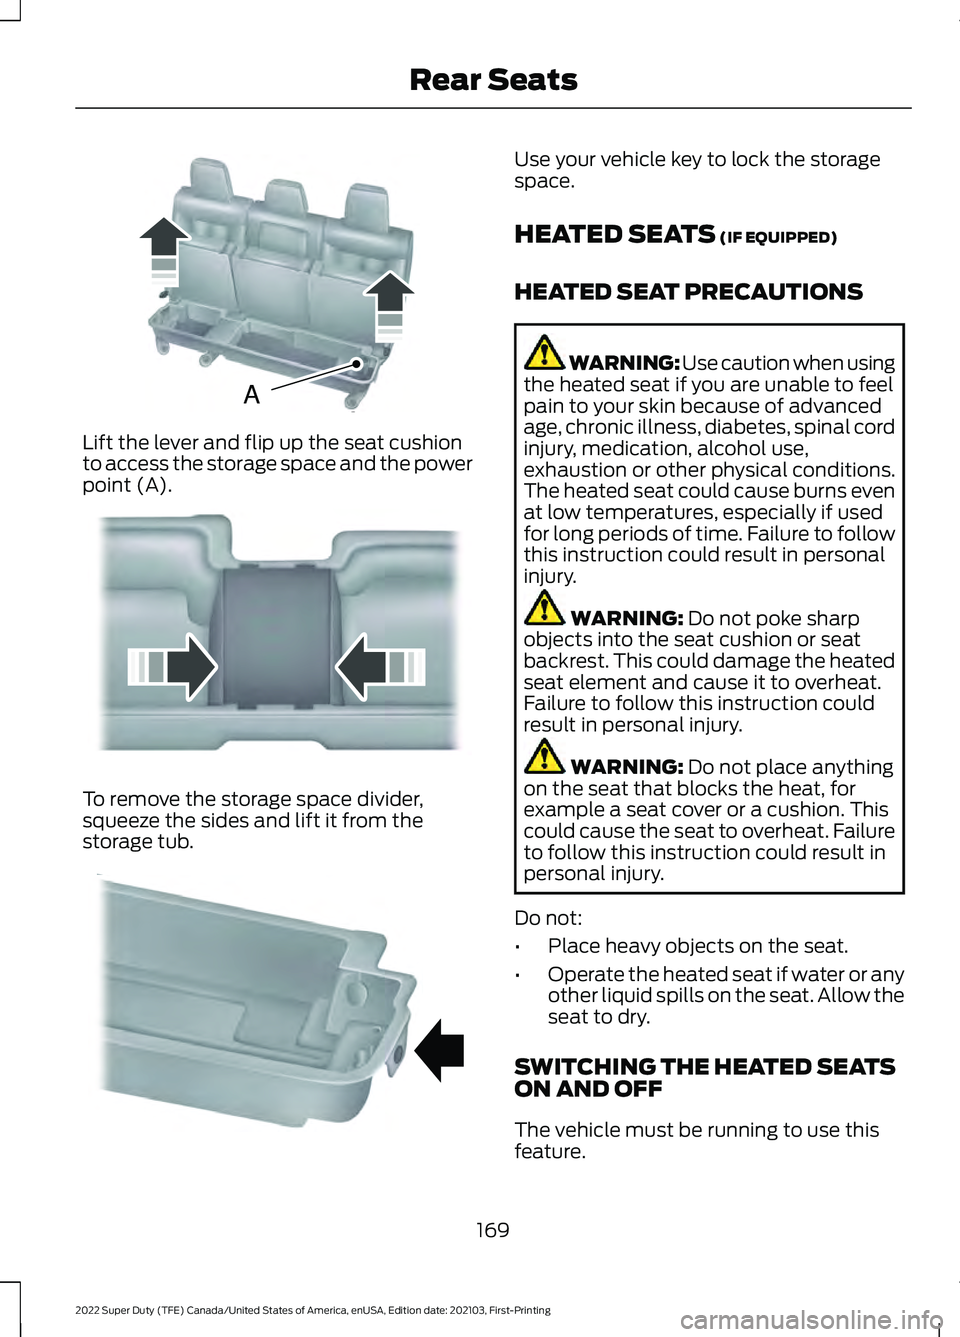
Lift the lever and flip up the seat cushion
to access the storage space and the power
point (A).
To remove the storage space divider,
squeeze the sides and lift it from the
storage tub. Use your vehicle key to lock the storage
space.
HEATED SEATS (IF EQUIPPED)
HEATED SEAT PRECAUTIONS WARNING: Use caution when using
the heated seat if you are unable to feel
pain to your skin because of advanced
age, chronic illness, diabetes, spinal cord
injury, medication, alcohol use,
exhaustion or other physical conditions.
The heated seat could cause burns even
at low temperatures, especially if used
for long periods of time. Failure to follow
this instruction could result in personal
injury. WARNING:
Do not poke sharp
objects into the seat cushion or seat
backrest. This could damage the heated
seat element and cause it to overheat.
Failure to follow this instruction could
result in personal injury. WARNING:
Do not place anything
on the seat that blocks the heat, for
example a seat cover or a cushion. This
could cause the seat to overheat. Failure
to follow this instruction could result in
personal injury.
Do not:
• Place heavy objects on the seat.
• Operate the heated seat if water or any
other liquid spills on the seat. Allow the
seat to dry.
SWITCHING THE HEATED SEATS
ON AND OFF
The vehicle must be running to use this
feature.
169
2022 Super Duty (TFE) Canada/United States of America, enUSA, Edition date: 202103, First-Printing Rear SeatsAE162739 E162740 E162741
Page 175 of 740

SWITCHING REAR OCCUPANT
ALERT SYSTEM ON AND OFF -
VEHICLES WITH: SYNC 3
1. Press Settings on the touchscreen.
2. Press
Vehicle.
3. Switch
Rear Occupant Alert on or off.
Note: The default setting is on.
Note: Performing a master reset causes the
system to switch on again.
Semiannual Reminder
(If Equipped)
When you switch the system off, a
message appears every six months as a
reminder that the system is off. You can
switch the system back on or leave it off.
SWITCHING REAR OCCUPANT
ALERT SYSTEM ON AND OFF -
VEHICLES WITH: SYNC 4
1. Press
Settings on the touchscreen.
2. Press
Vehicle.
3. Switch
Rear Occupant Alert on or off.
Note: The default setting is on.
Note: Performing a master reset causes the
system to switch on again.
Semiannual Reminder
(If Equipped)
When you switch the system off, a
message appears every six months as a
reminder that the system is off. You can
switch the system back on or leave it off. REAR OCCUPANT ALERT
SYSTEM INDICATORS -
VEHICLES WITH: SYNC Message
Check rear seats for occupants.
Displays when you switch the vehicle off
after the alert conditions are met. The message displays for a short
period of time. Press the
OK
button to acknowledge and
remove some messages from the
information display.
REAR OCCUPANT ALERT
SYSTEM INDICATORS -
VEHICLES WITH: SYNC 3/
SYNC 4 Message
Check rear seats for occupants.
Displays when you switch your vehicle off
after the alert conditions are met.
172
2022 Super Duty (TFE) Canada/United States of America, enUSA, Edition date: 202103, First-Printing Rear Occupant Alert System
(If Equipped)E281480 E350472
Page 223 of 740

Note:
The diesel exhaust fluid tank has a
blue filler cap.
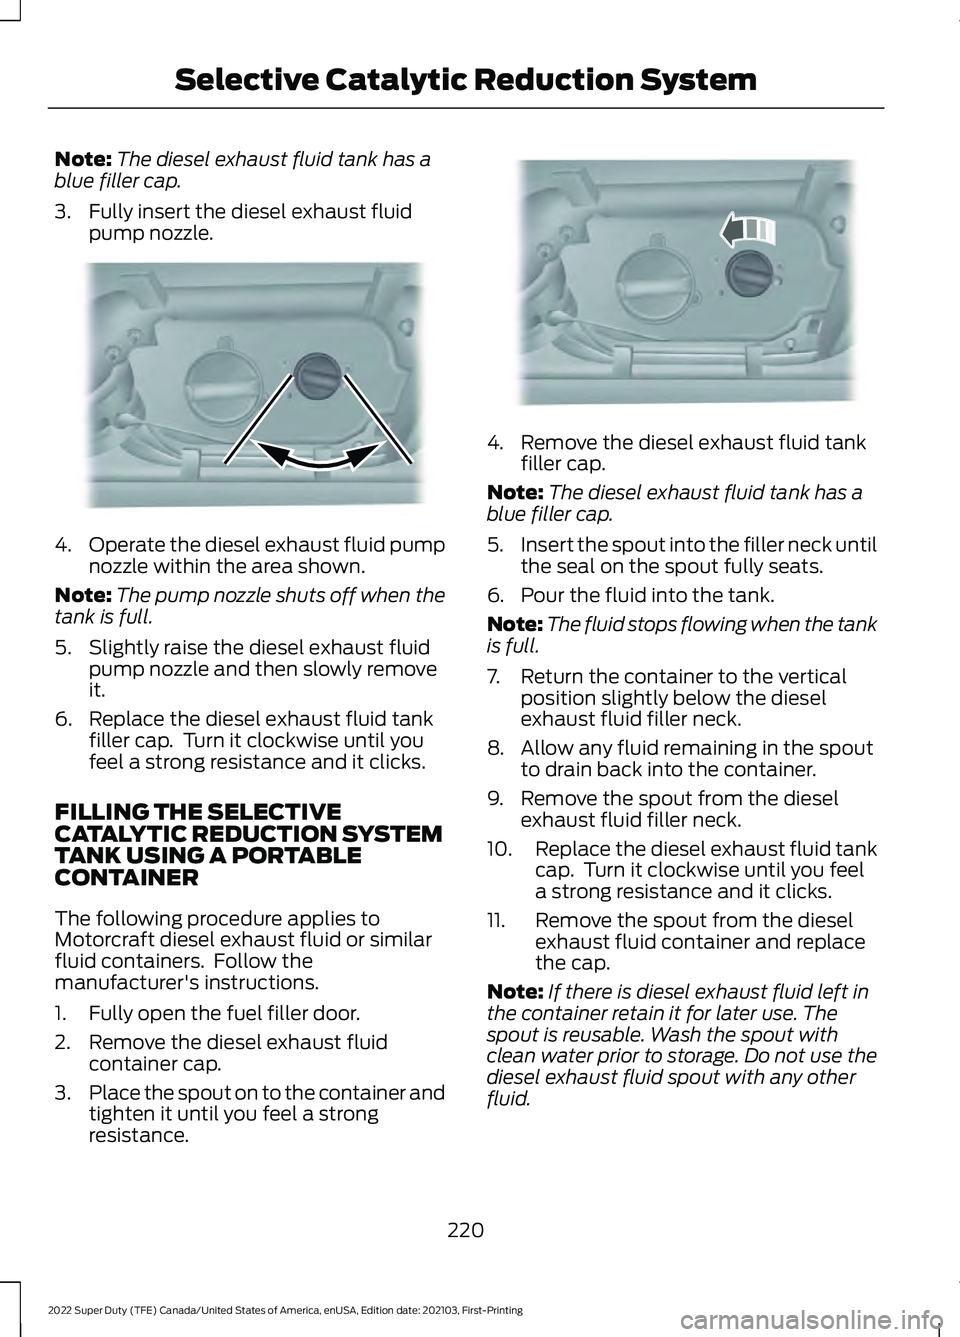
3. Fully insert the diesel exhaust fluid pump nozzle. 4.
Operate the diesel exhaust fluid pump
nozzle within the area shown.
Note: The pump nozzle shuts off when the
tank is full.
5. Slightly raise the diesel exhaust fluid pump nozzle and then slowly remove
it.
6. Replace the diesel exhaust fluid tank filler cap. Turn it clockwise until you
feel a strong resistance and it clicks.
FILLING THE SELECTIVE
CATALYTIC REDUCTION SYSTEM
TANK USING A PORTABLE
CONTAINER
The following procedure applies to
Motorcraft diesel exhaust fluid or similar
fluid containers. Follow the
manufacturer's instructions.
1. Fully open the fuel filler door.
2. Remove the diesel exhaust fluid container cap.
3. Place the spout on to the container and
tighten it until you feel a strong
resistance. 4. Remove the diesel exhaust fluid tank
filler cap.
Note: The diesel exhaust fluid tank has a
blue filler cap.
5. Insert the spout into the filler neck until
the seal on the spout fully seats.
6. Pour the fluid into the tank.
Note: The fluid stops flowing when the tank
is full.
7. Return the container to the vertical position slightly below the diesel
exhaust fluid filler neck.
8. Allow any fluid remaining in the spout to drain back into the container.
9. Remove the spout from the diesel exhaust fluid filler neck.
10. Replace the diesel exhaust fluid tank
cap. Turn it clockwise until you feel
a strong resistance and it clicks.
11. Remove the spout from the diesel exhaust fluid container and replace
the cap.
Note: If there is diesel exhaust fluid left in
the container retain it for later use. The
spout is reusable. Wash the spout with
clean water prior to storage. Do not use the
diesel exhaust fluid spout with any other
fluid.
220
2022 Super Duty (TFE) Canada/United States of America, enUSA, Edition date: 202103, First-Printing Selective Catalytic Reduction SystemE328783 E328788
Page 413 of 740

To maintain correct operation of the
battery management system, if you add
any electrical devices to your vehicle, do
not connect the ground connection directly
to the negative battery terminal. A
connection at the negative battery terminal
can cause inaccurate measurements of
the battery condition and potential
incorrect system operation.
Note:
If you add electrical accessories or
components to your vehicle this may
adversely affect battery performance,
durability and the performance of other
electrical systems on your vehicle.
If you replace the battery make sure it
matches the electrical requirements of
your vehicle.
If you disconnect or replace the battery
and your vehicle has an automatic
transmission, it must relearn its adaptive
strategy. Because of this, the transmission
may shift firmly when first driven. This is
normal operation while the transmission
fully updates its operation to optimum
shift feel.
Remove and Reinstall the Battery
To disconnect or remove the battery, do
the following:
1. Apply the parking brake and switch the
ignition off.
2. Switch all electrical equipment off, for
example lights and radio.
3. Wait a minimum of two minutes before
disconnecting the battery.
Note: The engine management system has
a power hold function and remains powered
for a period of time after you switch the
ignition off. This is to allow diagnostic and
adaptive tables to be stored. Disconnecting
the battery without waiting can cause
damage not covered by the vehicle
Warranty. 4. Disconnect the negative battery cable
terminal.
5. Disconnect the positive battery cable terminal.
6. Remove the battery securing clamp.
7. Remove the battery.
8. To install, reverse the removal procedure.
Note: Before reconnecting the battery,
make sure the ignition remains switched off.
Note: Make sure the battery cable terminals
are fully tightened.
Note: After cleaning or replacing the
battery, make sure you reinstall the battery
cover or shield.
If you disconnect or replace the vehicle
battery, you must reset the following
features:
• Window bounce-back. See Window
Bounce-Back (page 126).
• Clock Settings.
• Pre-set radio stations.
• Steering Angle Sensor.
Note: To calibrate the steering angle
sensor, drive the vehicle above
30 mph
(50 km/h) for a minimum of 1.2 mi (2 km).
Make sure to drive straight ahead for a
minimum of 30 seconds. Several vehicle
functions are disabled and a warning light
could appear until the sensor is calibrated.
Battery Management System
The battery management system monitors
battery conditions and takes actions to
extend battery life. If excessive battery
drain is detected, the system temporarily
disables some of the following features:
• Heated rear window.
• Heated seats.
• Climate control.
• Heated steering wheel.
410
2022 Super Duty (TFE) Canada/United States of America, enUSA, Edition date: 202103, First-Printing Maintenance
Page 427 of 740

The visible holes in the exhaust tip and the
holes under the shield just inboard of the
right rear tire(s) are functional. Keep the
holes clear of mud, debris or foreign
material to maintain proper function of the
exhaust system. Clean and remove debris
or foreign material if present as needed.
Spraying with a hose during regular
washing of vehicle should help keep holes
clean and clear of debris or foreign
material.
CLEANING THE INTERIOR
CLEANING THE INSTRUMENT
PANEL
WARNING: Do not use chemical
solvents or strong detergents when
cleaning the steering wheel or
instrument panel to avoid contamination
of the airbag system.
We recommend that you only clean the
instrument panel and cluster lens with a
damp soft cloth. Dry the area with a clean,
soft cloth.
For additional information and assistance,
we recommend that you contact an
authorized dealer. Note:
Avoid cleaners or polishes that
increase the gloss of the upper portion of
the instrument panel. The dull finish in this
area helps protect you from undesirable
windshield reflection.
CLEANING PLASTIC
We recommend that you only use a mild
soap and water solution on a soft cloth.
Dry the area with a clean, soft cloth.
CLEANING DISPLAYS AND
SCREENS
We recommend that you only use a
microfiber cloth in a circular motion to
clean off the fingerprint or dust.
If dirt or fingerprints are still on the screen,
apply a small amount of alcohol to the
cloth and try to clean it again.
Note: Do not pour or spray alcohol onto the
touchscreen.
Note: Do not use detergent or any type of
solvent to clean the touchscreen.
CLEANING SEATS AND THE
HEADLINER WARNING: On vehicles equipped
with seat-mounted airbags, do not use
chemical solvents or strong detergents.
Such products could contaminate the
side airbag system and affect
performance of the side airbag in a crash.
Cleaning Fabric Seats and the
Headliner
We recommend that you only clean the
fabric seats and headliners in the following
way:
1. Remove dust and loose dirt with a vacuum cleaner.
424
2022 Super Duty (TFE) Canada/United States of America, enUSA, Edition date: 202103, First-Printing Vehicle CareE163380