2022 FORD F-250 transmission
[x] Cancel search: transmissionPage 270 of 740

Bed Camera
The bed camera is mounted within the
high-mount stop lamp. It displays the
contents of your truck bed. The camera
contains a dynamic guideline to help locate
the center of your vehicle. This view can
be accessed while in drive (D) or reverse
(R).
Auxiliary Camera
The auxiliary camera is a variant of the rear
view camera and is accessed by pressing
the AUX button on the display screen when
moving in reverse (R) or in drive (D). It
displays a rear view image from the back
of a trailer while in reverse.
360 DEGREE CAMERA GUIDE
LINES
Note:
Active guide lines are only available
when the transmission is in reverse (R). Active guide lines.
A
Centerline.
B
Fixed guide line: Green zone.
C
Fixed guide line: Yellow zone.
D
Fixed guide line: Red zone.
E
Rear bumper.
F
Active guide lines only show with fixed
guide lines. Turn the steering wheel to
point the guide lines toward an intended
path. If the steering wheel position changes
when reversing, your vehicle could deviate
from the intended path.
267
2022 Super Duty (TFE) Canada/United States of America, enUSA, Edition date: 202103, First-Printing 360 Degree Camera (If Equipped)E306774
Page 284 of 740
WHAT IS DRIVE MODE
CONTROL
Your vehicle has various drive modes that
you can select for different driving
conditions. Depending on the drive mode
that you select, the system adjusts various
vehicle settings.
HOW DOES DRIVE MODE
CONTROL WORK
Drive mode control adjusts your vehicle
configuration for each mode you select.
Changing the drive mode adjusts the
steering effort and feel of the steering
system.
The stability and traction control assist
your vehicle control in adverse conditions
or high-performance driving.
Throttle control enhances the powertrain
response, transmission controls become
optimized with shift schedules, and
four-wheel drive settings are optimized
and tuned to each mode.
Changing the drive mode can engage or
disengage the electronic locking
differentials.
Changing the drive mode changes the
four-wheel drive mode to the default
setting for the selected drive mode.
Note:
The system has diagnostic checks
that continuously monitor the system for
proper operation. If a mode is unavailable
due to a system fault, the drive mode
system defaults to normal. When the
system defaults to normal, the driveline
settings remain the same as prior to the
system fault. Note:
The system reverts to the normal
mode each time you start your vehicle. At
startup the system also displays a prompt
on the instrument cluster display that gives
you the option to return to the previously
selected drive mode during the last ignition
cycle. If you select yes, the system returns
to the last selected drive mode and the
default driveline settings associated with
that mode. If you select no, the system
remains in normal mode and the driveline
settings remain the same as selected in the
prior ignition cycle. If you do not select yes
or no, the system stays in normal mode and
the driveline settings remain the same as
selected in the prior ignition cycle.
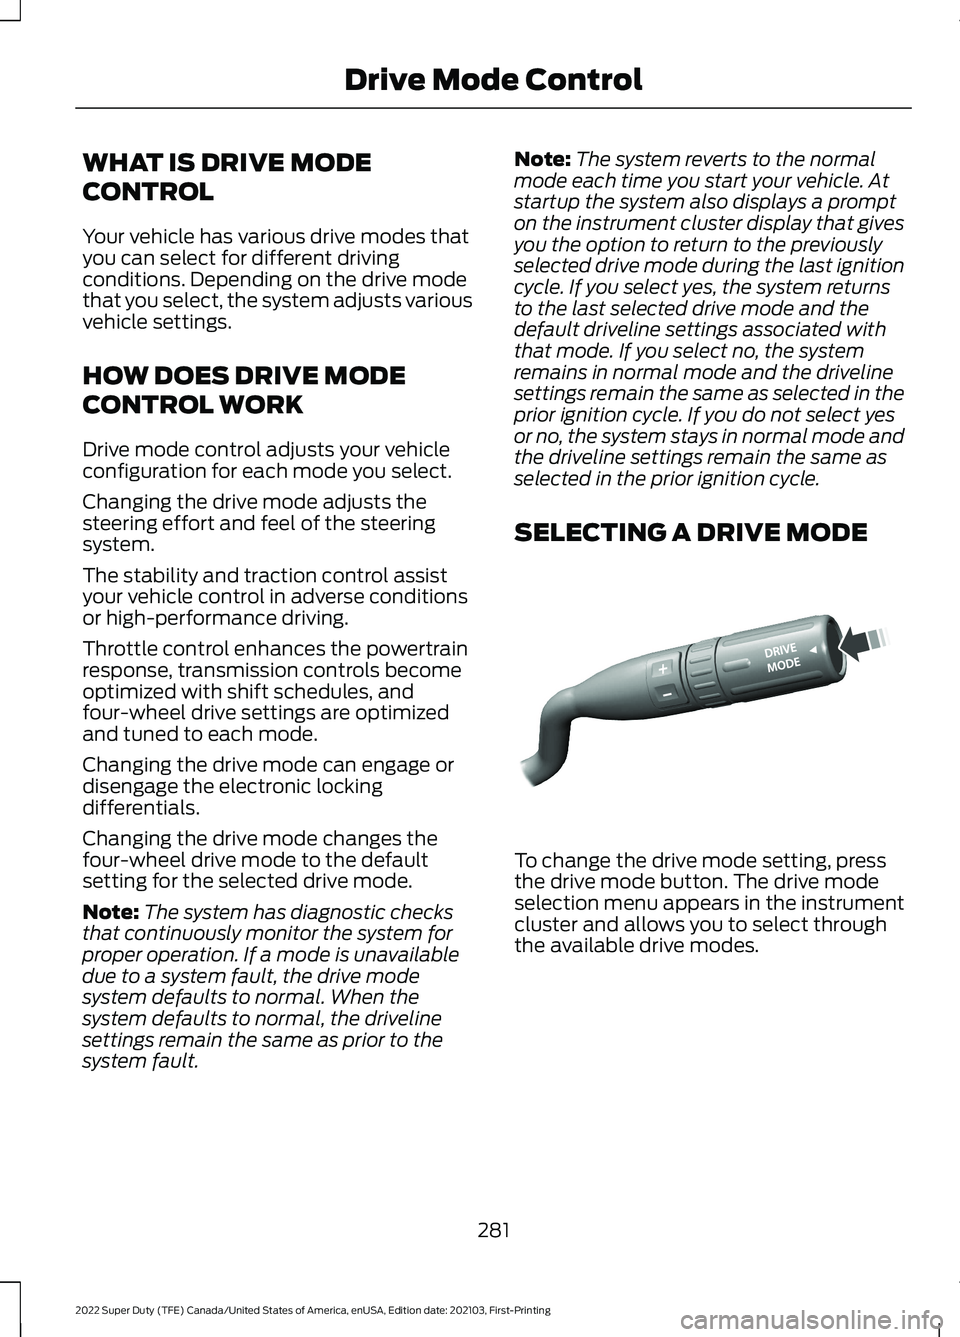
SELECTING A DRIVE MODE To change the drive mode setting, press
the drive mode button. The drive mode
selection menu appears in the instrument
cluster and allows you to select through
the available drive modes.
281
2022 Super Duty (TFE) Canada/United States of America, enUSA, Edition date: 202103, First-Printing Drive Mode ControlE249567
Page 286 of 740
ROCK CRAWL - TREMOR, 4X4
For off-road driving and
optimum rock-climbing. Rock
crawl mode engages the
electronic locking differential, optimizes
throttle response and adjusts transmission
shift points to provide additional control
of your vehicle.
Four-wheel drive low is the only four-wheel
drive mode available in rock crawl mode.
The electronic locking differential engages
when you select this mode at any speed,
and you can disengage it at any time using
the button. See Switching the Electronic
Locking Differential On and Off (page
238).
TOW/HAUL - 4X4 For improved transmission
operation when towing a trailer
or a heavy load. This mode
moves upshifts to higher engine speeds to
reduce the frequency of transmission
shifting. This mode also provides engine
braking in all forward gears, which slows
your vehicle and assists you in controlling
your vehicle when descending a slope. The
amount of downshift braking provided
varies based on the amount you press the
brake pedal.
All four-wheel drive modes are selectable
in tow/haul mode. This mode does not
default to a certain four-wheel drive mode.
The system tunes the steering and
suspension to enhance driving comfort
when towing or carrying heavy loads. The electronic locking differential is
available below
25 mph (40 km/h). See
Switching the Electronic Locking
Differential On and Off
(page 238).
TOW/HAUL - 4X2 For improved transmission
operation when towing a trailer
or a heavy load. This mode
moves upshifts to higher engine speeds to
reduce the frequency of transmission
shifting. This mode also provides engine
braking in all forward gears, which slows
your vehicle and assists you in controlling
your vehicle when descending a slope. The
amount of downshift braking provided
varies based on the amount you press the
brake pedal.
The system tunes the steering and
suspension to enhance driving comfort
when towing or carrying heavy loads.
The electronic locking differential is
available below
25 mph (40 km/h). See
Switching the Electronic Locking
Differential On and Off
(page 238).
DRIVE MODE CONTROL –
TROUBLESHOOTING
DRIVE MODE CONTROL –
WARNING LAMPS Some drive modes reduce
traction and stability control
performance and the indicator
illuminates in the instrument cluster.
283
2022 Super Duty (TFE) Canada/United States of America, enUSA, Edition date: 202103, First-Printing Drive Mode ControlE225315 E246592 E246592 E130458
Page 331 of 740
TOWING A TRAILER
PRECAUTIONS
WARNING: Do not exceed
the GVWR or the GAWR
specified on the certification
label. WARNING:
Towing trailers
beyond the maximum
recommended gross trailer
weight exceeds the limit of your
vehicle and could result in engine
damage, transmission damage,
structural damage, loss of
vehicle control, vehicle rollover
and personal injury. WARNING:
Do not exceed
the lowest rating capacity for
your vehicle or trailer hitch.
Overloading your vehicle or
trailer hitch can impair your
vehicle stability and handling.
Failure to follow this instruction
could result in the loss of control
of your vehicle, personal injury or
death. WARNING: Make sure that
the vertical load on the tow ball
is between the minimum and
maximum recommended weight
at all times. Failure to follow this
instruction could result in the
loss of control of your vehicle,
personal injury or death. WARNING:
Do not cut,
drill, weld or modify the trailer
hitch. Modifying the trailer hitch
could reduce the hitch rating. WARNING:
The anti-lock
brake system does not control
the trailer brakes.
TRAILER BRAKE
PRECAUTIONS WARNING:
Do not connect a
trailer's hydraulic brake system directly
to your vehicle's brake system. Your
vehicle may not have enough braking
power and your chances of having a
collision greatly increase. WARNING:
Do not tow a trailer
fitted with electric trailer brakes unless
your vehicle is fitted with a compatible
aftermarket electronic trailer brake
controller. Failure to follow this
instruction could result in the loss of
control of your vehicle, personal injury or
death. For additional information and
assistance, we recommend that you
contact an authorized dealer.
Electric brakes and manual, automatic or
surge-type trailer brakes are safe if you
install them properly and adjust them to
the manufacturer's specifications. The
trailer brakes must meet local and federal
regulations.
The rating for the tow vehicle's braking
system operation is at the gross vehicle
weight rating, not the gross combined
weight rating.
328
2022 Super Duty (TFE) Canada/United States of America, enUSA, Edition date: 202103, First-Printing Towing a Trailer
Page 332 of 740

Certain states require functioning trailer
brakes for trailers over a specified weight.
Be sure to check state regulations for this
specified weight.
Ford Motor Company recommends
separate functioning brake systems for
trailers weighing more than 1,500 lb
(680 kg) when loaded.
TOWING A TRAILER
LIMITATIONS
The vehicle's load capacity
designation is by weight, not by
volume, so you cannot necessarily
use all available space when
loading a vehicle or trailer.
Note: Your vehicle could have
reduced performance when
operating at high altitudes and
when heavily loaded or towing a
trailer. When driving at elevation,
to match driving performance as
perceived at sea level, reduce gross
vehicle weight and gross
combination weight by 2% per
1,000 ft (300 m)
elevation.
LOADING YOUR TRAILER
To help minimize how trailer
movement affects your vehicle
when driving:
• Load the heaviest items closest
to the trailer floor.
• Load the heaviest items
centered between the
left-hand and right-hand side
trailer tires. •
Load the heaviest items above
the trailer axles or just slightly
forward toward the trailer
tongue. Do not allow the final
trailer tongue weight to go
above or below 10-15% of the
loaded trailer weight. The
trailer tongue weight should
never exceed 10% of the
maximum towing capacity
when towing a conventional
trailer, and should never
exceed 15% of the maximum
towing capacity when towing
a fifth-wheel or gooseneck
trailer.
• Select a ball mount with the
correct rise or drop. When you
connect both the loaded
vehicle and trailer, the trailer
frame should be level, or
slightly angled down toward
your vehicle, when viewed from
the side.
TRAILER TOWING HINTS
Towing a trailer places an extra load on
your vehicle's engine, transmission, axle,
brakes, tires and suspension. Periodically
inspect these components during and after
any towing operation.
When driving with a trailer or payload, a
slight takeoff vibration or shudder may be
present due to the increased payload
weight.
329
2022 Super Duty (TFE) Canada/United States of America, enUSA, Edition date: 202103, First-Printing Towing a Trailer
Page 333 of 740

Your vehicle may have a temporary or
conventional spare tire. A temporary spare
tire is different in diameter or width,
tread-type, or is from a different
manufacturer than the road tires on your
vehicle. Consult information on the tire
label or Safety Compliance label for
limitations when using.
When towing a trailer:
•
Obey country specific regulations for
towing a trailer.
• Do not drive faster than 70 mph
(113 km/h) during the first 500 mi
(800 km).
• Do not make full-throttle starts.
• Check your hitch, electrical connections
and trailer wheel lug nuts thoroughly
after you have traveled 50 mi (80 km).
• When stopped in congested or heavy
traffic during hot weather, place the
transmission in park (P) to aid engine
and transmission cooling and to help
A/C performance.
• Turn off the speed control with heavy
loads or in hilly terrain. The speed
control may turn off when you are
towing on long, steep slopes.
• Shift to a lower gear when driving down
a long or steep hill. Do not continuously
apply the brakes, as they may overheat
and become less effective.
• If your transmission has Grade Assist
or Tow/Haul, use this feature when
towing. This provides engine braking
and helps eliminate excessive
transmission shifting for optimum fuel
economy and transmission cooling.
• If your vehicle has AdvanceTrac with
roll stability control, this system may
turn on during typical cornering
maneuvers with a heavily loaded trailer.
This is normal. Turning the corner at a
slower speed when towing may reduce
this tendency. •
Allow more distance for stopping with
a trailer attached. Anticipate stops and
gradually brake.
• Avoid parking on a slope. However, if
you must park on a slope, turn the
steering wheel to point your vehicle
tires away from traffic flow, set the
parking brake, place the transmission
in park (P) and place wheel chocks in
front and back of the trailer wheels.
Note: Chocks are not included with your
vehicle.
LAUNCHING OR RETRIEVING
A BOAT OR PERSONAL
WATERCRAFT
When backing down a ramp during boat
launching or retrieval:
• Do not allow the static water level to
rise above the bottom edge of the rear
bumper.
• Do not allow waves to break higher
than
6 in (15 cm) above the bottom
edge of the rear bumper.
Exceeding
6 in (15 cm) could allow water
to enter vehicle components, causing
internal damage to the components and
affecting driveability, emissions and
reliability.
Note: Replace the rear axle lubricant
anytime the rear axle has been submerged
in water.
Note: Disconnect the trailer wiring
connector before backing the trailer into the
water.
Note: Reconnect the trailer wiring
connector after removing the trailer from
the water.
330
2022 Super Duty (TFE) Canada/United States of America, enUSA, Edition date: 202103, First-Printing Towing a Trailer
Page 343 of 740
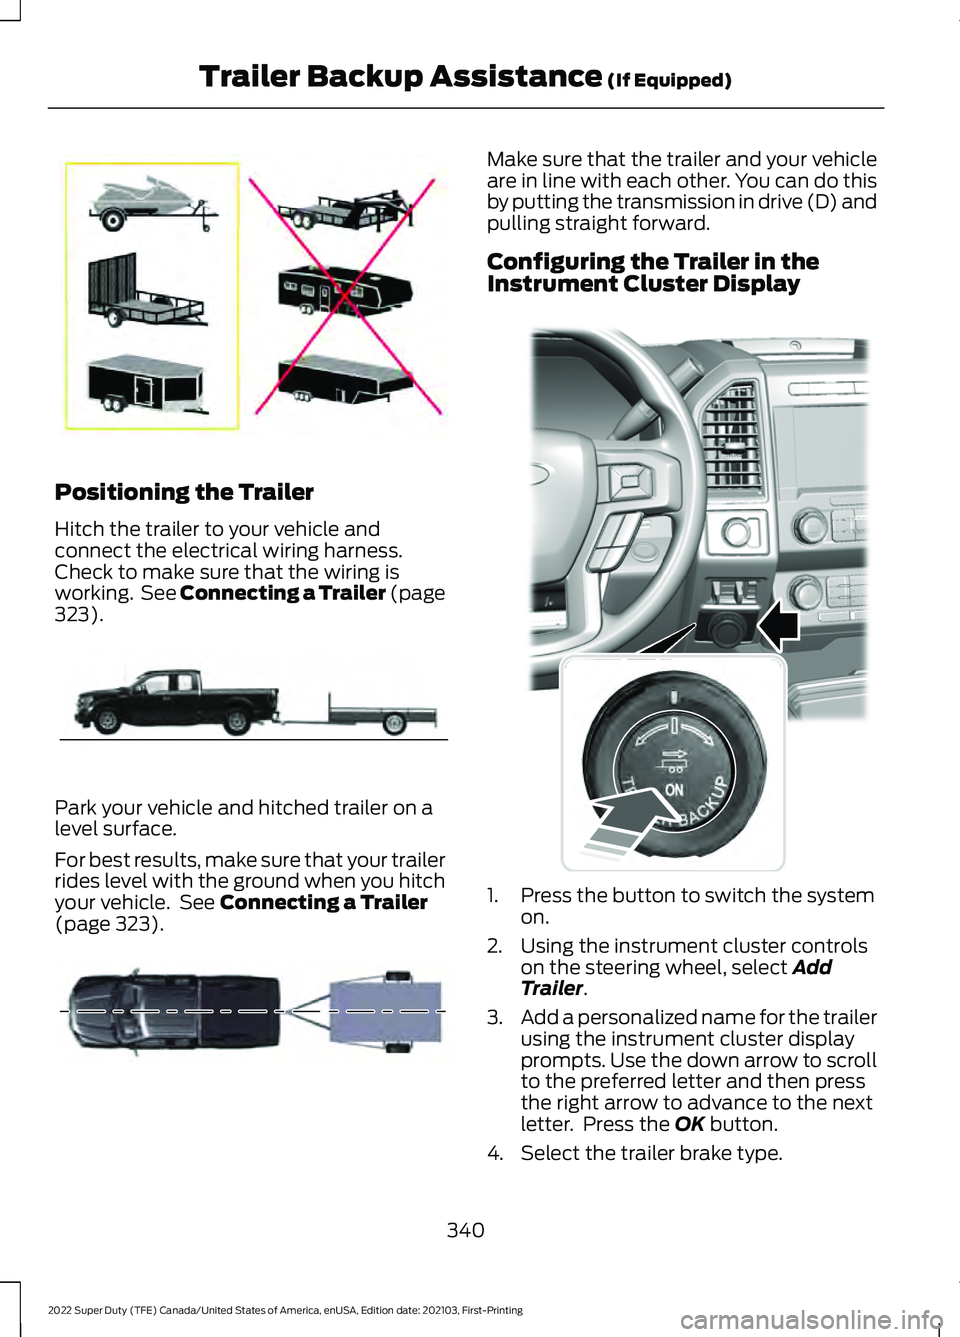
Positioning the Trailer
Hitch the trailer to your vehicle and
connect the electrical wiring harness.
Check to make sure that the wiring is
working. See Connecting a Trailer (page
323).
Park your vehicle and hitched trailer on a
level surface.
For best results, make sure that your trailer
rides level with the ground when you hitch
your vehicle. See
Connecting a Trailer
(page 323). Make sure that the trailer and your vehicle
are in line with each other. You can do this
by putting the transmission in drive (D) and
pulling straight forward.
Configuring the Trailer in the
Instrument Cluster Display
1. Press the button to switch the system
on.
2. Using the instrument cluster controls on the steering wheel, select
Add
Trailer.
3. Add a personalized name for the trailer
using the instrument cluster display
prompts. Use the down arrow to scroll
to the preferred letter and then press
the right arrow to advance to the next
letter. Press the
OK button.
4. Select the trailer brake type.
340
2022 Super Duty (TFE) Canada/United States of America, enUSA, Edition date: 202103, First-Printing Trailer Backup Assistance
(If Equipped)E209766 E209759 E209760 E318266
Page 361 of 740
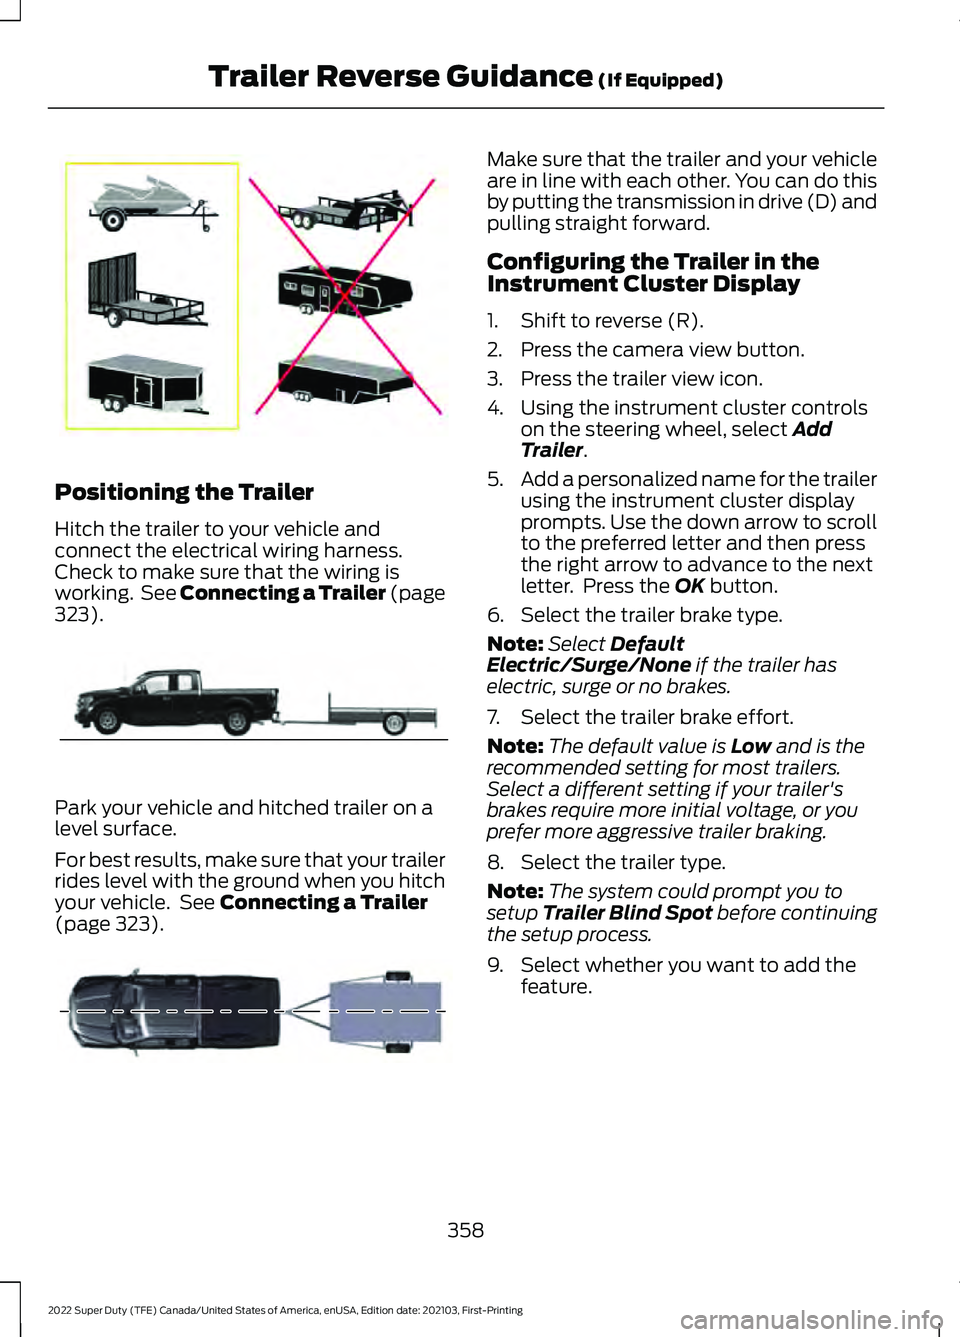
Positioning the Trailer
Hitch the trailer to your vehicle and
connect the electrical wiring harness.
Check to make sure that the wiring is
working. See Connecting a Trailer (page
323).
Park your vehicle and hitched trailer on a
level surface.
For best results, make sure that your trailer
rides level with the ground when you hitch
your vehicle. See
Connecting a Trailer
(page 323). Make sure that the trailer and your vehicle
are in line with each other. You can do this
by putting the transmission in drive (D) and
pulling straight forward.
Configuring the Trailer in the
Instrument Cluster Display
1. Shift to reverse (R).
2. Press the camera view button.
3. Press the trailer view icon.
4. Using the instrument cluster controls
on the steering wheel, select
Add
Trailer.
5. Add a personalized name for the trailer
using the instrument cluster display
prompts. Use the down arrow to scroll
to the preferred letter and then press
the right arrow to advance to the next
letter. Press the
OK button.
6. Select the trailer brake type.
Note: Select
Default
Electric/Surge/None if the trailer has
electric, surge or no brakes.
7. Select the trailer brake effort.
Note: The default value is
Low and is the
recommended setting for most trailers.
Select a different setting if your trailer's
brakes require more initial voltage, or you
prefer more aggressive trailer braking.
8. Select the trailer type.
Note: The system could prompt you to
setup
Trailer Blind Spot before continuing
the setup process.
9. Select whether you want to add the feature.
358
2022 Super Duty (TFE) Canada/United States of America, enUSA, Edition date: 202103, First-Printing Trailer Reverse Guidance
(If Equipped)E209766 E209759 E209760