2022 FORD F-250 reset
[x] Cancel search: resetPage 453 of 740

VIEWING THE TIRE
PRESSURES
Using the information display
arrow keys navigate to the truck
info section where you can view
the tire pressures.
RESETTING TIRE PRESSURE
MONITORING SYSTEM
Tire Pressure Monitoring
System Reset Procedure
WARNING: To determine
the required pressure(s) for your
vehicle, see the Safety
Compliance Certification Label
(on the door hinge pillar,
door-latch post or the door edge
that meets the door-latch post,
next to the driver seat) or the
Tire Label on the B-Pillar or the
edge of the driver door. You must reset the tire pressure
monitoring system after each tire
rotation on vehicles that require
different recommended tire
pressures in the front tires as
compared to the rear tires.
Note:
To reduce the chances of
interference from another vehicle,
perform the system reset
procedure at least three feet, one
meter, away from another vehicle
undergoing the system reset
procedure at the same time.
Note: Do not wait more than two
minutes between resetting each
tire sensor or the system can
time-out and you need to repeat
the entire procedure on all four
wheels.
1. Drive the vehicle above 20 mph
(32 km/h)
for at least two
minutes, then park in a safe
location where you can easily
get to all four tires and have
access to an air pump.
2. Switch the ignition off.
3. Switch the ignition on but do
not start the engine.
4. Switch the hazard flashers on
then off three times.
Note: You must accomplish this
within 10 seconds. If you
successfully enter the reset mode,
the horn sounds once, the system
indicator flashes and a message
shows in the information display.
450
2022 Super Duty (TFE) Canada/United States of America, enUSA, Edition date: 202103, First-Printing Tire Pressure Monitoring System
(If Equipped)E224333
Page 454 of 740

Note:
If the system does not enter
reset mode, try again starting at
Step 2. If after repeated attempts
to enter the reset mode, the horn
does not sound, the system
indicator does not flash and no
message shows in the information
display, contact your authorized
dealer.
5. Remove the valve cap from the
valve stem on the left front tire.
Decrease the air pressure until
the horn sounds.
Note: The single horn tone
confirms that the sensor
identification code has been
learned by the module for this
position. If the horn sounds twice,
the reset procedure was
unsuccessful, and you must repeat
it.
6. Remove the valve cap from the
valve stem on the right front
tire. Decrease the air pressure
until the horn sounds.
7. Repeat the previous step on the right rear tire and then on
the left rear tire.
8. Switch the ignition off.
Note: If the horn sounds twice
again after switching the ignition
off, and repeating the procedure,
contact your authorized dealer and
have your vehicle checked as soon
as possible.
9. Set all four tires to the
recommended air pressure as
indicated on the Safety
Compliance Certification Label. Trailer Tire Pressure
Monitoring System (If Equipped)
Note: Additional equipment may
be required for your vehicle to
support trailer tire pressure and
temperature monitoring. See your
authorized dealer for more
information.
Note: The trailer tire pressure
monitoring system is not a
substitute for proper tire
maintenance. It is your
responsibility to maintain correct
tire pressures at all times.
Note: If a trailer tire is repaired,
replaced or broken down for
service, the screw and valve on the
trailer tire pressure sensor should
be replaced. See your authorized
dealer for details. The trailer tire pressure monitoring
system is an added safety feature
that allows you to view your trailer
tire pressures and temperatures
through the information display.
See
Tire Pressure Monitoring
System – Information
Messages
(page 454). Tire
451
2022 Super Duty (TFE) Canada/United States of America, enUSA, Edition date: 202103, First-Printing Tire Pressure Monitoring System
(If Equipped)E235807
Page 455 of 740

pressure sensors are mounted into
each tire on your trailer. The
sensors send a message to your
vehicle indicating the current
trailer tire pressure and
temperature.
If the trailer tire pressure
monitoring system detects that a
tire is low, a warning message
appears in the information display.
The trailer tire information screen
in the information display
highlights the tire with a low
pressure.
If the trailer tire pressure
monitoring system detects that a
tire temperature is over temp, a
warning message appears in the
Information display. The trailer tire
information screen in the
information display highlights the
tire with a high temperature.
The main function of the trailer tire
pressure monitoring system is to
warn you when your trailer tires
need air or if the tires are
experiencing high temperatures.
It can also warn you in the event
the system is no longer capable
of functioning as intended. See
Tire Pressure Monitoring
System – Information
Messages
(page 454). When a Temporary Spare or
New Tire is Installed
If you have replaced a trailer tire
with a new or spare tire, a warning
message appears and pressure
readings are no longer displayed
for that tire.
To restore the full function of the
trailer tire pressure monitoring
system:
•
Have the damaged wheel and
tire assembly repaired and
remounted to your trailer.
• Install the trailer tire pressure
monitoring sensor into the new
wheel and tire assembly.
• Perform the trailer tire pressure
monitoring system reset
procedure.
Trailer Tire Pressure
Monitoring System Reset
Procedure
Note: You need to perform the tire
pressure monitoring system reset
procedure after each tire rotation,
or when a new trailer tire pressure
sensor is installed into a trailer tire.
The trailer tire pressure monitoring
system can be reset through the
menu in the information display.
See Tire Pressure Monitoring
System – Information
Messages (page 454). Performing
the trailer setup process also
resets the trailer tire pressure
monitoring system.
452
2022 Super Duty (TFE) Canada/United States of America, enUSA, Edition date: 202103, First-Printing Tire Pressure Monitoring System
(If Equipped)
Page 509 of 740
CREATING A VEHICLE WI-FI
HOTSPOT
You can create a Wi-Fi hotspot in your
vehicle and allow devices to connect to it
for access to the Internet.
Select the settings option on the
feature bar.
1. Press Vehicle Hotspot.
Note: The vehicle hotspot default setting
is on.
2. Press
Settings.
3. Press
Edit.
4. Press
Hotspot visibility.
Note: The hotspot visibility default setting
is on.
Finding the Wi-Fi Hotspot Name
and Password Select the settings option on the
feature bar.
1. Press
Vehicle Hotspot.
2. Press
Settings.
Note: The network name is the hotspot
name.
3. Press
View Password.
Connecting a Device to the Wi-Fi
Hotspot
1. On your device, switch Wi-Fi on and select the hotspot from the list of
available Wi-Fi networks.
2. When prompted, enter the password.
Purchasing a Data Plan
1. Connect a device to the hotspot.
Note: The vehicle network carrier ’s portal
opens on your device. 2. If the portal does not open on your
device, open a website and it redirects
to the vehicle network carrier ’s portal.
Note: Secure websites do not redirect.
3. Follow the instructions on the carrier portal to purchase a plan.
Note: If you have an active plan, the system
does not redirect to the vehicle network
carrier ’s portal when you connect a device.
Visit the vehicle network carrier ’s website
to purchase more data.
Note: If data usage information is available
in the vehicle hotspot menu, it is
approximate.
Note: If you carry out a master reset, the
system does not remove your vehicle from
your vehicle network carrier ’s account. To
remove your vehicle from the account,
contact your vehicle network carrier.
Note: The vehicle network carrier provides
Vehicle Hotspot services, subject to your
vehicle network carrier agreement, coverage
and availability.
CHANGING THE VEHICLE WI-
FI HOTSPOT NAME OR
PASSWORD Select the settings option on the
feature bar.
1. Press
Vehicle Hotspot.
2. Press
Settings.
3. Press
Edit.
4. Press
Change Network Name.
5. Enter your required network name.
6. Press
Done.
7. Press
Change Password.
8. Enter your required password.
9. Press
Done.
506
2022 Super Duty (TFE) Canada/United States of America, enUSA, Edition date: 202103, First-Printing Vehicle Wi-Fi HotspotE280315 E280315 E280315
Page 514 of 740
HD Radio technology is the digital
evolution of analog AM/FM radio. Your
system has a special receiver that allows
it to receive digital broadcasts, where
available, in addition to the analog
broadcasts, it already receives. Digital
broadcasts provide a better sound quality
than analog broadcasts with free,
crystal-clear audio and no static or
distortion. For more information, and a
guide to available stations and
programming, please visit
www.hdradio.com.
When HD Radio is on and you tune to a
station broadcasting HD Radio technology,
you may notice the HD Radio logo on your
screen. When this logo is available, you
may also see Title and Artist fields
on-screen.
The multicast indicator appears in FM
mode, only, if the current station is
broadcasting multiple digital broadcasts.
The highlighted numbers signify available
digital channels where new or different
content is available. HD1 signifies the main
programming status and is available in
analog and digital broadcasts. Other
multicast stations, HD2 through HD7, are
only available digitally.
When HD Radio broadcasts are active, you
can access the following functions:
•
Memory presets allow you to save an
active channel as a memory preset.
Touch and hold a memory preset slot
until the sound returns. There is a brief
mute while the radio saves the station.
Sound returns when finished. When
switching to an HD2 or HD3 memory
preset, the sound mutes before the
digital audio plays, because the system
has to reacquire the digital signal.
Note: As with any saved radio station, you
cannot access the saved station if your
vehicle is outside the station ’s reception
area.
511
2022 Super Duty (TFE) Canada/United States of America, enUSA, Edition date: 202103, First-Printing Audio System - Vehicles With: SYNC
Page 516 of 740
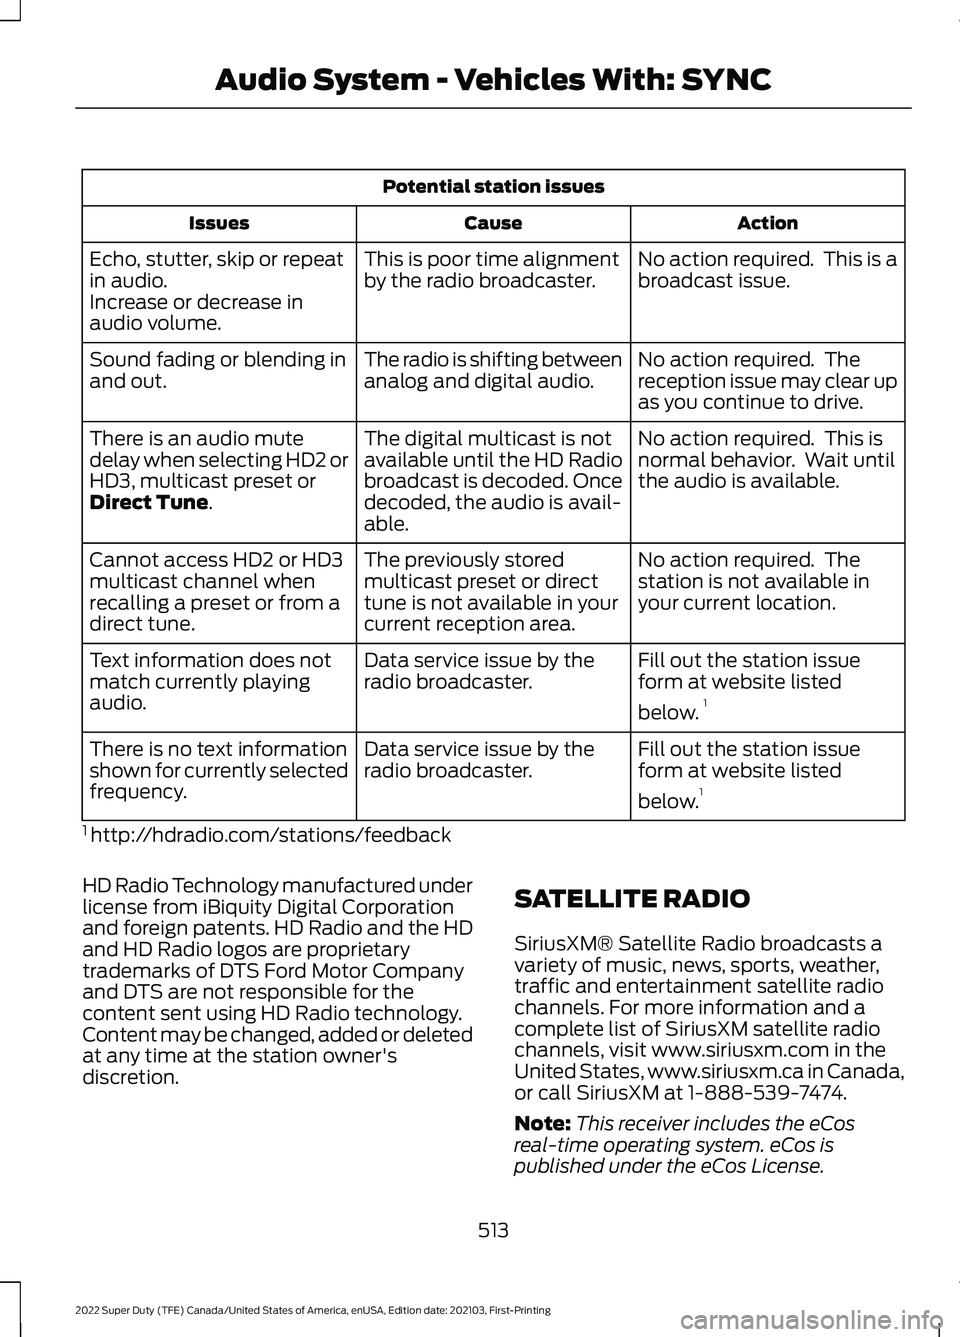
Potential station issues
Action
Cause
Issues
No action required. This is a
broadcast issue.
This is poor time alignment
by the radio broadcaster.
Echo, stutter, skip or repeat
in audio.
Increase or decrease in
audio volume.
No action required. The
reception issue may clear up
as you continue to drive.
The radio is shifting between
analog and digital audio.
Sound fading or blending in
and out.
No action required. This is
normal behavior. Wait until
the audio is available.
The digital multicast is not
available until the HD Radio
broadcast is decoded. Once
decoded, the audio is avail-
able.
There is an audio mute
delay when selecting HD2 or
HD3, multicast preset or
Direct Tune.
No action required. The
station is not available in
your current location.
The previously stored
multicast preset or direct
tune is not available in your
current reception area.
Cannot access HD2 or HD3
multicast channel when
recalling a preset or from a
direct tune.
Fill out the station issue
form at website listed
below.1
Data service issue by the
radio broadcaster.
Text information does not
match currently playing
audio.
Fill out the station issue
form at website listed
below.1
Data service issue by the
radio broadcaster.
There is no text information
shown for currently selected
frequency.
1 http://hdradio.com/stations/feedback
HD Radio Technology manufactured under
license from iBiquity Digital Corporation
and foreign patents. HD Radio and the HD
and HD Radio logos are proprietary
trademarks of DTS Ford Motor Company
and DTS are not responsible for the
content sent using HD Radio technology.
Content may be changed, added or deleted
at any time at the station owner's
discretion. SATELLITE RADIO
SiriusXM® Satellite Radio broadcasts a
variety of music, news, sports, weather,
traffic and entertainment satellite radio
channels. For more information and a
complete list of SiriusXM satellite radio
channels, visit www.siriusxm.com in the
United States, www.siriusxm.ca in Canada,
or call SiriusXM at 1-888-539-7474.
Note:
This receiver includes the eCos
real-time operating system. eCos is
published under the eCos License.
513
2022 Super Duty (TFE) Canada/United States of America, enUSA, Edition date: 202103, First-Printing Audio System - Vehicles With: SYNC
Page 518 of 740
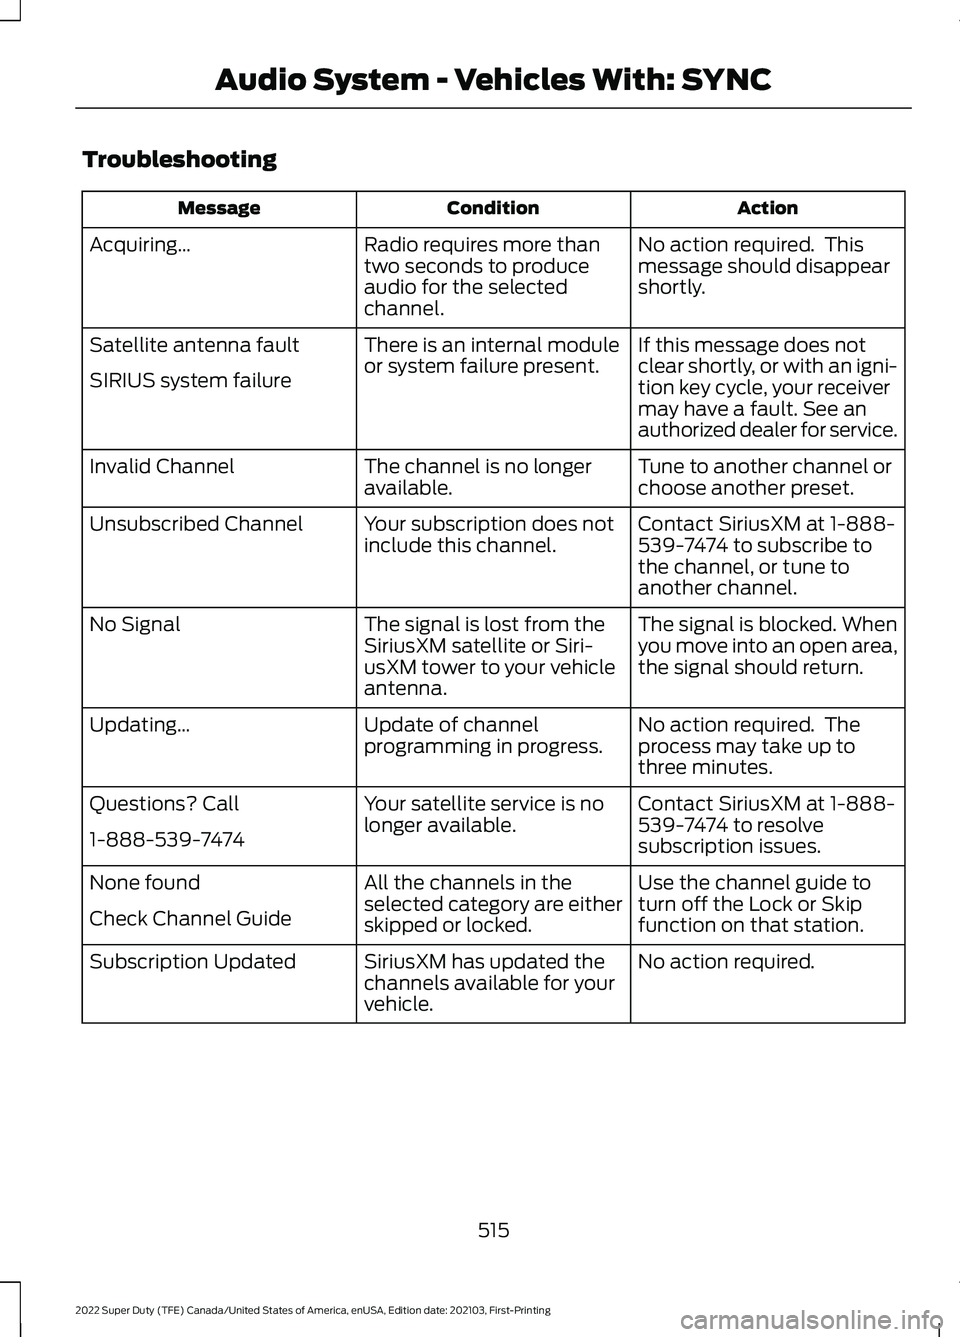
Troubleshooting
Action
Condition
Message
No action required. This
message should disappear
shortly.
Radio requires more than
two seconds to produce
audio for the selected
channel.
Acquiring…
If this message does not
clear shortly, or with an igni-
tion key cycle, your receiver
may have a fault. See an
authorized dealer for service.
There is an internal module
or system failure present.
Satellite antenna fault
SIRIUS system failure
Tune to another channel or
choose another preset.
The channel is no longer
available.
Invalid Channel
Contact SiriusXM at 1-888-
539-7474 to subscribe to
the channel, or tune to
another channel.
Your subscription does not
include this channel.
Unsubscribed Channel
The signal is blocked. When
you move into an open area,
the signal should return.
The signal is lost from the
SiriusXM satellite or Siri-
usXM tower to your vehicle
antenna.
No Signal
No action required. The
process may take up to
three minutes.
Update of channel
programming in progress.
Updating…
Contact SiriusXM at 1-888-
539-7474 to resolve
subscription issues.
Your satellite service is no
longer available.
Questions? Call
1-888-539-7474
Use the channel guide to
turn off the Lock or Skip
function on that station.
All the channels in the
selected category are either
skipped or locked.
None found
Check Channel Guide
No action required.
SiriusXM has updated the
channels available for your
vehicle.
Subscription Updated
515
2022 Super Duty (TFE) Canada/United States of America, enUSA, Edition date: 202103, First-Printing Audio System - Vehicles With: SYNC
Page 521 of 740
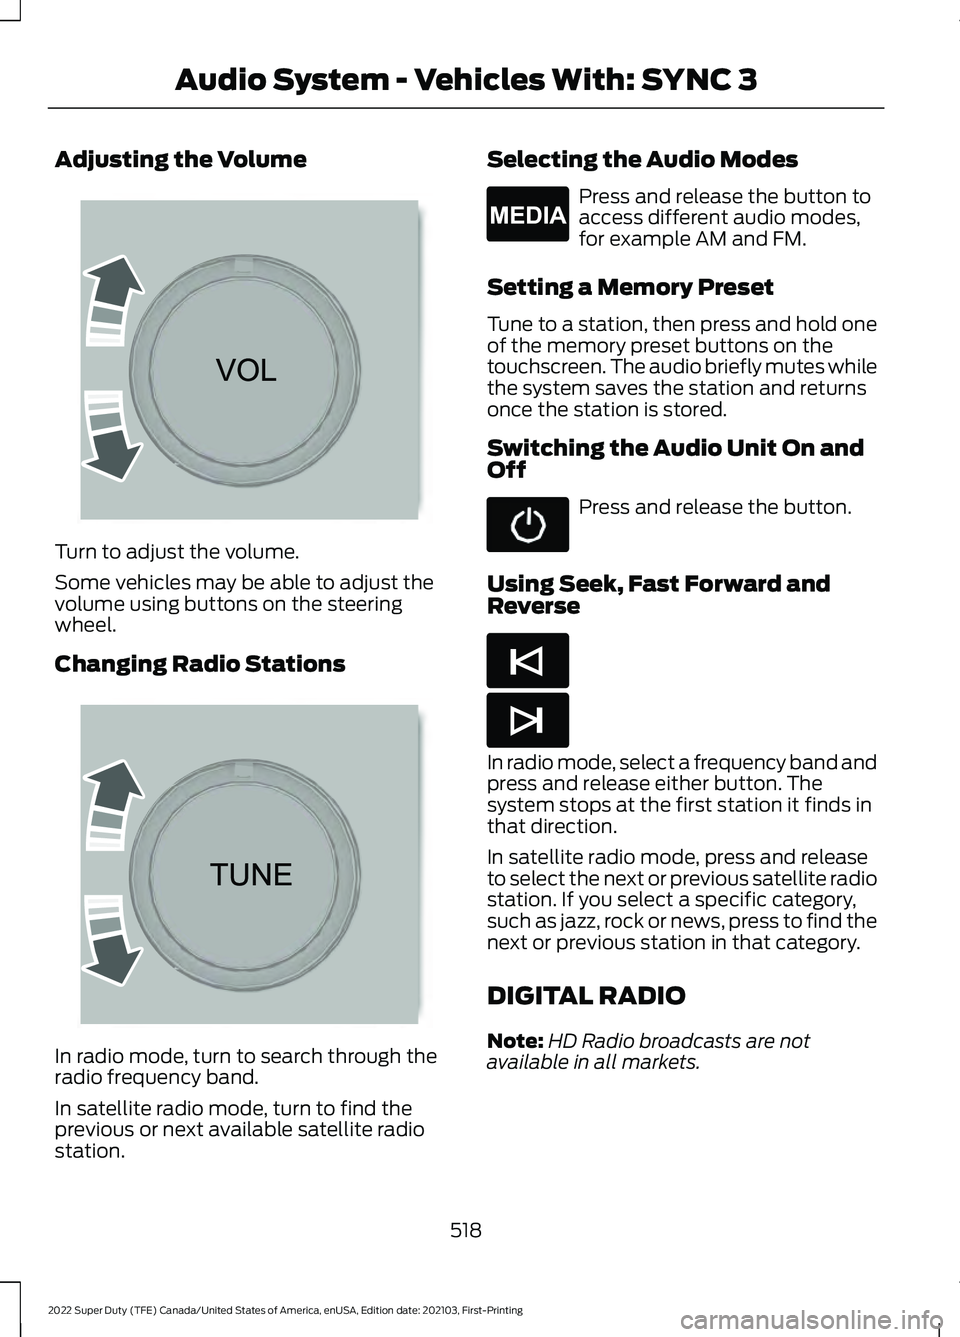
Adjusting the Volume
Turn to adjust the volume.
Some vehicles may be able to adjust the
volume using buttons on the steering
wheel.
Changing Radio Stations
In radio mode, turn to search through the
radio frequency band.
In satellite radio mode, turn to find the
previous or next available satellite radio
station. Selecting the Audio Modes Press and release the button to
access different audio modes,
for example AM and FM.
Setting a Memory Preset
Tune to a station, then press and hold one
of the memory preset buttons on the
touchscreen. The audio briefly mutes while
the system saves the station and returns
once the station is stored.
Switching the Audio Unit On and
Off Press and release the button.
Using Seek, Fast Forward and
Reverse In radio mode, select a frequency band and
press and release either button. The
system stops at the first station it finds in
that direction.
In satellite radio mode, press and release
to select the next or previous satellite radio
station. If you select a specific category,
such as jazz, rock or news, press to find the
next or previous station in that category.
DIGITAL RADIO
Note:
HD Radio broadcasts are not
available in all markets.
518
2022 Super Duty (TFE) Canada/United States of America, enUSA, Edition date: 202103, First-Printing Audio System - Vehicles With: SYNC 3 E265373 E265696 E265035 E265045 E265044