2022 FORD F-250 clock
[x] Cancel search: clockPage 413 of 740

To maintain correct operation of the
battery management system, if you add
any electrical devices to your vehicle, do
not connect the ground connection directly
to the negative battery terminal. A
connection at the negative battery terminal
can cause inaccurate measurements of
the battery condition and potential
incorrect system operation.
Note:
If you add electrical accessories or
components to your vehicle this may
adversely affect battery performance,
durability and the performance of other
electrical systems on your vehicle.
If you replace the battery make sure it
matches the electrical requirements of
your vehicle.
If you disconnect or replace the battery
and your vehicle has an automatic
transmission, it must relearn its adaptive
strategy. Because of this, the transmission
may shift firmly when first driven. This is
normal operation while the transmission
fully updates its operation to optimum
shift feel.
Remove and Reinstall the Battery
To disconnect or remove the battery, do
the following:
1. Apply the parking brake and switch the
ignition off.
2. Switch all electrical equipment off, for
example lights and radio.
3. Wait a minimum of two minutes before
disconnecting the battery.
Note: The engine management system has
a power hold function and remains powered
for a period of time after you switch the
ignition off. This is to allow diagnostic and
adaptive tables to be stored. Disconnecting
the battery without waiting can cause
damage not covered by the vehicle
Warranty. 4. Disconnect the negative battery cable
terminal.
5. Disconnect the positive battery cable terminal.
6. Remove the battery securing clamp.
7. Remove the battery.
8. To install, reverse the removal procedure.
Note: Before reconnecting the battery,
make sure the ignition remains switched off.
Note: Make sure the battery cable terminals
are fully tightened.
Note: After cleaning or replacing the
battery, make sure you reinstall the battery
cover or shield.
If you disconnect or replace the vehicle
battery, you must reset the following
features:
• Window bounce-back. See Window
Bounce-Back (page 126).
• Clock Settings.
• Pre-set radio stations.
• Steering Angle Sensor.
Note: To calibrate the steering angle
sensor, drive the vehicle above
30 mph
(50 km/h) for a minimum of 1.2 mi (2 km).
Make sure to drive straight ahead for a
minimum of 30 seconds. Several vehicle
functions are disabled and a warning light
could appear until the sensor is calibrated.
Battery Management System
The battery management system monitors
battery conditions and takes actions to
extend battery life. If excessive battery
drain is detected, the system temporarily
disables some of the following features:
• Heated rear window.
• Heated seats.
• Climate control.
• Heated steering wheel.
410
2022 Super Duty (TFE) Canada/United States of America, enUSA, Edition date: 202103, First-Printing Maintenance
Page 415 of 740

4. On the wall or screen, observe a light
pattern with a distinct horizontal edge
toward the right. If this edge is not at
the horizontal reference line, adjust the
beam so the edge is at the same height
as the horizontal reference line. 5. Locate the vertical adjuster on each
headlamp. Using a Phillips #2
screwdriver, turn the adjuster either
clockwise or counterclockwise in order
to adjust the vertical aim of the
headlamp.
Note: A. LED headlamp.
B. Halogen headlamp.
6. Repeat steps 3 thru 5 to adjust the other headlamp.
7. Close the hood and turn off the lamps.
Horizontal Aim Adjustment
Horizontal aim is not required for this
vehicle and is not adjustable.
EXTERIOR BULBS
EXTERIOR BULB SPECIFICATION
CHART
Replacement bulbs are specified in the
chart below. Headlamp bulbs must be
marked with an authorized D.O.T. marking
for North America to make sure they have
the proper lamp performance, light
brightness, light pattern and safe visibility.
The correct bulbs will not damage the
lamp assembly or void the lamp assembly
warranty and will provide quality bulb
illumination time. Power (Watt)
Specification
Lamp
60/55
H13/9008
Headlamp.
LED
LED
Headlamp.
5
W5W
Front side marker lamp.
40
9140
Front fog lamp.
LED
LED
Front fog lamp. 3
412
2022 Super Duty (TFE) Canada/United States of America, enUSA, Edition date: 202103, First-Printing MaintenanceE167358 A
BE223774
Page 417 of 740

REMOVING A REAR LAMP
ASSEMBLY - VEHICLES WITHOUT:
PICKUP BED
1.
Switch all of the lamps and the ignition
off.
2. Remove the screws and the lamp lens from lamp assembly.
3. To install, reverse the removal procedure.
REMOVING A REAR LAMP
ASSEMBLY - VEHICLES WITH:
PICKUP BED
1. Make sure the headlamps are off.
2. Open the tailgate to access the rear lamp assemblies. 3. Remove the bolts from the tail lamp
assembly. 4.
Carefully pull the lamp assembly from
the tailgate pillar by releasing the two
retaining tabs.
5. To install, reverse the removal procedure.
CHANGING A HEADLAMP BULB WARNING: Make sure the bulbs
have cooled down before removing
them. Failure to follow this warning could
result in serious personal injury.
Note: To access the right-hand side bulbs,
remove the air intake pipe. See
Changing
the Engine Air Filter (page 405).
For vehicles with diesel engines, to access
the left-hand side bulbs, remove the washer
reservoir filler tube. 1.
Switch all of the lamps and the ignition
off.
2. Disconnect the electrical connector.
3. Turn the bulb holder counterclockwise
and remove it.
Note: You cannot separate the bulb from
the bulb holder.
414
2022 Super Duty (TFE) Canada/United States of America, enUSA, Edition date: 202103, First-Printing MaintenanceE163828 E187288 E224991
Page 418 of 740

4. To install, reverse the removal
procedure.
Note: Handle a halogen headlamp bulb
carefully and keep out of children ’s reach.
Grasp the bulb only by its plastic base and
do not touch the glass. The oil from your
hand could cause the bulb to break the next
time you operate the headlamps.
CHANGING A FRONT TURN
SIGNAL LAMP BULB WARNING: Make sure the bulbs
have cooled down before removing
them. Failure to follow this warning could
result in serious personal injury.
Note: To access the right-hand side bulbs,
remove the air intake pipe. See
Changing
the Engine Air Filter (page 405).
To access the left-hand side bulbs, remove
the washer reservoir filler tube. Vehicles with
diesel engine only. 1.
Switch all of the lamps and the ignition
off.
2. Disconnect the electrical connector.
3. Turn the bulb holder counterclockwise
and remove it. Note:
You cannot separate the bulb from
the bulb holder.
4. To install, reverse the removal procedure.
CHANGING A FRONT FOG LAMP
BULB 1. Make sure the fog lamps are off.
2. Disconnect the electrical connector
from the fog lamp bulb.
3. Turn the bulb counterclockwise and remove it from the fog lamp.
4. To install, reverse the removal procedure.
415
2022 Super Duty (TFE) Canada/United States of America, enUSA, Edition date: 202103, First-Printing MaintenanceE224990 E163826
Page 419 of 740

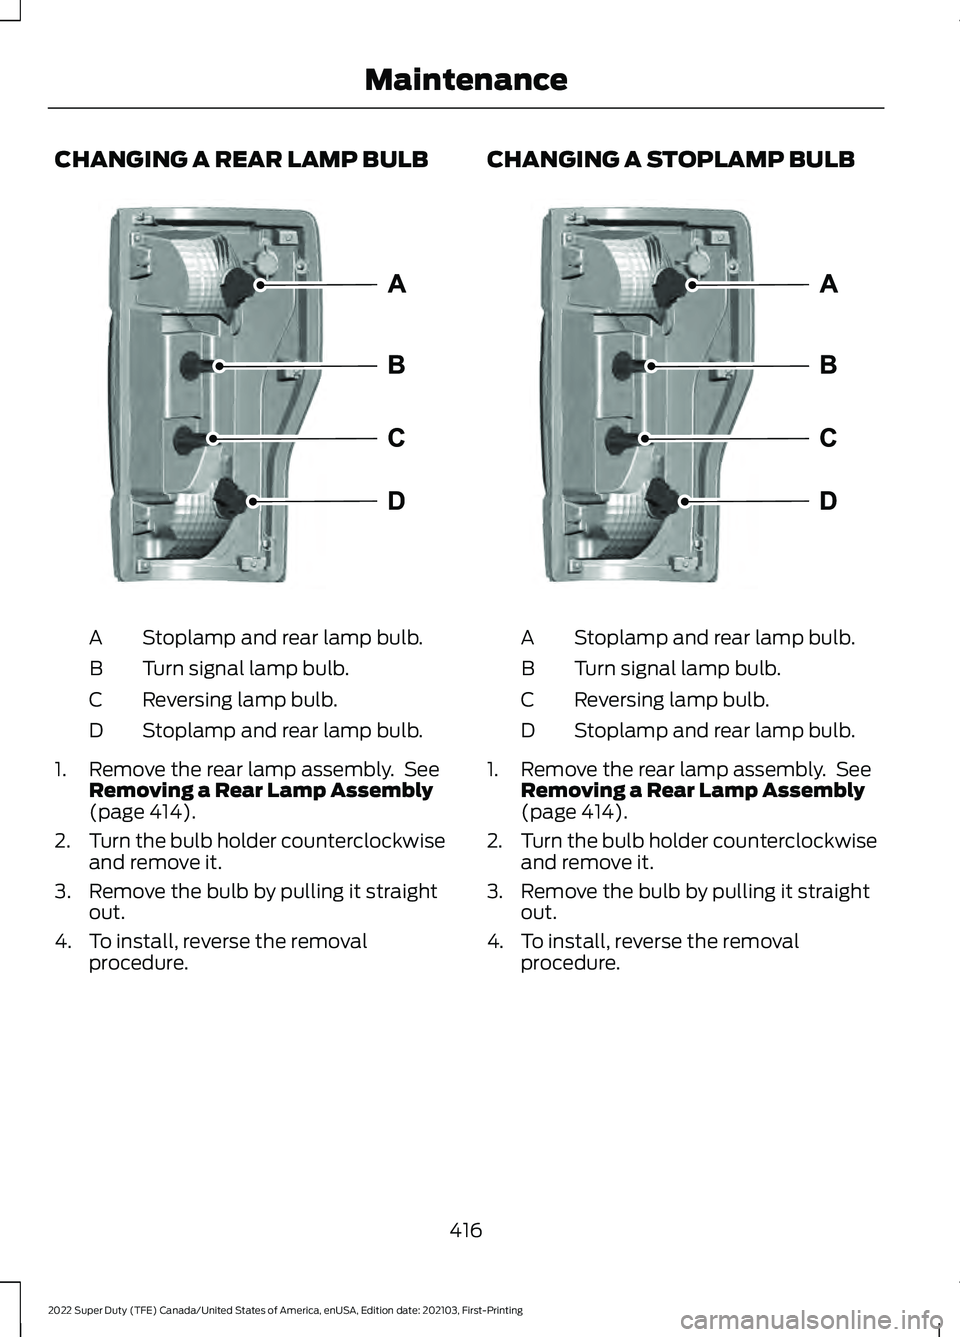
CHANGING A REAR LAMP BULB
Stoplamp and rear lamp bulb.
A
Turn signal lamp bulb.
B
Reversing lamp bulb.
C
Stoplamp and rear lamp bulb.
D
1. Remove the rear lamp assembly. See Removing a Rear Lamp Assembly
(page 414).
2. Turn the bulb holder counterclockwise
and remove it.
3. Remove the bulb by pulling it straight out.
4. To install, reverse the removal procedure. CHANGING A STOPLAMP BULB
Stoplamp and rear lamp bulb.
A
Turn signal lamp bulb.
B
Reversing lamp bulb.
C
Stoplamp and rear lamp bulb.
D
1. Remove the rear lamp assembly. See Removing a Rear Lamp Assembly
(page 414).
2. Turn the bulb holder counterclockwise
and remove it.
3. Remove the bulb by pulling it straight out.
4. To install, reverse the removal procedure.
416
2022 Super Duty (TFE) Canada/United States of America, enUSA, Edition date: 202103, First-Printing MaintenanceE346947 E346947
Page 420 of 740

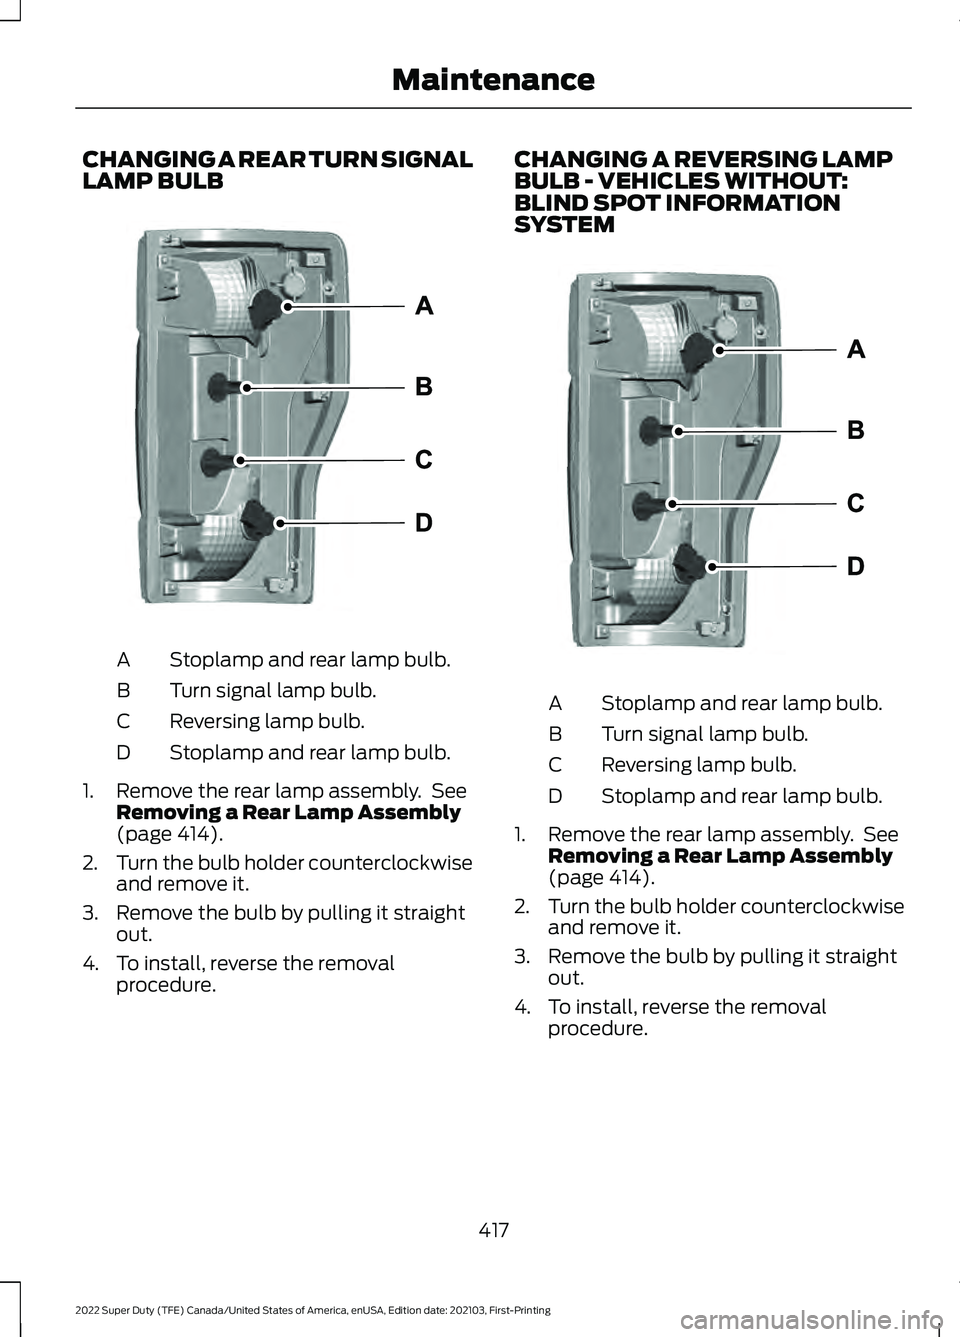
CHANGING A REAR TURN SIGNAL
LAMP BULB
Stoplamp and rear lamp bulb.
A
Turn signal lamp bulb.
B
Reversing lamp bulb.
C
Stoplamp and rear lamp bulb.
D
1. Remove the rear lamp assembly. See Removing a Rear Lamp Assembly
(page 414).
2. Turn the bulb holder counterclockwise
and remove it.
3. Remove the bulb by pulling it straight out.
4. To install, reverse the removal procedure. CHANGING A REVERSING LAMP
BULB - VEHICLES WITHOUT:
BLIND SPOT INFORMATION
SYSTEM
Stoplamp and rear lamp bulb.
A
Turn signal lamp bulb.
B
Reversing lamp bulb.
C
Stoplamp and rear lamp bulb.
D
1. Remove the rear lamp assembly. See Removing a Rear Lamp Assembly
(page
414).
2. Turn the bulb holder counterclockwise
and remove it.
3. Remove the bulb by pulling it straight out.
4. To install, reverse the removal procedure.
417
2022 Super Duty (TFE) Canada/United States of America, enUSA, Edition date: 202103, First-Printing MaintenanceE346947 E346947
Page 421 of 740

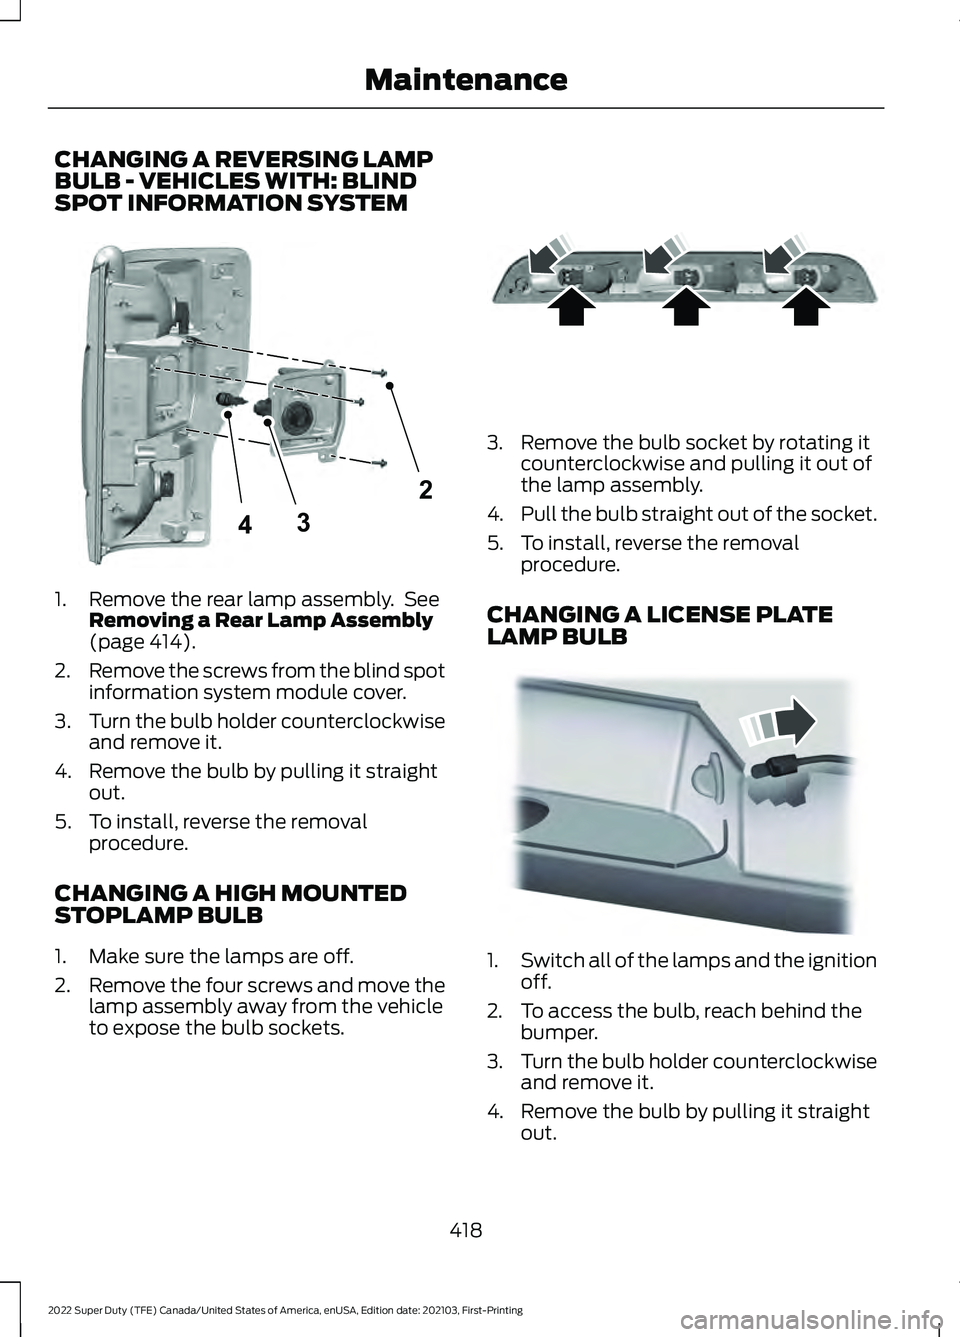
CHANGING A REVERSING LAMP
BULB - VEHICLES WITH: BLIND
SPOT INFORMATION SYSTEM
1. Remove the rear lamp assembly. See
Removing a Rear Lamp Assembly
(page 414).
2. Remove the screws from the blind spot
information system module cover.
3. Turn the bulb holder counterclockwise
and remove it.
4. Remove the bulb by pulling it straight out.
5. To install, reverse the removal procedure.
CHANGING A HIGH MOUNTED
STOPLAMP BULB
1. Make sure the lamps are off.
2. Remove the four screws and move the
lamp assembly away from the vehicle
to expose the bulb sockets. 3. Remove the bulb socket by rotating it
counterclockwise and pulling it out of
the lamp assembly.
4. Pull the bulb straight out of the socket.
5. To install, reverse the removal procedure.
CHANGING A LICENSE PLATE
LAMP BULB 1.
Switch all of the lamps and the ignition
off.
2. To access the bulb, reach behind the bumper.
3. Turn the bulb holder counterclockwise
and remove it.
4. Remove the bulb by pulling it straight out.
418
2022 Super Duty (TFE) Canada/United States of America, enUSA, Edition date: 202103, First-Printing Maintenance2
34E346930 E187290 E163830
Page 460 of 740

WARNING: To help prevent your
vehicle from moving when changing a
wheel, shift the transmission into park
(P), set the parking brake and use an
appropriate block or wheel chock to
secure the wheel diagonally opposite to
the wheel being changed. For example,
when changing the front left wheel,
place an appropriate block or wheel
chock on the right rear wheel. WARNING:
Always use the jack
provided as original equipment with your
vehicle. If using a jack other than the one
provided, make sure the jack capacity is
adequate for the vehicle weight,
including any vehicle cargo or
modifications. If you are unsure if the jack
capacity is adequate, contact the
authorized dealer. WARNING:
Failure to follow these
guidelines could result in an increased
risk of loss of vehicle control, injury or
death. WARNING:
Never place anything
between the vehicle jack and your
vehicle. WARNING:
Never place anything
between the vehicle jack and the ground. WARNING:
Park your vehicle so
that you do not obstruct the flow of
traffic or place yourself in any danger and
set up a warning triangle. WARNING:
The jack supplied with
this vehicle is only intended for changing
a flat tire in an emergency. Do not
attempt to do any other work on your
vehicle when it is supported by the jack,
as your vehicle could slip off the jack.
Failure to follow this instruction could
result in personal injury or death. WARNING:
Do not attempt to
change a tire on the side of the vehicle
close to moving traffic. Pull far enough
off the road to avoid the danger of being
hit when operating the jack or changing
the wheel. WARNING:
Only use the spare
wheel carrier to stow wheels provided
with your vehicle.
Note: Do not use impact tools or power
tools operating at over 200 RPM on the
spare wheel carrier winch, which may cause
it to malfunction and result in the wheel and
tire not being securely stowed.
Note: Passengers should not remain in the
vehicle when the vehicle is being jacked.
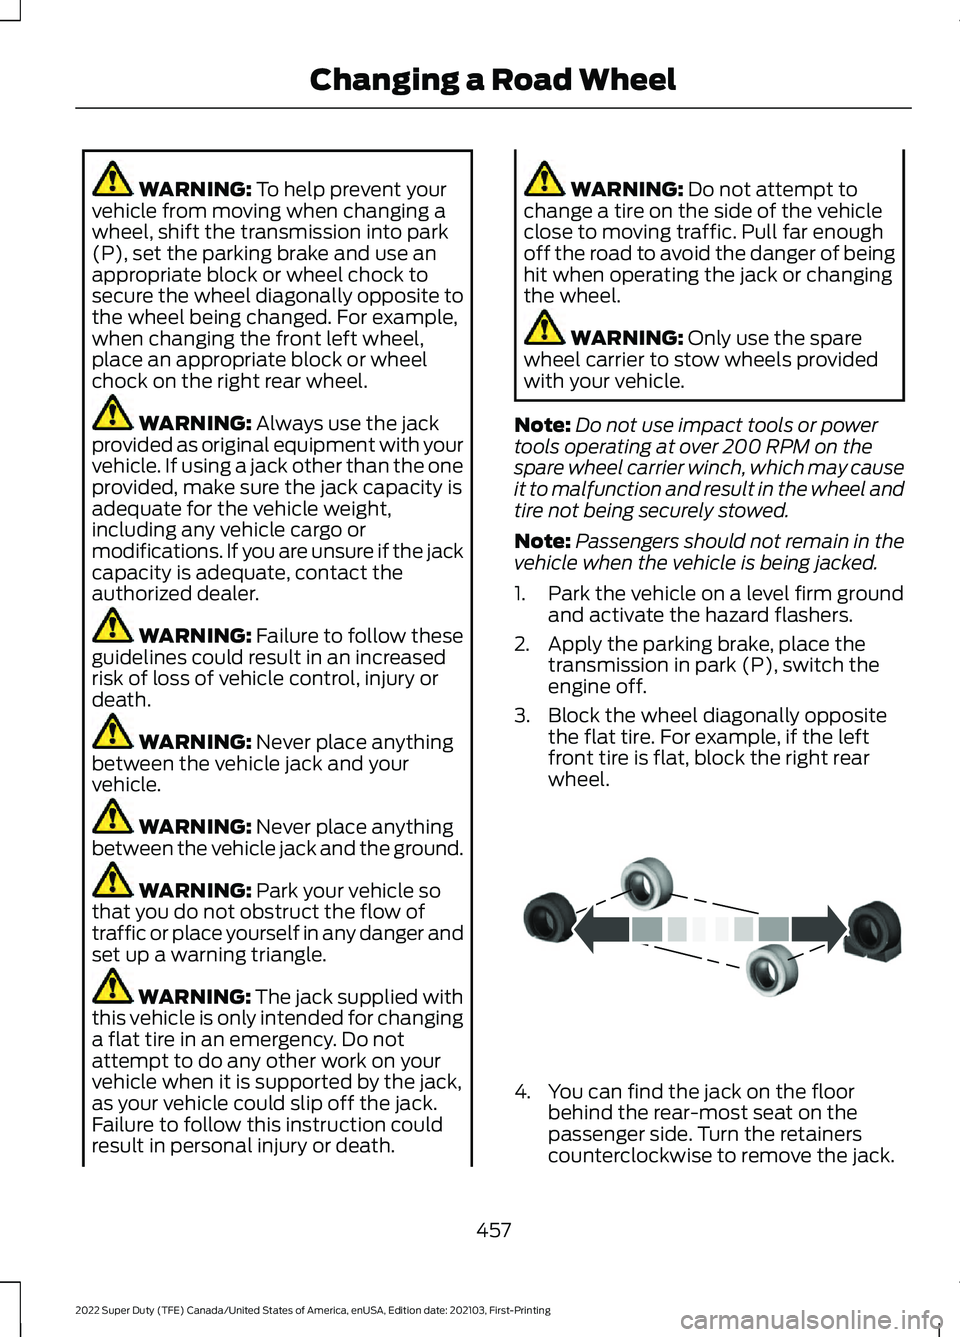
1. Park the vehicle on a level firm ground and activate the hazard flashers.
2. Apply the parking brake, place the transmission in park (P), switch the
engine off.
3. Block the wheel diagonally opposite the flat tire. For example, if the left
front tire is flat, block the right rear
wheel. 4. You can find the jack on the floor
behind the rear-most seat on the
passenger side. Turn the retainers
counterclockwise to remove the jack.
457
2022 Super Duty (TFE) Canada/United States of America, enUSA, Edition date: 202103, First-Printing Changing a Road WheelE175447