2022 FORD F-250 Engine
[x] Cancel search: EnginePage 58 of 740

SEATBELT REMINDER
INDICATORS
A warning lamp illuminates if the ignition
is on, a front seat is occupied and the
seatbelt has not been fastened.
The warning lamp illuminates
until you fasten your seatbelt.
SEATBELT REMINDER AUDIBLE
WARNINGS
A warning tone sounds if the warning lamp
illuminates and your vehicle exceeds a
relatively low speed.
The warning tone sounds for up to five
minutes or until you fasten your seatbelt.
SWITCHING THE SEATBELT
REMINDER ON AND OFF WARNING: While the system
allows you to deactivate it, this system
is designed to improve your chances of
being safely belted and surviving an
accident. We recommend you leave the
system activated for yourself and others
who may use the vehicle.
Note: The driver and front passenger
warnings switch off independently. When
you perform this procedure for one seating
position, do not buckle the other position as
this cancels the process.
Note: If you are using MyKey, you cannot
disable the seatbelt reminder. Also, if the
seatbelt reminder has been previously
disabled, it will be re-enabled during the use
of MyKey. See
MyKey ™ (page 77).
Read Steps 1 - 4 before proceeding with
the programming procedure. Make sure that:
•
The parking brake is set.
• The transmission is in park (P).
• The ignition is off.
• The driver and front passenger
seatbelts are unfastened.
1. Switch the ignition on. Do not start the
engine.
2. Wait about one minute until the seatbelt warning light switches off.
After Step 2, wait an additional five
seconds before proceeding with Step
3. Once you start Step 3, you must
complete the procedure within 30
seconds.
3. For the seating position you are switching off, buckle then unbuckle the
seatbelt three times at a moderate
speed, ending in the unbuckled state.
After Step 3, the seatbelt warning light
switches on.
4. When the seatbelt warning light is on, buckle then unbuckle the seatbelt.
After Step 4, the seatbelt warning light
flashes for confirmation.
This switches the feature off for that
seating position if it is currently on.
This switches the feature on for that
seating position if it is currently off.
CHECKING THE SEATBELTS
Check the seatbelts and child restraints
periodically to make sure they work
properly and are not damaged. Make sure
there are no nicks, tears or cuts. Replace if
necessary.
Check the following seatbelt assemblies
after a crash.
• Retractors.
• Buckles.
• Front seatbelt buckle assemblies.
55
2022 Super Duty (TFE) Canada/United States of America, enUSA, Edition date: 202103, First-Printing SeatbeltsE71880
Page 78 of 740
1. Place the first programmed remote in
the backup slot inside the center
console with your foot off the brake
pedal, press and release the push
button ignition switch.
2. Wait five seconds and then press and release the push button ignition switch
again.
3. Remove the remote control.
4. Within 10 seconds, place a second programmed remote control in the
backup slot. Press and release the
push button ignition switch.
5. Wait five seconds and then press and release the push button ignition switch
again. Keep the ignition on for at least
three seconds, but no more than 10
seconds.
6. Remove the remote control.
7. Place the unprogrammed remote control in the backup slot and press
and release the push button ignition
switch.
Programming is now complete. With your
foot on the brake pedal, press the push
button ignition switch to verify the remote
control functions operate and your vehicle
starts with the new remote control.
If programming was not successful, wait
10 seconds and repeat Steps 1 through 7.
If you are still unsuccessful, take your
vehicle to an authorized dealer.
PROGRAMMING THE REMOTE
CONTROL - VEHICLES WITH:
FLIP KEY
General Information
You can program your own remote control
to your vehicle. This procedure programs
both the engine immobilizer keycode and
the remote entry portion of the remote
control to your vehicle. Only use remote controls with an
integrated mechanical key.
You must have two previously
programmed coded remote controls and
the new un–programmed remote readily
accessible. Contact an authorized dealer
to have the spare remote control
programmed if the two previously
programmed coded remote controls are
not available.
Read and understand the entire procedure
before you begin.
Steps for Programming Your Spare
Remote Control
1.
Insert the first previously programmed
coded key into the ignition.
2. Switch the ignition from off to on. Keep
the ignition on for at least three
seconds, but no more than 10 seconds.
3. Switch the ignition off and remove the
first coded key from the ignition.
4. After three seconds but within 10 seconds of switching the ignition off,
insert the second previously coded key
into the ignition.
5. Switch the ignition from off to on. Keep
the ignition on for at least three
seconds, but no more than 10 seconds.
6. Switch the ignition off and remove the
second previously programmed coded
key from the ignition.
7. After three seconds but within 10 seconds of switching the ignition off
and removing the previously
programmed coded key, insert the new
un–programmed key into the ignition.
8. Switch the ignition from off to on. Keep
the ignition on for at least six seconds
until you hear the door locks cycle.
9. Remove the newly programmed coded
key from the ignition.
75
2022 Super Duty (TFE) Canada/United States of America, enUSA, Edition date: 202103, First-Printing Keys and Remote Controls
Page 79 of 740
The key starts the engine if programming
is successful. You can operate the keyless
remote entry system with the new remote
control with integrated key.
If programming was not successful, wait
20 seconds and repeat Steps 1 through 8.
If you are still unsuccessful, take your
vehicle to an authorized dealer.
Note:
You can program a maximum of six
coded remote controls to your vehicle.
KEYS AND REMOTE CONTROLS – TROUBLESHOOTING
KEYS AND REMOTE CONTROLS – INFORMATION MESSAGES Action
Message
Replace remote control battery.
Key Battery Low Replace
Soon
76
2022 Super Duty (TFE) Canada/United States of America, enUSA, Edition date: 202103, First-Printing Keys and Remote Controls
Page 85 of 740
MYKEY – FREQUENTLY ASKED
QUESTIONS
What is an admin key?
An admin key is a key that you have
not created as a MyKey. See Creating
a MyKey (page 78).
Why am I not able to create a MyKey? You have not placed the admin key in
the backup position. See
Creating a
MyKey (page 78). The key used to
switch the ignition on is not an admin
key. The key used to switch the ignition
on is the only admin key. There has to
be at least one admin key. You did not
switch the ignition off after creating
the last MyKey.
Why am I not able to program a MyKey? The admin key is not inside your
vehicle. The key used to switch the
ignition on is not an admin key. You
have not created any MyKeys. See
Creating a MyKey
(page 78).
Why am I not able to clear the MyKeys? The admin key is not inside your
vehicle. The key used to switch the
ignition on is not an admin key. You
have not created any MyKeys. See
Creating a MyKey
(page 78).
Why is the MyKey distance not
accumulating? The key used to start the engine is an
admin key. An admin key and a MyKey
are inside your vehicle. You have not
created any MyKeys. See
Creating a
MyKey (page 78). You have cleared
the MyKeys. See Clearing All
MyKeys (page 79). Why am I not able to start the engine
with a MyKey?
An admin key and a MyKey are inside
your vehicle. The system recognizes
only the admin key when both are
present.
MYKEY – FREQUENTLY ASKED
QUESTIONS - VEHICLES WITH:
FLIP KEY
What is an admin key? An admin key is a key that you have
not created as a MyKey. See Creating
a MyKey
(page 79).
Why am I not able to create a MyKey? The key used to switch the ignition on
is not an admin key. The key used to
switch the ignition on is the only admin
key. There has to be at least one admin
key.
Why am I not able to program a MyKey? The key used to switch the ignition on
is not an admin key. You have not
created any MyKeys. See
Creating a
MyKey (page 79).
Why am I not able to clear the MyKeys? The key used to switch the ignition on
is not an admin key. You have not
created any MyKeys. See
Creating a
MyKey (page 79).
Why is the MyKey distance not
accumulating? The key used to start the engine is an
admin key. You have not created any
MyKeys. See
Creating a MyKey
(page 79). You have cleared the
MyKeys. See Clearing All MyKeys
(page 79).
82
2022 Super Duty (TFE) Canada/United States of America, enUSA, Edition date: 202103, First-Printing MyKey
™
Page 132 of 740
ADJUSTING THE EXTERIOR
MIRRORS
WARNING: Do not adjust the
mirrors when your vehicle is moving. This
could result in the loss of control of your
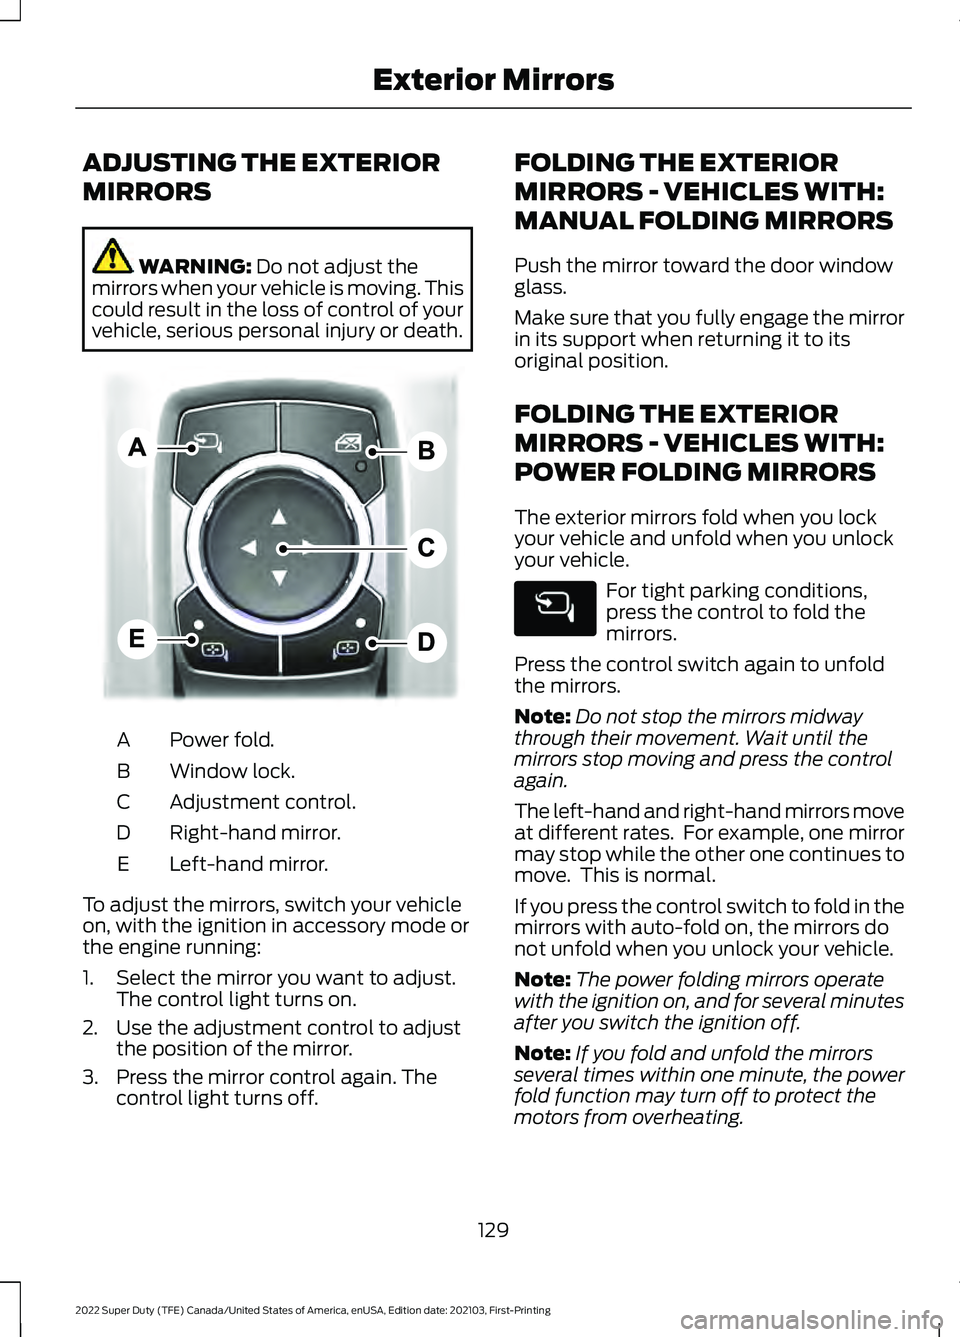
vehicle, serious personal injury or death. Power fold.
A
Window lock.
B
Adjustment control.
C
Right-hand mirror.
D
Left-hand mirror.
E
To adjust the mirrors, switch your vehicle
on, with the ignition in accessory mode or
the engine running:
1. Select the mirror you want to adjust. The control light turns on.
2. Use the adjustment control to adjust the position of the mirror.
3. Press the mirror control again. The control light turns off. FOLDING THE EXTERIOR
MIRRORS - VEHICLES WITH:
MANUAL FOLDING MIRRORS
Push the mirror toward the door window
glass.
Make sure that you fully engage the mirror
in its support when returning it to its
original position.
FOLDING THE EXTERIOR
MIRRORS - VEHICLES WITH:
POWER FOLDING MIRRORS
The exterior mirrors fold when you lock
your vehicle and unfold when you unlock
your vehicle.
For tight parking conditions,
press the control to fold the
mirrors.
Press the control switch again to unfold
the mirrors.
Note: Do not stop the mirrors midway
through their movement. Wait until the
mirrors stop moving and press the control
again.
The left-hand and right-hand mirrors move
at different rates. For example, one mirror
may stop while the other one continues to
move. This is normal.
If you press the control switch to fold in the
mirrors with auto-fold on, the mirrors do
not unfold when you unlock your vehicle.
Note: The power folding mirrors operate
with the ignition on, and for several minutes
after you switch the ignition off.
Note: If you fold and unfold the mirrors
several times within one minute, the power
fold function may turn off to protect the
motors from overheating.
129
2022 Super Duty (TFE) Canada/United States of America, enUSA, Edition date: 202103, First-Printing Exterior MirrorsE311081
Page 133 of 740
Switching Auto-fold On and Off
1. Press Settings on the touchscreen.
2. Press
Vehicle Settings.
3. Press
Mirrors.
4. Switch
Autofold on or off.
Loose Mirror
If you manually fold your power-folding
mirrors, they may not work properly even
after you re-position them. You need to
reset them if:
• The mirrors vibrate when you drive.
• The mirrors feel loose.
• The mirrors do not stay in the folded or
unfolded position.
• One of the mirrors is not in its normal
driving position.
To reset the mirrors, perform the following
steps:
1. By hand, fold or retract both mirrors.
2. Using the power folding/power telescoping mirror control switch,
operate the mirrors until you hear an
audible click.
3. Operate the power folding or power telescoping mirrors an additional 3 to
4 times to synchronize the mirrors.
EXTENDING THE EXTERIOR
MIRRORS
This optional feature lets you extend the
mirror about 3 in (75 mm). It is useful when
towing a trailer. You can manually pull out
or push in the mirrors to various positions.
Power Telescoping Mirrors
(If
Equipped)
This feature lets you position both mirrors
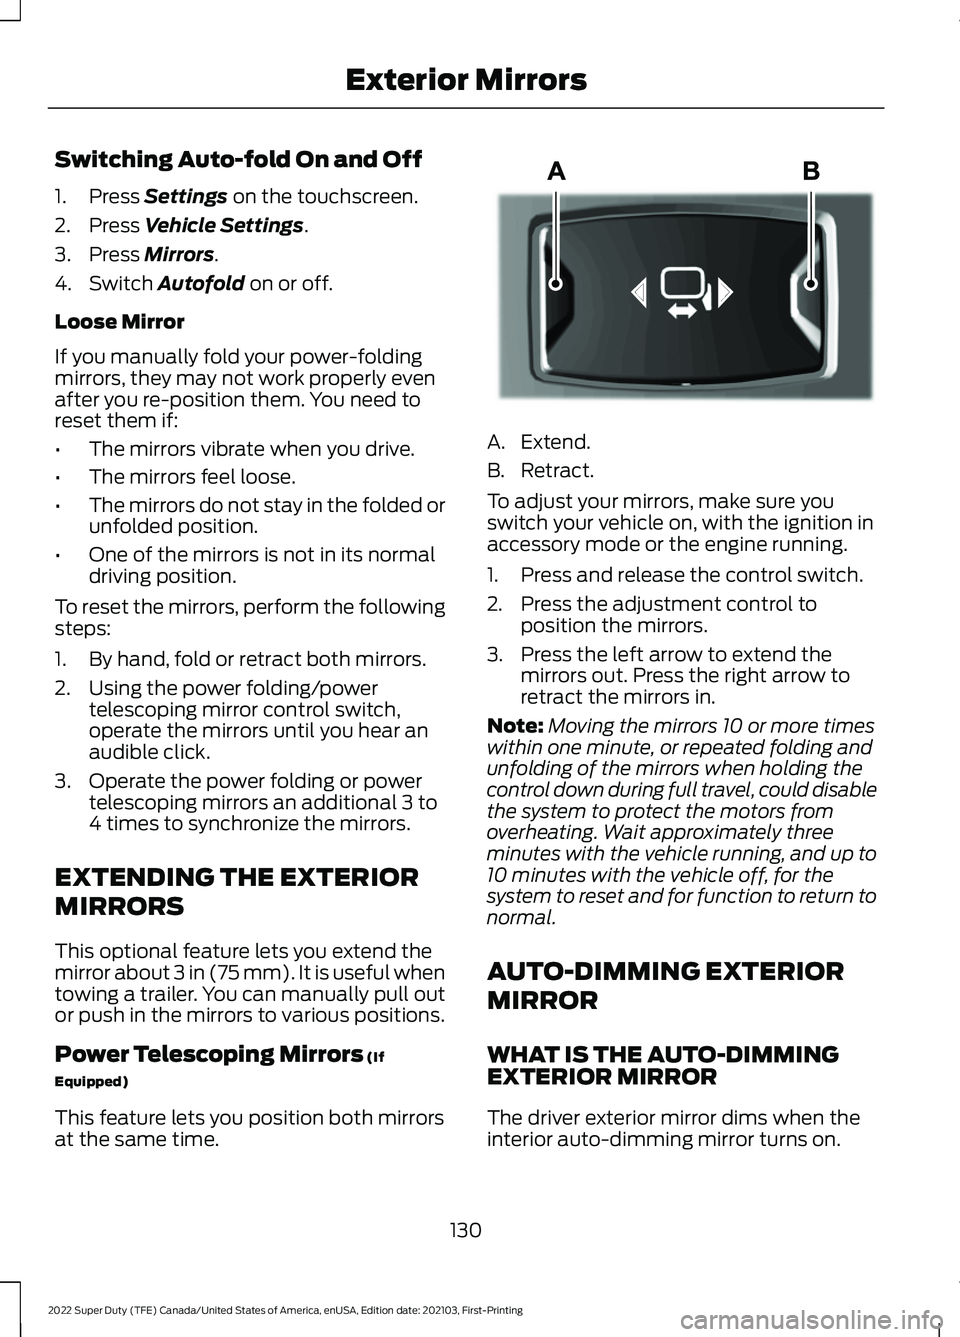
at the same time. A. Extend.
B. Retract.
To adjust your mirrors, make sure you
switch your vehicle on, with the ignition in
accessory mode or the engine running.
1. Press and release the control switch.
2. Press the adjustment control to
position the mirrors.
3. Press the left arrow to extend the mirrors out. Press the right arrow to
retract the mirrors in.
Note: Moving the mirrors 10 or more times
within one minute, or repeated folding and
unfolding of the mirrors when holding the
control down during full travel, could disable
the system to protect the motors from
overheating. Wait approximately three
minutes with the vehicle running, and up to
10 minutes with the vehicle off, for the
system to reset and for function to return to
normal.
AUTO-DIMMING EXTERIOR
MIRROR
WHAT IS THE AUTO-DIMMING
EXTERIOR MIRROR
The driver exterior mirror dims when the
interior auto-dimming mirror turns on.
130
2022 Super Duty (TFE) Canada/United States of America, enUSA, Edition date: 202103, First-Printing Exterior MirrorsE218902
Page 136 of 740
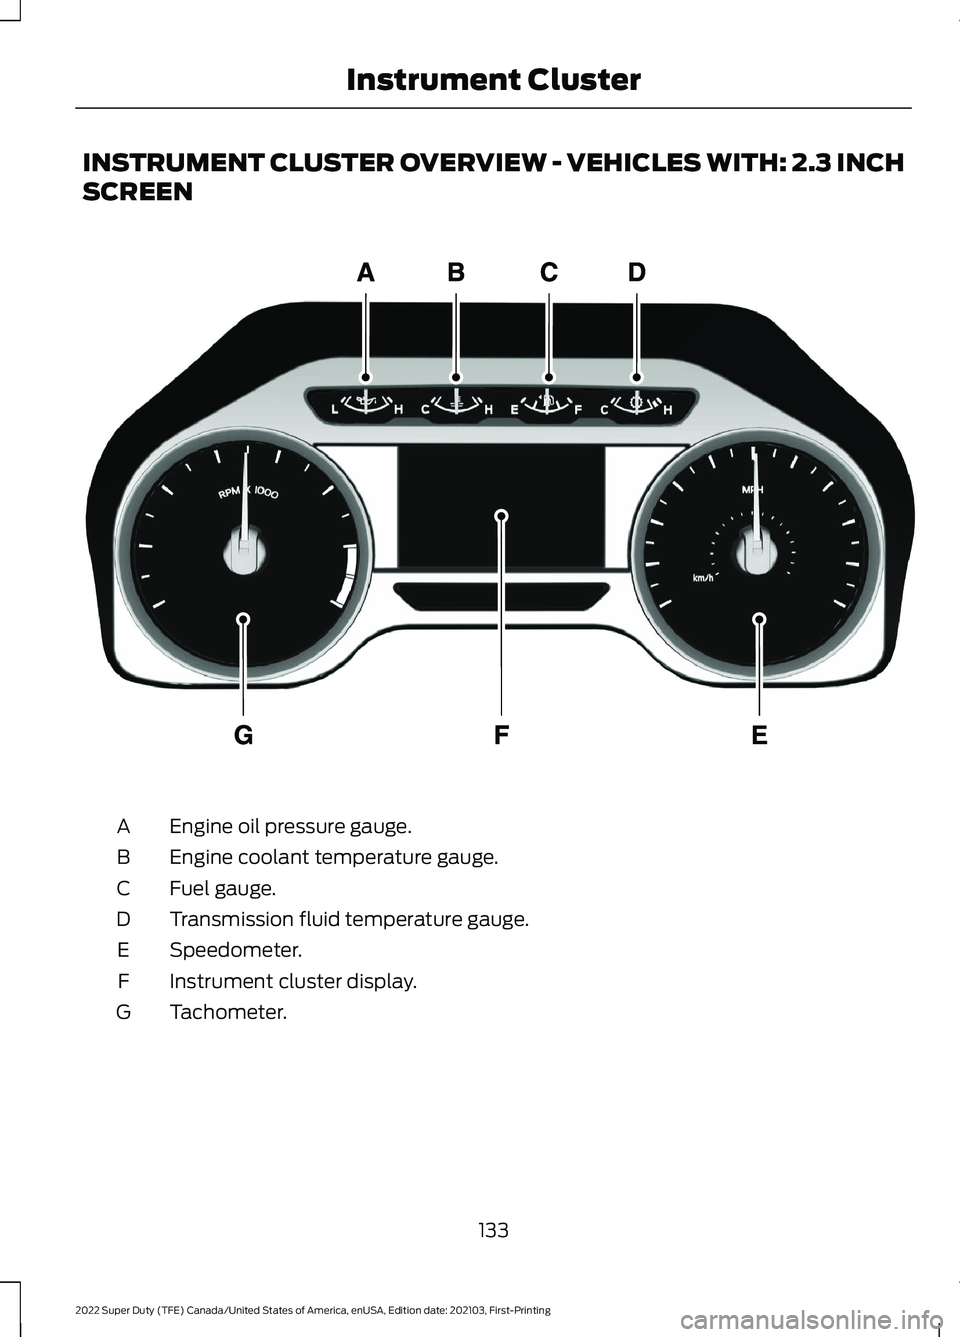
INSTRUMENT CLUSTER OVERVIEW - VEHICLES WITH: 2.3 INCH
SCREEN
Engine oil pressure gauge.
A
Engine coolant temperature gauge.
B
Fuel gauge.
C
Transmission fluid temperature gauge.
D
Speedometer.
E
Instrument cluster display.
F
Tachometer.
G
133
2022 Super Duty (TFE) Canada/United States of America, enUSA, Edition date: 202103, First-Printing Instrument ClusterE219638
Page 137 of 740
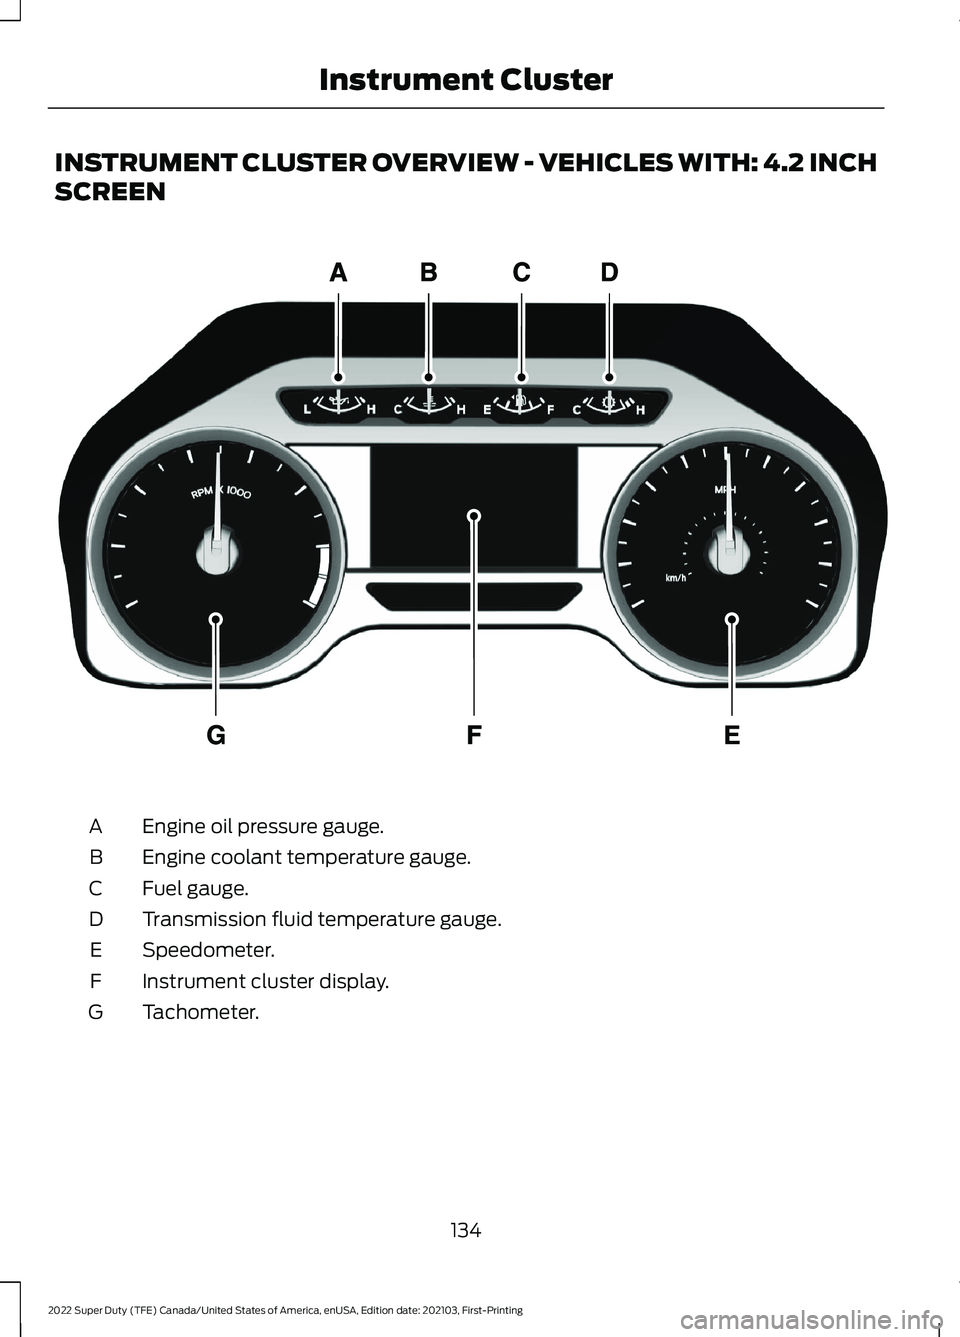
INSTRUMENT CLUSTER OVERVIEW - VEHICLES WITH: 4.2 INCH
SCREEN
Engine oil pressure gauge.
A
Engine coolant temperature gauge.
B
Fuel gauge.
C
Transmission fluid temperature gauge.
D
Speedometer.
E
Instrument cluster display.
F
Tachometer.
G
134
2022 Super Duty (TFE) Canada/United States of America, enUSA, Edition date: 202103, First-Printing Instrument ClusterE219638