2022 FORD F-250 Engine
[x] Cancel search: EnginePage 411 of 740

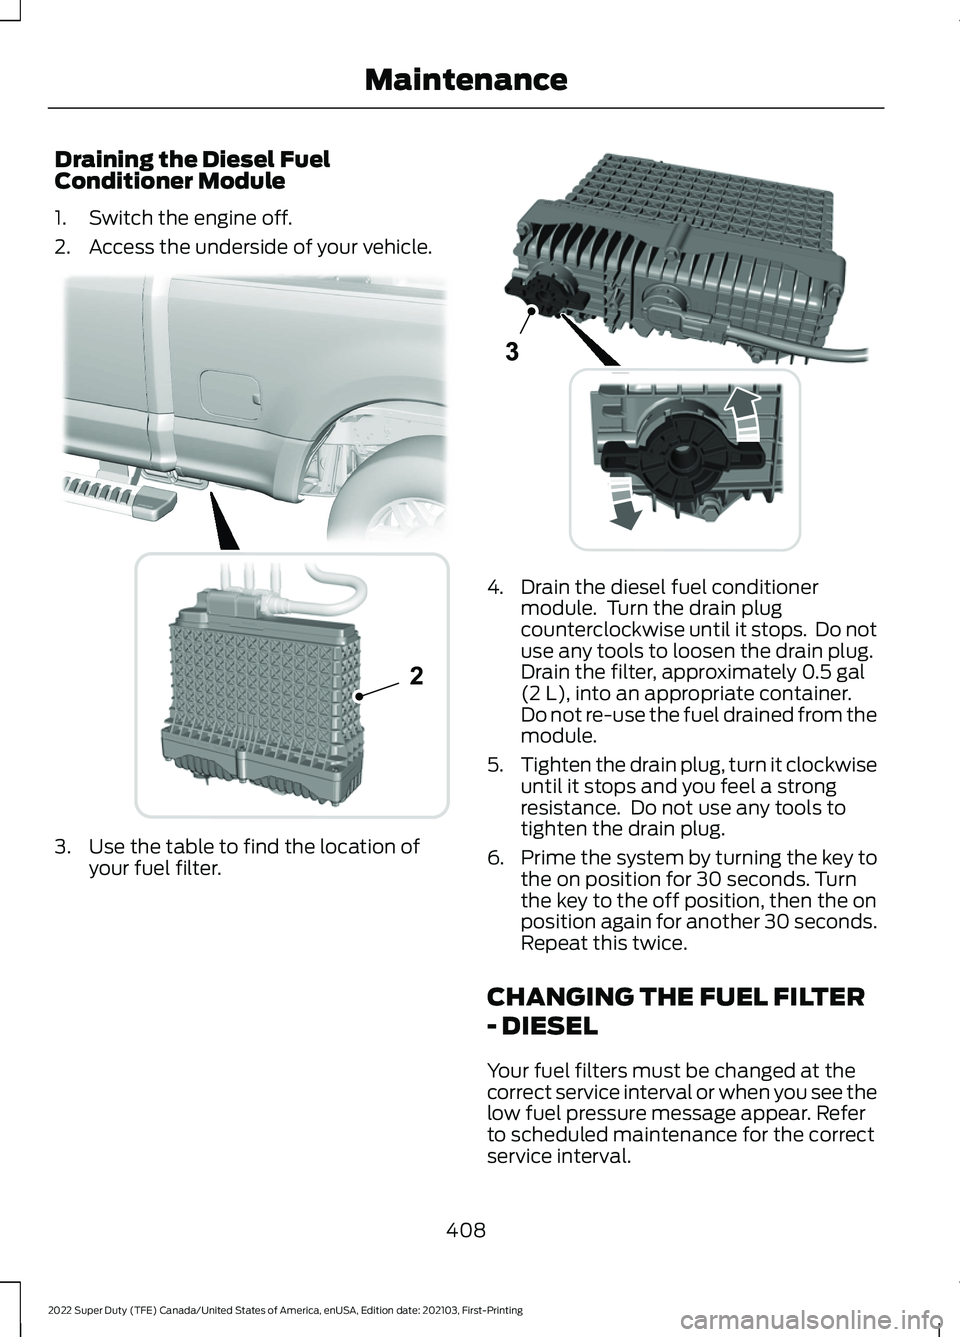
Draining the Diesel Fuel
Conditioner Module
1. Switch the engine off.
2. Access the underside of your vehicle.
3. Use the table to find the location of
your fuel filter. 4. Drain the diesel fuel conditioner
module. Turn the drain plug
counterclockwise until it stops. Do not
use any tools to loosen the drain plug.
Drain the filter, approximately 0.5 gal
(2 L), into an appropriate container.
Do not re-use the fuel drained from the
module.
5. Tighten the drain plug, turn it clockwise
until it stops and you feel a strong
resistance. Do not use any tools to
tighten the drain plug.
6. Prime the system by turning the key to
the on position for 30 seconds. Turn
the key to the off position, then the on
position again for another 30 seconds.
Repeat this twice.
CHANGING THE FUEL FILTER
- DIESEL
Your fuel filters must be changed at the
correct service interval or when you see the
low fuel pressure message appear. Refer
to scheduled maintenance for the correct
service interval.
408
2022 Super Duty (TFE) Canada/United States of America, enUSA, Edition date: 202103, First-Printing Maintenance2 E226475 E269861
Page 412 of 740

CHANGING THE FUEL FILTER
- GASOLINE
Your vehicle has a lifetime fuel filter that
integrates with the fuel tank. It does not
need regular maintenance or replacement.
CHANGING THE 12V BATTERY
WARNING: Batteries normally
produce explosive gases which can
cause personal injury. Therefore, do not
allow flames, sparks or lighted
substances to come near the battery.
When working near the battery, always
shield your face and protect your eyes.
Always provide correct ventilation. WARNING:
When lifting a
plastic-cased battery, excessive pressure
on the end walls could cause acid to flow
through the vent caps, resulting in
personal injury and damage to the
vehicle or battery. Lift the battery with a
battery carrier or with your hands on
opposite corners. WARNING:
Keep batteries out of
reach of children. Batteries contain
sulfuric acid. Avoid contact with skin,
eyes or clothing. Shield your eyes when
working near the battery to protect
against possible splashing of acid
solution. In case of acid contact with skin
or eyes, flush immediately with water for
a minimum of 15 minutes and get prompt
medical attention. If acid is swallowed,
call a physician immediately. WARNING:
Battery posts,
terminals and related accessories
contain lead and lead compounds,
chemicals known to the State of
California to cause cancer and
reproductive harm. Wash your hands
after handling
. WARNING:
This vehicle may have
more than one battery. Removing the
battery cables from only one battery
does not disconnect your vehicle
electrical system. Make sure you
disconnect the battery cables from all
batteries when disconnecting power.
Failure to do so may cause serious
personal injury or property damage.
The battery is in the engine compartment.
See
Under Hood Overview (page 397).
Your vehicle has a maintenance-free
battery. It does not require additional
water during service.
For longer, trouble-free operation, keep the
top of the battery clean and dry and the
battery cables tightly fastened to the
battery terminals. If any corrosion is
present on the battery or terminals, remove
the cables from the terminals and clean
with a wire brush. You can neutralize the
acid with a solution of baking soda and
water.
We recommend that you disconnect the
negative battery cable terminal from the
battery if you plan to store your vehicle for
an extended period.
Note: If you only disconnect the negative
battery cable terminal, make sure it is
isolated or placed away from the battery
terminal to avoid unintended connection or
arcing.
409
2022 Super Duty (TFE) Canada/United States of America, enUSA, Edition date: 202103, First-Printing Maintenance
Page 413 of 740

To maintain correct operation of the
battery management system, if you add
any electrical devices to your vehicle, do
not connect the ground connection directly
to the negative battery terminal. A
connection at the negative battery terminal
can cause inaccurate measurements of
the battery condition and potential
incorrect system operation.
Note:
If you add electrical accessories or
components to your vehicle this may
adversely affect battery performance,
durability and the performance of other
electrical systems on your vehicle.
If you replace the battery make sure it
matches the electrical requirements of
your vehicle.
If you disconnect or replace the battery
and your vehicle has an automatic
transmission, it must relearn its adaptive
strategy. Because of this, the transmission
may shift firmly when first driven. This is
normal operation while the transmission
fully updates its operation to optimum
shift feel.
Remove and Reinstall the Battery
To disconnect or remove the battery, do
the following:
1. Apply the parking brake and switch the
ignition off.
2. Switch all electrical equipment off, for
example lights and radio.
3. Wait a minimum of two minutes before
disconnecting the battery.
Note: The engine management system has
a power hold function and remains powered
for a period of time after you switch the
ignition off. This is to allow diagnostic and
adaptive tables to be stored. Disconnecting
the battery without waiting can cause
damage not covered by the vehicle
Warranty. 4. Disconnect the negative battery cable
terminal.
5. Disconnect the positive battery cable terminal.
6. Remove the battery securing clamp.
7. Remove the battery.
8. To install, reverse the removal procedure.
Note: Before reconnecting the battery,
make sure the ignition remains switched off.
Note: Make sure the battery cable terminals
are fully tightened.
Note: After cleaning or replacing the
battery, make sure you reinstall the battery
cover or shield.
If you disconnect or replace the vehicle
battery, you must reset the following
features:
• Window bounce-back. See Window
Bounce-Back (page 126).
• Clock Settings.
• Pre-set radio stations.
• Steering Angle Sensor.
Note: To calibrate the steering angle
sensor, drive the vehicle above
30 mph
(50 km/h) for a minimum of 1.2 mi (2 km).
Make sure to drive straight ahead for a
minimum of 30 seconds. Several vehicle
functions are disabled and a warning light
could appear until the sensor is calibrated.
Battery Management System
The battery management system monitors
battery conditions and takes actions to
extend battery life. If excessive battery
drain is detected, the system temporarily
disables some of the following features:
• Heated rear window.
• Heated seats.
• Climate control.
• Heated steering wheel.
410
2022 Super Duty (TFE) Canada/United States of America, enUSA, Edition date: 202103, First-Printing Maintenance
Page 417 of 740

REMOVING A REAR LAMP
ASSEMBLY - VEHICLES WITHOUT:
PICKUP BED
1.
Switch all of the lamps and the ignition
off.
2. Remove the screws and the lamp lens from lamp assembly.
3. To install, reverse the removal procedure.
REMOVING A REAR LAMP
ASSEMBLY - VEHICLES WITH:
PICKUP BED
1. Make sure the headlamps are off.
2. Open the tailgate to access the rear lamp assemblies. 3. Remove the bolts from the tail lamp
assembly. 4.
Carefully pull the lamp assembly from
the tailgate pillar by releasing the two
retaining tabs.
5. To install, reverse the removal procedure.
CHANGING A HEADLAMP BULB WARNING: Make sure the bulbs
have cooled down before removing
them. Failure to follow this warning could
result in serious personal injury.
Note: To access the right-hand side bulbs,
remove the air intake pipe. See
Changing
the Engine Air Filter (page 405).
For vehicles with diesel engines, to access
the left-hand side bulbs, remove the washer
reservoir filler tube. 1.
Switch all of the lamps and the ignition
off.
2. Disconnect the electrical connector.
3. Turn the bulb holder counterclockwise
and remove it.
Note: You cannot separate the bulb from
the bulb holder.
414
2022 Super Duty (TFE) Canada/United States of America, enUSA, Edition date: 202103, First-Printing MaintenanceE163828 E187288 E224991
Page 418 of 740

4. To install, reverse the removal
procedure.
Note: Handle a halogen headlamp bulb
carefully and keep out of children ’s reach.
Grasp the bulb only by its plastic base and
do not touch the glass. The oil from your
hand could cause the bulb to break the next
time you operate the headlamps.
CHANGING A FRONT TURN
SIGNAL LAMP BULB WARNING: Make sure the bulbs
have cooled down before removing
them. Failure to follow this warning could
result in serious personal injury.
Note: To access the right-hand side bulbs,
remove the air intake pipe. See
Changing
the Engine Air Filter (page 405).
To access the left-hand side bulbs, remove
the washer reservoir filler tube. Vehicles with
diesel engine only. 1.
Switch all of the lamps and the ignition
off.
2. Disconnect the electrical connector.
3. Turn the bulb holder counterclockwise
and remove it. Note:
You cannot separate the bulb from
the bulb holder.
4. To install, reverse the removal procedure.
CHANGING A FRONT FOG LAMP
BULB 1. Make sure the fog lamps are off.
2. Disconnect the electrical connector
from the fog lamp bulb.
3. Turn the bulb counterclockwise and remove it from the fog lamp.
4. To install, reverse the removal procedure.
415
2022 Super Duty (TFE) Canada/United States of America, enUSA, Edition date: 202103, First-Printing MaintenanceE224990 E163826
Page 423 of 740

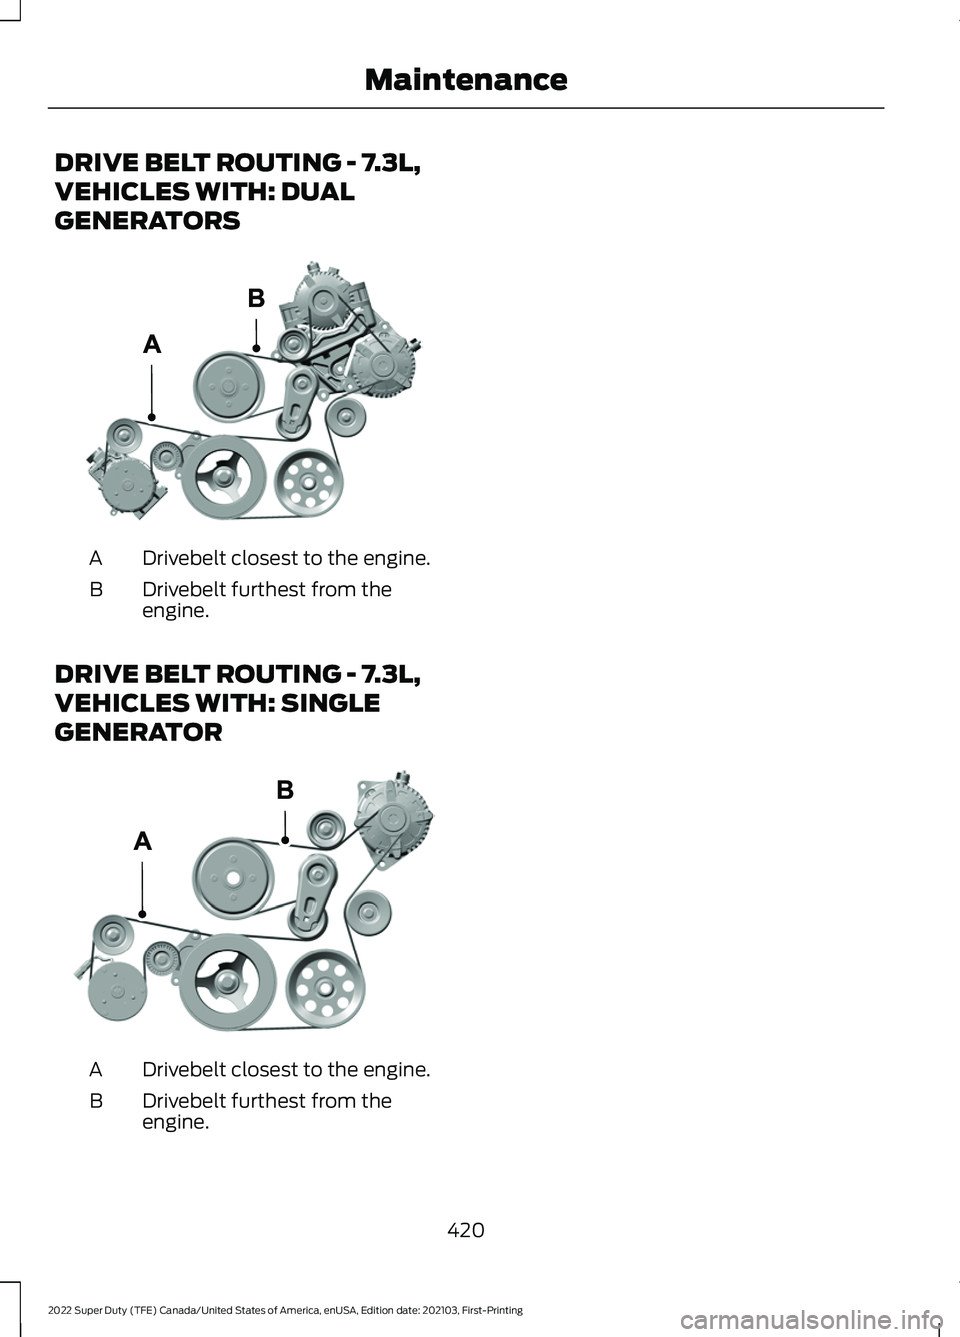
DRIVE BELT ROUTING - 7.3L,
VEHICLES WITH: DUAL
GENERATORS
Drivebelt closest to the engine.
A
Drivebelt furthest from the
engine.
B
DRIVE BELT ROUTING - 7.3L,
VEHICLES WITH: SINGLE
GENERATOR Drivebelt closest to the engine.
A
Drivebelt furthest from the
engine.
B
420
2022 Super Duty (TFE) Canada/United States of America, enUSA, Edition date: 202103, First-Printing MaintenanceE298579 E305075
Page 424 of 740

CLEANING PRODUCTS
Materials
For best results, use the following products
or products of equivalent quality:
For additional information and assistance,
we recommend that you contact an
authorized dealer. Specification
Name
Motorcraft® Bug and Tar Remover, ZC-42 (U.S. & Canada) ESR-M5B194-B
Motorcraft® Custom Bright Metal Cleaner, ZC-15 (U.S. & Canada)
ESR-M14P4-A
Motorcraft® Detail Wash, ZC-3-A (U.S. & Canada)
ESR-M14P3-A
Motorcraft® Engine Shampoo and Degreaser, ZC-20 (U.S.)
Motorcraft® Engine Shampoo, CXC-66-A (Canada)
Motorcraft® Premium Leather and Vinyl Cleaner, ZC-56 (U.S. &
Canada)
Motorcraft® Multi-Purpose Cleaner, CXC-101 (Canada)
WSS-M14P19-A
Motorcraft® Premium Windshield Wash Concentrate with
Bitterant, ZC-32-B2 (U.S.)
WSS-M14P19-A
Motorcraft® Premium Quality Windshield Washer Fluid, CXC-37-
F/M (Canada)
Motorcraft® Professional Strength Carpet & Upholstery Cleaner,
ZC-54 (U.S. & Canada)
ESR-M14P5-A
Motorcraft® Premium Glass Cleaner, CXC-100 (Canada)
Motorcraft® Spot and Stain Remover, ZC-14 (U.S.)
ESR-M14P5-A
Motorcraft® Ultra-Clear Spray Glass Cleaner, ZC-23 (U.S.)
Motorcraft® Wheel and Tire Cleaner, ZC-37-A (U.S. & Canada)
CLEANING THE EXTERIOR
CLEANING THE EXTERIOR
PRECAUTIONS
Immediately remove fuel spillages, AdBlue
residuals, bird droppings, insect deposits
and road tar. These may cause damage to
your vehicle ’s paintwork or trim over time. Remove any exterior accessories, for
example antennas, before entering a car
wash.
CLEANING HEADLAMPS AND
REAR LAMPS
We recommend that you only use cold or
lukewarm water containing car shampoo
to clean the headlamps and the rear
lamps.
421
2022 Super Duty (TFE) Canada/United States of America, enUSA, Edition date: 202103, First-Printing Vehicle Care
Page 425 of 740

Do not scrape the lamps.
Do not wipe lamps when they are dry.
CLEANING WINDOWS AND WIPER
BLADES
To clean the windshield and wiper blades:
•
Clean the windshield with a
non-abrasive glass cleaner.
Note: When cleaning the interior of the
windshield, avoid getting any glass cleaner
on the instrument panel or door panels.
Wipe any glass cleaner off these surfaces
immediately.
• Clean the wiper blades with washer
fluid or water applied with a soft
sponge or cloth.
Note: Do not use razor blades or other
sharp objects to clean or remove decals
from the inside of the heated rear window.
This can cause damage not covered by the
vehicle Warranty.
CLEANING CHROME, ALUMINIUM
OR STAINLESS STEEL
We recommend that you only use a car
shampoo, a soft cloth and water on
bumpers and other chrome, aluminium or
stainless steel parts.
Note: For additional information and
assistance, we recommend that you contact
an authorized dealer.
Note: Rinse the area well after cleaning.
Note: Do not use abrasive materials, for
example steel wool or plastic pads, as they
can scratch these surfaces.
Note: Do not use chrome cleaner, metal
cleaner or polish on wheels or wheel covers. CLEANING WHEELS
Only use a recommended wheel and tire
cleaner to clean the wheels weekly. For
additional information and assistance, we
recommend that you contact an
authorized dealer.
1. Use a sponge to remove heavy
deposits of dirt and brake dust.
2. Rinse well after cleaning.
Note: Do not apply a cleaning chemical to
warm or hot wheel rims and covers.
If you intend on parking your vehicle for an
extended period after cleaning the wheels
with a wheel cleaner, drive your vehicle for
a few minutes before parking your vehicle.
This reduces the risk of corrosion of the
brake discs, brake pads and linings.
Do not clean the wheels when they are hot.
Note: Some car washes could damage
wheel rims and covers.
Note: Using non-recommended cleaners,
harsh cleaning products, chrome wheel
cleaners or abrasive materials could
damage wheel rims and covers.
CLEANING THE ENGINE
COMPARTMENT
Use a vacuum cleaner to remove debris
from the screen area below windshield.
Note: If you are not familiar with the parts
around the engine do not wash the engine
compartment. Avoid frequent engine
washes.
When washing the engine compartment:
• Never wash or rinse the engine while it
is hot or running.
• Never wash or rinse any ignition coil,
spark plug wire or spark plug well.
• Cover the battery, power distribution
box, and air filter assembly to prevent
water damage.
422
2022 Super Duty (TFE) Canada/United States of America, enUSA, Edition date: 202103, First-Printing Vehicle Care