2022 FORD F-250 steering wheel
[x] Cancel search: steering wheelPage 392 of 740

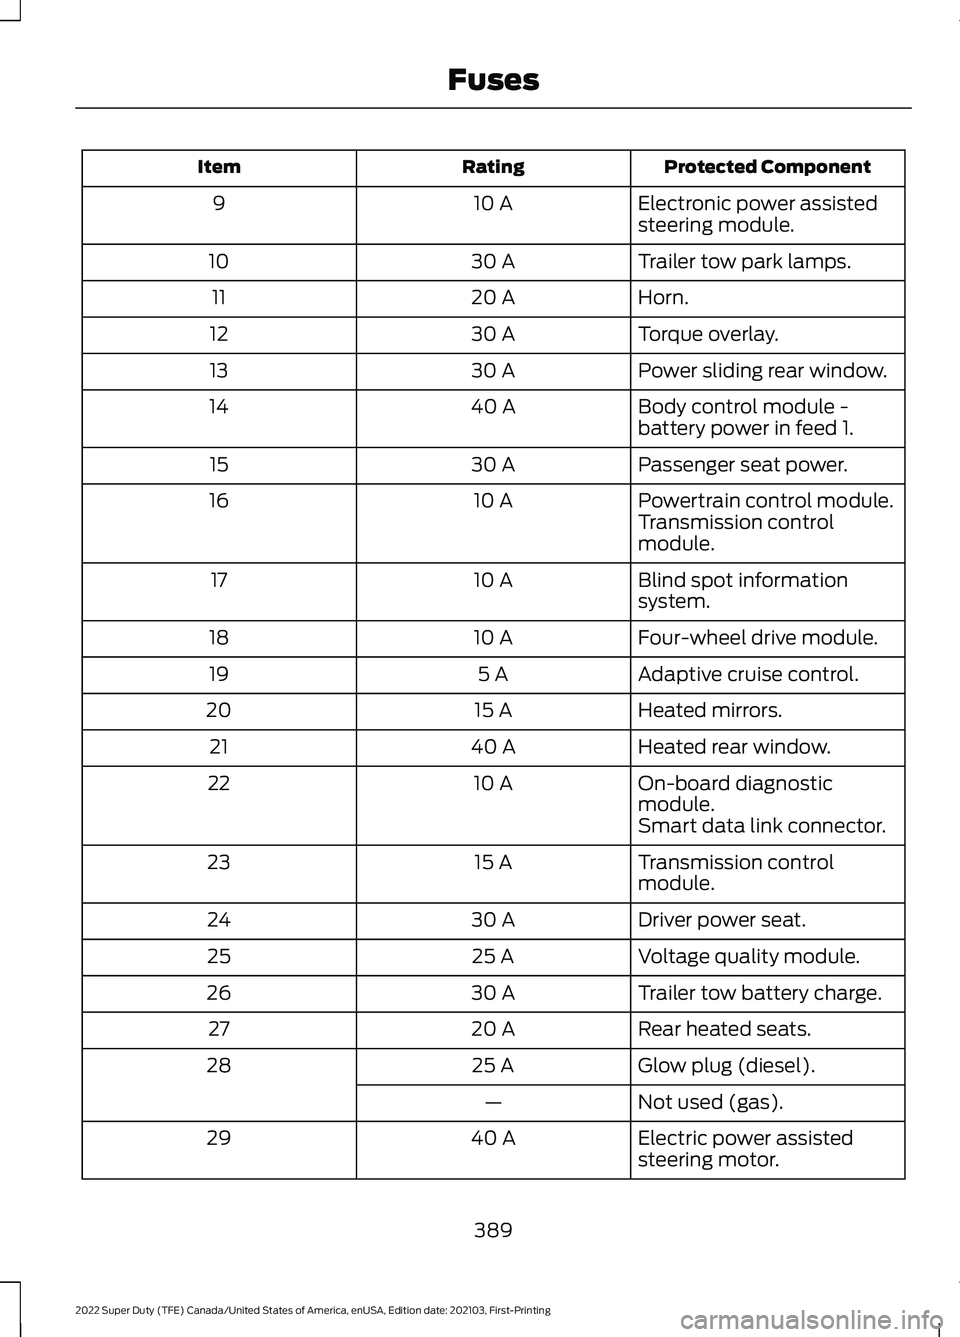
Protected Component
Rating
Item
Electronic power assisted
steering module.
10 A
9
Trailer tow park lamps.
30 A
10
Horn.
20 A
11
Torque overlay.
30 A
12
Power sliding rear window.
30 A
13
Body control module -
battery power in feed 1.
40 A
14
Passenger seat power.
30 A
15
Powertrain control module.
10 A
16
Transmission control
module.
Blind spot information
system.
10 A
17
Four-wheel drive module.
10 A
18
Adaptive cruise control.
5 A
19
Heated mirrors.
15 A
20
Heated rear window.
40 A
21
On-board diagnostic
module.
10 A
22
Smart data link connector.
Transmission control
module.
15 A
23
Driver power seat.
30 A
24
Voltage quality module.
25 A
25
Trailer tow battery charge.
30 A
26
Rear heated seats.
20 A
27
Glow plug (diesel).
25 A
28
Not used (gas).
—
Electric power assisted
steering motor.
40 A
29
389
2022 Super Duty (TFE) Canada/United States of America, enUSA, Edition date: 202103, First-Printing Fuses
Page 398 of 740

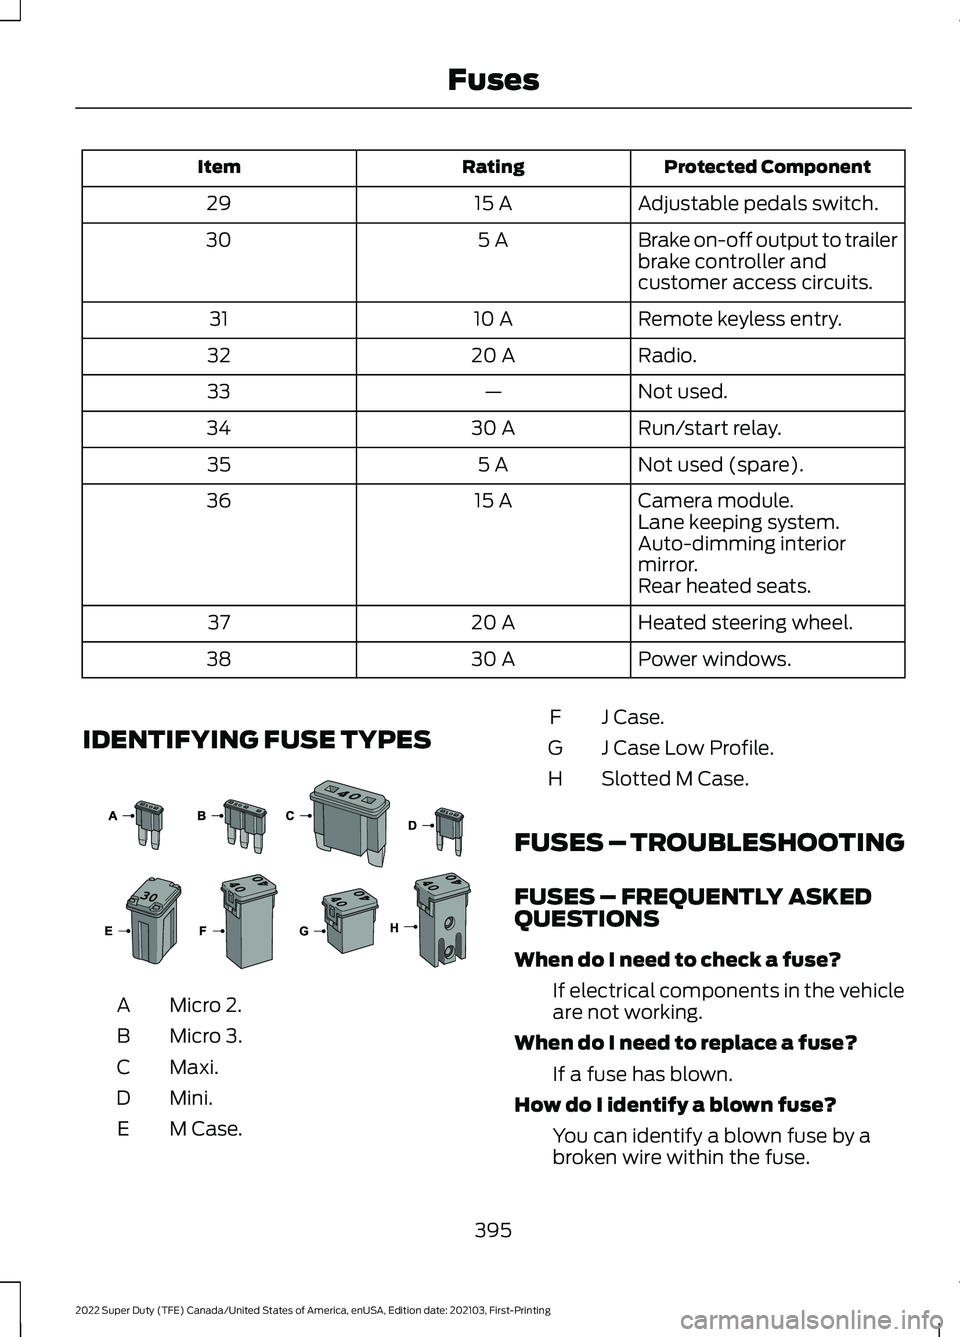
Protected Component
Rating
Item
Adjustable pedals switch.
15 A
29
Brake on-off output to trailer
brake controller and
customer access circuits.
5 A
30
Remote keyless entry.
10 A
31
Radio.
20 A
32
Not used.
—
33
Run/start relay.
30 A
34
Not used (spare).
5 A
35
Camera module.
15 A
36
Lane keeping system.
Auto-dimming interior
mirror.
Rear heated seats.
Heated steering wheel.
20 A
37
Power windows.
30 A
38
IDENTIFYING FUSE TYPES Micro 2.
A
Micro 3.
B
Maxi.
C
Mini.
D
M Case.
E J Case.
F
J Case Low Profile.
G
Slotted M Case.
H
FUSES – TROUBLESHOOTING
FUSES – FREQUENTLY ASKED
QUESTIONS
When do I need to check a fuse? If electrical components in the vehicle
are not working.
When do I need to replace a fuse? If a fuse has blown.
How do I identify a blown fuse? You can identify a blown fuse by a
broken wire within the fuse.
395
2022 Super Duty (TFE) Canada/United States of America, enUSA, Edition date: 202103, First-Printing Fuses E267379
Page 404 of 740

Note:
The oil consumption of new engines
reaches its normal level after approximately
3,000 mi (5,000 km).
ADDING ENGINE OIL WARNING: Do not remove the filler
cap when the engine is running. WARNING:
Do not add engine oil
when the engine is hot. Failure to follow
this instruction could result in personal
injury.
Do not use supplemental engine oil
additives because they are unnecessary
and could lead to engine damage that the
vehicle warranty may not cover.
1. Clean the area surrounding the engine oil filler cap before you remove it.
2. Remove the engine oil filler cap.
3. Add engine oil that meets our specifications. See
Engine Oil (page
401).
4. Reinstall the engine oil filler cap. Turn it clockwise until you feel a strong
resistance.
Note: Do not add oil further than the
maximum mark. Oil levels above the
maximum mark may cause engine damage.
Note: Immediately soak up any oil spillage
with an absorbent cloth.
RESETTING THE ENGINE OIL
CHANGE REMINDER - VEHICLES
WITH: 2.3 INCH SCREEN/4.2 INCH
SCREEN
1. Press the Menu button on the steering
wheel to enter the information display
main menu.
2. Select
Truck Info.
3. Select
Oil Life. 4. Select
Reset Oil Life.
5. Press and hold the OK button until the
system reset confirmation appears.
RESETTING THE ENGINE OIL
CHANGE REMINDER - VEHICLES
WITH: 8 INCH SCREEN
Depending on your cluster, there are two
paths to reset the engine oil change
reminder.
Path 1
1. Press the Menu button on the steering
wheel to enter the information display
main menu.
2. Select
Settings.
3. Select
Vehicle Maintenance.
4. Select
Oil Life.
5. Press and hold the OK button until the
system reset confirmation appears.
Path 2
1. Press the Menu button on the steering
wheel to enter the information display
main menu.
2. Select
Truck Info.
3. Select
Engine Information.
4. Press and hold the OK button until the
system reset confirmation appears.
ENGINE OIL CAPACITY AND
SPECIFICATION
For filling information, please refer to the
Capacities and Specifications section of
your owner's manual. See
Engine Oil
Capacity and Specification (page 401).
401
2022 Super Duty (TFE) Canada/United States of America, enUSA, Edition date: 202103, First-Printing Maintenance
Page 413 of 740

To maintain correct operation of the
battery management system, if you add
any electrical devices to your vehicle, do
not connect the ground connection directly
to the negative battery terminal. A
connection at the negative battery terminal
can cause inaccurate measurements of
the battery condition and potential
incorrect system operation.
Note:
If you add electrical accessories or
components to your vehicle this may
adversely affect battery performance,
durability and the performance of other
electrical systems on your vehicle.
If you replace the battery make sure it
matches the electrical requirements of
your vehicle.
If you disconnect or replace the battery
and your vehicle has an automatic
transmission, it must relearn its adaptive
strategy. Because of this, the transmission
may shift firmly when first driven. This is
normal operation while the transmission
fully updates its operation to optimum
shift feel.
Remove and Reinstall the Battery
To disconnect or remove the battery, do
the following:
1. Apply the parking brake and switch the
ignition off.
2. Switch all electrical equipment off, for
example lights and radio.
3. Wait a minimum of two minutes before
disconnecting the battery.
Note: The engine management system has
a power hold function and remains powered
for a period of time after you switch the
ignition off. This is to allow diagnostic and
adaptive tables to be stored. Disconnecting
the battery without waiting can cause
damage not covered by the vehicle
Warranty. 4. Disconnect the negative battery cable
terminal.
5. Disconnect the positive battery cable terminal.
6. Remove the battery securing clamp.
7. Remove the battery.
8. To install, reverse the removal procedure.
Note: Before reconnecting the battery,
make sure the ignition remains switched off.
Note: Make sure the battery cable terminals
are fully tightened.
Note: After cleaning or replacing the
battery, make sure you reinstall the battery
cover or shield.
If you disconnect or replace the vehicle
battery, you must reset the following
features:
• Window bounce-back. See Window
Bounce-Back (page 126).
• Clock Settings.
• Pre-set radio stations.
• Steering Angle Sensor.
Note: To calibrate the steering angle
sensor, drive the vehicle above
30 mph
(50 km/h) for a minimum of 1.2 mi (2 km).
Make sure to drive straight ahead for a
minimum of 30 seconds. Several vehicle
functions are disabled and a warning light
could appear until the sensor is calibrated.
Battery Management System
The battery management system monitors
battery conditions and takes actions to
extend battery life. If excessive battery
drain is detected, the system temporarily
disables some of the following features:
• Heated rear window.
• Heated seats.
• Climate control.
• Heated steering wheel.
410
2022 Super Duty (TFE) Canada/United States of America, enUSA, Edition date: 202103, First-Printing Maintenance
Page 427 of 740

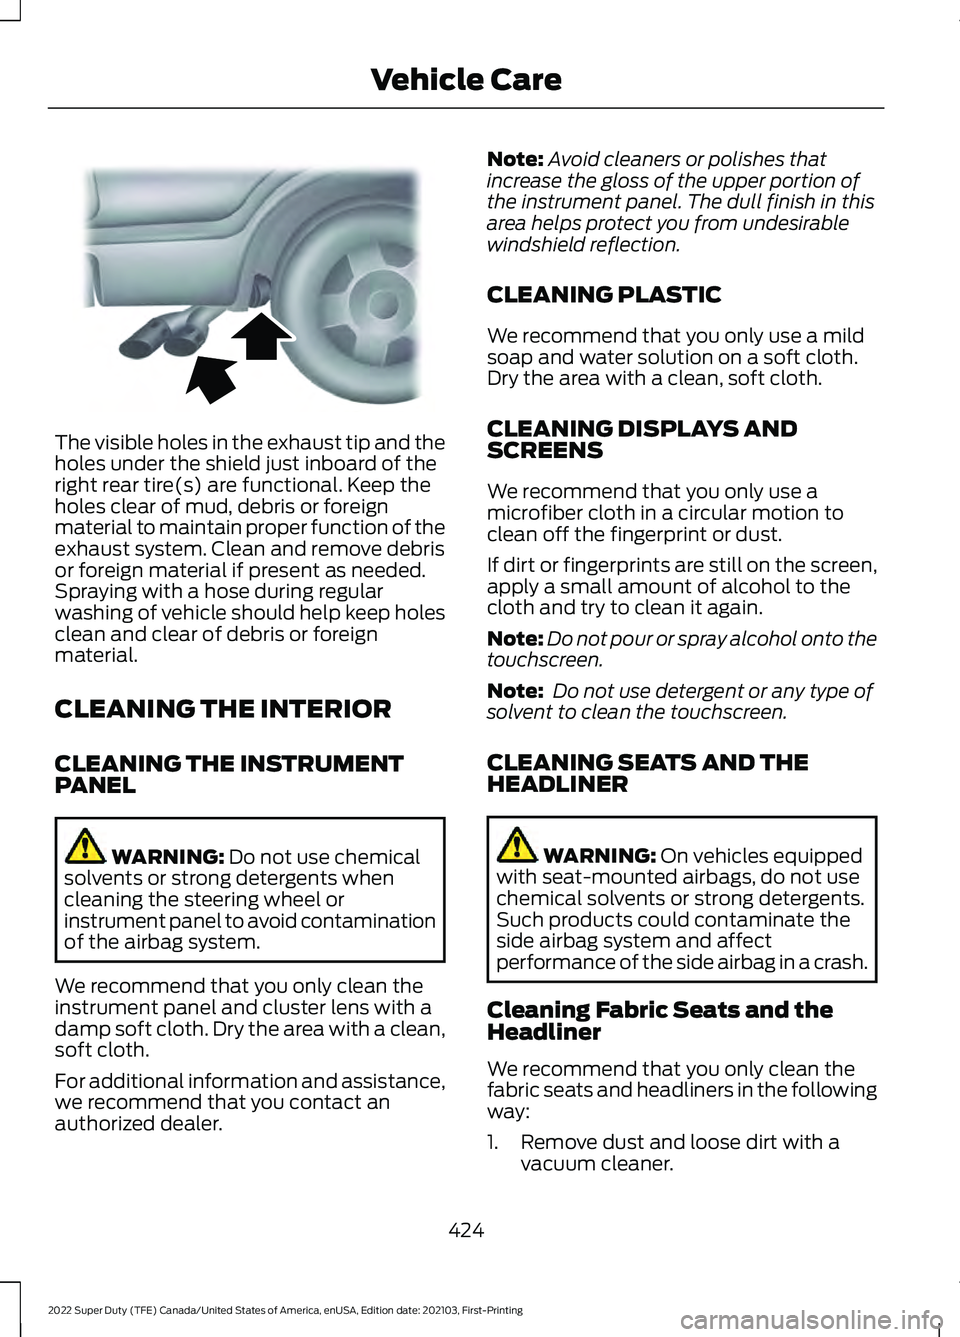
The visible holes in the exhaust tip and the
holes under the shield just inboard of the
right rear tire(s) are functional. Keep the
holes clear of mud, debris or foreign
material to maintain proper function of the
exhaust system. Clean and remove debris
or foreign material if present as needed.
Spraying with a hose during regular
washing of vehicle should help keep holes
clean and clear of debris or foreign
material.
CLEANING THE INTERIOR
CLEANING THE INSTRUMENT
PANEL
WARNING: Do not use chemical
solvents or strong detergents when
cleaning the steering wheel or
instrument panel to avoid contamination
of the airbag system.
We recommend that you only clean the
instrument panel and cluster lens with a
damp soft cloth. Dry the area with a clean,
soft cloth.
For additional information and assistance,
we recommend that you contact an
authorized dealer. Note:
Avoid cleaners or polishes that
increase the gloss of the upper portion of
the instrument panel. The dull finish in this
area helps protect you from undesirable
windshield reflection.
CLEANING PLASTIC
We recommend that you only use a mild
soap and water solution on a soft cloth.
Dry the area with a clean, soft cloth.
CLEANING DISPLAYS AND
SCREENS
We recommend that you only use a
microfiber cloth in a circular motion to
clean off the fingerprint or dust.
If dirt or fingerprints are still on the screen,
apply a small amount of alcohol to the
cloth and try to clean it again.
Note: Do not pour or spray alcohol onto the
touchscreen.
Note: Do not use detergent or any type of
solvent to clean the touchscreen.
CLEANING SEATS AND THE
HEADLINER WARNING: On vehicles equipped
with seat-mounted airbags, do not use
chemical solvents or strong detergents.
Such products could contaminate the
side airbag system and affect
performance of the side airbag in a crash.
Cleaning Fabric Seats and the
Headliner
We recommend that you only clean the
fabric seats and headliners in the following
way:
1. Remove dust and loose dirt with a vacuum cleaner.
424
2022 Super Duty (TFE) Canada/United States of America, enUSA, Edition date: 202103, First-Printing Vehicle CareE163380
Page 442 of 740

cause steering, suspension, axle, transfer
case or power transfer unit failure.
Follow the recommended tire inflation
pressures found on the Safety
Compliance Certification label, or the
Tire Label on the B-Pillar or the edge of
the driver door. Failure to follow this
instruction could result in loss of vehicle
control, vehicle rollover, or personal injury
or death.
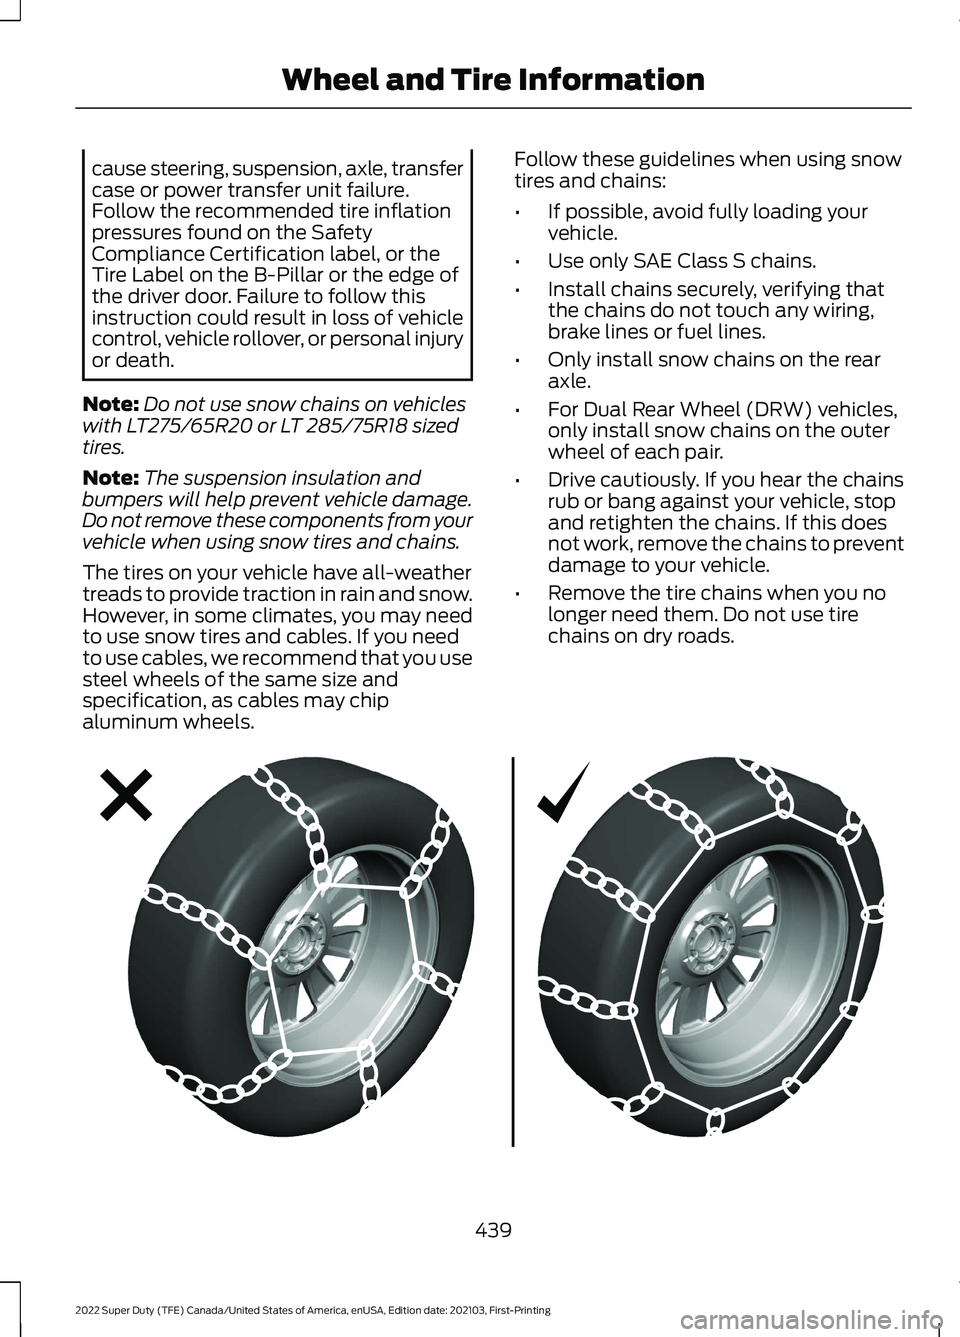
Note: Do not use snow chains on vehicles
with LT275/65R20 or LT 285/75R18 sized
tires.
Note: The suspension insulation and
bumpers will help prevent vehicle damage.
Do not remove these components from your
vehicle when using snow tires and chains.
The tires on your vehicle have all-weather
treads to provide traction in rain and snow.
However, in some climates, you may need
to use snow tires and cables. If you need
to use cables, we recommend that you use
steel wheels of the same size and
specification, as cables may chip
aluminum wheels. Follow these guidelines when using snow
tires and chains:
•
If possible, avoid fully loading your
vehicle.
• Use only SAE Class S chains.
• Install chains securely, verifying that
the chains do not touch any wiring,
brake lines or fuel lines.
• Only install snow chains on the rear
axle.
• For Dual Rear Wheel (DRW) vehicles,
only install snow chains on the outer
wheel of each pair.
• Drive cautiously. If you hear the chains
rub or bang against your vehicle, stop
and retighten the chains. If this does
not work, remove the chains to prevent
damage to your vehicle.
• Remove the tire chains when you no
longer need them. Do not use tire
chains on dry roads. 439
2022 Super Duty (TFE) Canada/United States of America, enUSA, Edition date: 202103, First-Printing Wheel and Tire InformationE292547
Page 445 of 740
![FORD F-250 2022 Owners Manual 1. Make sure the tires are cool,
meaning they are not hot from
driving even a mile.
Note:
If you are checking tire
pressure when the tire is hot, (for
example, driven more than 1 mile
[1.6 kilometers] FORD F-250 2022 Owners Manual 1. Make sure the tires are cool,
meaning they are not hot from
driving even a mile.
Note:
If you are checking tire
pressure when the tire is hot, (for
example, driven more than 1 mile
[1.6 kilometers]](/manual-img/11/40567/w960_40567-444.png)
1. Make sure the tires are cool,
meaning they are not hot from
driving even a mile.
Note:
If you are checking tire
pressure when the tire is hot, (for
example, driven more than 1 mile
[1.6 kilometers]), never bleed or
reduce air pressure. The tires are
hot from driving and it is normal for
pressures to increase above
recommended cold pressures. A
hot tire at or below recommended
cold inflation pressure could be
significantly under-inflated.
2. Remove the cap from the valve
on one tire, then firmly press the
tire gauge onto the valve and
measure the pressure.
3. Add enough air to reach the
recommended air pressure.
Note: If you overfill the tire, release
air by pressing on the metal stem
in the center of the valve. Then
recheck the pressure with your tire
gauge.
4. Replace the valve cap.
5. Repeat this procedure for each
tire, including the spare. Note:
Some spare tires operate at
a higher inflation pressure than the
other tires. For T type mini-spare
tires, (see the Dissimilar spare
wheel and tire assembly
information for a description. Store
and maintain at 60 psi
(4.15 bar)60 psi (4.15 bar). For
full-size and dissimilar spare tires,
see the Dissimilar spare wheel and
tire assembly information for a
description. Store and maintain at
the higher of the front and rear
inflation pressure as shown on the
Safety Compliance Certification
Label or Tire Label.
Note: Do not reduce tire pressure
to change the ride characteristics
of the vehicle. If you do not
maintain the inflation pressure at
the levels specified by Ford, your
vehicle may experience a condition
known as shimmy. Shimmy is a
severe vibration and oscillation in
the steering wheel after the vehicle
travels over a bump or dip in the
road that does not dampen out by
itself. Shimmy may result from
significant under-inflation of the
tires, improper tires (load range,
size, or type), or vehicle
modifications such as lift-kits. In
the event that your vehicle
experiences shimmy, you should
slowly reduce speed by either lifting
off the accelerator pedal or lightly
applying the brakes. The shimmy
will cease as the vehicle speed
decreases.
442
2022 Super Duty (TFE) Canada/United States of America, enUSA, Edition date: 202103, First-Printing Tire Care
Page 458 of 740

CHANGING A FLAT TIRE
WARNING: If the tire pressure
monitor sensor becomes damaged it
may not function.
Note: The use of tire sealant may damage
your tire pressure monitoring system and
should only be used in roadside
emergencies.
Note: The tire pressure monitoring system
indicator light illuminates when the spare
tire is in use. To restore the full function of
the monitoring system, all road wheels
equipped with tire pressure monitoring
sensors must be mounted on this vehicle.
If you get a flat tire when driving, do not
apply the brake heavily. Instead, gradually
decrease your speed. Hold the steering
wheel firmly and slowly move to a safe
place on the side of the road.
Have a flat serviced by an authorized
dealer to prevent damage to the system
sensors.
See Tire Pressure Monitoring
System Precautions (page 449). Replace
the spare tire with a road tire as soon as
possible. During repairing or replacing the
flat tire, have the authorized dealer inspect
the system sensor for damage.
Dissimilar Spare Wheel and Tire
Assembly Information WARNING:
Failure to follow these
guidelines could result in an increased
risk of loss of vehicle control, injury or
death. If you have a dissimilar spare wheel and
tire, then it is intended for temporary use
only. This means that if you need to use it,
you should replace it as soon as possible
with a road wheel and tire assembly that
is the same size and type as the road tires
and wheels that were originally provided
by Ford. If the dissimilar spare tire or wheel
is damaged, it should be replaced rather
than repaired.
A dissimilar spare wheel and tire assembly
is defined as a spare wheel and tire
assembly that is different in brand, size or
appearance from the road tires and
wheels.
Full-size dissimilar spare
When driving with the full-size dissimilar
spare wheel and tire assembly, do not:
•
Exceed
70 mph (113 km/h).
• Use more than one dissimilar spare
wheel and tire assembly at a time.
• Use snow chains on the end of the
vehicle with the dissimilar spare wheel
and tire assembly.
When driving with the full-size dissimilar
spare wheel and tire assembly, 4WD
functionality may be limited. You may
experience the following:
• Additional noise from the transfer case
or other drive components.
• Difficulty shifting out of a mechanically
locked 4WD mode.
When driving with the full-size dissimilar
spare wheel and tire assembly, it is
recommended that you do not:
• Exceed
50 mph (80 km/h) in 4WD.
• Engage 4WD unless the vehicle is
stationary.
• Use 4WD on dry pavement.
455
2022 Super Duty (TFE) Canada/United States of America, enUSA, Edition date: 202103, First-Printing Changing a Road Wheel