Page 556 of 750

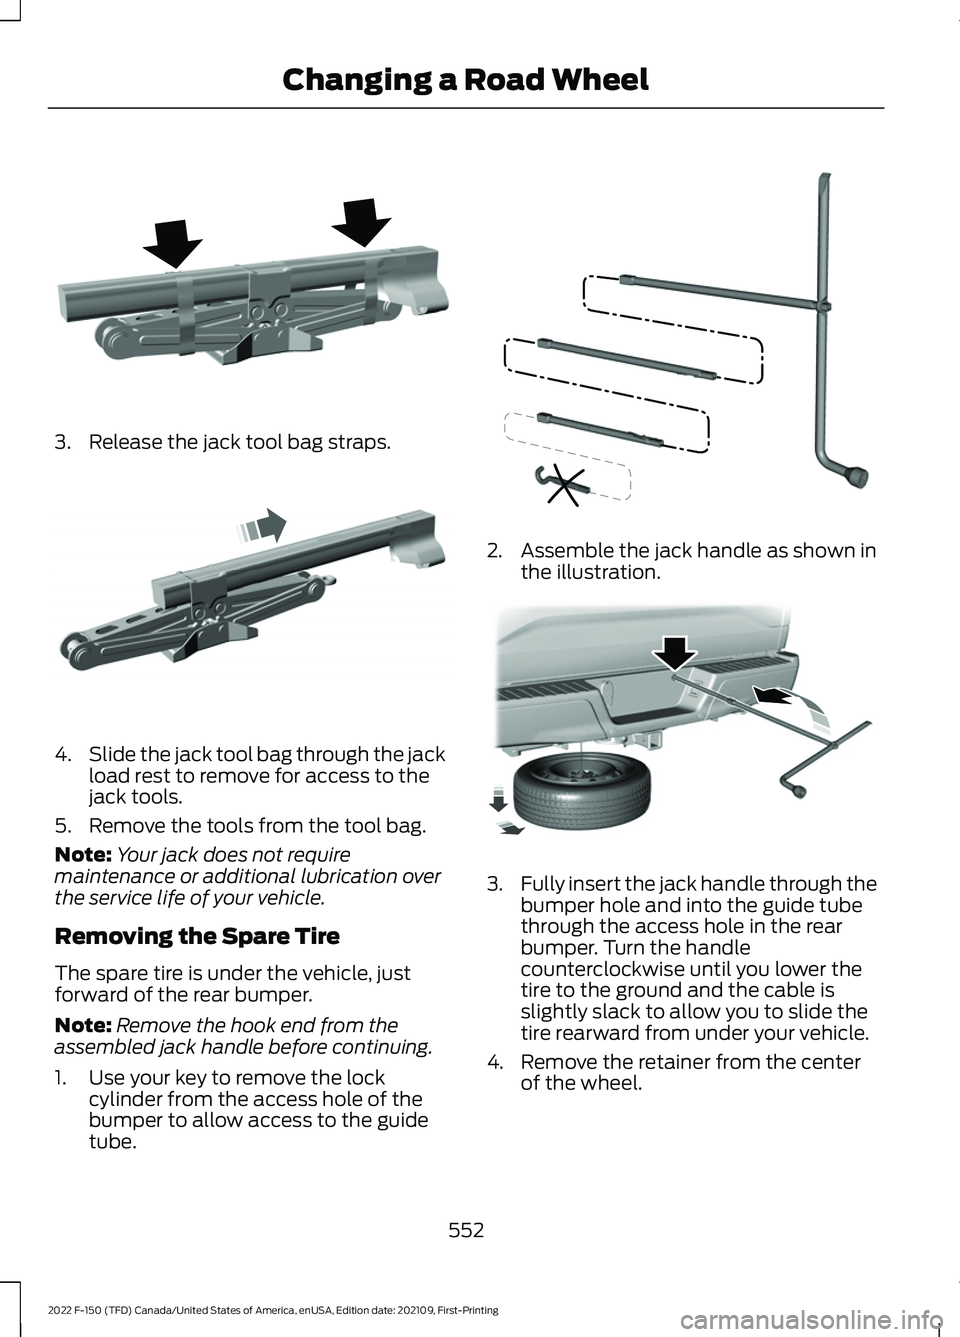
3. Release the jack tool bag straps.
4.
Slide the jack tool bag through the jack
load rest to remove for access to the
jack tools.
5. Remove the tools from the tool bag.
Note: Your jack does not require
maintenance or additional lubrication over
the service life of your vehicle.
Removing the Spare Tire
The spare tire is under the vehicle, just
forward of the rear bumper.
Note: Remove the hook end from the
assembled jack handle before continuing.
1. Use your key to remove the lock cylinder from the access hole of the
bumper to allow access to the guide
tube. 2. Assemble the jack handle as shown in
the illustration. 3.
Fully insert the jack handle through the
bumper hole and into the guide tube
through the access hole in the rear
bumper. Turn the handle
counterclockwise until you lower the
tire to the ground and the cable is
slightly slack to allow you to slide the
tire rearward from under your vehicle.
4. Remove the retainer from the center of the wheel.
552
2022 F-150 (TFD) Canada/United States of America, enUSA, Edition date: 202109, First-Printing Changing a Road WheelE323386 E327651 E188735 E184020
Page 557 of 750
5. Block both the front and rear of the
wheel diagonally opposite the flat tire.
For example, if the left front tire is flat,
block the right rear wheel.
6. Obtain the spare tire and vehicle jack from their storage locations.
7. Loosen each wheel nut on the affected
flat tire one-half turn counterclockwise,
but do not remove them.
Jacking the Vehicle Front Jacking Points
Note:
Use the frame rail as the front jacking
location point, not the control arm. There is
an arrow marked on the frame rail.
Rear Jacking Points Note:
Jack at the specified locations to
avoid damage to the vehicle.
553
2022 F-150 (TFD) Canada/United States of America, enUSA, Edition date: 202109, First-Printing Changing a Road WheelE175447 E166722 E363810 E363124 E323397
Page 558 of 750

Extension Block
1.
Wing bolt
2.
1. Place the vehicle jack at the jacking point next to the tire you are changing.
2. When jacking the vehicle to service a front wheel/tire, remove the wing bolt
holding the extension block to the jack
stowage bracket and reuse wing bolt
to attach extension block to jacking
surface.
Note: If servicing a rear tire position, the
extension block is not needed.
3. Reassemble the jack handle, including
the S-hook, to the lug wrench. Insert
the S-hook into the eyelet of the jack
and turn the jack handle clockwise until
the wheel is completely off the ground. 4. Remove the wheel nuts with the lug
wrench.
5. Replace the flat tire with the spare tire,
making sure the valve stem is facing
outward. Reinstall the wheel nuts until
the wheel is snug against the hub. Do
not fully tighten the wheel nuts until
you lower the wheel.
6. Lower the wheel by turning the jack handle counterclockwise.
7. Remove the vehicle jack and fully tighten the wheel nuts in the order
shown.
8. Stow the flat tire.
9. Stow the vehicle jack and lug wrench. Make sure the jack is securely fastened
before you drive.
10. Unblock the wheels. Stowing the Flat or Spare Tire
Note:
Failure to follow the spare tire
stowage instructions could result in failure
of the cable or loss of the spare tire.
1. Lay the tire on the ground with the valve stem facing up.
2. Slide the wheel partially under the vehicle and install the retainer through
the wheel center. Pull on the cable to
align the components at the end of the
cable.
554
2022 F-150 (TFD) Canada/United States of America, enUSA, Edition date: 202109, First-Printing Changing a Road Wheel1
2E363809 1
2E363808 E166719
Page 559 of 750

3. Turn the jack handle clockwise until
you raise the tire to its stowed position
underneath the vehicle. The effort to
turn the jack handle increases
significantly and the spare tire carrier
ratchets or slips when you raise the tire
to the maximum tightness. Tighten to
the point where the ratchet or slip
occurs a minimum of three times, as
indicated by an audible click each time.
The spare tire carrier does not allow
you to overtighten. If the spare tire
carrier ratchets or slips with little effort,
have your vehicle checked as soon as
possible.
4. Check that the tire lies flat against the frame and you properly tighten it. Try
to push or pull, then turn the tire to be
sure it does not move. Loosen and
retighten, if necessary. Failure to
properly stow the spare tire could
result in failure of the winch cable and
loss of the tire.
5. Repeat this tightness check procedure
when servicing the spare tire pressure,
every six months, as per your scheduled
maintenance information, or at any
time that the spare tire gets disturbed
through service of other components.
6. If removed, install the spare tire lock into the bumper drive tube with the
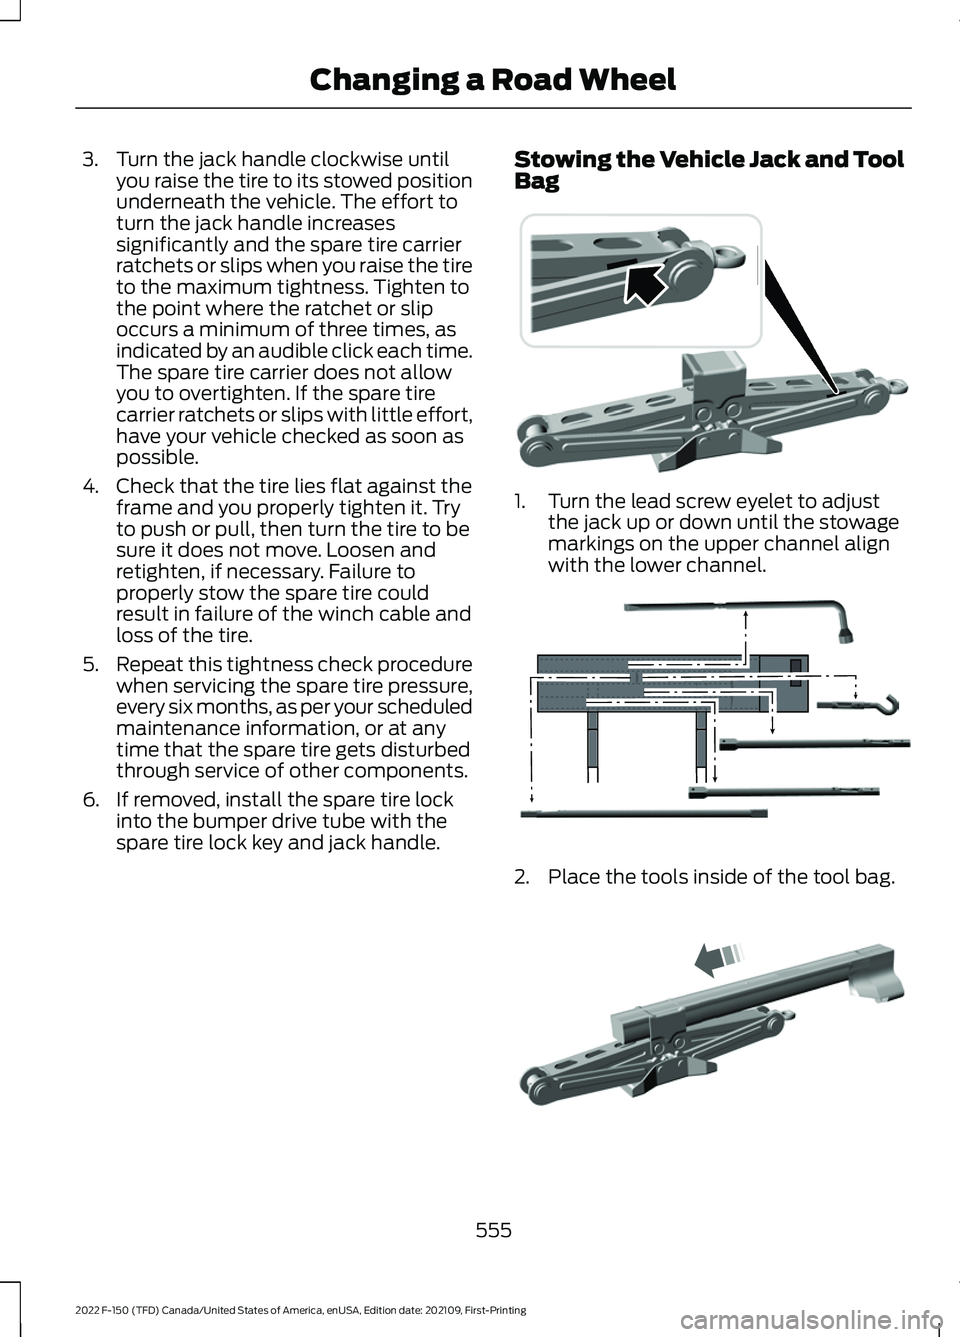
spare tire lock key and jack handle. Stowing the Vehicle Jack and Tool
Bag 1. Turn the lead screw eyelet to adjust
the jack up or down until the stowage
markings on the upper channel align
with the lower channel. 2. Place the tools inside of the tool bag.
555
2022 F-150 (TFD) Canada/United States of America, enUSA, Edition date: 202109, First-Printing Changing a Road Wheel E323394 E323393 E327653
Page 560 of 750

3.
Install the tool bag through the vehicle
jack load rest.
4. Restow the extension block and wing bolt to the jack bracket. 5.
Secure the jack tool bag straps around
the vehicle jack. 6. Place the jack and tool bag back onto
the jack bracket. 7. Turn the wing bolt on the jack bracket
clockwise until you secure the jack and
tools to the jack bracket.
WHEEL NUTS WARNING: When you install a
wheel, always remove any corrosion, dirt
or foreign materials present on the
mounting surfaces of the wheel or the
surface of the wheel hub, brake drum or
brake disc that contacts the wheel. Make
sure to secure any fasteners that attach
the rotor to the hub so they do not
interfere with the mounting surfaces of
the wheel. Installing wheels without
correct metal-to-metal contact at the
wheel mounting surfaces can cause the
wheel nuts to loosen and the wheel to
come off while your vehicle is in motion,
resulting in loss of vehicle control,
personal injury or death. lb.ft (Nm)
1
Bolt Size
150 lb.ft (204 Nm)
M14 x 1.5
1 Torque specifications are for nut and bolt
threads free of dirt and rust. Use only our
recommended replacement wheel nuts
and or wheel bolts.
556
2022 F-150 (TFD) Canada/United States of America, enUSA, Edition date: 202109, First-Printing Changing a Road WheelE323386 E327654 E323384
Page 561 of 750
Retighten the wheel nuts to the specified
torque within 100 mi (160 km) after any
wheel disturbance, such as tire rotation,
changing a flat tire or wheel removal. Hub pilot bore.
A
Inspect the wheel pilot hole and
mounting surface prior to installation.
Remove any visible corrosion or loose
particles.
557
2022 F-150 (TFD) Canada/United States of America, enUSA, Edition date: 202109, First-Printing Changing a Road WheelE145950
Page 595 of 750

TRANSFER CASE FLUID
CAPACITY AND
SPECIFICATION
Use fluid that meets the defined
specification and viscosity grade.
If you do not use fluid that meets the
defined specification and viscosity grade,
it could result in:
•
Component damage that your vehicle
warranty does not cover.
• Reduced vehicle performance.
Capacities Quantity
Variant
1.5 qt (1.4 L)
Four-wheel drive (Electronic shift on the
Fly).
1.5 qt (1.4 L)
Automatic four-wheel drive (Torque on
demand).
1.9 qt (1.8 L)
Two-speed automatic four-wheel drive
(Mechanical lock).
Materials Specification
Name
WSS-M2C938-AMERCON® LV,
Motorcraft® MERCON® LV Automatic Transmission
Fluid(U.S.)
Motorcraft® MERCON® LV Automatic Transmission
Fluid / Huile pour boîte automatique MERCON® LV
Motorcraft®(Canada)
XT-10-QLVC(U.S.)
CXT-10-LV6(Canada)
TRANSFER CASE FLUID
CAPACITY AND
SPECIFICATION - RAPTOR
Use fluid that meets the defined
specification and viscosity grade. If you do not use fluid that meets the
defined specification and viscosity grade,
it could result in:
•
Component damage that your vehicle
warranty does not cover.
• Reduced vehicle performance.
Capacities Quantity
Variant
1.9 qt (1.8 L)
Two-speed four-high lock (Torque on
demand).
591
2022 F-150 (TFD) Canada/United States of America, enUSA, Edition date: 202109, First-Printing Capacities and Specifications
Page 608 of 750

ADJUSTING THE VOLUME
Turn to adjust the volume.
Some vehicles may be able to adjust the
volume using buttons on the steering
wheel.
SWITCHING SHUFFLE MODE
ON AND OFF
Press the button on the
touchscreen to switch shuffle
mode on or off.
Note: Not all sources have shuffle mode.
SWITCHING REPEAT MODE ON
AND OFF Press the button on the
touchscreen to switch repeat
mode on or off.
Note: Not all sources have repeat mode. SETTING A MEMORY PRESET
1. Select a station or channel.
2.
Press and hold a memory preset button
on the touchscreen.
Note: The audio mutes briefly while the
system saves the preset and returns once it
is stored.
Note: You can save presets from multiple
sources to the memory preset bar.
MUTING THE AUDIO Press to mute the signal. Press
again to restore the signal.
ADJUSTING THE SOUND
SETTINGS
Balance and Fade (If Equipped)
1. Press
Settings on the touchscreen.
2. Press
Sound Settings.
3. Press
Balance / Fade.
4. Press the arrows to adjust the settings.
Tone Settings
1. Press
Settings on the touchscreen.
2. Press
Sound Settings.
3. Press
Tone Settings.
4. Press the arrows or slider bar to adjust
the settings.
Speed Compensated Volume
1. Press
Settings on the touchscreen.
2. Press
Sound Settings.
3. Press
Speed Compensated Volume.
4. Press a setting.
604
2022 F-150 (TFD) Canada/United States of America, enUSA, Edition date: 202109, First-Printing Audio SystemE248939