2022 FORD ESCAPE trim
[x] Cancel search: trimPage 52 of 585

The Safety Canopy deploys during
significant side crashes or when a certain
likelihood of a rollover event is detected
by the rollover sensor. The Safety Canopy
is mounted to the roof side-rail sheet
metal, behind the headliner, above each
row of seats. In certain sideways crashes
or rollover events, the Safety Canopy will
be activated, regardless of which seats are
occupied. The Safety Canopy inflates
between the side window area and
occupants to further enhance protection
provided in side impact crashes and
rollover events.
E75004E75004
The system consists of the following:
€ Safety Canopy curtain airbags abovethe trim panels over the front and rear
side windows identified by a label or
wording on the headliner or roof-pillar
trim.
€ A flexible headliner which opens above the side doors to allow air curtain
deployment
E67017
· Crash sensors and monitoring
system with a readiness
indicator. See Crash Sensors
and Airbag Indicator (page 54). Properly restrain children 12 years old and
under in the rear seats. The Safety Canopy
will not interfere with children restrained
using a properly installed child or booster
seat because it is designed to inflate
downward from the headliner above the
doors along the side window opening.
AIRBAG PRECAUTIONS
WARNING: Airbags do not inflate
slowly or gently, and the risk of injury
from a deploying airbag is the greatest
close to the trim covering the airbag
module.
WARNING: All occupants of your
vehicle, including the driver, should
always properly wear their seatbelts,
even when an airbag supplemental
restraint system is provided. Failure to
properly wear your seatbelt could
seriously increase the risk of injury or
death.
WARNING: Properly secure
children 12 years old and under in a rear
seating position whenever possible. If
you are unable to properly secure all
children in a rear seating position,
properly secure the largest child on the
front seat. If you must use a forward
facing child restraint on the front seat,
move the seat as far back as possible.
Failure to follow these instructions could
result in personal injury or death.
WARNING: Do not place your arms
on the airbag cover or through the
steering wheel. Failure to follow this
instruction could result in personal injury.
49
Airbags
Page 171 of 585

WHAT IS THE POWER OUTLET
The power outlet can power devices using
a 12 V outlet adapter.
POWER OUTLET
PRECAUTIONS
When you switch the vehicle on, you can
use the socket to power 12 V appliances
with a maximum current rating of 15 A. Do
not use the power point over the vehicle
capacity of 12 V DC 180 W or a fuse could
blow. Do not plug in any device that
supplies power to the vehicle through the
power points. This could result in damage
to vehicle systems. Do not hang any
accessory from the accessory plug. Always
keep the power point caps closed when
not in use. Do not insert objects other than
an accessory plug into the power point.
To prevent the battery from running out of
charge:
• Do not use the power point longer thannecessary when the vehicle is off.
• Do not leave devices plugged in overnight or when you park your vehicle
for extended periods.
LOCATING THE POWER
OUTLETS
Power outlets may be in the following
locations:
• On the lower instrument panel.
• Inside the center console.
• On the front of the center console.
• On the rear of the center console.
• In the cargo area.
• On the passenger side floor panel.
• 3rd row on the quarter trim panels.
168
Power Outlet - Vehicles With: 12V Power Outlet
Page 297 of 585
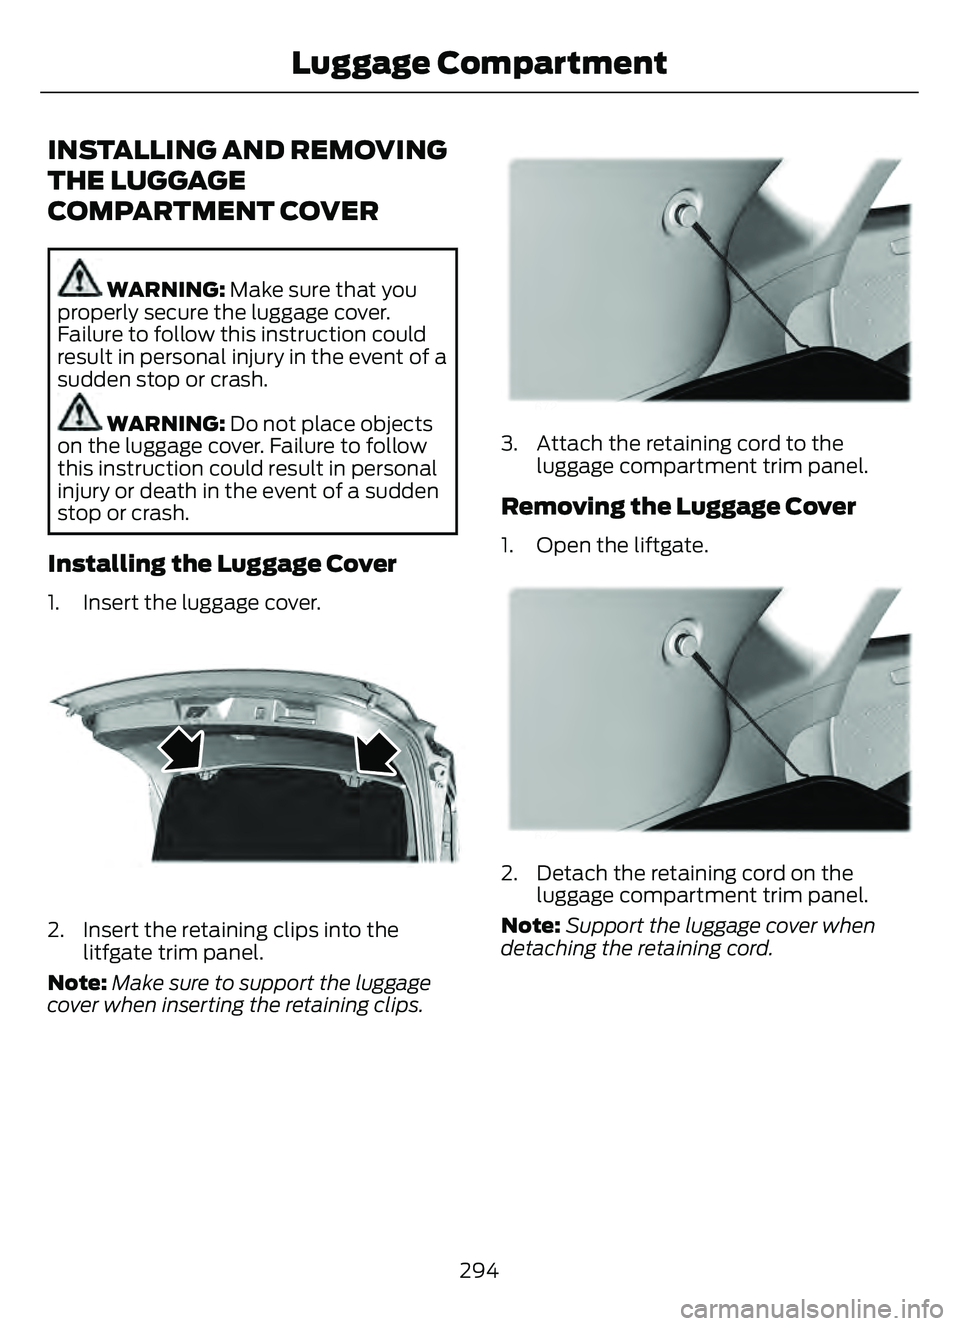
INSTALLING AND REMOVING
THE LUGGAGE
COMPARTMENT COVER
WARNING: Make sure that you
properly secure the luggage cover.
Failure to follow this instruction could
result in personal injury in the event of a
sudden stop or crash.
WARNING: Do not place objects
on the luggage cover. Failure to follow
this instruction could result in personal
injury or death in the event of a sudden
stop or crash.
Installing the Luggage Cover
1. Insert the luggage cover.
E309671E309671
2. Insert the retaining clips into the litfgate trim panel.
Note: Make sure to support the luggage
cover when inserting the retaining clips.
E309672E309672E309 672
3. Attach the retaining cord to the
luggage compartment trim panel.
Removing the Luggage Cover
1. Open the liftgate.
E309672E309672E309 672
2. Detach the retaining cord on the
luggage compartment trim panel.
Note: Support the luggage cover when
detaching the retaining cord.
294
Luggage Compartment
Page 298 of 585
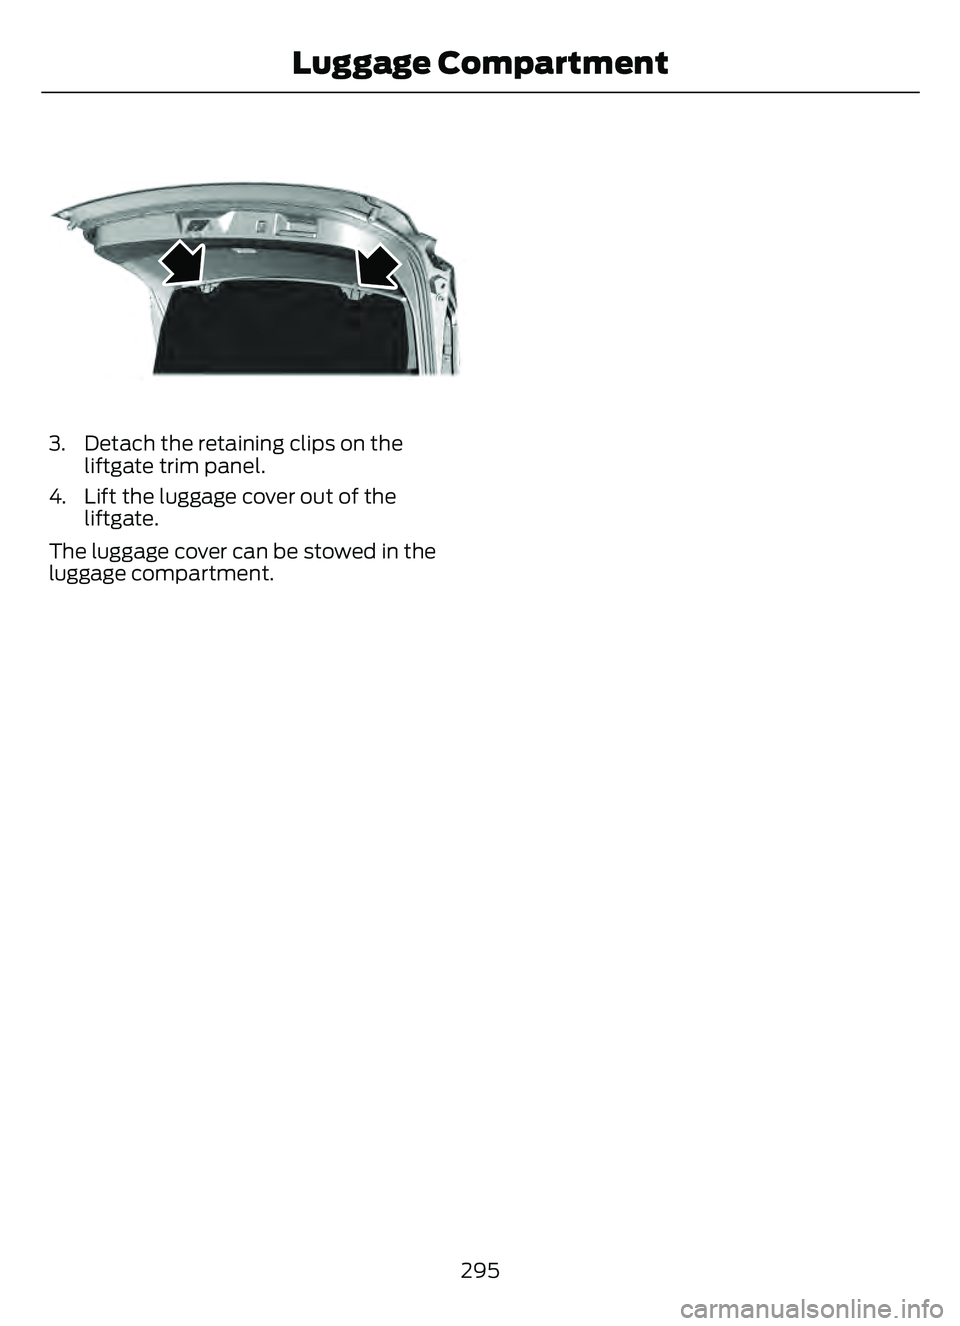
E309671E309671
3. Detach the retaining clips on theliftgate trim panel.
4. Lift the luggage cover out of the liftgate.
The luggage cover can be stowed in the
luggage compartment.
295
Luggage Compartment
Page 306 of 585

HOW DOES TRAILER SWAY
CONTROL WORK
The system applies the brakes to the
individual wheels and reduces engine
torque to aid vehicle stability.
If the trailer begins to sway, the stability
control lamp flashes and the message
Trailer Sway Reduce Speed appears in
the information display.
Stop your vehicle as soon as it is safe to
do so. Check the vertical weight on the
tow ball and trailer load distribution.
TRAILER SWAY CONTROL
PRECAUTIONS
WARNING: Turning off trailer sway
control increases the risk of loss of
vehicle control, serious injury or death.
Ford does not recommend disabling this
feature except in situations where speed
reduction may be detrimental (such as
hill climbing), the driver has significant
trailer towing experience, and can control
trailer sway and maintain safe operation.
Note: This feature only activates when
significant trailer sway occurs.
Note: This feature does not prevent trailer
sway, but reduces it once it begins.
Note: This feature cannot stop all trailers
from swaying.
Note: In some cases, if vehicle speed is too
high, the system may activate multiple
times, gradually reducing vehicle speed.
SWITCHING TRAILER SWAY
CONTROL ON AND OFF
1. Press Features on the touchscreen. 2. Press Towing.
3. Switch Trailer Sway Control
on or off.
The system turns on each time you start
your vehicle.
303
Trailer Sway Control
Page 352 of 585

CLEANING PRODUCTS
Materials
For best results, use the following products
or products of equivalent quality:
Specification
Name
-
Motorcraft® Bug and Tar Remover, ZC-42 (U.S. & Canada)
ESR-M5B194-B
Motorcraft® Custom Bright Metal Cleaner, ZC-15 (U.S. & Canada)
ESR-M14P4-A
Motorcraft® Detail Wash, ZC-3-A (U.S. & Canada)
ESR-M14P3-A
Motorcraft® Engine Shampoo and Degreaser, ZC-20 (U.S.)
-
Motorcraft® Engine Shampoo, CXC-66-A (Canada)
-
Motorcraft® Premium Leather and Vinyl Cleaner, ZC-56 (U.S. &
Canada)
-
Motorcraft® Multi-Purpose Cleaner, CXC-101 (Canada)
WSS-M14P19-A
Motorcraft® Premium Windshield Wash Concentrate with
Bitterant, ZC-32-B2 (U.S.)
WSS-M14P19-A
Motorcraft® Premium Quality Windshield Washer Fluid, CXC-37-
F/M (Canada)
-
Motorcraft® Professional Strength Carpet & Upholstery Cleaner,
ZC-54 (U.S. & Canada)
ESR-M14P5-A
Motorcraft® Premium Glass Cleaner, CXC-100 (Canada)
-
Motorcraft® Spot and Stain Remover, ZC-14 (U.S.)
ESR-M14P5-A
Motorcraft® Ultra-Clear Spray Glass Cleaner, ZC-23 (U.S.)
-
Motorcraft® Wheel and Tire Cleaner, ZC-37-A (U.S. & Canada)
CLEANING THE EXTERIOR
CLEANING THE EXTERIOR
PRECAUTIONS
Immediately remove fuel spillages, additive
residuals, bird droppings, insect deposits
and road tar. These may cause damage to
your vehicle’s paintwork or trim over time. Remove any exterior accessories, for
example antennas, before entering a car
wash.
CLEANING HEADLAMPS AND
REAR LAMPS
We recommend that you only use cold or
lukewarm water containing car shampoo
to clean the headlamps and the rear
lamps.
Do not scrape the lamps.
349
Vehicle Care
Page 358 of 585

PREPARING YOUR VEHICLE
FOR STORAGE
If you plan on storing your vehicle for 30
days or more, the following maintenance
recommendations ensures your vehicle
stays in good operating condition.
Under various conditions, long-term
storage may lead to degraded engine
performance or failure unless you use
specific precautions to preserve your
vehicle.
General
• Store all vehicles in a dry, ventilatedplace.
• If vehicles are stored outside, they require regular maintenance to protect
against rust and weather damage.
• Make sure all linkages, cables, levers and pins under your vehicle are covered
with grease to prevent rust.
• Move vehicles at least 25 ft (7.5 m) every 15 days to lubricate working parts
and prevent corrosion.
• Fill the fuel tank with high-quality fuel until the first automatic shutoff of the
fuel pump nozzle.
Engine
• Change the engine oil and filter prior tostorage because used engine oil
contains contaminants which may
cause engine damage.
• Start the engine every 15 days for a minimum of 15 minutes. Run at fast
idle with the climate controls set to
defrost until the engine reaches normal
operating temperature.
• With your foot on the brake, shift through all the gears while the engine
is running.
Body
• Wash your vehicle thoroughly toremove dirt, grease, oil, tar or mud from
exterior surfaces, rear-wheel housings
and the underside of front fenders.
• Periodically wash your vehicle if it is stored in exposed locations.
• Touch-up exposed or primed metal to prevent rust.
• Cover chrome and stainless steel parts with a thick coat of auto wax to prevent
discoloration. Re-wax as necessary
when you wash your vehicle.
• Lubricate all hood, door and luggage compartment hinges and latches with
a light grade oil.
• Cover interior trim to prevent fading.
• Keep all rubber parts free from oil and solvents.
Hybrid Battery Systems
We recommend the following actions for
your vehicle:
• When storing your vehicle for greaterthan 30 days the state of charge
should be approximately 50%.
Additionally we recommend
disconnecting the 12V battery which
will reduce system loads on the HV
battery.
12 Volt Battery
• Check and recharge as necessary. Keepconnections clean.
Note: It is necessary to reset memory
features if you disconnect the battery
cables.
Brakes
Make sure the brakes and parking brake
release fully.
355
Storing Your Vehicle
Page 369 of 585
In general, tires should be
replaced after six years
regardless of tread wear.
However, heat caused by hot
climates or frequent high loading
conditions can accelerate the
aging process and may require
tires to be replaced more
frequently.
You should replace your spare
tire when you replace the road
tires or after six years due to
aging even if it has not been
used.
U.S. DOT Tire Identification
Number
Both United States and Canada
Federal regulations require tire
manufacturers to place
standardized information on the
sidewall of all tires. This
information identifies and
describes the fundamental
characteristics of the tire and also
provides a U.S. DOT Tire
Identification Number for safety
standard certification and in case
of a recall.
This begins with the letters DOT
and indicates that the tire meets
all federal standards. The next
two numbers or letters are the
plant code designating where it
was manufactured, the next two
are the tire size code and the last
four numbers represent the week
and year the tire was built. For
example, the numbers 317 mean
the 31st week of 1997. After 2000, the numbers go to four digits. For
example, 2501 means the 25th
week of 2001. The numbers in
between are identification codes
used for traceability. This
information is used to contact
customers if a tire defect requires
a recall.
USING SNOW CHAINS
WARNING:
Do not exceed 30 mph
(50 km/h). Failure to follow this
instruction could result in the loss of
control of your vehicle, personal injury or
death.
WARNING: Do not use snow chains
on snow-free roads.
WARNING: Only fit snow chains to
specified tires.
WARNING: If your vehicle is fitted
with wheel trims, remove them before
fitting snow chains.
WARNING: If you are driving in
slippery conditions that require tire
chains or cables, then it is critical that
you drive cautiously. Keep speeds down,
allow for longer stopping distances and
avoid aggressive steering to reduce the
chances of a loss of vehicle control
which can lead to serious injury or death.
If the rear end of your vehicle slides while
cornering, steer in the direction of the
slide until you regain control of your
vehicle.
366
Wheel and Tire Information