2022 DODGE CHARGER brake pedal
[x] Cancel search: brake pedalPage 231 of 312

IN CASE OF EMERGENCY229
NOTE:There are steps that you can take to slow down an
impending overheat condition:
If your Air Conditioner (A/C) is on, turn it off. The
A/C system adds heat to the engine cooling
system and turning the A/C off can help remove
this heat.
You can also turn the temperature control to
maximum heat, the mode control to floor and
the blower control to high. This allows the heater
core to act as a supplement to the radiator and
aids in removing heat from the engine cooling
system.
MANUAL PARK RELEASE–8–SPEED
TRANSMISSION
In order to move the vehicle in cases where the
transmission will not shift out of PARK (P) (such as
a depleted battery), a Manual Park Release is
available. The manual park release lever is located
in the center console next to the gear shifter.
To use the Manual Park Release, see the following
steps:
1. Firmly apply the parking brake.
2. Remove the console storage bin.
Console Storage Bin
WARNING!
You or others can be badly burned by hot engine
coolant (antifreeze) or steam from your radiator.
If you see or hear steam coming from under the
hood, do not open the hood until the radiator
has had time to cool. Never try to open a cooling
system pressure cap when the radiator or
coolant bottle is hot.
CAUTION!
Driving with a hot cooling system could damage
your vehicle. If the temperature gauge reads
HOT (H), pull over and stop the vehicle. Idle the
vehicle with the air conditioner turned off until
the pointer drops back into the normal range. If
the pointer remains on HOT (H), and you hear
continuous chimes, turn the engine off
immediately and call for service.
WARNING!
Always secure your vehicle by fully applying the
parking brake before activating the Manual Park
Release. In addition, you should be seated in the
driver's seat with your foot firmly on the brake
pedal when activating the Manual Park Release.
Activating the Manual Park Release will allow
your vehicle to roll away if it is not secured by the
parking brake, or by proper connection to a tow
vehicle. Activating the Manual Park Release on
an unsecured vehicle could lead to serious
injury or death for those in or around the vehicle.
7
22_LD_OM_EN_USC_t.book Page 229
Page 232 of 312

230IN CASE OF EMERGENCY
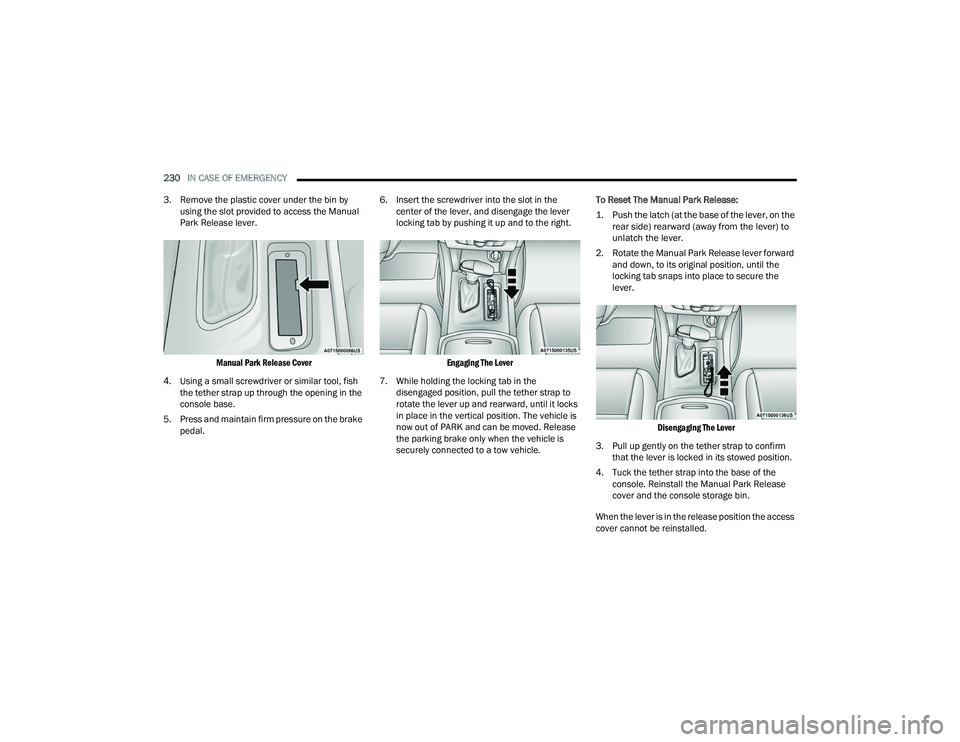
3. Remove the plastic cover under the bin by using the slot provided to access the Manual
Park Release lever.
Manual Park Release Cover
4. Using a small screwdriver or similar tool, fish the tether strap up through the opening in the
console base.
5. Press and maintain firm pressure on the brake pedal. 6. Insert the screwdriver into the slot in the
center of the lever, and disengage the lever
locking tab by pushing it up and to the right.
Engaging The Lever
7. While holding the locking tab in the disengaged position, pull the tether strap to
rotate the lever up and rearward, until it locks
in place in the vertical position. The vehicle is
now out of PARK and can be moved. Release
the parking brake only when the vehicle is
securely connected to a tow vehicle. To Reset The Manual Park Release:
1. Push the latch (at the base of the lever, on the
rear side) rearward (away from the lever) to
unlatch the lever.
2. Rotate the Manual Park Release lever forward and down, to its original position, until the
locking tab snaps into place to secure the
lever.
Disengaging The Lever
3. Pull up gently on the tether strap to confirm that the lever is locked in its stowed position.
4. Tuck the tether strap into the base of the console. Reinstall the Manual Park Release
cover and the console storage bin.
When the lever is in the release position the access
cover cannot be reinstalled.
22_LD_OM_EN_USC_t.book Page 230
Page 233 of 312

IN CASE OF EMERGENCY231
FREEING A STUCK VEHICLE
If your vehicle becomes stuck in mud, sand, or
snow, it can often be moved using a rocking
motion. Turn the steering wheel right and left to
clear the area around the front wheels. For
vehicles with automatic transmission, push and
hold the lock button on the gear selector. Then
shift back and forth between DRIVE and REVERSE
(with automatic transmission) or FIRST gear and
REVERSE (with manual transmission), while gently
pressing the accelerator. Use the least amount of
accelerator pedal pressure that will maintain the
rocking motion, without spinning the wheels or
racing the engine.
NOTE:For vehicles with automatic transmission: Shifts
between DRIVE and REVERSE can only be
achieved at wheel speeds of 5 mph (8 km/h) or
less. Whenever the transmission remains in
NEUTRAL for more than two seconds, you must
press the brake pedal to engage DRIVE or
REVERSE.
Push the ESC OFF button to place the Electronic
Stability Control (ESC) system in “Partial OFF”
mode, before rocking the vehicle Ú page 170.
Once the vehicle has been freed, push the ESC OFF
button again to restore “ESC On” mode.
CAUTION!
Racing the engine or spinning the wheels may
lead to transmission overheating and failure.
Allow the engine to idle with the transmission in
NEUTRAL for at least one minute after every five
rocking-motion cycles. This will minimize
overheating and reduce the risk of clutch or
transmission failure during prolonged efforts to
free a stuck vehicle.
WARNING!
Fast spinning tires can be dangerous. Forces
generated by excessive wheel speeds may
cause damage, or even failure, of the axle and
tires. A tire could explode and injure someone.
Do not spin your vehicle's wheels faster than
30 mph (48 km/h) or for longer than 30
seconds continuously without stopping when
you are stuck and do not let anyone near a
spinning wheel, no matter what the speed.
CAUTION!
Racing the engine or spinning the wheels may
lead to transmission overheating and failure.
Allow the engine to idle with the transmission
in NEUTRAL for at least one minute after every
five rocking-motion cycles. This will minimize
overheating and reduce the risk of transmis -
sion failure during prolonged efforts to free a
stuck vehicle.
When “rocking” a stuck vehicle by shifting
between DRIVE and REVERSE, do not spin the
wheels faster than 15 mph (24 km/h), or
drivetrain damage may result.
Revving the engine or spinning the wheels too
fast may lead to transmission overheating and
failure. It can also damage the tires. Do not
spin the wheels above 30 mph (48 km/h)
while in gear (no transmission shifting occur -
ring).
7
22_LD_OM_EN_USC_t.book Page 231
Page 253 of 312

SERVICING AND MAINTENANCE251
(Continued)
BRAKE SYSTEM
In order to ensure brake system performance, all
brake system components should be inspected
periodically Ú page 234.
Fluid Level Check — Brake Master Cylinder
Check the fluid level in the master cylinder
immediately if the Brake System Warning Light
indicates system failure.
Check the fluid level in the master cylinder when
performing underhood services.
Clean the top of the master cylinder area before
removing the cap. Add fluid to bring the level up to
the top of the “FULL” mark on the side of the
master cylinder reservoir.
Overfilling of fluid is not recommended because it
may cause leaking in the system.
Add enough fluid to bring the level up to the
requirements described on the brake fluid reservoir. With disc brakes, fluid level can be
expected to fall as the brake pads wear. However,
low fluid level may be caused by a leak and a
checkup may be needed.
Use only brake fluid that has been recommended
by the manufacturer, and has been kept in a tightly
closed container to avoid contamination from
foreign matter or moisture.
For further information Ú
page 291.
AUTOMATIC TRANSMISSION
Special Additives
The manufacturer strongly recommends against
using any special additives in the transmission.
Automatic Transmission Fluid (ATF) is an
engineered product and its performance may be
impaired by supplemental additives. Therefore, do
not add any fluid additives to the transmission.
Avoid using transmission sealers as they may
adversely affect seals.
WARNING!
Riding the brakes can lead to brake failure and
possibly a collision. Driving with your foot resting
or riding on the brake pedal can result in
abnormally high brake temperatures, excessive
lining wear, and possible brake damage. You
would not have your full braking capacity in an
emergency.
WARNING!
Use only manufacturer's recommended brake
fluid Úpage 291. Using the wrong type of
brake fluid can severely damage your brake
system and/or impair its performance. The
proper type of brake fluid for your vehicle is
also identified on the original factory installed
hydraulic master cylinder reservoir.
To avoid contamination from foreign matter or
moisture, use only new brake fluid or fluid that
has been in a tightly closed container. Keep
the master cylinder reservoir cap secured at
all times. Brake fluid in an open container
absorbs moisture from the air resulting in a
lower boiling point. This may cause it to boil
unexpectedly during hard or prolonged
braking, resulting in sudden brake failure. This
could result in a collision.
Overfilling the brake fluid reservoir can result
in spilling brake fluid on hot engine parts,
causing the brake fluid to catch fire. Brake
fluid can also damage painted and vinyl
surfaces, care should be taken to avoid its
contact with these surfaces.
Do not allow petroleum based fluid to contam -
inate the brake fluid. Brake seal components
could be damaged, causing partial or
complete brake failure. This could result in a
collision.
WARNING!
8
22_LD_OM_EN_USC_t.book Page 251
Page 288 of 312

286
TECHNICAL SPECIFICATIONS
VEHICLE IDENTIFICATION NUMBER (VIN)
The VIN is on the left front corner of the instrument
panel. The VIN is visible from outside of the vehicle
through the
windshield.
Windshield VIN Location
NOTE:It is illegal to remove or alter the VIN.
BRAKE SYSTEM
Your vehicle is equipped with dual hydraulic brake
systems. If either of the two hydraulic systems lose
normal capability, the remaining system will still
function. There will be some loss of overall braking
effectiveness. This may be evident by increased
pedal travel during application, greater pedal force
required to slow or stop, and potential activation of
the Brake Warning Light.
In the event power assist is lost for any reason (for
example, repeated brake applications with the
engine off), the brakes will still function. The effort
required to brake the vehicle will be much greater
than that required with the power system
operating.
WHEEL AND TIRE TORQUE SPECIFICATIONS
Proper lug nut/bolt torque is very important to
ensure that the wheel is properly mounted to the
vehicle. Any time a wheel has been removed and
reinstalled on the vehicle, the lug nuts/bolts
should be torqued using a properly calibrated
torque wrench using a six-sided (hex) deep wall
socket.
TORQUE SPECIFICATIONS
**Use only authorized dealer recommended lug
nuts/bolts and clean or remove any dirt or oil
before tightening.
Lug Nut/Bolt
Torque**Lug Nut/
Bolt SizeLug Nut/Bolt
Socket Size
130 Ft-Lb
(176 N·m) M14 x 1.50 22 mm
22_LD_OM_EN_USC_t.book Page 286