2022 CITROEN DS7 CROSSBACK instrument panel
[x] Cancel search: instrument panelPage 162 of 244

160
Practical information07
or in certain moving components - risk of
strangulation and serious injury!
Rechargeable hybrid vehicles
Before any work is carried out under the
bonnet, it is essential to switch off the ignition
and disconnect the charging connector nozzle
if it is connected, check that the READY
indicator lamp is off on the instrument panel
and wait 4 minutes - risk of serious injury!
The location of the interior bonnet release
lever prevents the bonnet being opened
when the left-hand front door is closed.
When the engine is hot, handle the
exterior safety catch with care (risk of
burns), using the protected area.
When the bonnet is open, take care not to
damage the safety catch.
Do not open the bonnet under very windy
conditions.
Cooling of the engine when stopped
The engine cooling fan may start after the
engine has been switched off.
Take care with objects or clothing that could
be caught in the blades of the fan!
Opening
► From the inside: pull the control lever, located
on the left below the dashboard, towards you.
► From the outside: lift the safety catch and
raise the bonnet.
A bonnet strut opens the bonnet and holds it
open.
Closing
► Lower the bonnet and release it near the end
of its travel.
► Check the locking.
Because of the presence of electrical
equipment under the bonnet, it is strongly
recommended that exposure to water (rain,
washing, etc.) be limited.
Engine compartment
The engine shown here is an example for
illustrative purposes only.
The locations of the following components may
vary:
–
Air filt
er.
–
Engine oil dip
stick.
–
Engine oil filler c
ap.
–
Priming pump
.
–
Degas
sing screw.
Page 163 of 244

161
Practical information07
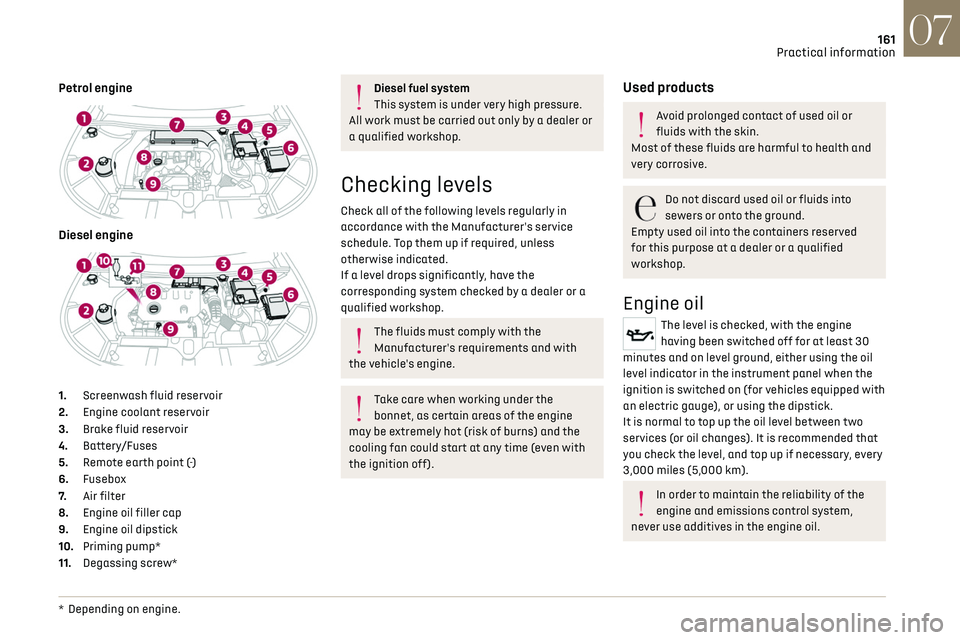
Petrol engine
Diesel engine
1. Screenwash fluid reservoir
2. Engine coolant reservoir
3. Brake fluid reservoir
4. Battery/Fuses
5. Remote earth point (-)
6. Fusebox
7. Air filter
8. Engine oil filler cap
9. Engine oil dipstick
10. Priming pump*
11. Degassing screw*
* Depending on engine .
Diesel fuel system
This system is under very high pressure.
All work must be carried out only by a dealer or
a qualified workshop.
Checking levels
Check all of the following levels regularly in
accordance with the Manufacturer's service
schedule. Top them up if required, unless
otherwise indicated.
If a level drops significantly, have the
corresponding system checked by a dealer or a
qualified workshop.
The fluids must comply with the
Manufacturer's requirements and with
the vehicle's engine.
Take care when working under the
bonnet, as certain areas of the engine
may be extremely hot (risk of burns) and the
cooling fan could start at any time (even with
the ignition off).
Used products
Avoid prolonged contact of used oil or
fluids with the skin.
Most of these fluids are harmful to health and
very corrosive.
Do not discard used oil or fluids into
sewers or onto the ground.
Empty used oil into the containers reserved
for this purpose at a dealer or a qualified
workshop.
Engine oil
The level is checked, with the engine
having been switched off for at least 30
minutes and on level ground, either using the oil
level indicator in the instrument panel when the
ignition is switched on (for vehicles equipped with
an electric gauge), or using the dipstick.
It is normal to top up the oil level between two
services (or oil changes). It is recommended that
you check the level, and top up if necessary, every
3,000 miles (5,000 km).
In order to maintain the reliability of the
engine and emissions control system,
never use additives in the engine oil.
Page 164 of 244

162
Practical information07
Checking using the dipstick
For the location of the dipstick, please refer
to the illustration of the corresponding engine
compartment.
► Grasp the dipstick by its coloured grip and pull
it out completely.
► Wipe the end of the dipstick using a clean, lint-
free cloth.
► Reinsert the dipstick and push fully down,
then pull it out again to visually check the oil level:
the correct level is between marks A (max) and
B (min).
Do not start the engine if the level is:
–
abo
ve mark A: contact a dealer or a qualified
workshop.
–
belo
w mark B: top up the engine oil
immediately.
Oil grade
Before topping up or changing the engine
oil, check that the oil is suitable for your engine
and complies with the recommendations in
the service schedule supplied with the vehicle
(or available from your dealer or qualified
workshop).
Use of non-recommended oil may invalidate
your warranty in the event of engine failure.
Topping up the engine oil level
For the location of the engine oil filler cap, please
refer to the corresponding engine compartment
illustration.
► Add oil in small quantities, avoiding any spills
on engine components (risk of fire).
► Wait a few minutes before checking the level
again using the dipstick.
► Top up the level if necessary.
► After checking the level, carefully screw the
oil filler cap back on and replace the dipstick in
its tube.
The oil level indication displayed on the
instrument panel when the ignition is
switched on is not valid for 30 minutes
following an addition of oil.
Brake fluid
The level of this fluid should be close to the
"MAX" mark. If not, check the brake pads
for wear.
To know how often the brake fluid should be
replaced, refer to the manufacturer's servicing
schedule.
Clean the cap before removing it to refill.
Use only DOT4 brake fluid from a sealed
container.
Engine coolant
It is normal to top up this fluid between
two services.
The check and top-up must only be done with the
engine cold.
A level of coolant that is too low risks causing
major damage to the engine; the coolant level
must be close to the "MAX" mark without ever
going above it.
If the level is close to or below the "MIN" mark, it
is essential to top it up.
When the engine is hot, the temperature of the
coolant is regulated by the fan.
As the cooling system is pressurised, wait at least
one hour after switching off the engine before
carrying out any work.
In order to avoid the risk of scalding if you need to
top up in an emergency, wrap a cloth around the
cap and unscrew the cap by two turns to allow the
pressure to drop.
Once the pressure has dropped, remove the cap
and top up to the required level.
Screenwash fluid
Top up to the required level when
necessary.
Fluid specification
The fluid must be topped up with a pre-mixed
product.
In winter (temperatures below zero), a fluid
containing an anti-freeze agent which is
Page 169 of 244

167
Practical information07
Never leave the vehicle unattended with
the vehicle into free-wheeling mode.
/
Release procedure
► With the vehicle stationary and the engine
running, select mode N and switch off the engine.
Within 5 seconds:
► Switch on the ignition.
► While depressing the brake pedal, move the
push selector forwards or backwards to confirm
mode N.
► While depressing the brake pedal, press the
control to release the parking brake.
► Release the brake pedal, switch off the
ignition.
If the 5-second time limit is exceeded, the
gearbox engages mode P; it is then
necessary to restart the procedure.
Reverting to normal operation
► While depressing the brake pedal, restart the
engine and select mode P.
Keyless Entry and Start
You must not depress the brake pedal
while switching the ignition on again, then
switching it off. If you do, the engine will start,
requiring you to restart the procedure.
Advice on care and
maintenance
General recommendations
Observe the following recommendations to avoid
damaging the vehicle.
Exterior
Never use a high-pressure jet wash in the
engine compartment - risk of damaging
the electrical components!
Do not wash the vehicle in bright sunshine or
extremely cold conditions.
When washing the vehicle in an automatic
roller-brush car wash, be sure to lock the
doors and, depending on version, move the
electronic key away and deactivate the
"hands-free" function (Hands-Free Tailgate
Access).
When using a pressure washer, keep the jet
nozzle at a minimum distance of 30 cm from
the vehicle (particularly when cleaning areas
containing chipped paint, sensors or seals).
Promptly clean up any stains containing
chemicals liable to damage the vehicle's
paintwork (including tree resin, bird droppings,
insect secretions, pollen and tar).
Depending on the environment, clean the
vehicle frequently to remove salty deposits
(in coastal areas), soot (in industrial areas)
and mud/salts (in wet or cold areas). These
substances can be highly corrosive.
Contact a dealer or a qualified workshop for
advice on removing stubborn stains requiring
special products (such as tar or insect
removers).
Preferably, have paint touch-ups performed by
a dealer or a qualified workshop.
Interior
When washing the vehicle, never use a
water hose or high-pressure jet to clean
the interior.
Liquids carried in cups or other open
containers can spill, presenting a risk of
damage to the instruments and controls and
the controls located on the centre console. Be
vigilant!
To clean instrument panels, touch screens
or other displays, wipe gently with a soft,
dry cloth. Do not use products (e.g. alcohol,
disinfectant) or soapy water directly on these
surfaces - risk of damage!
Page 178 of 244

176
In the event of a breakdown08
Check that the parking brake indicator lamps
on the instrument panel are on fixed.
The occupants must get out of the vehicle and
wait where they are safe.
If necessary, place a chock under the wheel
diagonally opposite the wheel to be changed.
Never go underneath a vehicle raised using a
jack; use an axle stand.
Wheel with wheel trim
When removing the wheel, first remove
the wheel trim by pulling at the valve aperture
using the wheelbrace.
When refitting the wheel, refit the wheel trim,
starting by placing its aperture in line with the
valve and then pushing it into place all round
its edge with the palm of your hand.
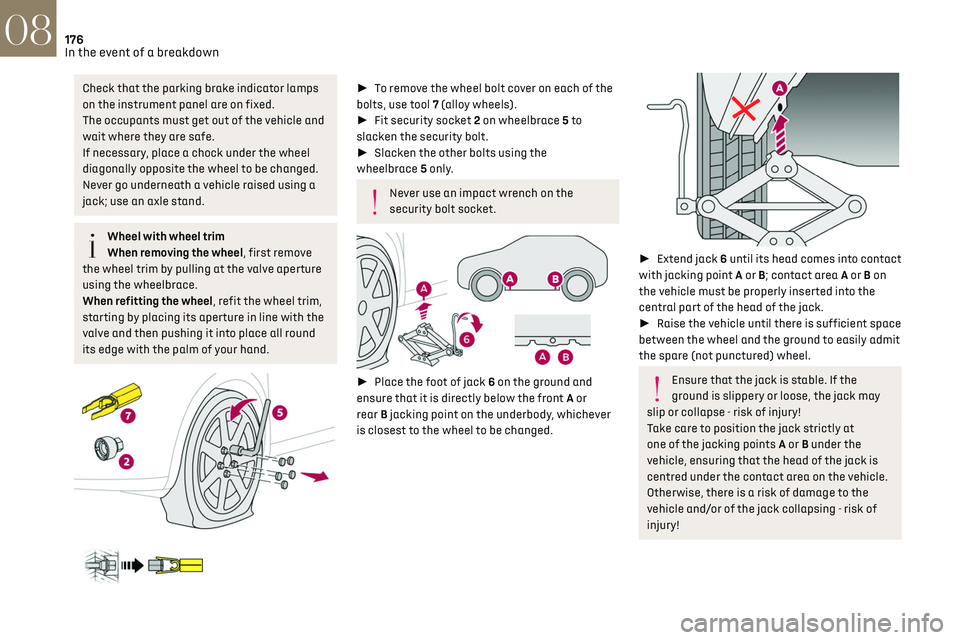
► To remove the wheel bolt cover on each of the
bolts, use tool 7 (alloy wheels).
► Fit security socket 2 on wheelbrace 5 to
slacken the security bolt.
► Slacken the other bolts using the
wheelbrace 5 only.
Never use an impact wrench on the
security bolt socket.
► Place the foot of jack 6 on the ground and
ensure that it is directly below the front A or
rear B jacking point on the underbody, whichever
is closest to the wheel to be changed.
► Extend jack 6 until its head comes into contact
with jacking point A or B; contact area A or B on
the vehicle must be properly inserted into the
central part of the head of the jack.
► Raise the vehicle until there is sufficient space
between the wheel and the ground to easily admit
the spare (not punctured) wheel.
Ensure that the jack is stable. If the
ground is slippery or loose, the jack may
slip or collapse - risk of injury!
Take care to position the jack strictly at
one of the jacking points A or B under the
vehicle, ensuring that the head of the jack is
centred under the contact area on the vehicle.
Otherwise, there is a risk of damage to the
vehicle and/or of the jack collapsing - risk of
injury!
Page 188 of 244

186
In the event of a breakdown08
Referring to the relevant section, reinitialise
certain equipment:
–
Electronic k
ey.
–
Sunroo
f and electric blind.
–
Electric windo
ws.
–
Da
te and time.
–
Pre
set radio stations.
After reconnecting the battery, the
message "Collision risk detection system
fault" is displayed on the instrument panel
when the ignition is switched on. This
operation is perfectly normal. The message
will disappear while driving.
Towing the vehicle
General recommendations
Observe the legislation in force in the
country where you are driving.
Ensure that the weight of the towing vehicle is
higher than that of the towed vehicle.
The driver must remain at the wheel of the
towed vehicle and must have a valid driving
licence.
When towing a vehicle with all four wheels on
the ground, always use an approved towing
arm; rope and straps are prohibited.
The towing vehicle must move off gently.
When the vehicle is towed with its engine
off, there is no longer braking and steering
assistance.
A professional towing service must be
called if:
–
B
roken down on a motorway or main road.
–
No
t possible to put the gearbox into neutral,
unlock the steering, or release the parking
brake.
– Not possible to tow a vehicle with an
automatic gearbox, with the engine running.
–
T
owing with only two wheels on the ground.
–
Four-wheel driv
e vehicle.
–
No appro
ved towbar available.
Rechargeable hybrid vehicles
Before any intervention, with the ignition
on, depress the brake pedal and select mode
N, then switch off the hybrid system (READY
indicator lamp off).
Always call on professionals for recovery of the
vehicle on a flatbed lorry or trailer.
Use the towing eye only to free the vehicle
if it is stuck, or to secure it for recovery on a
flatbed lorry or trailer.
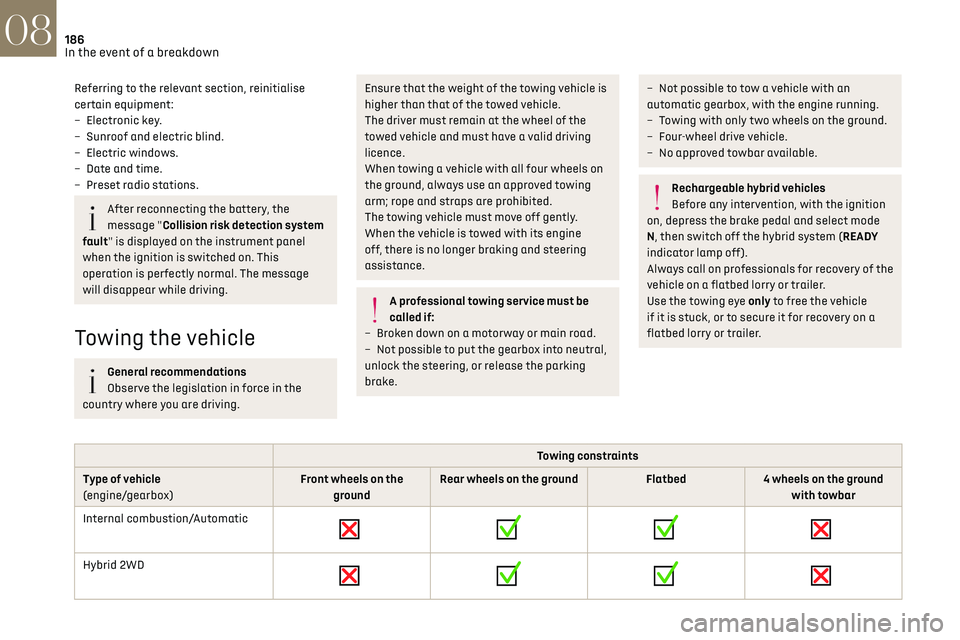
Towing constraints
Type of vehicle
(engine/gearbox) Front wheels on the
ground Rear wheels on the ground
Flatbed4 wheels on the ground
with towbar
Internal combustion/Automatic
Hybrid 2WD
Page 196 of 244

194DS IRIS SYSTEM - 12" touch screen Infotainment system10
DS IRIS SYSTEM - 12" touch
screen Infotainment
system
GPS navigation - Applications
- Multimedia audio system -
Bluetooth
® telephone
The functions and settings described vary
according to the version and
configuration of the vehicle, and according to
the country of sale.
For safety reasons and because they
require continued attention on the part of
the driver, the following operations must be
carried out with the vehicle stationary and the
ignition on:
–
Pairing the smartphone with the s
ystem via
Bluetooth
®.
–
U
sing the smartphone.
–
Connecting t
o Mirror Screen (Apple
®CarPlay®
or Android Auto).
–
C
hanging the system settings and
configuration.
The message Energy economy mode is
displayed when the system is about to go
into standby.
For more information on Energy economy
mode, refer to the "Practical information"
section.
Warning
Navigation is a driving aid. It cannot
replace the driver. All guidance instructions
should be carefully checked by the user.
By using the navigation, you accept the
following terms and conditions:
https://www.tomtom.com/en_gb/legal/
eula-automotive/?388448
First steps
The system starts when the ignition is
switched on.
Short press, ignition off: system on/off.
Short press, ignition on: mute/restore sound.
Long press, ignition on: start standby mode (mute
sound, screens and clock display off).
► Increase or decrease the volume using the
knob or the "plus" or "minus" buttons (depending
on equipment).
Information
This system gives access to the following
elements: –
Audio equipmen
t and telephone controls with
display of associated information.
–
Connect
ed services and display of associated
information.
–
Na
vigation system controls and display
of associated information (depending on
equipment).
–
V
oice recognition (depending on equipment).
–
Time and outside t
emperature.
–
Hea
ting/air conditioning system controls and
reminders of settings.
–
Settings for driving aid functions, c
omfort
and safety functions, extended head-up display
(depending on equipment and version), audio
equipment and digital instrument panel.
–
Settings for functions specific t
o rechargeable
hybrid vehicles.
–
Displa
y of visual manoeuvring aid functions.
–
In
teractive handbook.
–
Video t
utorials (e.g. screen management,
driving aids, voice recognition).
Upper banner
Certain information is displayed permanently in
the upper banner of the touch screen:
–
O
utside temperature from the vehicle's sensors
(associated with a blue symbol if there is a risk
of ice).
–
T
emperature setting reminder for the air
conditioning on the driver's and passenger sides.
–
C
harge level of the connected smartphone.
–
Sy
stem connection status (Bluetooth
®, Wi-Fi,
mobile telephone network).
Page 200 of 244

198DS IRIS SYSTEM - 12" touch screen Infotainment system10
Adding a Widget
To add a Widget, press "Widget" on the
left of the screen.
Or
Press one of these buttons on the screen.
Select the desired Widget.
Press the back arrow to return to the
previous page.
Organising the Widgets on a home page
(HOME)
To move a Widget, press and hold it, then drag it
to the desired location.
Adding a page
To add a page, press "Page" on the left of
the screen.
Press the back arrow to return to the
previous page.
Deleting a Widget
To move a Widget to the bin, press and
hold it, then drag it to the bin.
Personalising the instrument
panel
Press the pencil in the "Customize Driver
Information" part.
The modification of the organisation of the
different Widget is displayed on the instrument
panel in real time.
A Widget is a reduced window of an
application or service.
Adding a Widget
To add a Widget, press "Widget" on the
left of the screen.
Or
Press one of these buttons on the screen.
Select the desired Widget.
Press the back arrow to return to the
previous page.
Deleting a Widget
To move a Widget to the bin, press and
hold it, then drag it to the bin.
Steering-mounted controls
Voice control:
Short press, system voice commands
(depending on equipment).
Long press, voice commands of
the smartphone connected using Bluetooth
® or
Mirror Screen® (Apple®CarPlay®/Android Auto) via
the system.
Increase volume.
Decrease volume.
Mute the sound: long press on the
decrease volume button. Restore the sound by pressing one of the two
volume buttons.
Incoming call (short press): accept the
call.
Call in progress (short press): hang up.
Incoming call (long press): refuse the incoming
call.
Out of call (short press): access the call log of the
telephone connected via Bluetooth
®.
Mirror Screen® connected (short press): access
the projected view of the telephone application of
your Mirror Screen
® equipment.Radio: automatic search for the
previous/next station (in the list of
radio stations sorted by name or by frequencies).
Media: previous/next track, movement in the
lists.
Phone: browse the telephone's call log.
Short press: validate a selection. Out of selection,
display the lists.
Media (short press): change the
multimedia source.
Radio: display the list of stations.
Media: display the list of tracks.
Radio (press and hold): update the list of detected
stations.
Applications
From the home page, press this button to
access the applications wall.