2022 CITROEN C5 AIRCROSS park assist
[x] Cancel search: park assistPage 150 of 276

148
Driving
► Move forwards slowly until a message
is displayed, accompanied by an audible
signal, asking you to engage reverse gear.
► Engage reverse gear, release the
steering wheel and move without
exceeding a speed of 4 mph (7 km/h).
The assisted parking manoeuvre is in progress.
7► Without exceeding 5 mph (7 km/h),
move forwards and backwards, aided by
the warnings from the "Parking sensors" system,
until the end of the manoeuvre is indicated.
► At the end of the manoeuvre, the
indicator lamp on the instrument panel
goes off, accompanied by a message and an
audible signal.
Parking assistance is deactivated: you can take
over the controls again.
Assistance with "bay" parking manoeuvres
► When parking, select “ Park Assist” in
the Driving/Vehicle touch screen menu
to activate the function.
With a digital instrument panel, this
indicator lamp comes on in the instrument
panel to confirm the activation of the function.
► Limit the vehicle speed to a maximum
of 12 mph (20 km/h) and select “Enter
bay parking space” on the touch screen.
► Operate the direction indicator on the
parking side chosen to activate the
The Park Assist system takes control of the steering for a maximum of 4
manoeuvring cycles. It is deactivated after
these 4 cycles. If the vehicle is not positioned
correctly, take back control to complete the
manoeuvre.
The sequence of manoeuvres and the driving instructions are displayed on the
touch screen.
The assistance is activated: the display of this symbol and a speed limit
indicate that the steering manoeuvres are
controlled by the system: do not touch the
steering wheel.
The assistance is deactivated: the display of this symbol indicates that the
steering manoeuvres are no longer controlled
by the system: take over the steering.
Activation of Park Assist deactivates the Blind Spot Monitoring.
The Parking sensors function is not available during parking space
measurement. It intervenes later when
manoeuvring to warn that the vehicle is
approaching an obstacle: the audible signal
becomes continuous when the obstacle is
less than 30 centimetres away.
If the Parking sensors function has
been deactivated, it will be automatically
reactivated during the assisted manoeuvring
phases.
During parking and exit from parking
manoeuvres, the Top Rear Vision - Top
360 Vision functions may come into operation.
They allow better monitoring of the
surroundings of the vehicle, by displaying
additional information in the touch screen.
For more information on the Top Rear Vision
- Top 360 Vision
functions, refer to the
corresponding section.
In some circumstances, the sensors may
not detect small obstacles located in their
blind spots.
Any object exceeding the size of the vehicle
(e.g.
roof ladder, towball) is not taken
into account by the Park Assist during a
manoeuvre.
Always check the surroundings of the vehicle before starting a manoeuvre.
If the lateral distance between the vehicle and
the space is too great, the system may not be
able to measure the space.
During manoeuvring phases, the steering
wheel performs rapid turns: do not hold
the steering wheel or put your hands between
the spokes of the steering wheel.
Beware of any object likely to block the
manoeuvre (e.g.
loose clothing, scarves, ties)
- risk of injury!
Assistance with "parallel" parking manoeuvres
► When parking, select " Park Assist " in
the Driving/Vehicle touch screen menu
to activate the function.
With a digital instrument panel, this
indicator lamp lights up on the instrument
panel to confirm the activation of the function.
► Limit the vehicle speed to a maximum
of 12 mph (20 km/h) and select "Enter
parallel parking space" on the touch screen.
To enter a "parallel" parking space, the system does not identify spaces that are
clearly smaller or larger than the vehicle.
► Operate the direction indicator on the
side you have chosen to park in order to
activate the measurement function.
The vehicle
must drive at a distance of between 0.5
m and
1.5
m from the row of parked vehicles.
20► Drive at a speed below 12 mph (20
km/h) following the instructions until the
system finds an available space.
Page 151 of 276

149
Driving
6► Move forwards slowly until a message
is displayed, accompanied by an audible
signal, asking you to engage reverse gear
.
► Engage reverse gear, release the
steering wheel and move without
exceeding a speed of 4 mph (7 km/h).
The assisted parking manoeuvre is in progress.
7► Without exceeding 5 mph (7 km/h),
move forwards and backwards, aided by
the warnings from the "Parking sensors" system,
until the end of the manoeuvre is indicated.
► At the end of the manoeuvre, the
indicator lamp on the instrument panel
goes off, accompanied by a message and an
audible signal.
Parking assistance is deactivated: you can take
over the controls again.
Assistance with "bay" parking manoeuvres
► When parking, select “ Park Assist ” in
the Driving/Vehicle touch screen menu
to activate the function.
With a digital instrument panel, this
indicator lamp comes on in the instrument
panel to confirm the activation of the function.
► Limit the vehicle speed to a maximum
of 12 mph (20 km/h) and select “Enter
bay parking space” on the touch screen.
► Operate the direction indicator on the
parking side chosen to activate the
measurement function. The vehicle should drive
at a distance of between 0.5 m and 1.5 m from
the row of parked vehicles.
20► Drive at a speed below 12 mph (20
km/h) following the instructions until the
system finds an available space.
When several successive spaces are
found, the vehicle will be directed
towards the last one.
► Move forwards slowly until a message
is displayed, accompanied by an audible
signal, asking you to engage reverse gear
.
► Engage reverse gear, release the
steering wheel and move without
exceeding the speed of 5 mph (7 km/h).
The assisted parking manoeuvre is in progress.
7► Without exceeding 5 mph (7 km/h),
follow the instructions and the warnings
from the "Parking sensors" system, until the end
of the manoeuvre is indicated.
At the end of the manoeuvre, the indicator lamp in the instrument panel goes off,
accompanied by a message and an audible
signal.
The system is deactivated: it is possible to retake
control.
During a "bay" parking manoeuvre, the
Park Assist system is automatically
deactivated once the rear of the vehicle is
within 50
cm of an obstacle.
Assistance with "parallel" parking exit manoeuvres
► To leave a "parallel" parking space, switch
the engine on.
► With the vehicle stationary , select
"Park Assist" in the Driving/Vehicle
touch screen menu to activate the function.
With a digital instrument panel, this
indicator lamp comes on in the instrument
panel to confirm the activation of the function.
► Press " Exit parking slot " on the touch
screen.
► Operate the direction indicator for the
exit side chosen.
► Engage reverse or forward gear
and release the steering wheel.
The assisted parking manoeuvre is in progress.
5► Without exceeding 3 mph (5 km/h),
move forwards and backwards, aided by
the warnings from the "Parking sensors" system,
until the end of the manoeuvre is indicated.
The manoeuvre is complete when the vehicle's
front wheels are clear of the parking space.
At the end of the manoeuvre, the indicator lamp in the instrument panel goes off,
accompanied by a message and an audible
signal.
The system is deactivated: it is possible to retake
control.
Page 184 of 276

182
In the event of a breakdown
With a tyre repaired using this type of kit,
do not exceed a speed of 50 mph
(80
km/h) and do not drive more than
125
miles (200 km).
Contact a CITROËN dealer or a qualified
workshop to have the tyre changed.
Checking/adjusting tyre
pressures
The compressor can be used, without injecting
sealant, to check and, if necessary, adjust the
tyre pressures.
►
Remove the valve cap from the tyre and keep
it in a clean place.
►
Uncoil
the pipe stowed under the compressor.
►
Screw the pipe onto the valve and tighten
firmly
.
►
Check that the compressor switch is in
position " O
".
►
Fully uncoil the electric cable stowed under
the compressor
.
►
Connect
the compressor's electric plug to one
of the vehicle's 12
V sockets.
►
Switch the ignition on.
►
Start the compressor by placing the switch at
position " I
" and adjust the pressure to the value
shown on the vehicle's tyre pressure label. To
deflate: press the black button located on the
compressor pipe, near the valve connection.
If after 7 minutes the pressure of 2 bar is
not reached, the tyre is damaged;
contact a CITROËN dealer or a qualified
workshop for assistance.
►
Once the correct pressure is reached, put the
switch in position " O
".
►
Remove the kit and stow it.
►
Refit the cap on the valve.
Spare wheel
Scan the QR Code on page 3 to view
explanatory videos.
For more information on the Tool kit,
refer to the corresponding section.
Accessing the spare wheel
The spare wheel is stored in the boot, under the
floor.
To access the spare wheel, first refer to the
Tool
kit
section.
Depending on version, the spare wheel
may be a standard size steel or alloy
wheel.
In some countries, it is a ‘space saver’ wheel.
Removing the spare wheel
► Slacken the central nut.
► Remove the fastening device (nut and bolt).
►
Lift the spare wheel towards you from the
rear
.
►
T
ake the wheel out of the boot.
Putting the spare wheel back in place
The punctured wheel cannot be put under the boot floor.
► Put the spare wheel back in place in its
housing.
► Slacken the nut on the bolt by a few turns.
► Position the fastening device (nut and bolt) in
the middle of the wheel.
► Tighten the central nut sufficiently to retain
the wheel correctly.
► Put the tool box back in place in the middle of
the wheel and clip it in place.
If there is no wheel in the well, the
fastening device (nut and bolt) cannot be
refitted.
Removing a wheel
Parking the vehicle
Immobilise the vehicle where it does
not obstruct traffic: the ground must be level,
stable and non-slippery.
With a manual gearbox, engage first gear
to lock the wheels, apply the parking brake,
unless it is set to automatic mode, and switch
off the ignition.
Page 197 of 276

195
In the event of a breakdown
8
► Lift the plastic cover on the (+) terminal, if the
vehicle has one.
►
Connect the red cable to the (+) terminal of
flat battery
A (at the metal elbow), then to the
(+) terminal of the backup battery
B or of the
booster.
►
Connect one end of the green or black cable
to the (-) terminal of the backup battery
B or of
the booster (or to an earth point on the assisting
vehicle).
►
Connect the other end of the green or black
cable to the earth point
C
.
►
Start the engine on the assisting vehicle and
leave it running for a few minutes.
►
Operate the starter on the broken down
vehicle and let the engine run.
If the engine does not start immediately
, switch
off the ignition and wait a few moments before
trying again.
►
W
ait for it to return to idle.
►
Disconnect the jump leads in reverse order.
► Refit the plastic cover to the (+) terminal, if
the vehicle has one.
►
Allow the engine to run for at least
30
minutes, with the vehicle stationary, so that
the battery reaches an adequate state of charge.
Drive cautiously during the first 30
minutes after starting the engine.
With an automatic gearbox, never try to
start the engine by pushing the vehicle.
Charging the battery using a
battery charger
For optimum service life of the battery, it is
essential to maintain an adequate state of
charge.
In some circumstances, it may be necessary to
charge the battery:
–
When using the vehicle mainly for short
journeys.
–
If the vehicle is to be taken off the road for
several weeks.
Contact a CITROËN dealer or a qualified
workshop.
To charge the vehicle's battery yourself, use only a charger compatible with
lead-acid batteries with a nominal voltage of
12
V.
Follow the instructions provided by the
manufacturer of the charger.
Never reverse polarities.
It is not necessary to disconnect the
battery.
►
Switch the ignition off.
►
Switch off all electrical consumers (audio
system, lighting, wipers, etc.).
► Switch off charger B before connecting
the cables to the battery, so as to avoid any
dangerous sparks.
►
Ensure that the charger cables are in good
condition.
►
Lift the plastic cover on the (+) terminal, if the
vehicle has one.
►
Connect the cables of charger B
as follows:
•
the positive (+) red cable to the (+) terminal
of battery
A,
•
the negative (-) black cable to earth point C
on the vehicle.
Page 201 of 276

199
In the event of a breakdown
8
► Disconnect the (+) terminal of the front
battery by disconnecting the red quick-release
clamp: •
Raise lever
A
fully to release clamp
B
.
•
Remove clamp
B
by lifting it off.
Reconnection
► Connect the (+) terminal of the front battery
by connecting the red quick-release clamp: •
Raise lever
A
fully.
•
Refit open clamp
B
on the (+) terminal.
• Push clamp B fully down.
• Lower lever A to lock clamp B.
►
Connect the
(-) terminal of the rear battery
using the black quick-release connector.
After reconnection
After reconnecting the battery, turn on the
ignition and wait 1 minute before starting the
engine, to enable the electronic systems to
initialise.
If minor problems nevertheless persist following
this operation, contact a CITROËN dealer or a
qualified workshop.
Referring to the relevant section, reset certain
equipment:
–
Remote control key or electronic key
(depending on version).
–
Sunroof and electric sun blind.
–
Electric windows.
–
Date and time.
–
Preset radio stations.
Towing the vehicle
Procedure for having your vehicle towed or
for towing another vehicle using a removable
mechanical device.
General recommendations
Observe the legislation in force in the
country where you are driving.
Ensure that the weight of the towing vehicle is
higher than that of the towed vehicle.
The driver must remain at the wheel of the
towed vehicle and must have a valid driving
licence.
When towing a vehicle with all four wheels on
the ground, always use an approved towing
arm; rope and straps are prohibited.
The towing vehicle must move off gently.
When the vehicle is towed with its engine
off, there is no longer braking and steering
assistance.
A professional towing service must be
called if:
–
Broken down on a motorway or main road.
–
Not possible to put
the gearbox into neutral,
unlock the steering, or release the parking
brake.
–
Not possible to tow a vehicle with an
automatic gearbox, with the engine running.
–
T
owing with only two wheels on the ground.
–
Four-wheel drive vehicle.
–
No approved towbar available.
Rechargeable hybrid vehicles
Before any intervention, with the ignition
on, depress the brake pedal and select mode
N, then switch off the hybrid system (READY
indicator lamp off).
Always call on professionals for recovery of
the vehicle on a flatbed lorry or trailer.
Page 203 of 276
201
In the event of a breakdown
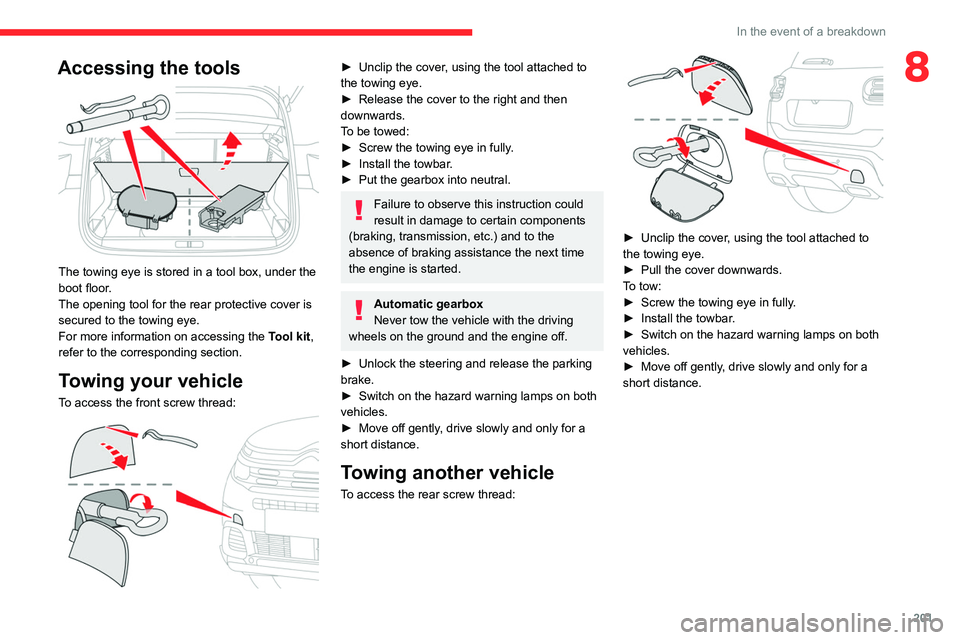
8Accessing the tools
The towing eye is stored in a tool box, under the
boot floor.
The opening tool for the rear protective cover is
secured to the towing eye.
For more information on accessing the Tool kit,
refer to the corresponding section.
Towing your vehicle
To access the front screw thread:
► Unclip the cover , using the tool attached to
the towing eye.
►
Release the cover to the right and then
downwards.
T
o be towed:
►
Screw the towing eye in fully
.
►
Install the towbar
.
►
Put the gearbox into neutral.
Failure to observe this instruction could
result in damage to certain components
(braking, transmission, etc.) and to the
absence of braking assistance the next time
the engine is started.
Automatic gearbox
Never tow the vehicle with the driving
wheels on the ground and the engine off.
►
Unlock the steering and release the parking
brake.
►
Switch on the hazard warning lamps on both
vehicles.
►
Move off gently
, drive slowly and only for a
short distance.
Towing another vehicle
To access the rear screw thread:
► Unclip the cover , using the tool attached to
the towing eye.
►
Pull the cover downwards.
T
o tow:
►
Screw the towing eye in fully
.
►
Install the towbar
.
►
Switch on the hazard warning lamps on both
vehicles.
►
Move off gently
, drive slowly and only for a
short distance.
Page 250 of 276

248
Alphabetical index
Inflating tyres 172, 206
Inflating tyres and accessories
(using the kit)
180, 182
Infrared camera
11 8
Instrument panel
9–10, 21–22, 118
Intelligent Traction Control
79
Internet browser
229, 232
ISOFIX mountings
90
J
Jack 180, 182, 235
Jump starting
194
K
Key 27, 31–33
Key, electronic
29–30
Keyless Entry and Starting
29–31, 100–101
Key not recognised
101–102
Key with remote control
27–28, 98
Kit, hands-free
215, 237
Kit, puncture repair
179
Kit, temporary puncture repair
179–180, 182
L
Labels, identification 206
Lamp, boot
66, 189
Lamps, parking
68
Lamps, rear 187
Lams with Full LED technology
71
Lane assist
126, 130–131, 133
Lane departure warning active
137, 141
Leather (care)
176
LEDs - Light-emitting diodes
68, 185, 187
Level, AdBlue®
171
Level, brake fluid
170
Level, Diesel additive
171–172
Level, engine coolant
18, 170
Level, engine oil
17, 169
Levels and checks
169–171
Level, screenwash fluid
72, 171
Light-emitting diodes - LEDs
68, 185, 187
Lighting, cornering
71
Lighting dimmer
21
Lighting, exterior
67
Lighting, guide-me home
29, 69
Lighting, interior
63–64
Lighting, mood
63
Lighting, welcome
69
Loading
64–65, 167
Load reduction mode
165
Locating your vehicle
29
Locking
30–31
Locking from the inside
32
Locking the doors
32
Low fuel level
152
Lumbar
45M
Mains socket (domestic network) 155
Maintenance (advice)
154, 175
Maintenance, routine
118, 171
Manoeuvring aids (recommendations)
11 7
Markings, identification
206
Massage function
47
Massage, multi-point
47
Mat
62, 118
Memorising a speed
125
Menu
214
Menu, main
24
Menus (audio)
209–210, 221–222
Menu short cuts
24
Messages
239
Messages, quick
239
Mirror, rear view
49
Mirrors, door
48, 57, 140
Mirror, vanity
60
Misfuel prevention
153
Mobile application
25–26, 59, 160–161
Motor, electric
111–112, 154, 205
Motorised tailgate
36–38
Mountings, ISOFIX
90
N
Navigation 226–228
Navigation, connected
229–231
Net, high load retaining
64–65
Number plate lamps
188
Page 251 of 276

249
Alphabetical index
O
Obstacle detection 141
Oil change
169
Oil consumption
169
OIl, engine
169
On-board tools
66, 178–180
Opening the bonnet
168
Opening the boot
29, 35
Opening the doors
29, 34
Opening the windows
27
P
Pads, brake 172
Paint
176, 206
Paint colour code
206
Parcel shelf, rear
63
Park Assist
147–149
Parking brake, electric
102–104, 172
Parking sensors, audible and visual
141
Parking sensors, front
142
Parking sensors, rear
142
Personalisation
10
Plates, identification
206
Player, Apple®
213, 236
Player, USB
212, 235
Port, USB
60, 212, 214, 231, 235
Power
20
Power indicator (Rechargeable hybrid)
8, 20
Pressures, tyres
172, 180, 206
Pre-tensioning seat belts 85
Priming the fuel system
178
Profiles
217, 240
Programmable cruise control
124
Programmable speed limiter
122
Protecting children
86, 88–92
Puncture
180, 182
Q
Quiet vehicle warning sound 76
R
Radar (warnings) 11 7
Radio
210–211, 234
Radio, digital (Digital Audio Broadcasting -
DAB)
212, 235
Range, AdBlue®
18, 171
RDS
211, 234
Reading lamps
63–64
READY lamp
168
Rear screen, demisting
57
Rechargeable hybrid engine
8, 24, 168, 199, 205
Rechargeable hybrid system
5, 8, 24,
100, 112, 154
Recharging the battery
195, 197–198
Recharging the traction battery
157
Recharging the traction battery
(Rechargeable hybrid)
154, 160–162
Recirculation, air
54–55
Recovery
199, 201
Recovery of the vehicle
199, 201
Reduction of electrical load
165
Regeneration of the particle filter
172
Regenerative braking (deceleration by
engine braking)
11 0
Reinitialisation of the under-inflation
detection system
11 6
Reinitialising the remote control
34
Reminder, key in ignition
99
Reminder, lighting on
67–68
Remote control
27–32
Remote functions
161
Removing a wheel
183–184
Removing the mat
62
Replacing bulbs
185–188
Replacing fuses
189–190
Replacing the air filter
172
Replacing the oil filter
172
Replacing the passenger compartment
filter
171
Reservoir, screenwash
171
Resetting the trip recorder
20–21
Reset trip
22
Rev counter
9–10
Reversing camera
118, 143–145
Reversing lamps
187–188
Roof bars
167–168
Running out of fuel (Diesel)
178