2022 CITROEN BERLINGO VAN fold seats
[x] Cancel search: fold seatsPage 72 of 324

70
Ease of use and comfort
► Tighten the strap using the adjustable section
in order to correctly retain the items that have
been loaded inside the cover.
The protective cover may be left in place after use.
Regularly check the condition of the
protective cover.
When signs of wear and tear appear, contact
a CITROËN dealer to have it replaced by a
protective cover that meets the specifications
and qualities required by CITROËN and your
vehicle.
Crew cab
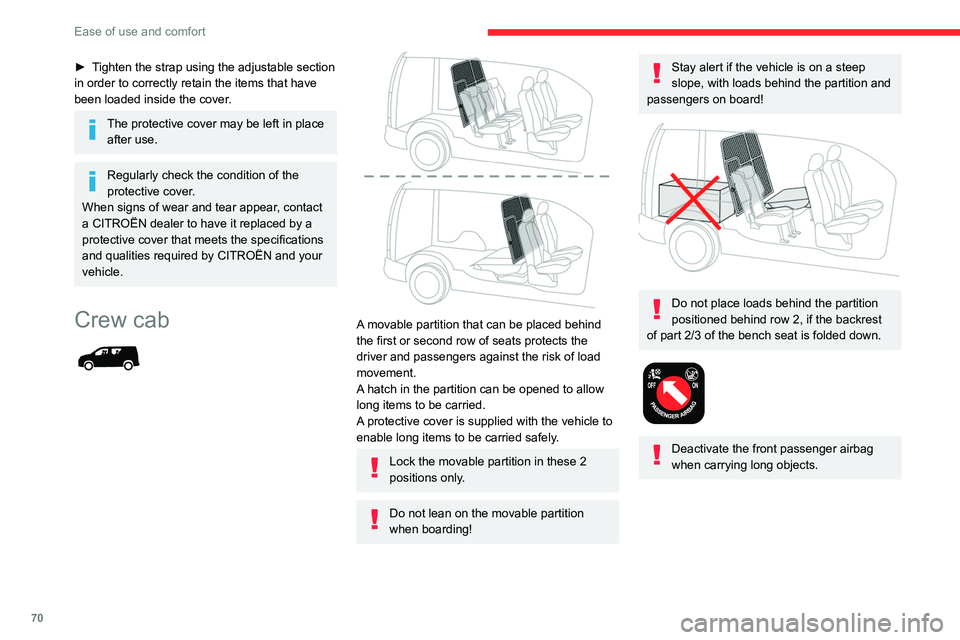
A movable partition that can be placed behind
the first or second row of seats protects the
driver and passengers against the risk of load
movement.
A hatch in the partition can be opened to allow
long items to be carried.
A protective cover is supplied with the vehicle to
enable long items to be carried safely.
Lock the movable partition in these 2
positions only.
Do not lean on the movable partition
when boarding!
Stay alert if the vehicle is on a steep
slope, with loads behind the partition and
passengers on board!
Do not place loads behind the partition
positioned behind row 2, if the backrest
of part 2/3 of the bench seat is folded down.
Deactivate the front passenger airbag
when carrying long objects.
Page 73 of 324

71
Ease of use and comfort
3Moving the partition
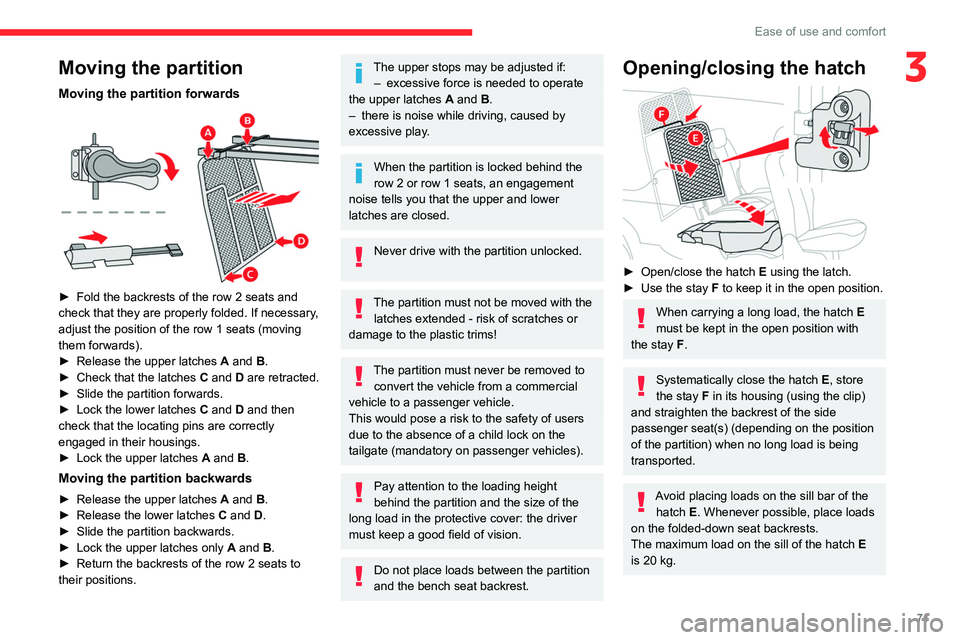
Moving the partition forwards
► Fold the backrests of the row 2 seats and
check that they are properly folded. If necessary ,
adjust the position of the row 1 seats (moving
them forwards).
►
Release the upper latches
A
and B.
►
Check that the latches
C and D are retracted.
►
Slide the partition forwards.
►
Lock the lower latches
C
and D and then
check that the locating pins are correctly
engaged in their housings.
►
Lock the upper latches
A
and B.
Moving the partition backwards
► Release the upper latches A and B.
► Release the lower latches C and D.
►
Slide the partition backwards.
►
Lock the upper latches only
A
and B.
►
Return the backrests of the row 2 seats to
their positions.
The upper stops may be adjusted if: – excessive force is needed to operate
the upper latches
A
and B.
–
there is noise while driving, caused by
excessive play
.
When the partition is locked behind the
row 2 or row 1 seats, an engagement
noise tells you that the upper and lower
latches are closed.
Never drive with the partition unlocked.
The partition must not be moved with the latches extended - risk of scratches or
damage to the plastic trims!
The partition must never be removed to convert the vehicle from a commercial
vehicle to a passenger vehicle.
This would pose a risk to the safety of users
due to the absence of a child lock on the
tailgate (mandatory on passenger vehicles).
Pay attention to the loading height
behind the partition and the size of the
long load in the protective cover: the driver
must keep a good field of vision.
Do not place loads between the partition
and the bench seat backrest.
Opening/closing the hatch
► Open/close the hatch E using the latch.
► Use the stay F to keep it in the open position.
When carrying a long load, the hatch E
must be kept in the open position with
the stay F.
Systematically close the hatch E, store
the stay F in its housing (using the clip)
and straighten the backrest of the side
passenger seat(s) (depending on the position
of the partition) when no long load is being
transported.
Avoid placing loads on the sill bar of the hatch E. Whenever possible, place loads
on the folded-down seat backrests.
The maximum load on the sill of the hatch E
is 20 kg.
Page 104 of 324

102
Safety
6.Rear centre seat belt (row 2) not fastened/
unfastened warning lamp.
7. Rear right-hand seat belt (row 2) not
fastened/unfastened warning lamp.
Not fastened at the front
When the ignition is switched on, warning lamp
1 lights up on the instrument panel (depending
on version) and the corresponding indicator lamp
(2, 3 or 4 (depending on version)) lights up if the
driver and/or front passenger have not fastened
their seat belts.
At a speed greater than 12 mph (20 km/h),
these warning lamps flash, accompanied by an
increasing audible signal for approximately two
minutes. After two minutes, these warning lamps
remain on as long as the front seatbelts are not
fastened.
Not fastened at the rear
When the ignition is switched on, with the engine
running or the vehicle moving at a speed below
12
mph (20 km/h), warning lamp 1 (depending
on version) and the corresponding indicator
lamps (5 to 7) light up for around sixty seconds,
if one or more rear seat belts (row 2) are not
fastened.
There are no seat belt warning lamps for row 3.
Unfastened
After the ignition is switched on, warning lamp 1
(depending on version) and the corresponding
indicator lamps light up if the driver and/or one or
more passengers unfasten their seat belts.
At a speed greater than 12 mph (20 km/h), these
warning lamps flash, accompanied by an audible
signal for approximately two minutes. After this
time, these warning lamps remain on as long as
the seatbelts are not refastened.
Advice
The driver must ensure that passengers use the seat belts correctly and that they
are all fastened before setting off.
Wherever seated in the vehicle, you must
always fasten the seat belt, even for short
journeys.
Do not invert the seat belt buckles, as they
will not fulfil their role properly.
To ensure the proper functioning of the belt
buckles, make sure that there are no foreign
bodies present (e.g.
a coin) before fastening.
Before and after use, ensure that the seat belt
is reeled in correctly.
After folding or moving a seat or rear bench
seat, ensure that the seat belt is positioned
and reeled in correctly.
Installation
The lower part of the strap must be
positioned as low as possible over the pelvis.
The upper part must be positioned in the
hollow of the shoulder.
At the front, adjusting the position of the
seat belt may require the seat height to be
adjusted.
In order to be effective, a seat belt must:
–
be tightened as close to the body as
possible.
–
be pulled in front of you with a smooth
movement, checking that it is not twisted.
–
must only be used to secure one person.
–
not show signs of tearing or fraying.
–
not be changed or modified, in order to
avoid affecting its performance.
Recommendations for children
Use a suitable child seat if the passenger
is less than 12 years old or shorter than 1.5
metres.
Never use the same seat belt to secure more
than one child.
Never carry a child on your lap.
For more information on Child seats, refer to
the corresponding section.
Maintenance
In accordance with current safety
regulations, for all work on your vehicle's
seat belts, contact a qualified workshop with
the skills and equipment needed, which a
CITROËN dealer is able to provide.
Page 114 of 324

11 2
Safety
(f) With the fixed passenger seat (which cannot be placed in the folded position), adjust the backrest angle to 0°.
For more information on the Front seats and, in particular, the folded position for the backrest, refer to the corresponding secti\
on.
(g) On the M version, fold down the backrests in row
2.
(h) Installing child seats with a support leg is prohibited in the third ro\
w.
U Seat position suitable for installing a child seat secured using the se\
at belt and universally approved for rearward-facing and/or forward-faci\
ng use.
UF Seat position suitable for installing a child seat secured using a seat\
belt and universally approved for forward-facing use.
X Seat position not suitable for installing a child seat for the stated w\
eight class.
"ISOFIX" mountings
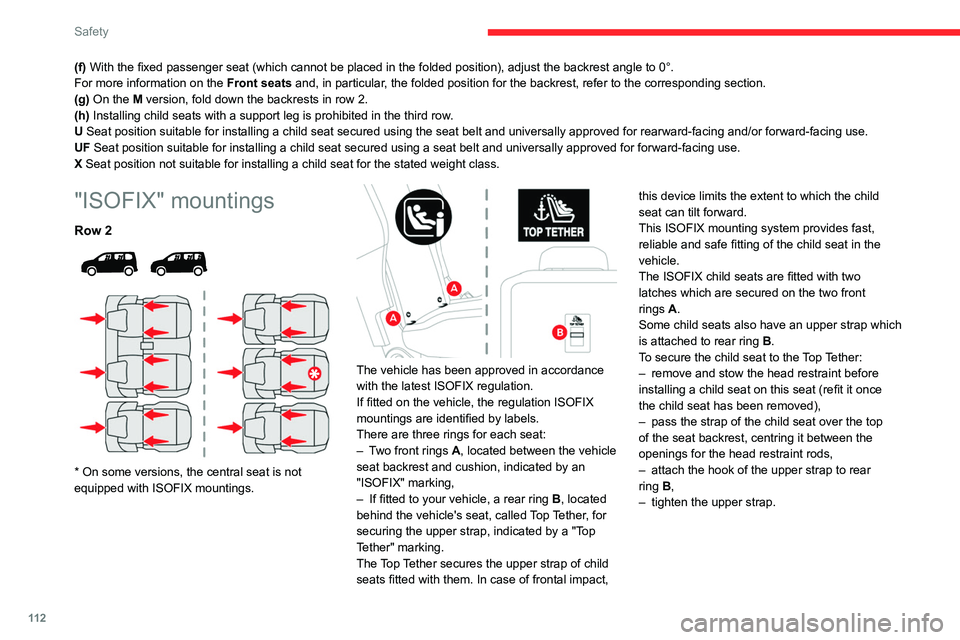
Row 2
* On some versions, the central seat is not
equipped with ISOFIX mountings.
The vehicle has been approved in accordance
with the latest ISOFIX regulation.
If fitted on the vehicle, the regulation ISOFIX
mountings are identified by labels.
There are three rings for each seat:
–
T
wo front rings A, located between the vehicle
seat backrest and cushion, indicated by an
"ISOFIX" marking,
–
If fitted to your vehicle, a rear ring
B, located
behind the vehicle's seat, called Top Tether, for
securing the upper strap, indicated by a "Top
Tether" marking.
The Top Tether secures the upper strap of child
seats fitted with them. In case of frontal impact, this device limits the extent to which the child
seat can tilt forward.
This ISOFIX mounting system provides fast,
reliable and safe fitting of the child seat in the
vehicle.
The ISOFIX child seats are fitted with two
latches which are secured on the two front
rings
A.
Some child seats also have an upper strap which
is attached to rear ring B.
To secure the child seat to the Top Tether:
– remove and stow the head restraint before
installing a child seat on this seat (refit it once
the child seat has been removed),
–
pass the strap
of the child seat over the top
of the seat backrest, centring it between the
openings for the head restraint rods,
–
attach the hook of the upper strap to rear
ring
B,
–
tighten the upper strap.
Page 292 of 324

290
Alphabetical index
Dynamic stability control (DSC) 96–98
E
EBFD 95
Eco-driving (advice)
8
ECO mode
134
Economy mode
187
Electric motor
5, 9, 30, 176, 190,
193, 215, 218, 236
Electric windows
47
Electronic brake force distribution (EBFD)
95
Emergency braking assistance (EBA)
95
Emergency call
92–93
Emergency warning lamps
67, 94
Emissions control system, SCR
197
Energy economy mode
187
Energy flows
30
Energy recovery
133
Engine compartment
193
Engine, Diesel
174, 193, 202, 229–231, 235
Engine, petrol
193, 227–228
Engines
227–231, 235
Environment
8, 40, 81, 118
ESC (electronic stability control)
95
Expanded traffic sign recognition
143
Exterior lighting
86
F
Fatigue detection 160
Filling the AdBlue® tank
195, 198
Filling the fuel tank
174–175
Filter, air
196
Filter, oil
196
Filter, particle
195–196
Filter, passenger compartment
73, 196
Finisher
209
Fitting a wheel
207–208
Fitting roof bars
191
Fittings, interior
60, 64
Flap, fuel filler
174–175
Flap, removable
69
Flashing indicators
84, 213
Fluid, brake
194
Fluid, engine coolant
194
Foglamp, rear
213
Foglamps
212
Foglamps, front
83, 210
Foglamps, rear
83
Folding the rear seats
56–57
Frequency (radio)
274
Fuel
8, 174
Fuel consumption
8
Fuel tank
174–176
Fuses
214
G
Gauge, fuel 174–175
Gearbox, automatic
126–132, 196, 216
Gearbox, manual
126–127, 196
Gear lever, automatic gearbox
127–129
Gear lever, manual gearbox
126–127
Gear shift indicator ~ Gear efficiency
indicator
134
Glove box
60
G.P.S.
268
H
Hazard warning lamps 67, 94
Headlamp adjustment
88
Headlamps, automatic dipping
86–87
Headlamps, automatic illumination
84–86
Headlamps, dipped beam
83, 210–211
Headlamps, halogen
210
Headlamps, main beam
83, 86, 210, 212
Head restraints, front
59
Head restraints, rear
56–57
Head-up display
138–139
Heating
73–75, 79–80
Heating, additional
46, 79–80
Heating, programmable
46, 79–81
High voltage
176
Hill Assist Descent Control (HADC)
98
Hill start assist
126
Histogramme, fuel consumption
30