2022 CITROEN BERLINGO VAN engine
[x] Cancel search: enginePage 177 of 324
175
Practical information
7
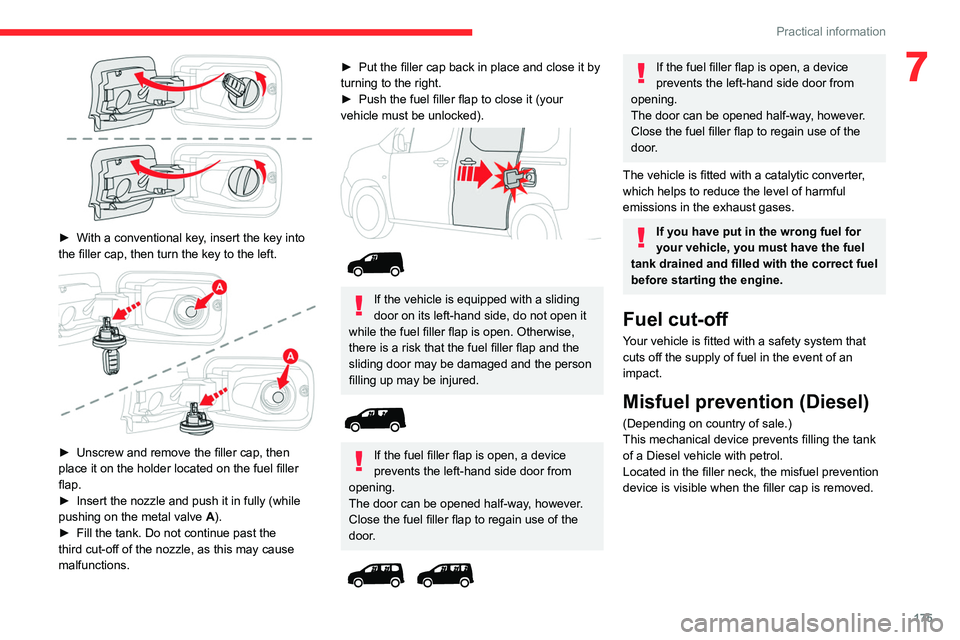
► With a conventional key, insert the key into
the filler cap, then turn the key to the left.
► Unscrew and remove the filler cap, then
place it on the holder located on the fuel filler
flap.
►
Insert the nozzle and push it in fully (while
pushing on the metal valve A
).
►
Fill the tank. Do not continue past the
third cut-off of the nozzle, as this may cause
malfunctions.
► Put the filler cap back in place and close it by
turning to the right.
►
Push the fuel filler flap to close it (your
vehicle must be unlocked).
If the vehicle is equipped with a sliding
door on its left-hand side, do not open it
while the fuel filler flap is open. Otherwise,
there is a risk that the fuel filler flap and the
sliding door may be damaged and the person
filling up may be injured.
If the fuel filler flap is open, a device
prevents the left-hand side door from
opening.
The door can be opened half-way, however.
Close the fuel filler flap to regain use of the
door.
If the fuel filler flap is open, a device
prevents the left-hand side door from
opening.
The door can be opened half-way, however.
Close the fuel filler flap to regain use of the
door.
The vehicle is fitted with a catalytic converter,
which helps to reduce the level of harmful
emissions in the exhaust gases.
If you have put in the wrong fuel for
your vehicle, you must have the fuel
tank drained and filled with the correct fuel
before starting the engine.
Fuel cut-off
Your vehicle is fitted with a safety system that
cuts off the supply of fuel in the event of an
impact.
Misfuel prevention (Diesel)
(Depending on country of sale.)
This mechanical device prevents filling the tank
of a Diesel vehicle with petrol.
Located in the filler neck, the misfuel prevention
device is visible when the filler cap is removed.
Page 179 of 324
177
Practical information
7– Do not inhale the gases emitted by the
traction battery which are toxic.
–
Move away from the vehicle in the event of
incident or accident, the gases emitted being
flammable and could cause a fire.
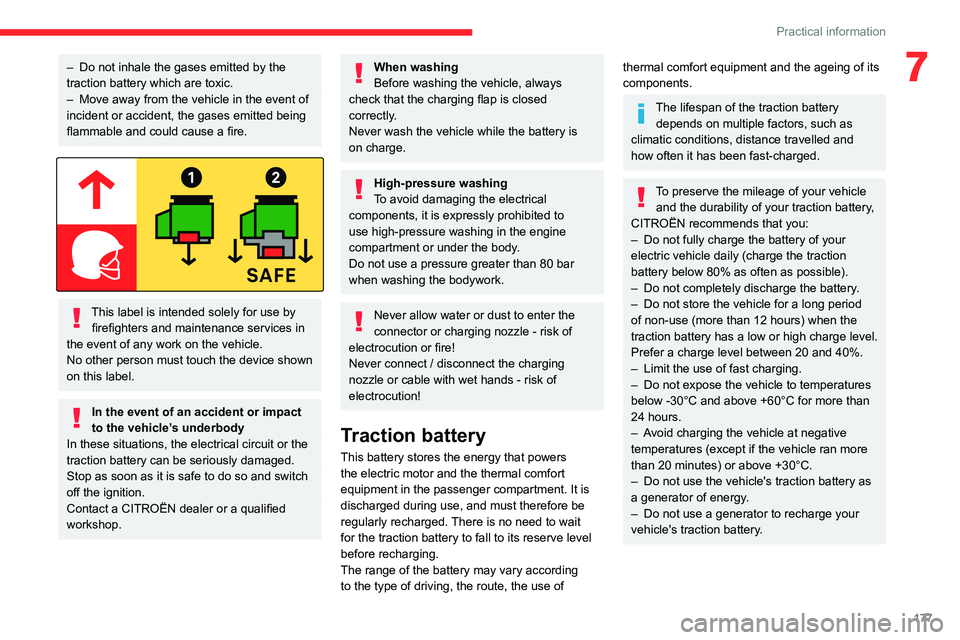
This label is intended solely for use by firefighters and maintenance services in
the event of any work on the vehicle.
No other person must touch the device shown
on this label.
In the event of an accident or impact
to the vehicle’s underbody
In these situations, the electrical
circuit or the
traction battery can be seriously damaged.
Stop as soon as it is safe to do so and switch
off the ignition.
Contact a CITROËN dealer or a qualified
workshop.
When washing
Before washing the vehicle, always
check that the charging flap is closed
correctly.
Never wash the vehicle while the battery is
on charge.
High-pressure washing
To avoid damaging the electrical
components, it is expressly prohibited to
use high-pressure washing in the engine
compartment or under the body.
Do not use a pressure greater than 80 bar
when washing the bodywork.
Never allow water or dust to enter the
connector or charging nozzle - risk of
electrocution or fire!
Never connect / disconnect the charging
nozzle or cable with wet hands - risk of
electrocution!
Traction battery
This battery stores the energy that powers
the electric motor and the thermal comfort
equipment in the passenger compartment. It is
discharged during use, and must therefore be
regularly recharged. There is no need to wait
for the traction battery to fall to its reserve level
before recharging.
The range of the battery may vary according
to the type of driving, the route, the use of
thermal comfort equipment and the ageing of its
components.
The lifespan of the traction battery depends on multiple factors, such as
climatic conditions, distance travelled and
how often it has been fast-charged.
To preserve the mileage of your vehicle and the durability of your traction battery,
CITROËN recommends that you:
–
Do not fully charge the battery of your
electric vehicle daily (charge the traction
battery below 80% as often as possible).
–
Do not completely discharge the battery
.
–
Do not store the vehicle for a long period
of non-use (more than 12
hours) when the
traction battery has a low or high charge level.
Prefer a charge level between 20 and 40%.
–
Limit the use of fast charging.
–
Do not expose the vehicle to temperatures
below -30°C and above +60°C for more than
24
hours.
–
A
void charging the vehicle at negative
temperatures (except if the vehicle ran more
than 20
minutes) or above +30°C.
–
Do not use the vehicle's traction battery as
a generator of energy
.
–
Do not use a generator to recharge your
vehicle's traction battery
.
Page 186 of 324
184
Practical information
For a full charge, follow the desired charging
procedure without pausing it, until it ends
automatically. Charging can be either immediate
or deferred (except fast public charger, mode 4).
You can stop domestic or accelerated charging
at any time by unlocking the vehicle and
removing the nozzle. For superfast charging,
refer to the fast public charger.
For more information on the charging displays
on the Instrument panel and the Touch screen,
refer to the corresponding section.
It is also possible to monitor the charging
progress using the MyCitroën App
application.
For more information on Remote functions,
refer to the corresponding section.
As a safety measure, the engine will not start if the charging cable is plugged into
the connector on the vehicle. A warning is
displayed on the instrument panel.
Cooling the traction battery
The cooling fan in the engine
compartment comes on during charging to
cool the on-board charger and the traction
battery.
Low load / Driving
Driving when the charge level of the
traction battery is too low can lead to the
vehicle breaking down and can lead to
accidents or serious injuries. ALWAYS make
sure the traction battery has a sufficient
charge level.
Low load / Parking
If the outside temperature is negative,
it is recommended not to park your vehicle
outside for several hours at a low load (less
than 20%).
Vehicle in storage for more than
1 month
In the event of a long period of non-use of
the vehicle (beyond 4
weeks) without the
possibility of charging when restarting, the
self-discharge may make it impossible to
restart if the traction battery charge level
is a low or very low, especially at negative
ambient temperatures. ALWAYS make sure
that the traction battery has a charge between
20% and 40% if you do not plan to use your
vehicle for several weeks.
Do not connect the charging cable.
Always park the vehicle in a place with
temperatures between -10°C and 30°C
(parking in a place with extreme temperatures
can damage the traction battery).
Disconnect the cable from the (+) terminal
of the accessory battery in the engine
compartment.
Connect a 12 V battery charger to the (+)
and (-) terminals of the accessory battery
about every 3 months in order to recharge the
accessory battery and maintain an operating
voltage.
Precautions
Our electric vehicles have been developed in
accordance with the recommendations on the
maximum limits for electromagnetic fields, as
issued by the International Commission on Non-
Ionizing Radiation Protection
(ICNIRP - 1998
Guidelines).
Wearers of pacemakers or equivalent
devices
Ask your doctor about what precautions you should take, or ask the manufacturer
of your implanted electro-medical device about
whether its operation is guaranteed in an
environment which complies with the ICNIRP
recommendations.
If in doubt
Domestic or accelerated charging: do
not remain inside or near the vehicle, or near
the charging cable or charging unit, even for
a short time.
Superfast charging: do not use the system
yourself and avoid approaching public fast
charging points. Leave the area and ask a
third party to recharge the vehicle.
Page 189 of 324

187
Practical information
7► If the vehicle is locked, unlock it.
The red indicator lamp in the flap goes out to
confirm that the charging nozzle is unlocked.
►
In modes 2 and 3, remove the charging
nozzle within 30 seconds
.
The locking of the nozzle is linked to the locking of the loading area. For more
information on Complete or selective
unlocking , refer to the corresponding
section.
The charging indicator lamp comes on in white.
With selective door unlocking activated,
press the unlocking button twice to
disconnect the charging nozzle.
When charging is complete, the green
charging indicator lamp in the flap goes
out after about 2 minutes.
Domestic charging, mode 2
The end of charging is confirmed when the green
CHARGE indicator lamp on the control unit and
the green charging indicator lamp in the flap
come on fixed.
►
Replace the protective cover on the charging
nozzle and close the charging flap.
►
Disconnect the control unit end of the
charging cable from the domestic socket.
Accelerated charging, mode 3
The end of charging is indicated by the charging
control unit and by the fixed lighting of the green
indicator lamp in the flap.
►
Hang up the nozzle on the charging unit and
close the charging flap.
Superfast charging, mode 4
The end of charging is indicated by the charger
and by the fixed lighting of the green indicator
lamp in the flap.
► You can also pause charging by
pressing this button in the flap (in mode 4
only).
►
Hang up the nozzle on the charger
.
►
Depending on version, replace the protective
cover on the lower section and close the
charging flap.
When the charging nozzle is
disconnected, a message on the
instrument panel indicates that charging is
complete, even if the charging nozzle was
disconnected before full charging was
completed.
Energy economy mode
This system manages the duration of use of
certain functions, in order to conserve a sufficient
level of charge in the battery with the ignition off.
After switching off the engine and for a maximum
cumulative period of around 30 minutes, you can
continue to use functions such as the audio and
telematics system, dipped beam headlamps or
courtesy lamps.
Selecting the mode
A confirmation message is displayed when
energy economy mode is entered, and the active
functions are placed on standby.
If a telephone call is in progress at the
time, it will be maintained for around 10
minutes via the audio system’s hands-free
system.
Exiting the mode
These functions are automatically reactivated the
next time the vehicle is used.
To restore the use of these functions
immediately, start the engine and let it run:
–
For less than 10 minutes, to use the
equipment for approximately 5 minutes.
–
For more than 10 minutes, to use the
equipment for approximately 30 minutes.
Let the engine run for the specified duration to
ensure that the battery charge is sufficient.
T
o recharge the battery, avoid repeatedly or
continuously restarting the engine.
A flat battery prevents the engine from starting.
For more information on the 12
V battery,
refer to the corresponding section.
Page 191 of 324
189
Practical information
7In case of difficulty with installation/
removal
Contact a CITROËN dealer or a qualified
workshop.
Before any operation, ensure that the
engine is off and the cooling fan has
stopped.
It is essential to remove them when:
– the outside temperature exceeds
10°C.
–
recovery is in progress.
–
the speed is above 75 mph (120
km/h).
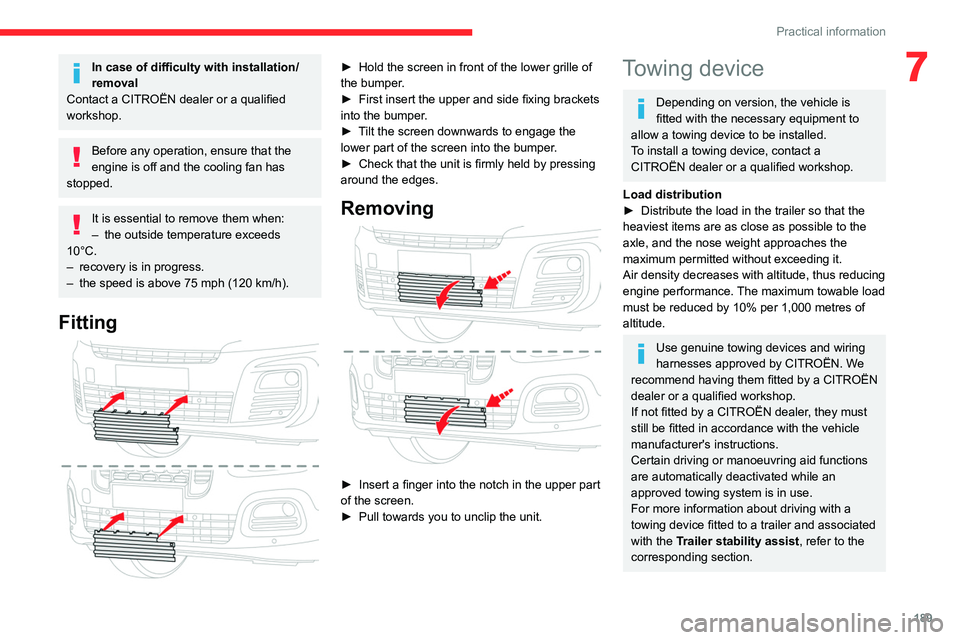
Fitting
► Hold the screen in front of the lower grille of
the bumper .
►
First insert the upper and side fixing brackets
into the bumper
.
►
T
ilt the screen downwards to engage the
lower part of the screen into the bumper.
►
Check that the unit is firmly held by pressing
around the edges.
Removing
► Insert a finger into the notch in the upper part
of the screen.
►
Pull towards you to unclip the unit.
Towing device
Depending on version, the vehicle is
fitted with the necessary equipment to
allow a towing device to be installed.
To install a towing device, contact a
CITROËN dealer or a qualified workshop.
Load distribution
►
Distribute the load in the trailer so that the
heaviest items are as close as possible to the
axle, and the nose weight approaches the
maximum permitted without exceeding it.
Air density decreases with altitude, thus reducing
engine performance.
The maximum towable load
must be reduced by 10% per 1,000
metres of
altitude.
Use genuine towing devices and wiring
harnesses approved by CITROËN. We
recommend having them fitted by a CITROËN
dealer or a qualified workshop.
If not fitted by a CITROËN dealer, they must
still be fitted in accordance with the vehicle
manufacturer's instructions.
Certain driving or manoeuvring aid functions
are automatically deactivated while an
approved towing system is in use.
For more information about driving with a
towing device fitted to a trailer and associated
with the Trailer stability assist, refer to the
corresponding section.
Page 192 of 324

190
Practical information
Comply with the maximum authorised
towable weight, as indicated on your
vehicle's registration certificate, on the
manufacturer's label and in the Technical
data section of this guide.
If using accessories attached to the
towing device (e.g. bicycle carriers, tow
boxes):
–
Comply with the maximum authorised nose
weight.
–
Do not transport more than 4 conventional
bicycles or 2 electric bicycles.
When loading bicycles onto a bicycle carrier
on a towball, be sure to place the heaviest
bicycles as close as possible to the vehicle.
Observe the legislation in force in the
country where you are driving.
Electric motor
An electric vehicle may be fitted with a
towing device.
It is therefore possible to tow a trailer or
caravan.
Contact a CITROËN dealer or qualified
workshop for more information and to obtain a
suitable towing device.
Overload indicator
The overload indicator is a driving aid and
informs you that the maximum authorised
weight has been exceeded; this may be either
the gross vehicle weight (GVW) or the maximum
authorised weight on either axle (front and rear)
(GAWR).
The indicator does not relieve the user from their responsibility.
Even if you correctly measure the weight
of the vehicle's load, any factor that may
vary this weight (driver/additional passengers
seated or taking on additional fuel) after the
measurement may put the vehicle into the
overload condition.
The load includes the weight of the items stored in the loading area (including any
fittings such as shelves), but also the weight
of all persons on board the vehicle, the
amount of fuel (depending on version) and
various equipment fitted on the vehicle.
For optimal performance, the vehicle must
be parked and loaded on level ground (avoid
the following conditions: parking on a slope or
straddling a pavement).
Attaching a trailer to your vehicle may affect the operation of the system.
Operation
The weight on board your vehicle is measured:
► When the engine starts, automatically .
ON► When stationary, by pressing this
button in the loading area. The system is
then active for 5 minutes.
Display of the measurement in the loading
area
ON
Page 194 of 324
192
Practical information
To fit the transverse roof bars or a roof rack, use
the fixing points provided for this purpose:
►
Remove the fixing covers installed on the
vehicle.
►
Put each fixing in place and lock them on the
roof one by one.
►
Ensure that the roof bars or the roof rack are
correctly fitted (by shaking them).
The bars are adaptable for each fixing point.
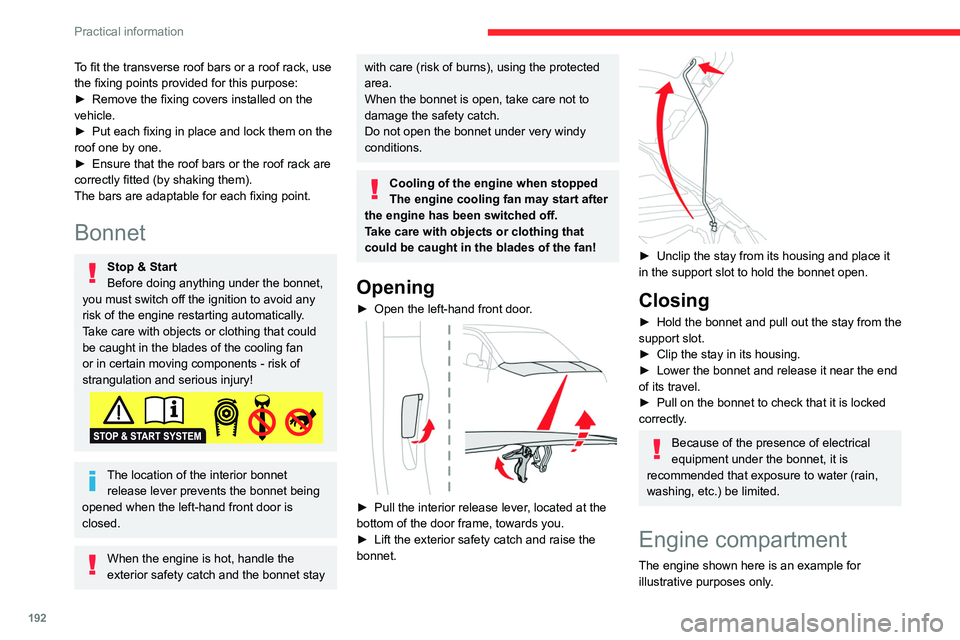
Bonnet
Stop & Start
Before doing anything under the bonnet,
you must switch off the ignition to avoid any
risk of the engine restarting automatically.
Take care with objects or clothing that could
be caught in the blades of the cooling fan
or in certain moving components - risk of
strangulation and serious injury!
The location of the interior bonnet release lever prevents the bonnet being
opened when the left-hand front door is
closed.
When the engine is hot, handle the
exterior safety catch and the bonnet stay
with care (risk of burns), using the protected
area.
When the bonnet is open, take care not to
damage the safety catch.
Do not open the bonnet under very windy
conditions.
Cooling of the engine when stopped
The engine cooling fan may start after
the engine has been switched off.
Take care with objects or clothing that
could be caught in the blades of the fan!
Opening
► Open the left-hand front door .
► Pull the interior release lever, located at the
bottom of the door frame, towards you.
►
Lift the exterior safety catch and raise the
bonnet.
► Unclip the stay from its housing and place it
in the support slot to hold the bonnet open.
Closing
► Hold the bonnet and pull out the stay from the
support slot.
►
Clip the stay in its housing.
►
Lower the bonnet and release it near the end
of its travel.
►
Pull on the bonnet to check that it is locked
correctly
.
Because of the presence of electrical
equipment under the bonnet, it is
recommended that exposure to water (rain,
washing, etc.) be limited.
Engine compartment
The engine shown here is an example for
illustrative purposes only.
Page 195 of 324

193
Practical information
7The locations of the following components may
vary:
–
Air filter
.
–
Engine oil dipstick.
–
Engine oil filler cap.
Petrol engine
Diesel engine
1. Screenwash fluid reservoir
2. Engine coolant reservoir
3. Brake fluid reservoir
4. Battery/Fuses
5. Remote earth point (-)
6. Fusebox
7. Air filter
8. Engine oil filler cap
9. Engine oil dipstick
Diesel fuel system
This system is under very high pressure.
All work must be carried out only by a
CITROËN dealer or a qualified workshop
Electric motor
1. Screenwash fluid reservoir
2. Engine coolant reservoir (level only)
3. Brake fluid reservoir
4. Battery/Fuses
5. Remote earth point (-)
6. Fusebox
7. 400
V electrical circuit
8. Emergency circuit-breaker for emergency
services and maintenance technicians
For more information on the Charging system
(Electric), refer to the corresponding section.
Checking levels
Check all of the following levels regularly in
accordance with the manufacturer's service
schedule. Top them up if required, unless
otherwise indicated.
If a level drops significantly, have the
corresponding system checked by a CITROËN
dealer or a qualified workshop.
The fluids must comply with the manufacturer's requirements and with
the vehicle's engine.
Take care when working under the bonnet, as certain areas of the engine
may be extremely hot (risk of burns) and the
cooling fan could start at any time (even with
the ignition off).
Used products
Avoid prolonged contact of used oil or fluids with the skin.
Most of these fluids are harmful to health and
very corrosive.
Do not discard used oil or fluids into
sewers or onto the ground.
Empty used oil into the containers reserved
for this purpose at a CITROËN dealer or a
qualified workshop.
Engine oil
The level is checked, with the engine having been switched off for at least 30
minutes and on level ground, either using the oil
level indicator in the instrument panel when the