2022 CHRYSLER PACIFICA head unit
[x] Cancel search: head unitPage 63 of 384
GETTING TO KNOW YOUR VEHICLE61
UNIVERSAL GARAGE DOOR OPENER
(HOMELINK®)
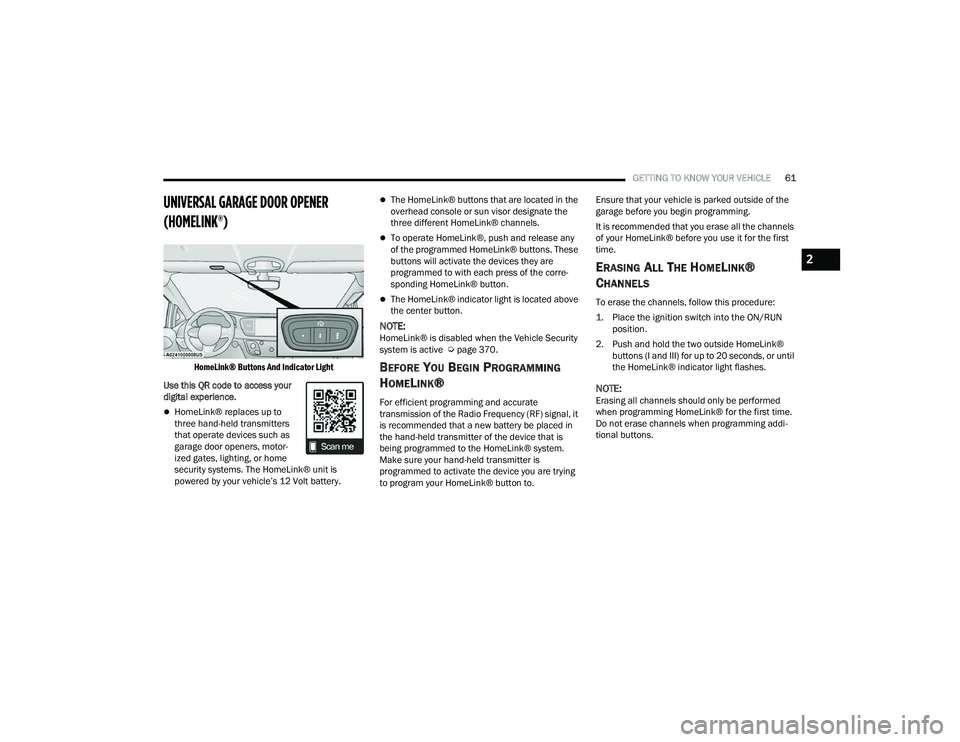
HomeLink® Buttons And Indicator Light
Use this QR code to access your
digital experience.
HomeLink® replaces up to
three hand-held transmitters
that operate devices such as
garage door openers, motor -
ized gates, lighting, or home
security systems. The HomeLink® unit is
powered by your vehicle’s 12 Volt battery.
The HomeLink® buttons that are located in the
overhead console or sun visor designate the
three different HomeLink® channels.
To operate HomeLink®, push and release any
of the programmed HomeLink® buttons. These
buttons will activate the devices they are
programmed to with each press of the corre -
sponding HomeLink® button.
The HomeLink® indicator light is located above
the center button.
NOTE:HomeLink® is disabled when the Vehicle Security
system is active Ú page 370.
BEFORE YOU BEGIN PROGRAMMING
H
OMELINK®
For efficient programming and accurate
transmission of the Radio Frequency (RF) signal, it
is recommended that a new battery be placed in
the hand-held transmitter of the device that is
being programmed to the HomeLink® system.
Make sure your hand-held transmitter is
programmed to activate the device you are trying
to program your HomeLink® button to. Ensure that your vehicle is parked outside of the
garage before you begin programming.
It is recommended that you erase all the channels
of your HomeLink® before you use it for the first
time.
ERASING ALL THE HOMELINK®
C
HANNELS
To erase the channels, follow this procedure:
1. Place the ignition switch into the ON/RUN
position.
2. Push and hold the two outside HomeLink® buttons (I and III) for up to 20 seconds, or until
the HomeLink® indicator light flashes.
NOTE:Erasing all channels should only be performed
when programming HomeLink® for the first time.
Do not erase channels when programming addi -
tional buttons.
2
22_RUP_OM_EN_USC_t.book Page 61
Page 84 of 384
82GETTING TO KNOW YOUR VEHICLE
REAR BLOWER CONTROL
The rear blower control can be manually
set to off, or any fixed blower speed by
pushing the blower control buttons. This
allows the rear seat occupants to control
the volume of air circulated in the rear of the
vehicle. The larger of the two icons increases
blower speed, whereas the smaller of the two icons
decreases the blower speed.
REAR MODE CONTROL
Push this button on the Rear Climate
Controls to change the air distribution
mode for the rear passengers.
PANEL MODE
Air comes from the outlets in the
headliner. Each of these outlets can be
individually adjusted to direct the flow of
air. Moving the air vanes of the outlets to
one side will shut off the airflow.
BI-LEVEL MODE
Air comes from both the headliner outlets
and the floor outlets.
NOTE:In many temperature positions, the Bi-Level mode
is designed to provide cooler air out of the head -
liner outlets and warmer air from the floor outlets.
FLOOR MODE
Air comes from the floor outlets.
REAR CLIMATE CONTROL/BLOWER OFF
To manually set the rear blower controls
to off, press the Rear Climate Control/
Blower Off button.
AUTOMATIC TEMPERATURE CONTROL
(ATC) — I
F EQUIPPED
Automatic Operation
1. Push the AUTO button on the faceplate, or the
AUTO button on the touchscreen on the
Automatic Temperature Control (ATC) Panel.
2. Next, adjust the temperature you would like the system to maintain by adjusting the driver
and passenger temperature control buttons.
Once the desired temperature is displayed, the
system will achieve and automatically
maintain that comfort level. 3. When the system is set up for your comfort
level, it is not necessary to change the
settings. You will experience the greatest
efficiency by simply allowing the system to
function automatically.
NOTE:
It is not necessary to move the temperature
settings for cold or hot vehicles. The system
automatically adjusts the temperature, mode,
and blower speed to provide comfort as quickly
as possible.
The temperature can be displayed in U.S. or
Metric units by selecting the U.S./Metric
customer-programmable feature within the
Uconnect system Ú page 188.
To provide you with maximum comfort in the
Automatic mode during cold start-ups, the blower
fan will remain on low until the engine warms up.
The blower will increase in speed and transition
into Auto mode.
Manual Operation Override
This system offers a full complement of manual
override features. The AUTO symbol in the front
Automatic Temperature Control (ATC) display will
be turned off when the system is being used in the
manual mode.
22_RUP_OM_EN_USC_t.book Page 82
Page 130 of 384

128GETTING TO KNOW YOUR INSTRUMENT PANEL
KeySense Indicator Light —
If Equipped
The KeySense indicator is illuminated
when a KeySense key is detected upon
startup of the vehicle. The indicator will
remain lit for the entire key cycle as a
reminder that the KeySense key is in use. While
the KeySense key is in use, the vehicle will respond
to settings associated with the KeySense profile
Ú page 14.
LaneSense Indicator Light — If Equipped
The LaneSense indicator light illuminates
solid green when both lane markings
have been detected and the system is
“armed” and ready to provide visual and
torque warnings if an unintentional lane departure
occurs Ú page 166.
Parking/Headlights On Indicator Light
This indicator light will illuminate when
the parking lights or headlights are
turned on.
Stop/Start Active Indicator Light —
If Equipped
This indicator light will illuminate when
the Stop/Start function is in “Autostop”
mode Úpage 143.
Turn Signal Indicator Lights
When the left or right turn signal is
activated, the turn signal indicator will
flash independently and the
corresponding exterior turn signal lamps
will flash. Turn signals can be activated when the
multifunction lever is moved down (left) or
up (right).
NOTE:
A continuous chime will sound if the vehicle is
driven more than 1 mile (1.6 km) with either
turn signal on.
Check for an inoperative outside light bulb if
either indicator flashes at a rapid rate.
WHITE INDICATOR LIGHTS
Adaptive Cruise Control (ACC) Ready
Light — If Equipped
This indicator light will illuminate when
the vehicle equipped with ACC has been
turned on but not set Ú page 147.
Cruise Control Ready Indicator Light
This indicator light will illuminate when
the cruise control is ready, but not set
Úpage 146.
LaneSense Indicator Light — If Equipped
When the LaneSense system is ON, but
not armed, the LaneSense indicator light
illuminates solid white. This occurs when
only left, right, or neither lane line has
been detected. If a single lane line is detected, the
system is ready to provide only visual warnings if
an unintentional lane departure occurs on the
detected lane line Ú page 166.
Speed Warning Indicator Light
The white indicator will illuminate along
with a pop-up message (Speed Warning
Set to XX followed by unit), once the
feature is enabled. When the set speed is
exceeded, a continuous chime (up to 10 seconds
or until the speed is no longer exceeded) will sound
along with a Speed Warning Exceeded pop-up
message and the indicator light will turn yellow and
flash.
NOTE:The number “31” is only an example of a speed
that can be selected.
Set Speed Display
The Set Speed Display indicator light
indicates the set speed for the Cruise
Control and Adaptive Cruise Control
(ACC) settings.
22_RUP_OM_EN_USC_t.book Page 128
Page 193 of 384
MULTIMEDIA191
Display Brightness Headlights On This setting will allow you to set the brightness when the headlights are on. To
access this setting, Display Mode must be set to “Manual”. The “+” setting will
increase the brightness; the “-” will decrease the brightness.
Display Brightness Headlights Off This setting will allow you to set the brightness when the headlights are off. To
access this setting, Display Mode must be set to “Manual”. The “+” setting will
increase the brightness; the “-” will decrease the brightness.
Set Theme This setting will allow you to change the theme of the radio.
Units This setting changes the “Speed” (MPH or km/h), “Distance” (mi or km), “Fuel
Consumption” (MPG [US], MPG [UK], L/100 km, or km/L), “Pressure” (psi,
kPa, or bar), “Temperature” (°C or °F), and “Current Consumption” (MPG
[US], MPG [UK], L/100 km, or km/L) units of measurement independently.
Touchscreen Beep This setting will allow you to turn the touchscreen beep on or off.
Show Main Category Bar Labels This setting will allow the main category bar labels to be shown on or off.
Navigation Next Turn Displayed in Cluster This setting will display navigation prompts in the Instrument Cluster Display.
Phone Pop-Ups Displayed In Cluster This setting will display smartphone notifications and messages in the
Instrument Cluster Display.
System Text Size This setting will allow you to change the text on the radio to “Standard”,
“Large”, and “Taller”.
Time Format This setting will allow you to set the time format (AM/PM). Sync Time With
GPS must be “Off” for this setting to be available. The “12 hrs” setting will set
the time to a 12-hour format. The “24 hrs” setting will set the time to a
24-hour format.
Setting Name
Description
5
22_RUP_OM_EN_USC_t.book Page 191
Page 196 of 384

194MULTIMEDIA
Display
After pressing the Display button on the touchscreen, the following settings will be available:
NOTE:Depending on the vehicle’s options, feature settings may vary.
Setting Name Description
Language This setting will change the language of the Uconnect system and Instrument
Cluster Display. The available languages are English, Français, Español, and
Italiano.
Display Mode This setting will allow you to set the brightness manually or have the system
set it automatically. The “Auto” setting has the system automatically adjust
the display brightness. The “Manual” setting will allow the user to adjust the
brightness of the display.
Display Brightness With Headlights ON/Brightness This setting will allow you to set the brightness when the headlights are on. To
access this setting, Display Mode must be set to Manual. The “+” setting will
increase the brightness; the “-” will decrease the brightness.
Display Brightness With Headlights OFF/Brightness This setting will allow you to set the brightness when the headlights are off. To
access this setting, Display Mode must be set to Manual. The “+” setting will
increase the brightness; the “-” will decrease the brightness.
Set Theme/Theme Mode This setting will allow you to change the theme of the radio.
Units This setting changes the “Speed” (MPH or km/h), “Distance” (mi or km), “Fuel
Consumption” (MPG [US], MPG [UK], L/100 km, or km/L), “Pressure” (psi,
kPa, or bar), “Temperature” (°C or °F), and “Current Consumption” (MPG
[US], MPG [UK], L/100 km, or km/L) units of measurement independently.
Touchscreen Beep This setting will allow you to turn the touchscreen beep on or off.
Show Main Category Bar Labels This setting will allow the main category bar labels to be shown on or off.
22_RUP_OM_EN_USC_t.book Page 194
Page 335 of 384

SERVICING AND MAINTENANCE333
F53 ––Not Populated
F54 40 Amp Green –ESP-ECU And Valves
F55 –15 Amp BlueRadio Frequency HUB/ Keyless
Ignition System (KIN) / ESL / DVD
F56 –10 Amp RedFront and Rear HVAC Control
Module / Occupant Classification
Module (OCM) / Electronic Steering Lock (ESL) / ESP / ESC
F57 ––Not Populated
F58 –10 Amp RedDrive Train Control Mod / Power
Transfer Unit *
F59 30 Amp Pink –Trailer Tow Receptacle *
F60 –20 Amp Yellow Rear Cargo Pwr Outlet
F61 –20 Amp YellowTrailer Tow Right Stop/Turn *
F62 –20 Amp Yellow Power Transfer Unit *
F63 –20 Amp Yellow Trailer Tow Left Stop/Turn *
F64 –15 Amp Blue RT HID Headlamp *
F65 ––Not Populated
F66 –15 Amp Blue Cluster
F67 –10 Amp RedHaptic Lane Feedback Module
(HALF) / Parktronics System (PTS)/
Drivers Assist System Module (DASM)
Cavity Cartridge Fuse Blade FuseDescription
*If Equipped
8
22_RUP_OM_EN_USC_t.book Page 333