2022 CHRYSLER PACIFICA key
[x] Cancel search: keyPage 163 of 384

STARTING AND OPERATING161
ice, mud, dirt or other obstruction and then cycle
the ignition. If the message continues to appear
see an authorized dealer.
If the "PARKSENSE UNAVAILABLE SERVICE
REQUIRED" message appears in the instrument
cluster display, see an authorized dealer.
CLEANING THE PARKSENSE SYSTEM
Clean the ParkSense sensors with water, car wash
soap and a soft cloth. Do not use rough or hard
cloths. Do not scratch or poke the sensors.
PARKSENSE SYSTEM USAGE
P
RECAUTIONS
NOTE:
Ensure that the front and rear fascia/bumper
are free of snow, ice, mud, dirt, and debris to
keep the ParkSense system operating properly.
Construction equipment, large trucks, and
other vibrations could affect the performance of
ParkSense.
When you turn ParkSense off, the instrument
cluster will display “PARKSENSE OFF.” Further -
more, once you turn ParkSense off, it remains
off until you turn it on again, even if you cycle the
ignition key.
When you move the gear selector to the
REVERSE position and ParkSense is turned off,
the instrument cluster will display “PARKSENSE
OFF” for as long as the vehicle is in REVERSE.
ParkSense, when on, will reduce the volume of
the radio when it is sounding a tone.
Clean the ParkSense sensors regularly, taking
care not to scratch or damage them. The
sensors must not be covered with ice, snow,
slush, mud, dirt or debris. Failure to do so can
result in the system not working properly. The
ParkSense system might not detect an obstacle
behind or in front of the appropriate fascia/
bumper, or it could provide a false indication
that an obstacle is behind or in front of the
appropriate fascia/bumper.
Use the ParkSense switch to turn the ParkSense
system off if objects such as bicycle carriers,
trailer hitches, etc., are placed within 12 inches
(30 cm) from the rear fascia/bumper. Failure to
do so can result in the system misinterpreting a
close object as a sensor problem, causing the
“PARKSENSE UNAVAILABLE WIPE REAR
SENSORS” message to be displayed in the
instrument cluster.
ParkSense should be disabled when the liftgate
is in the open position. An opened liftgate could
provide a false indication that an obstacle is
behind the vehicle.
There may be a delay in the object detection
rate if the object is moving. This may cause the
automatic braking application to be delayed.
WARNING!
Drivers must be careful when backing up even
when using ParkSense. Always check carefully
behind your vehicle, look behind you, and be
sure to check for pedestrians, animals, other
vehicles, obstructions, and blind spots before
backing up. You are responsible for safety and
must continue to pay attention to your
surroundings. Failure to do so can result in
serious injury or death.
Before using ParkSense, it is strongly recom -
mended that the ball mount and hitch ball
assembly be disconnected from the vehicle
when the vehicle is not used for towing.
Failure to do so can result in injury or damage
to vehicles or obstacles because the hitch ball
will be much closer to the obstacle than the
rear fascia when the vehicle sounds the
continuous tone. Also, the sensors could
detect the ball mount and hitch ball assembly,
depending on its size and shape, giving a false
indication that an obstacle is behind the
vehicle.
4
22_RUP_OM_EN_USC_t.book Page 161
Page 172 of 384

170STARTING AND OPERATING
NOTE:
If the vehicle speed remains below 8 mph
(13 km/h), the Rear View Camera image will be
displayed continuously until deactivated via the
touchscreen button X, the transmission is
shifted into PARK, or the ignition is placed in the
OFF position.
The touchscreen button X to disable display of
the camera image is made available ONLY when
the vehicle is not in REVERSE.
When enabled, active guidelines are overlaid on
the image to illustrate the width of the vehicle,
including the side view mirrors and its projected
back up path based on the steering wheel position.
Different colored zones indicate the distance to
the rear of the vehicle.
The following table shows the approximate
distances for each zone: Modes Of Operation
Manual activation of the Surround View system is
selected by pressing the Surround View Camera
soft key located in the Controls screen within the
Uconnect system.
Top View
The Top View will show in the Uconnect system with
Rear View and Front View in a split screen display.
There is integrated ParkSense arcs in the image at
the front and rear of the vehicle. The arcs will
change color from yellow to red corresponding the
distance zones to the oncoming object.
Surround View Camera View
NOTE:
Front tires will be in image when the tires are
turned.
Due to wide angle cameras in the mirrors, the
image will appear distorted.
Top View will show which sliding doors are open.
Open front doors will remove outside image.
Rear View Plus Top View This is the default view of the system in
REVERSE and is always paired with the
Top View of the vehicle with optional
active guidelines for the projected path
when enabled.
Rear Cross Path View
Pressing the Rear Cross Path soft key will
give the driver a wider angle view of the
Rear View. The Top View will be disabled
when this is selected.
Front View Plus Top View The Front View will show you what is
immediately in front of the vehicle and is
always paired with the Top View of the
vehicle.
Front Cross Path View Pressing the Front Cross Path soft key
will give the driver a wider angle view of
the Front View. The Top View will be
disabled when this is selected.
Back Up Camera View Pressing the Back Up Camera soft key
will provide a full screen rear view with
Zoom View.
Zone
Distance To The Rear
Of The Vehicle
Red 0 - 1 ft (0 - 30 cm)
Yellow 1 ft - 6.5 ft (30 cm - 2 m)
Green 6.5 ft or greater
(2 m or greater)
22_RUP_OM_EN_USC_t.book Page 170
Page 191 of 384
MULTIMEDIA189
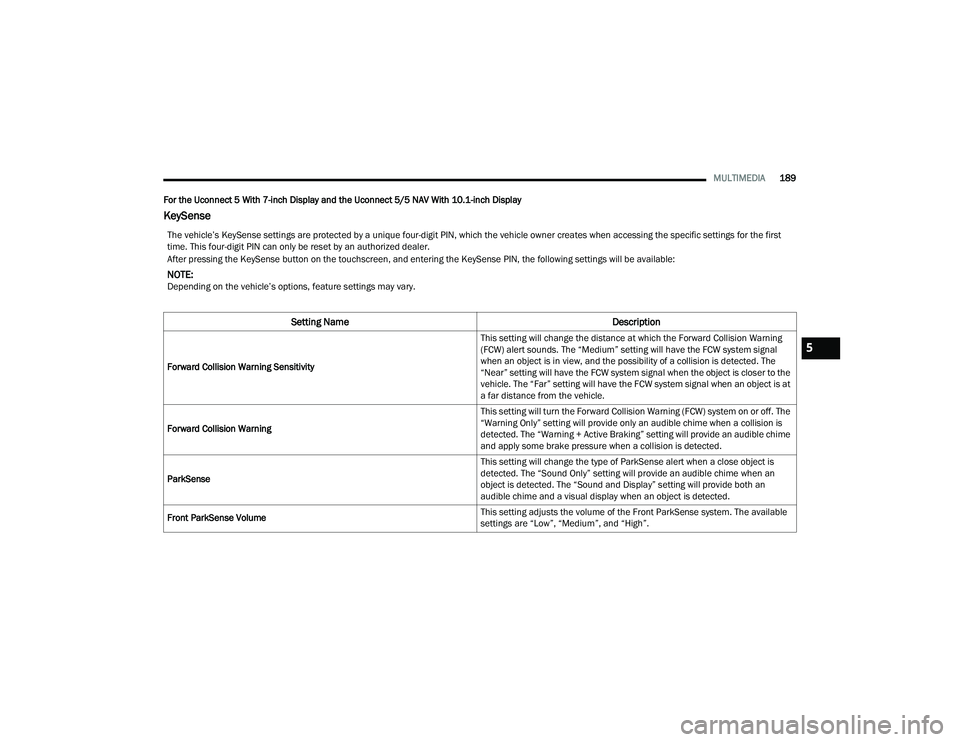
For the Uconnect 5 With 7-inch Display and the Uconnect 5/5 NAV With 10.1-inch Display
KeySense
The vehicle’s KeySense settings are protected by a unique four-digit PIN, which the vehicle owner creates when accessing the specific settings for the first
time. This four-digit PIN can only be reset by an authorized dealer.
After pressing the KeySense button on the touchscreen, and entering the KeySense PIN, the following settings will be available:
NOTE:Depending on the vehicle’s options, feature settings may vary.
Setting Name Description
Forward Collision Warning Sensitivity This setting will change the distance at which the Forward Collision Warning
(FCW) alert sounds. The “Medium” setting will have the FCW system signal
when an object is in view, and the possibility of a collision is detected. The
“Near” setting will have the FCW system signal when the object is closer to the
vehicle. The “Far” setting will have the FCW system signal when an object is at
a far distance from the vehicle.
Forward Collision Warning This setting will turn the Forward Collision Warning (FCW) system on or off. The
“Warning Only” setting will provide only an audible chime when a collision is
detected. The “Warning + Active Braking” setting will provide an audible chime
and apply some brake pressure when a collision is detected.
ParkSense This setting will change the type of ParkSense alert when a close object is
detected. The “Sound Only” setting will provide an audible chime when an
object is detected. The “Sound and Display” setting will provide both an
audible chime and a visual display when an object is detected.
Front ParkSense Volume This setting adjusts the volume of the Front ParkSense system. The available
settings are “Low”, “Medium”, and “High”.
5
22_RUP_OM_EN_USC_t.book Page 189
Page 194 of 384
192MULTIMEDIA
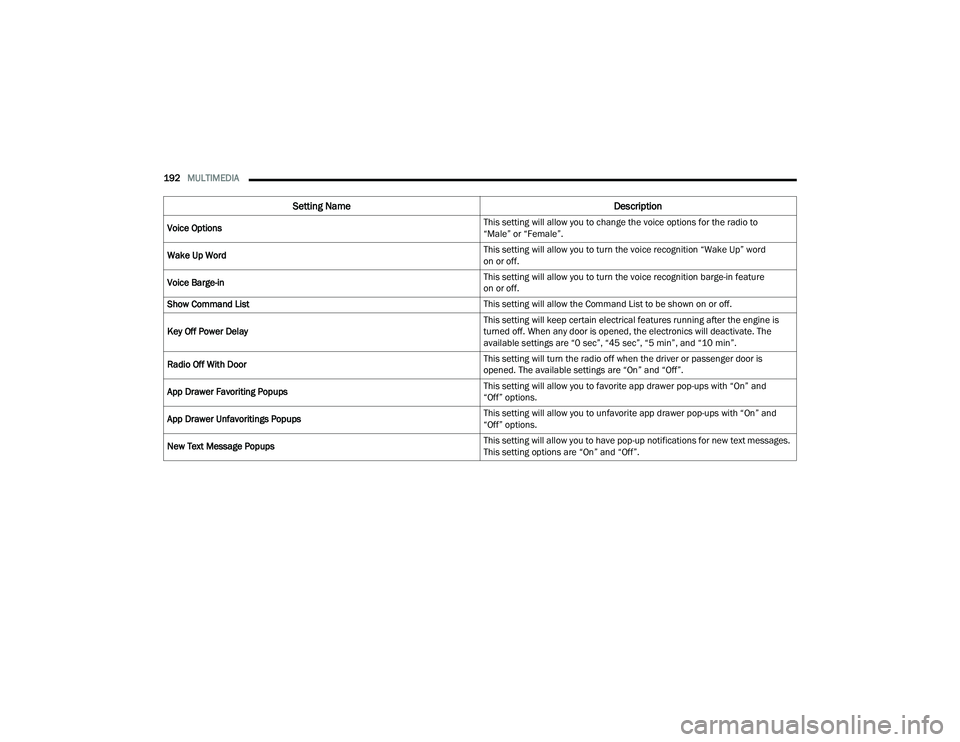
Voice Options This setting will allow you to change the voice options for the radio to
“Male” or “Female”.
Wake Up Word This setting will allow you to turn the voice recognition “Wake Up” word
on or off.
Voice Barge-in This setting will allow you to turn the voice recognition barge-in feature
on or off.
Show Command List This setting will allow the Command List to be shown on or off.
Key Off Power Delay This setting will keep certain electrical features running after the engine is
turned off. When any door is opened, the electronics will deactivate. The
available settings are “0 sec”, “45 sec”, “5 min”, and “10 min”.
Radio Off With Door This setting will turn the radio off when the driver or passenger door is
opened. The available settings are “On” and “Off”.
App Drawer Favoriting Popups This setting will allow you to favorite app drawer pop-ups with “On” and
“Off” options.
App Drawer Unfavoritings Popups This setting will allow you to unfavorite app drawer pop-ups with “On” and
“Off” options.
New Text Message Popups This setting will allow you to have pop-up notifications for new text messages.
This setting options are “On” and “Off”.
Setting Name
Description
22_RUP_OM_EN_USC_t.book Page 192
Page 198 of 384
196MULTIMEDIA
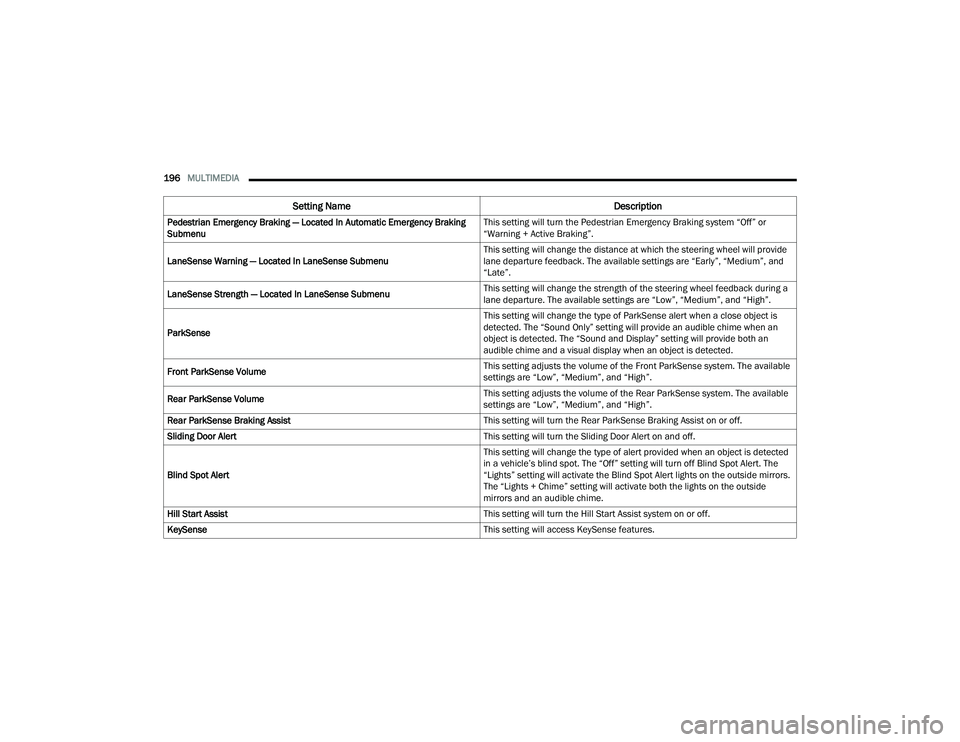
Pedestrian Emergency Braking — Located In Automatic Emergency Braking
Submenu This setting will turn the Pedestrian Emergency Braking system “Off” or
“Warning + Active Braking”.
LaneSense Warning — Located In LaneSense Submenu This setting will change the distance at which the steering wheel will provide
lane departure feedback. The available settings are “Early”, “Medium”, and
“Late”.
LaneSense Strength — Located In LaneSense Submenu This setting will change the strength of the steering wheel feedback during a
lane departure. The available settings are “Low”, “Medium”, and “High”.
ParkSense This setting will change the type of ParkSense alert when a close object is
detected. The “Sound Only” setting will provide an audible chime when an
object is detected. The “Sound and Display” setting will provide both an
audible chime and a visual display when an object is detected.
Front ParkSense Volume This setting adjusts the volume of the Front ParkSense system. The available
settings are “Low”, “Medium”, and “High”.
Rear ParkSense Volume This setting adjusts the volume of the Rear ParkSense system. The available
settings are “Low”, “Medium”, and “High”.
Rear ParkSense Braking Assist This setting will turn the Rear ParkSense Braking Assist on or off.
Sliding Door Alert This setting will turn the Sliding Door Alert on and off.
Blind Spot Alert This setting will change the type of alert provided when an object is detected
in a vehicle’s blind spot. The “Off” setting will turn off Blind Spot Alert. The
“Lights” setting will activate the Blind Spot Alert lights on the outside mirrors.
The “Lights + Chime” setting will activate both the lights on the outside
mirrors and an audible chime.
Hill Start Assist This setting will turn the Hill Start Assist system on or off.
KeySense This setting will access KeySense features.
Setting NameDescription
22_RUP_OM_EN_USC_t.book Page 196
Page 203 of 384
MULTIMEDIA201
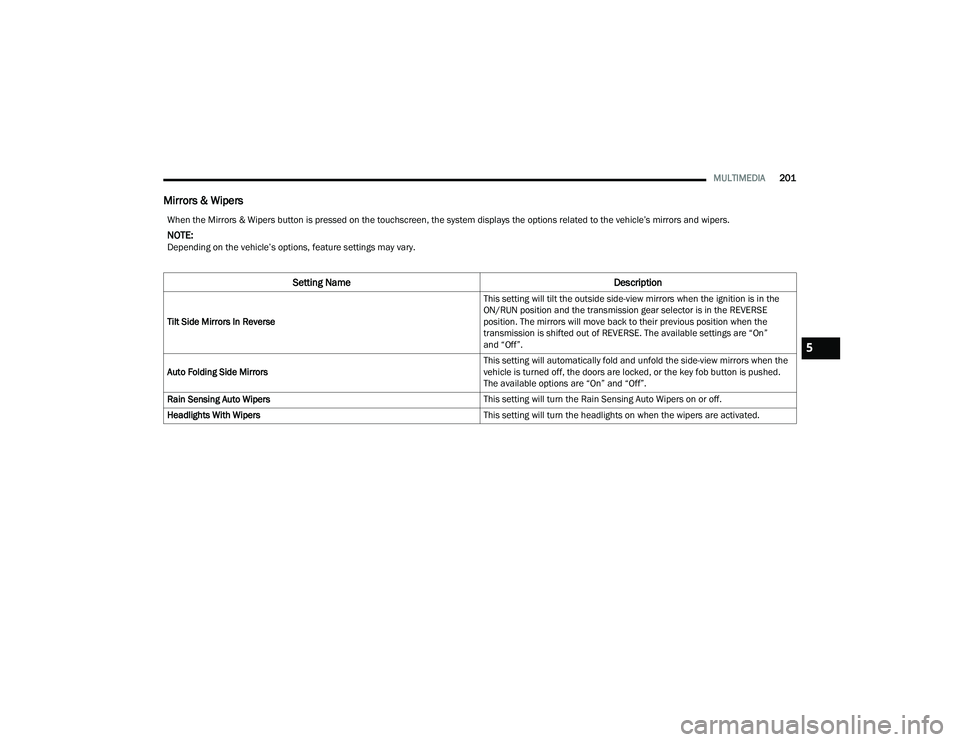
Mirrors & Wipers
When the Mirrors & Wipers button is pressed on the touchscreen, the system displays the options related to the vehicle’s mirrors and wipers.
NOTE:Depending on the vehicle’s options, feature settings may vary.
Setting Name Description
Tilt Side Mirrors In Reverse This setting will tilt the outside side-view mirrors when the ignition is in the
ON/RUN position and the transmission gear selector is in the REVERSE
position. The mirrors will move back to their previous position when the
transmission is shifted out of REVERSE. The available settings are “On”
and “Off”.
Auto Folding Side Mirrors This setting will automatically fold and unfold the side-view mirrors when the
vehicle is turned off, the doors are locked, or the key fob button is pushed.
The available options are “On” and “Off”.
Rain Sensing Auto Wipers This setting will turn the Rain Sensing Auto Wipers on or off.
Headlights With Wipers This setting will turn the headlights on when the wipers are activated.
5
22_RUP_OM_EN_USC_t.book Page 201
Page 204 of 384
202MULTIMEDIA
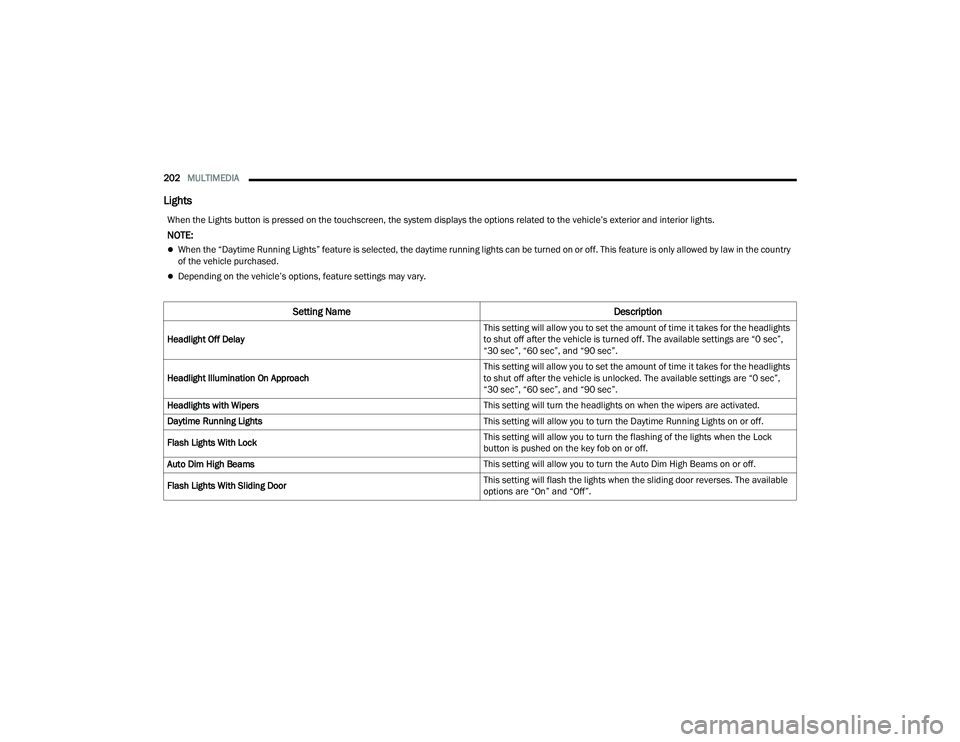
Lights
When the Lights button is pressed on the touchscreen, the system displays the options related to the vehicle’s exterior and interior lights.
NOTE:
When the “Daytime Running Lights” feature is selected, the daytime running lights can be turned on or off. This feature is only allowed by law in the country
of the vehicle purchased.
Depending on the vehicle’s options, feature settings may vary.
Setting Name Description
Headlight Off Delay This setting will allow you to set the amount of time it takes for the headlights
to shut off after the vehicle is turned off. The available settings are “0 sec”,
“30 sec”, “60 sec”, and “90 sec”.
Headlight Illumination On Approach This setting will allow you to set the amount of time it takes for the headlights
to shut off after the vehicle is unlocked. The available settings are “0 sec”,
“30 sec”, “60 sec”, and “90 sec”.
Headlights with Wipers This setting will turn the headlights on when the wipers are activated.
Daytime Running Lights This setting will allow you to turn the Daytime Running Lights on or off.
Flash Lights With Lock This setting will allow you to turn the flashing of the lights when the Lock
button is pushed on the key fob on or off.
Auto Dim High Beams This setting will allow you to turn the Auto Dim High Beams on or off.
Flash Lights With Sliding Door This setting will flash the lights when the sliding door reverses. The available
options are “On” and “Off”.
22_RUP_OM_EN_USC_t.book Page 202
Page 205 of 384
MULTIMEDIA203
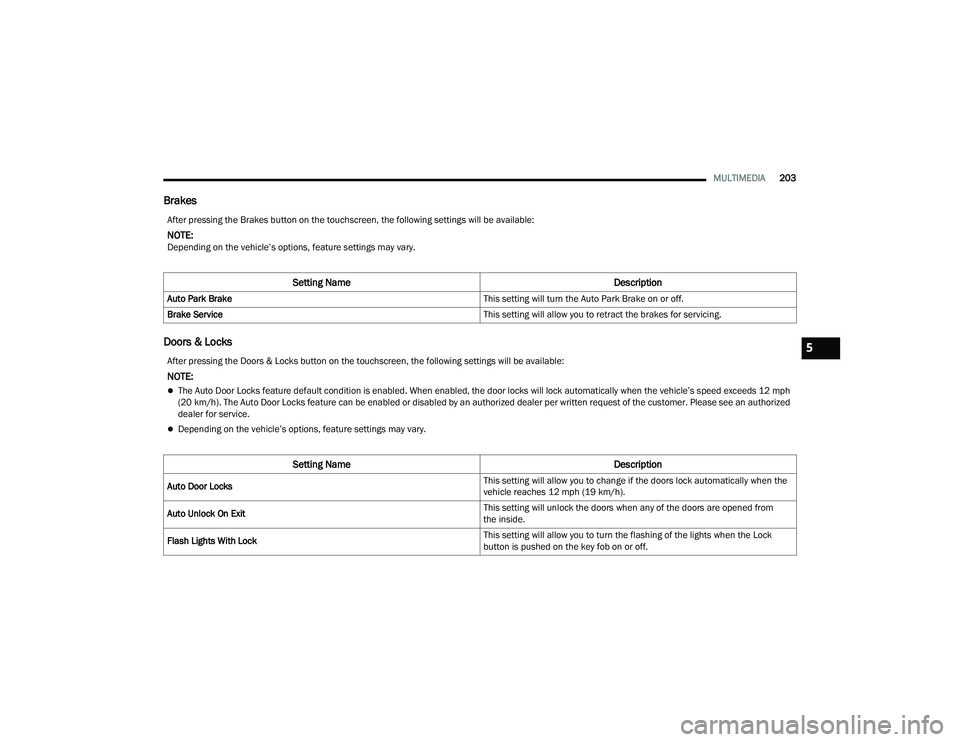
Brakes
Doors & Locks
After pressing the Brakes button on the touchscreen, the following settings will be available:
NOTE:Depending on the vehicle’s options, feature settings may vary.
Setting Name Description
Auto Park Brake This setting will turn the Auto Park Brake on or off.
Brake Service This setting will allow you to retract the brakes for servicing.
After pressing the Doors & Locks button on the touchscreen, the following settings will be available:
NOTE:
The Auto Door Locks feature default condition is enabled. When enabled, the door locks will lock automatically when the vehicle’s speed exceeds 12 mph
(20 km/h). The Auto Door Locks feature can be enabled or disabled by an authorized dealer per written request of the customer. Please see an authorized
dealer for service.
Depending on the vehicle’s options, feature settings may vary.
Setting NameDescription
Auto Door Locks This setting will allow you to change if the doors lock automatically when the
vehicle reaches 12 mph (19 km/h).
Auto Unlock On Exit This setting will unlock the doors when any of the doors are opened from
the inside.
Flash Lights With Lock This setting will allow you to turn the flashing of the lights when the Lock
button is pushed on the key fob on or off.
5
22_RUP_OM_EN_USC_t.book Page 203