2022 CHRYSLER PACIFICA seats
[x] Cancel search: seatsPage 55 of 384

GETTING TO KNOW YOUR VEHICLE53
Head Restraints — Front Seats
The front driver and passenger seats are equipped
with four-way head restraints.
To raise the head restraint, pull upward on the
head restraint. To lower the head restraint, push
the adjustment button, located at the base of the
head restraint, and push downward. The front
head restraints are also adjustable forward and
rearward. To tilt forward, pull the top of the head
restraint toward the front of the vehicle to the
desired position. To adjust the head restraint
rearward, continue pulling forward on the top of
the head restraint to the furthest forward position
and the head restraint will return to the upright
position.
NOTE:To remove the head restraint, raise it as far as it
can go. Then, push the release button and the
adjustment button at the base of each post while
pulling the head restraint up. Seatback angle may
need to be adjusted to fully remove the head
restraint. To reinstall the head restraint, put the
head restraint posts into the holes and push
downward. Then, adjust the head restraint to the
appropriate height.
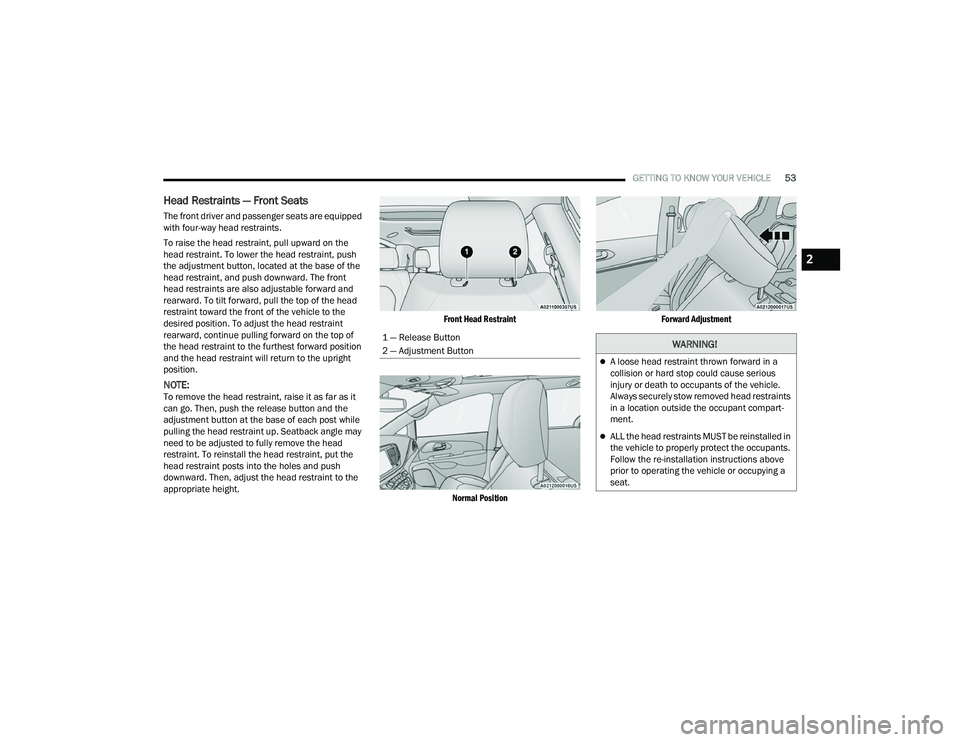
Front Head Restraint
Normal Position Forward Adjustment
1 — Release Button
2 — Adjustment Button
WARNING!
A loose head restraint thrown forward in a
collision or hard stop could cause serious
injury or death to occupants of the vehicle.
Always securely stow removed head restraints
in a location outside the occupant compart -
ment.
ALL the head restraints MUST be reinstalled in
the vehicle to properly protect the occupants.
Follow the re-installation instructions above
prior to operating the vehicle or occupying a
seat.
2
22_RUP_OM_EN_USC_t.book Page 53
Page 56 of 384

54GETTING TO KNOW YOUR VEHICLE
Head Restraints — Second Row Quad
Seats
The second row outboard head restraints, as well
as the removable 8th passenger seat (if equipped),
may have adjustable head restraints.
NOTE:If equipped with Stow ‘n Go seating, the head
restraints are non-adjustable and non-removable.
Do not pull on non-adjustable head restraints
when folding the seat.
To raise the head restraint, pull upward on the
head restraint. To lower the head restraint, push
the adjustment button, located at the base of the
head restraint, and push downward.
To remove the head restraint, raise it as far as it
can go. Then, push the release button and the
adjustment button at the base of each post while
pulling the head restraint up. Seatback angle may
need to be adjusted to fully remove the head
restraint. To reinstall the head restraint, put the
head restraint posts into the holes and push
downward. Then, adjust the head restraint to the
appropriate height.
Head Restraints — Second Row Bench
The second row bench seat is equipped with
adjustable head restraints.
To raise the head restraint, pull upward on the
head restraint. To lower the head restraint, push
the adjustment button, located at the base of the
head restraint, and push downward.
Bench Seat Head Restraint
To remove the head restraint, raise it as far as it
can go. Then, push the release button and the
adjustment button at the base of each post while
pulling the head restraint up. Seatback angle may
need to be adjusted to fully remove the head
restraint. To reinstall the head restraint, put the
head restraint posts into the holes and push
downward. Then, adjust the head restraint to the
appropriate height.
NOTE:For information on child restraint tethering, see
Ú
page 239.
1 — Release Button
2 — Adjustment Button
WARNING!
A loose head restraint thrown forward in a
collision or hard stop could cause serious
injury or death to occupants of the vehicle.
Always securely stow removed head restraints
in a location outside the occupant compart
-
ment.
ALL the head restraints MUST be reinstalled in
the vehicle to properly protect the occupants.
Follow the re-installation instructions above
prior to operating the vehicle or occupying a
seat.
22_RUP_OM_EN_USC_t.book Page 54
Page 57 of 384

GETTING TO KNOW YOUR VEHICLE55
Head Restraints — Third Row
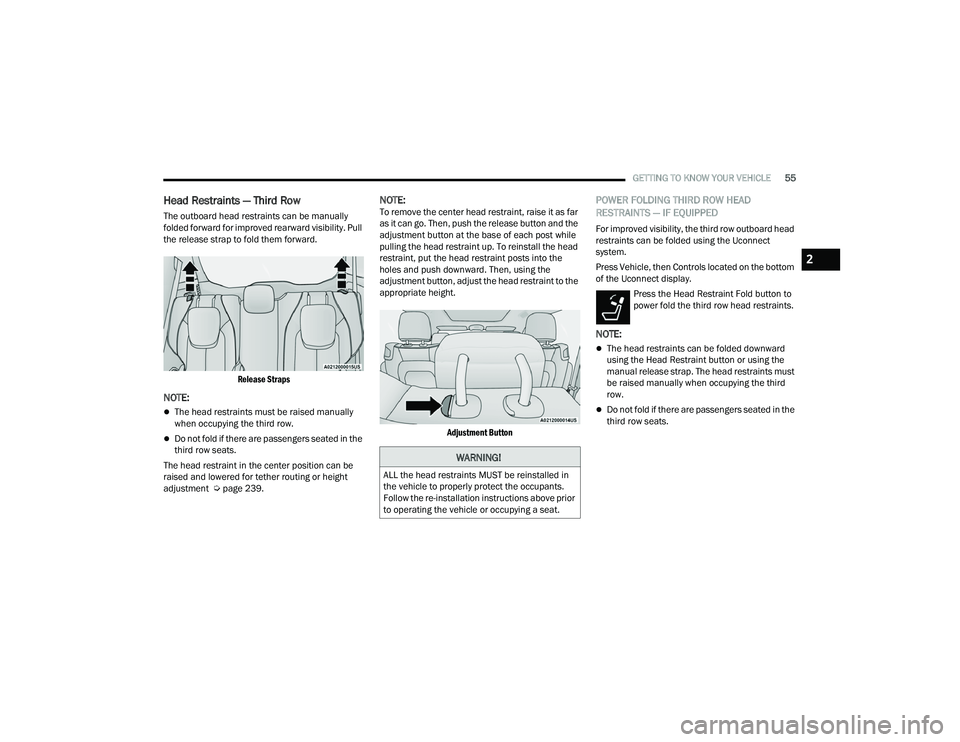
The outboard head restraints can be manually
folded forward for improved rearward visibility. Pull
the release strap to fold them forward.
Release Straps
NOTE:
The head restraints must be raised manually
when occupying the third row.
Do not fold if there are passengers seated in the
third row seats.
The head restraint in the center position can be
raised and lowered for tether routing or height
adjustment Ú page 239.
NOTE:To remove the center head restraint, raise it as far
as it can go. Then, push the release button and the
adjustment button at the base of each post while
pulling the head restraint up. To reinstall the head
restraint, put the head restraint posts into the
holes and push downward. Then, using the
adjustment button, adjust the head restraint to the
appropriate height.
Adjustment Button
POWER FOLDING THIRD ROW HEAD
RESTRAINTS — IF EQUIPPED
For improved visibility, the third row outboard head
restraints can be folded using the Uconnect
system.
Press Vehicle, then Controls located on the bottom
of the Uconnect display.Press the Head Restraint Fold button to
power fold the third row head restraints.
NOTE:
The head restraints can be folded downward
using the Head Restraint button or using the
manual release strap. The head restraints must
be raised manually when occupying the third
row.
Do not fold if there are passengers seated in the
third row seats.
WARNING!
ALL the head restraints MUST be reinstalled in
the vehicle to properly protect the occupants.
Follow the re-installation instructions above prior
to operating the vehicle or occupying a seat.
2
22_RUP_OM_EN_USC_t.book Page 55
Page 78 of 384

76GETTING TO KNOW YOUR VEHICLE
BI-LEVEL MODE
Press this button on the touchscreen to
change the air distribution mode to
Bi-Level Mode. In Bi-Level Mode, air
comes from both the headliner outlets
and the floor outlets.
NOTE:Bi-Level mode is designed under comfort condi -
tions to provide cooler air out of the panel outlets
and warmer air from the floor outlets.
FLOOR MODE
Press this button on the touchscreen to
change the air distribution mode to Floor
Mode. In Floor Mode, air comes from the
floor outlets.
REAR PASSENGER CLIMATE CONTROL OFF
BUTTON
Press and release the OFF button to
turn the Rear Climate Controls off.
Rear Automatic Temperature
Control (ATC) — If Equipped
The rear Automatic Temperature Control (ATC)
system has floor air outlets underneath the
passengers’ seats, and overhead outlets at
each outboard rear seating position. The system provides heated air through the floor outlets or
cool, dehumidified air through the headliner
outlets.
Rear second row occupants can only adjust the
rear ATC control when the Rear Temperature Lock
button is turned off.
The rear ATC system is located in the headliner, on
the passenger side of the vehicle.
Rear Automatic Climate Controls
1. Adjust the rear blower, rear temperature and the rear modes to suit your comfort needs.
2. ATC is selected by pushing the AUTO button.
Once the desired temperature is displayed, the
ATC System will automatically achieve and
maintain that comfort level. When the system is
set up for your comfort level, it is not necessary to change the settings. You will experience the
greatest efficiency by simply allowing the system to
function automatically.
NOTE:It is not necessary to move the temperature
settings. The system automatically adjusts the
temperature, mode and fan speed to provide
comfort as quickly as possible.
AUTO BUTTON
The AUTO button automatically controls
the interior cabin temperature by
adjusting distribution and amount of
airflow. Performing this function will
cause the system to switch between manual mode
and automatic modes Ú page 82.
REAR TEMPERATURE CONTROL
To change the temperature in the rear of
the vehicle, push temperature control up
button to raise the temperature. The rear
temperature settings are displayed in
control head.
To change the temperature in the rear of
the vehicle, push temperature control
down button to lower the temperature.
The rear temperature settings are
displayed in control head.
22_RUP_OM_EN_USC_t.book Page 76
Page 83 of 384

GETTING TO KNOW YOUR VEHICLE81
PANEL MODE
Press this button on the touchscreen to
change the air distribution mode to Panel
Mode. In Panel Mode, air comes from the
outlets in the headliner. Each of these
outlets can be individually adjusted to direct the
flow of air. Moving the air vanes of the outlets to
one side will shut off the airflow.
BI-LEVEL MODE
Press this button on the touchscreen to
change the air distribution mode to
Bi-Level Mode. In Bi-Level Mode, air comes
from the headliner and floor outlets.
NOTE:Bi-Level Mode is designed under comfort condi -
tions to provide cooler air out of the panel outlets
and warmer air from the floor outlets.
FLOOR MODE
Press this button on the touchscreen to
change the air distribution mode to Floor
Mode. In Floor Mode, air comes from the
floor outlets.
REAR PASSENGER CLIMATE CONTROL OFF
BUTTON
Press and release this button to turn the
Rear Climate Controls off.
Rear Manual Temperature Control (MTC)
The rear Manual Temperature Control (MTC)
system has floor air outlets at the rear right side of
the third row seats and overhead outlets at each
outboard rear seating position. The system
provides heated air through the floor outlets or
cool, dehumidified air through the headliner
outlets.
The rear system temperature control buttons are
located on the headliner on the passenger side of
the vehicle.
Rear Manual Climate Controls
REAR TEMPERATURE CONTROL
To change the temperature in the rear of
the vehicle, push temperature control up
button to raise the temperature. The rear
temperature settings are displayed in
control head.
To change the temperature in the rear of
the vehicle, push temperature control
down button to lower the temperature.
The rear temperature settings are
displayed in control head.
CAUTION!
Interior air enters the Rear Automatic
Temperature Control system through an intake
grille, located in the floor under the passengers’
seats. Do not block or place objects directly in
front of the inlet grille or heater outlets. The
electrical system could overload causing
damage to the blower motor.
2
22_RUP_OM_EN_USC_t.book Page 81
Page 85 of 384

GETTING TO KNOW YOUR VEHICLE83
CLIMATE VOICE COMMANDS
Adjust vehicle temperatures hands-free and keep
everyone comfortable while you keep moving
ahead. (If vehicle is equipped with climate control.)
Push the VR button on the steering wheel. After the
beep, say one of the following commands:
“Set driver temperature to 70 degrees ”
“Set passenger temperature to 70 degrees ”
Did you know : Voice Command for Climate may only
be used to adjust the interior temperature of your
vehicle. Voice Command will not work to adjust the
heated seats or steering wheel if equipped.
OPERATING TIPS
Refer to the chart at the end of this section for
suggested control settings for various weather
conditions.
Summer Operation
The engine cooling system must be protected with
a high-quality antifreeze coolant to provide proper
corrosion protection and to protect against engine
overheating. OAT coolant (conforming to
MS.90032) is recommended.
Winter Operation
To ensure the best possible heater and defroster
performance, make sure the engine cooling
system is functioning properly and the proper amount, type, and concentration of coolant is
used. Use of the Air Recirculation mode during
Winter months is not recommended, because it
may cause window fogging.
Vacation/Storage
For information on maintaining the Climate Control
system when the vehicle is being stored for an
extended period of time, see Ú
page 357.
Window Fogging
Vehicle windows tend to fog on the inside in mild,
rainy, and/or humid weather. To clear the
windows, select Defrost or Mix mode and increase
the front blower speed. Do not use the
Recirculation mode without A/C for long periods,
as fogging may occur.
Outside Air Intake
Make sure the air intake, located directly in front of
the windshield, is free of obstructions, such as
leaves. Leaves collected in the air intake may
reduce airflow, and if they enter the air distribution
box, they could plug the water drains. In Winter
months, make sure the air intake is clear of ice,
slush, and snow.
Cabin Air Filter
The Climate Control system filters out dust and
pollen from the air. Contact an authorized dealer to
service your cabin air filter, and to have it replaced
when needed.
Stop/Start System — If Equipped
While in an Autostop, the Climate Control system
may automatically adjust airflow to maintain cabin
comfort. Customer settings will be maintained
upon return to an engine running condition.
Operating Tips Chart
WEATHER CONTROL SETTINGS
Hot Weather
And Vehicle Interior Is Very Hot Set the mode control to
(Panel Mode), (A/C) on, and blower on high. Roll down the
windows for a minute to flush out the hot air. Adjust the controls as needed to achieve comfort.
Warm
Weather Turn (A/C) on and set the
mode control to (Panel Mode).
Cool Sunny Operate in (Bi-Level Mode).
Cool &
Humid
Conditions Set the mode control to (Floor
Mode) and turn (A/C) on to keep windows clear.
Cold
Weather Set the mode control to (Floor
Mode). If windshield fogging
starts to occur, move the control
to (Mix Mode).
2
22_RUP_OM_EN_USC_t.book Page 83
Page 87 of 384

GETTING TO KNOW YOUR VEHICLE85
Front Seatback Storage — If Equipped
The front seatbacks have a storage pocket on
some models.
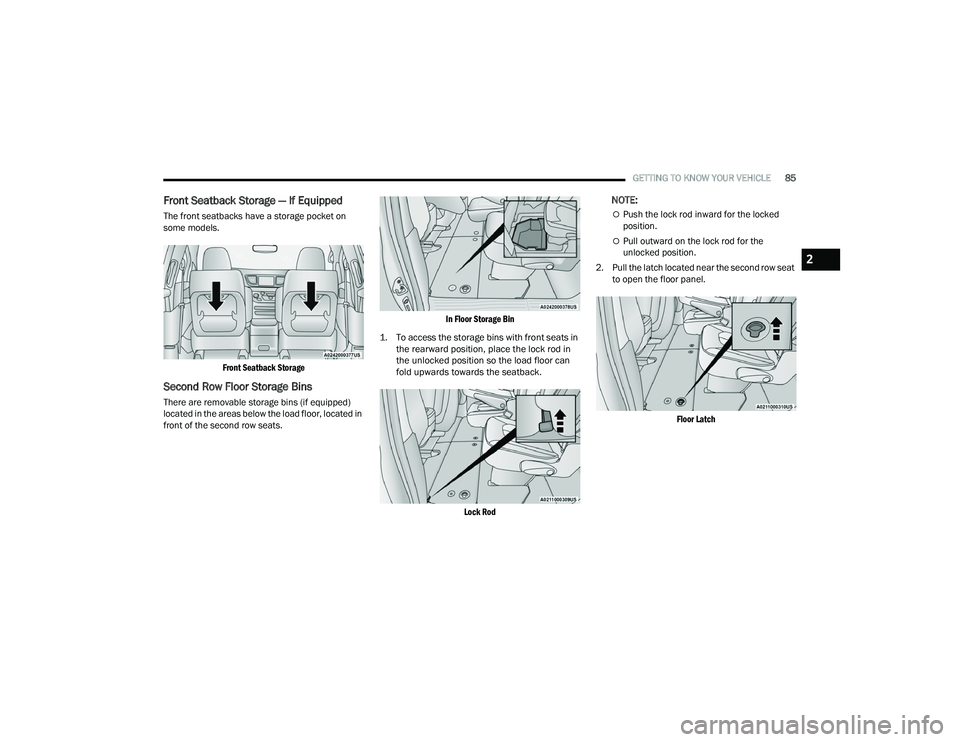
Front Seatback Storage
Second Row Floor Storage Bins
There are removable storage bins (if equipped)
located in the areas below the load floor, located in
front of the second row seats.
In Floor Storage Bin
1. To access the storage bins with front seats in the rearward position, place the lock rod in
the unlocked position so the load floor can
fold upwards towards the seatback.
Lock Rod
NOTE:
Push the lock rod inward for the locked
position.
Pull outward on the lock rod for the
unlocked position.
2. Pull the latch located near the second row seat to open the floor panel.
Floor Latch
2
22_RUP_OM_EN_USC_t.book Page 85
Page 90 of 384

88GETTING TO KNOW YOUR VEHICLE
There are multiple USB “Charge Only” ports in this
vehicle.
In the center console
On the instrument panel
On the back of the front row seats in the Ucon -
nect Theater Media Hubs (if equipped)
On the back of the front row seats
Above the rear cup holder in the third row of
seats
Charge Only USB In The Center Console
NOTE:The USB outlet in the bottom of the instrument
panel can be switched from ignition only to
constant battery powered all the time. See an
authorized dealer for details.
Rear Seat USB Charging Port Without Uconnect Theater
Rear Seat USB Media Hub With Uconnect Theater 3rd Row USB Charging Port
NOTE:The USB “Charge Only” ports will recharge battery
operated USB devices when connected.
Different scenarios are listed below when a
non-phone device is plugged into the smaller and
larger USB ports, and when a phone device is
plugged into the smaller and larger USB ports:
“A new device is now connected. Previous
connection was lost”.
“(Phone Name) now connected. Previous
connection was lost”.
“Another device is in use through the same USB
port. Please disconnect the first device to use
the second device”.1 — Headphone Jack (Headphone Output Only)
2 — HDMI Port
3 — USB Port (Charge Only)
22_RUP_OM_EN_USC_t.book Page 88