2022 CHRYSLER PACIFICA buttons
[x] Cancel search: buttonsPage 115 of 384

GETTING TO KNOW YOUR INSTRUMENT PANEL113
INSTRUMENT CLUSTER DISPLAY
L
OCATION AND CONTROLS
The vehicle’s instrument cluster is equipped with
an instrument cluster display (base or premium
cluster), which offers useful information to the
driver.
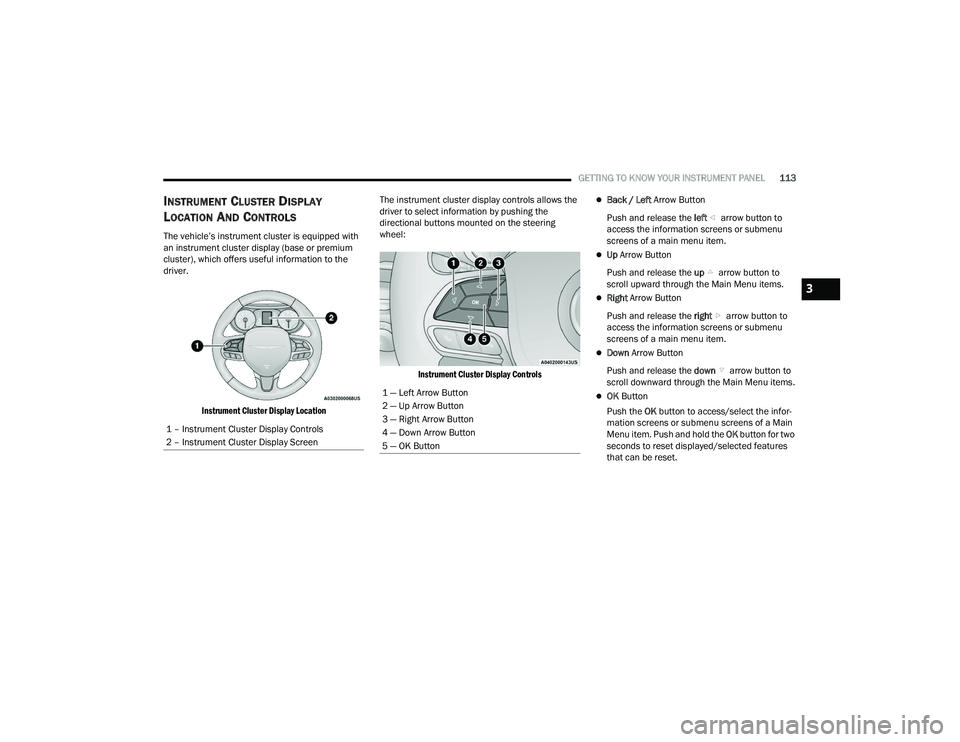
Instrument Cluster Display Location
The instrument cluster display controls allows the
driver to select information by pushing the
directional buttons mounted on the steering
wheel:
Instrument Cluster Display Controls
Back / Left Arrow Button
Push and release the left arrow button to
access the information screens or submenu
screens of a main menu item.
Up Arrow Button
Push and release the up arrow button to
scroll upward through the Main Menu items.
Right Arrow Button
Push and release the right arrow button to
access the information screens or submenu
screens of a main menu item.
Down Arrow Button
Push and release the down arrow button to
scroll downward through the Main Menu items.
OK Button
Push the OK button to access/select the infor -
mation screens or submenu screens of a Main
Menu item. Push and hold the OK button for two
seconds to reset displayed/selected features
that can be reset.
1 – Instrument Cluster Display Controls
2 – Instrument Cluster Display Screen1 — Left Arrow Button
2 — Up Arrow Button
3 — Right Arrow Button
4 — Down Arrow Button
5 — OK Button
3
22_RUP_OM_EN_USC_t.book Page 113
Page 118 of 384

116GETTING TO KNOW YOUR INSTRUMENT PANEL
INSTRUMENT CLUSTER DISPLAY MENU
I
TEMS
The instrument cluster display can be used to view
the main menu items for several features. Use the
up and down arrow buttons to scroll through
the driver interactive display menu options until
the desired menu is reached Ú page 113.
NOTE:The instrument cluster display menu items display
in the center of the instrument cluster. Menu items
may vary depending on your vehicle features.
Speedometer
Push and release the up or down arrow
button until Speedometer is highlighted in the
instrument cluster display. Push and release the
OK button to toggle between MPH and km/h.
Vehicle Info
Push and release the up or down arrow
button until Vehicle Info is highlighted in the
instrument cluster display. Push the left or
right arrow button to scroll through the following
information submenus: Tire Pressure
If tire pressure is
OK for all tires, a vehicle ICON is
displayed with tire pressure values in each corner
of the ICON.
If one or more tires have low pressure, “Inflate Tire
To XX” is displayed with the vehicle ICON, and the
tire pressure values in each corner of the ICON with
the pressure value of the low tire displayed in a
different color than the other tire pressure value.
If the Tire Pressure system requires service,
“Service Tire Pressure System” is displayed.
Tire PSI is an information only function and cannot
be reset Ú page 236.
Coolant Temp
Displays the actual coolant temperature.
Transmission Temp
Displays the actual transmission temperature.
Oil Temp — If Equipped
Displays the actual oil temperature.
Oil Pressure
Displays the actual oil pressure. Oil Life
Displays the remaining engine oil life as a
percentage.
To reset the Oil Life, you must hold the
OK button.
The “Hold OK to Reset” instruction will be
displayed at all times, but the following conditions
will need to be met in order to reset Oil Life:
The ignition must be in the ON/RUN position.
If the conditions are met, holding the OK button will
reset the gauge and the numeric display will return
to 100%.
If the conditions are not met, a pop-up message
will display for five seconds, describing the
required conditions, and then the Oil Life screen
will reappear.
Battery Voltage
Displays the actual battery voltage.
Engine Hours — If Equipped
Displays the number of hours of engine operation.
22_RUP_OM_EN_USC_t.book Page 116
Page 119 of 384

GETTING TO KNOW YOUR INSTRUMENT PANEL117
Driver Assist — If Equipped
Push and release the up or down arrow
button until the Driver Assist display icon is
highlighted in the instrument cluster display.
Fuel Economy
Push and release the up or down arrow
button until the Fuel Economy Menu item is
highlighted in the instrument cluster display.
The Fuel Economy Menu will display the following:
Two submenu pages that can be toggled
between using the left and right arrow
buttons; one with Current Value displayed and
one without the Current Value displayed:
Average Fuel Economy (MPG, L/100 km, or
km/L)
Range To Empty (miles or km)
Current Fuel Economy (MPG, L/100 km, or
km/L)
The Max and Min values will correspond to
the particular engine requirements
Hold OK to reset average fuel economy informa -
tion.
Trip Info
Push and release the up or down arrow
button until the Trip Menu item is highlighted in the
instrument cluster display. Push the left or
right arrow button to scroll through the Trip A
and Trip B submenus. The Trip information will
display the following:
Distance
Average Fuel Economy
Elapsed Time
Hold the OK button to reset feature information.
Stop / Start – If Equipped
Push and release the up or down arrow
button until the Stop/Start menu title is displayed
in the instrument cluster display.
Audio
Push and release the up or down arrow
button until the Audio Menu displays in the
instrument cluster display.
Messages
Push and release the up or down arrow
button until Messages is highlighted in the
instrument cluster display. This feature shows the
number of stored warning messages. Pushing the
right arrow button will allow you to see what the
stored messages are.
NOTE:The pop-up messages indicate the status of the
system and/or the conditions that need to be met.
Messages remain in the stored stack until
condition is cleared.
Screen Setup
Push and release the up or down arrow
button until the Screen Setup Menu displays in the
instrument cluster display. Push and release the
OK button to enter the submenus. The Screen
Setup feature allows you to change what
information is displayed in the instrument cluster
as well as the location that information is
displayed.
3
22_RUP_OM_EN_USC_t.book Page 117
Page 123 of 384

GETTING TO KNOW YOUR INSTRUMENT PANEL121
TRIP COMPUTER
The Trip Computer is located in the instrument
cluster display. Push and release the up or
down arrow button until “Trip Info” is
highlighted in the instrument cluster display.
Navigate between Trip A or Trip B by using the
right and left arrow buttons.
For each trip the following information will be
displayed:
Trip A
Shows the total distance traveled for Trip A
since the last reset.
Shows the Average MPG for Trip A since the last
reset.
Shows the elapsed time traveled for Trip A since
the last reset. Elapsed time will increment when
the ignition switch is in the ON or START position.
Trip B
Shows the total distance traveled for Trip B
since the last reset.
Shows the Average MPG for Trip B since the last
reset.
Shows the elapsed time traveled for Trip B since
the last reset. Elapsed time will increment when
the ignition switch is in the ON or START position.
To Reset A Trip Function
Push and hold the OK button to reset the currently
displayed trip.
WARNING LIGHTS AND MESSAGES
The warning/indicator lights will illuminate in the
instrument panel together with a dedicated
message and/or acoustic signal when applicable.
These indications are indicative and precautionary
and as such must not be considered as exhaustive
and/or alternative to the information contained in
the Owner’s Manual, which you are advised to read
carefully in all cases. Always refer to the
information in this chapter in the event of a failure
indication. All active telltales will display first if
applicable. The system check menu may appear
different based upon equipment options and
current vehicle status. Some telltales are optional
and may not appear.
RED WARNING LIGHTS
Air Bag Warning Light
This warning light will illuminate to
indicate a fault with the air bag, and will
turn on for four to eight seconds as a bulb
check when the ignition is placed in the
ON/RUN or ACC/ON/RUN position. This light will
illuminate with a single chime when a fault with the
air bag has been detected, it will stay on until the
fault is cleared. If the light is either not on during
startup, stays on, or turns on while driving, have
the system inspected at an authorized dealer as
soon as possible.
Battery Charge Warning Light
This warning light will illuminate when
the battery is not charging properly. If it
stays on while the engine is running,
there may be a malfunction with the
charging system. Contact an authorized dealer as
soon as possible.
This indicates a possible problem with the
electrical system or a related component.
3
22_RUP_OM_EN_USC_t.book Page 121
Page 148 of 384

146STARTING AND OPERATING
CRUISE CONTROL SYSTEMS — IF EQUIPPED
Your vehicle may be equipped with the Cruise
Control system, or the Adaptive Cruise Control
(ACC) system:
Cruise Control will keep your vehicle at a
constant preset speed.
Adaptive Cruise Control (ACC) will adjust the
vehicle speed up to the preset speed to main -
tain a distance with the vehicle ahead.
NOTE:
In vehicles equipped with ACC, if ACC is not
enabled, Fixed Speed Cruise Control will not
detect vehicles directly ahead of you. Always be
aware of the feature selected.
Only one Cruise Control feature can operate at a
time. For example, if Fixed Speed Cruise Control
is enabled, Adaptive Cruise Control will be
unavailable, and vice versa.
CRUISE CONTROL
When engaged, the Cruise Control takes over
accelerator operations at speeds greater than
25 mph (40 km/h).
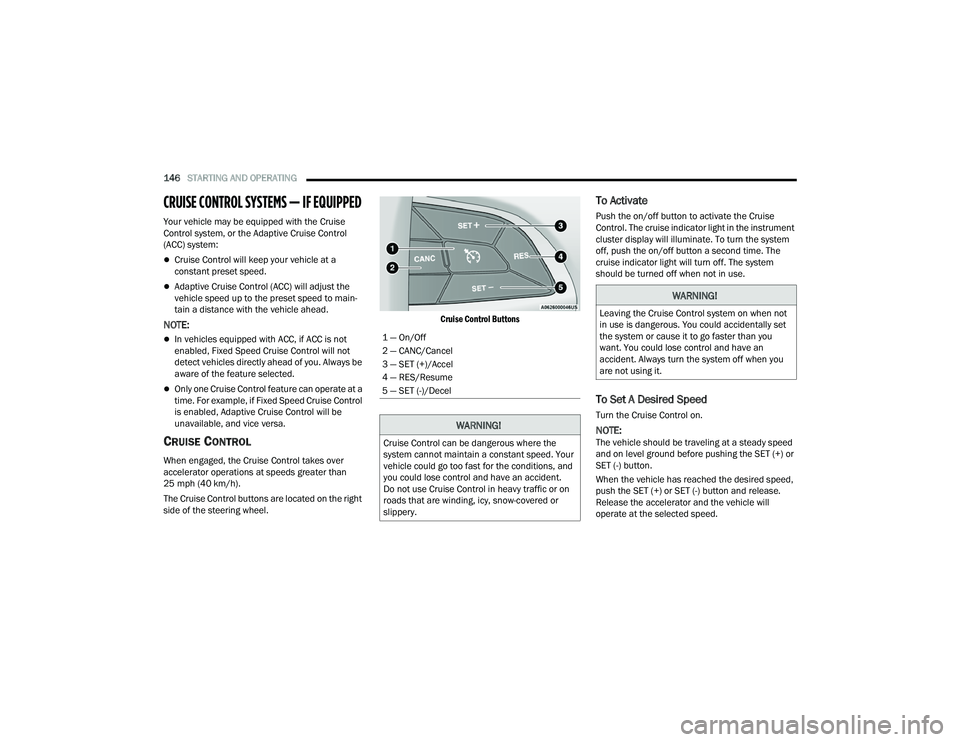
The Cruise Control buttons are located on the right
side of the steering wheel.
Cruise Control Buttons
To Activate
Push the on/off button to activate the Cruise
Control. The cruise indicator light in the instrument
cluster display will illuminate. To turn the system
off, push the on/off button a second time. The
cruise indicator light will turn off. The system
should be turned off when not in use.
To Set A Desired Speed
Turn the Cruise Control on.
NOTE:The vehicle should be traveling at a steady speed
and on level ground before pushing the SET (+) or
SET (-) button.
When the vehicle has reached the desired speed,
push the SET (+) or SET (-) button and release.
Release the accelerator and the vehicle will
operate at the selected speed.
1 — On/Off
2 — CANC/Cancel
3 — SET (+)/Accel
4 — RES/Resume
5 — SET (-)/Decel
WARNING!
Cruise Control can be dangerous where the
system cannot maintain a constant speed. Your
vehicle could go too fast for the conditions, and
you could lose control and have an accident.
Do not use Cruise Control in heavy traffic or on
roads that are winding, icy, snow-covered or
slippery.
WARNING!
Leaving the Cruise Control system on when not
in use is dangerous. You could accidentally set
the system or cause it to go faster than you
want. You could lose control and have an
accident. Always turn the system off when you
are not using it.
22_RUP_OM_EN_USC_t.book Page 146
Page 151 of 384

STARTING AND OPERATING149
Adaptive Cruise Control (ACC) Operation
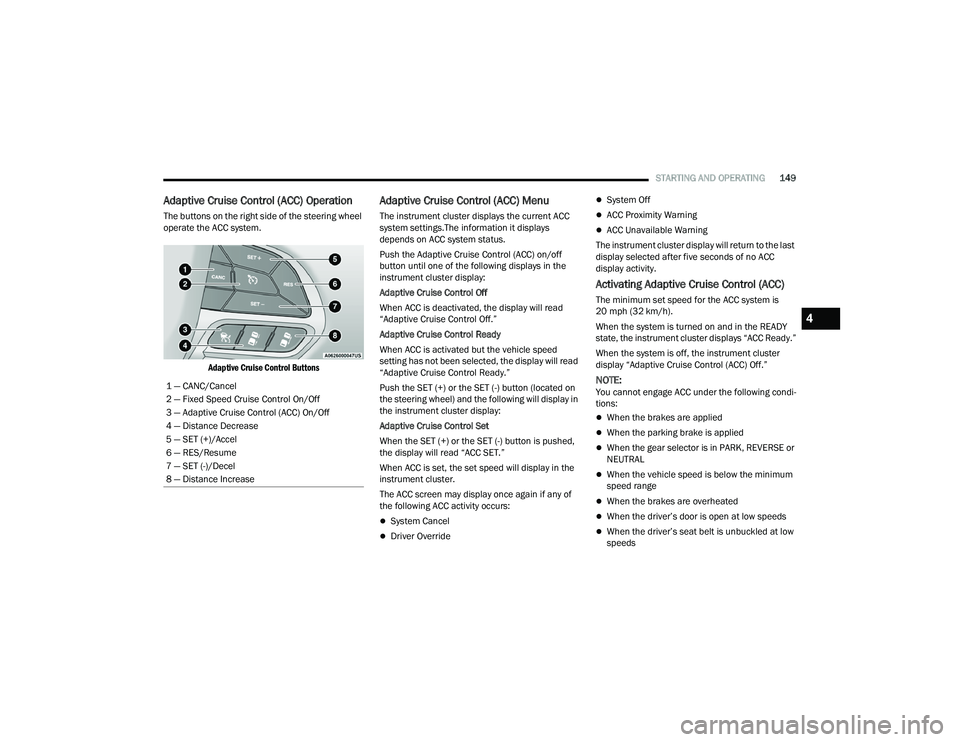
The buttons on the right side of the steering wheel
operate the ACC system.
Adaptive Cruise Control Buttons
Adaptive Cruise Control (ACC) Menu
The instrument cluster displays the current ACC
system settings.The information it displays
depends on ACC system status.
Push the Adaptive Cruise Control (ACC) on/off
button until one of the following displays in the
instrument cluster display:
Adaptive Cruise Control Off
When ACC is deactivated, the display will read
“Adaptive Cruise Control Off.”
Adaptive Cruise Control Ready
When ACC is activated but the vehicle speed
setting has not been selected, the display will read
“Adaptive Cruise Control Ready.”
Push the SET (+) or the SET (-) button (located on
the steering wheel) and the following will display in
the instrument cluster display:
Adaptive Cruise Control Set
When the SET (+) or the SET (-) button is pushed,
the display will read “ACC SET.”
When ACC is set, the set speed will display in the
instrument cluster.
The ACC screen may display once again if any of
the following ACC activity occurs:
System Cancel
Driver Override
System Off
ACC Proximity Warning
ACC Unavailable Warning
The instrument cluster display will return to the last
display selected after five seconds of no ACC
display activity.
Activating Adaptive Cruise Control (ACC)
The minimum set speed for the ACC system is
20 mph (32 km/h).
When the system is turned on and in the READY
state, the instrument cluster displays “ACC Ready.”
When the system is off, the instrument cluster
display “Adaptive Cruise Control (ACC) Off.”
NOTE:You cannot engage ACC under the following condi -
tions:
When the brakes are applied
When the parking brake is applied
When the gear selector is in PARK, REVERSE or
NEUTRAL
When the vehicle speed is below the minimum
speed range
When the brakes are overheated
When the driver’s door is open at low speeds
When the driver’s seat belt is unbuckled at low
speeds
1 — CANC/Cancel
2 — Fixed Speed Cruise Control On/Off
3 — Adaptive Cruise Control (ACC) On/Off
4 — Distance Decrease
5 — SET (+)/Accel
6 — RES/Resume
7 — SET (-)/Decel
8 — Distance Increase
4
22_RUP_OM_EN_USC_t.book Page 149
Page 153 of 384

STARTING AND OPERATING151
The vehicle parking brake is applied
The braking temperature exceeds normal range
(overheated)
The following conditions will only cancel the ACC
system:
Driver seat belt is unbuckled at low speeds
Driver door is opened at low speeds
To Turn Off
The system will turn off and clear the set speed in
memory if:
The Adaptive Cruise Control (ACC) on/off button
is pushed
The Fixed Speed Cruise Control on/off button is
pushed
The ignition is placed in the OFF position
To Resume
If there is a set speed in memory, push the RES
(resume) button and then remove your foot from
the accelerator pedal. The instrument cluster
display will display the last set speed.
Resume can be used at any speed above 20 mph
(32 km/h) when only Fixed Speed Cruise Control is
being used.
NOTE:
If your vehicle is at a standstill longer than two
seconds, the driver will either have to push the
RES (resume) button, or apply the accelerator
pedal to reengage the Adaptive Cruise Control
(ACC) to the existing set speed.
ACC cannot be resumed if there is a stationary
vehicle in front of your vehicle in close proximity.
To Vary The Speed Setting
To Increase Or Decrease The Set Speed
After setting a speed, you can increase the set
speed by pushing the SET (+) button, or decrease
speed by pushing the SET (-) button. U.S. Speed (mph)
Pushing the SET (+)
, or SET (-) button once will
result in a 1 mph speed adjustment. Each
subsequent tap of the button results in an
adjustment of 1 mph.
If the button is continually pushed, the set
speed will continue to adjust in 5 mph incre -
ments until the button is released. The new set
speed is reflected in the instrument cluster
display.
Metric Speed (km/h)
Pushing the SET (+) , or SET (-) button once will
result in a 1 km/h speed adjustment. Each
subsequent tap of the button results in an
adjustment of 1 km/h.
If the button is continually pushed, the set
speed will continue to adjust in 10 km/h incre -
ments until the button is released. The new set
speed is reflected in the instrument cluster
display.
NOTE:When you override and push the SET (+) button or
SET (-) buttons, the new set speed will be the
current speed of the vehicle.
WARNING!
The Resume function should only be used if
traffic and road conditions permit. Resuming a
set speed that is too high or too low for
prevailing traffic and road conditions could
cause the vehicle to accelerate or decelerate too
sharply for safe operation. Failure to follow these
warnings can result in a collision and death or
serious personal injury.4
22_RUP_OM_EN_USC_t.book Page 151
Page 171 of 384

STARTING AND OPERATING169
The following table shows the approximate
distances for each zone:
NOTE:If snow, ice, mud, or any foreign substance builds
up on the camera lens, clean the lens, rinse with
water, and dry with a soft cloth. Do not cover the
lens.
SURROUND VIEW CAMERA SYSTEM —
IF EQUIPPED
Your vehicle may be equipped with the Surround
View Camera system that allows you to see an
on-screen image of the surroundings and Top View
of your vehicle whenever the gear selector is put
into REVERSE or a different view is selected
through the touchscreen soft buttons. The Top
View of the vehicle will show which doors are open.
The image will be displayed on the touchscreen
display along with a caution note “Check Entire
Surroundings” across the top of the screen.
After five seconds, this note will disappear.
The Surround View Camera system is comprised of
four sequential cameras located in the front grille,
rear liftgate and side mirrors.
NOTE:The Surround View Camera system has program -
mable settings that may be selected through the
Uconnect system Ú page 188.
Press this button on the touchscreen to
enter the Surround View Camera menu in
the Uconnect system.
When the vehicle is shifted into REVERSE, the Rear
View and Top View is the default view of the
system.
When the vehicle is shifted out of REVERSE with
camera delay turned on, the camera image will
continue to be displayed for up to 10 seconds
unless the vehicle speed exceeds 8 mph (13 km/h),
the vehicle is shifted into PARK, or the ignition is
placed in the OFF position. There is a touchscreen
button X to disable the display of the camera image.
When the vehicle is shifted out of REVERSE with
camera delay turned off, the Surround View system
is exited and the last known screen appears again.
Whenever the Rear View Camera image is
activated through the Back Up Camera button in
the Controls menu, and the vehicle speed is
greater than, or equal to, 8 mph (13 km/h), a
display timer for the image is initiated. The image
will continue to be displayed until the display timer
exceeds 10 seconds.
Zone
Distance To The Rear Of
The Vehicle
Red 0 - 1 ft (0 - 30 cm)
Yellow 1 ft - 6.5 ft (30 cm - 2 m)
Green 6.5 ft or greater
(2 m or greater)
WARNING!
Drivers must be careful when backing up even
when using the ParkView Rear Back Up Camera.
Always check carefully behind your vehicle, and
be sure to check for pedestrians, animals, other
vehicles, obstructions, or blind spots before
backing up. You are responsible for the safety of
your surroundings and must continue to pay
attention while backing up. Failure to do so can
result in serious injury or death.
CAUTION!
To avoid vehicle damage, ParkView should
only be used as a parking aid. The ParkView
camera is unable to view every obstacle or
object in your drive path.
To avoid vehicle damage, the vehicle must be
driven slowly when using ParkView to be able
to stop in time when an obstacle is seen. It is
recommended that the driver look frequently
over his/her shoulder when using ParkView.
4
22_RUP_OM_EN_USC_t.book Page 169