2022 CHRYSLER PACIFICA phone
[x] Cancel search: phonePage 193 of 384

MULTIMEDIA191
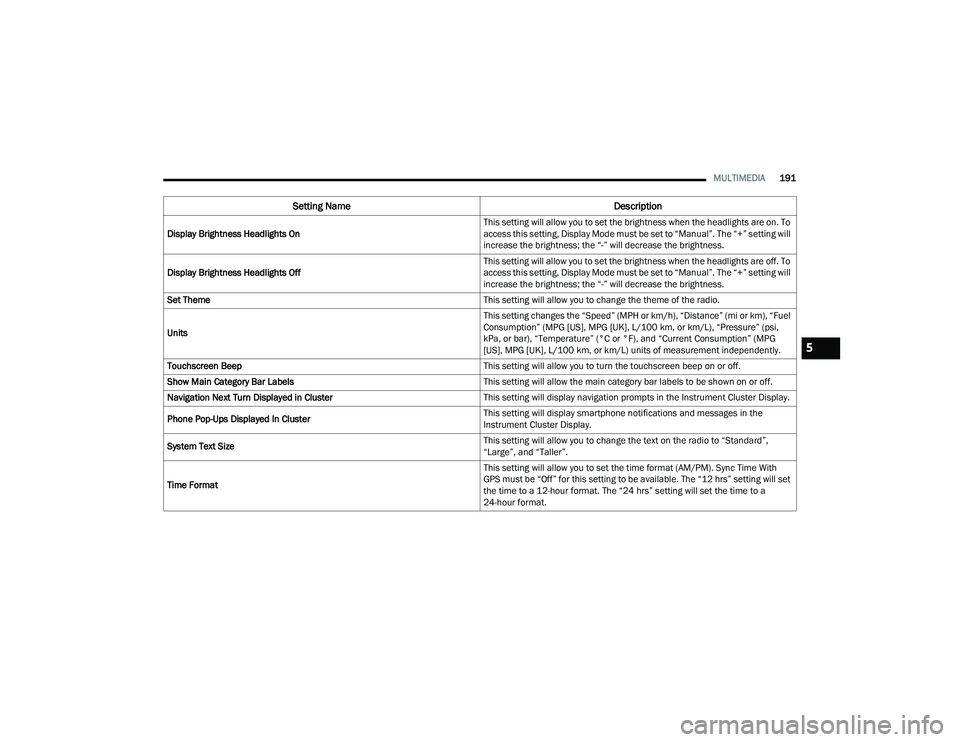
Display Brightness Headlights On This setting will allow you to set the brightness when the headlights are on. To
access this setting, Display Mode must be set to “Manual”. The “+” setting will
increase the brightness; the “-” will decrease the brightness.
Display Brightness Headlights Off This setting will allow you to set the brightness when the headlights are off. To
access this setting, Display Mode must be set to “Manual”. The “+” setting will
increase the brightness; the “-” will decrease the brightness.
Set Theme This setting will allow you to change the theme of the radio.
Units This setting changes the “Speed” (MPH or km/h), “Distance” (mi or km), “Fuel
Consumption” (MPG [US], MPG [UK], L/100 km, or km/L), “Pressure” (psi,
kPa, or bar), “Temperature” (°C or °F), and “Current Consumption” (MPG
[US], MPG [UK], L/100 km, or km/L) units of measurement independently.
Touchscreen Beep This setting will allow you to turn the touchscreen beep on or off.
Show Main Category Bar Labels This setting will allow the main category bar labels to be shown on or off.
Navigation Next Turn Displayed in Cluster This setting will display navigation prompts in the Instrument Cluster Display.
Phone Pop-Ups Displayed In Cluster This setting will display smartphone notifications and messages in the
Instrument Cluster Display.
System Text Size This setting will allow you to change the text on the radio to “Standard”,
“Large”, and “Taller”.
Time Format This setting will allow you to set the time format (AM/PM). Sync Time With
GPS must be “Off” for this setting to be available. The “12 hrs” setting will set
the time to a 12-hour format. The “24 hrs” setting will set the time to a
24-hour format.
Setting Name
Description
5
22_RUP_OM_EN_USC_t.book Page 191
Page 197 of 384

MULTIMEDIA195
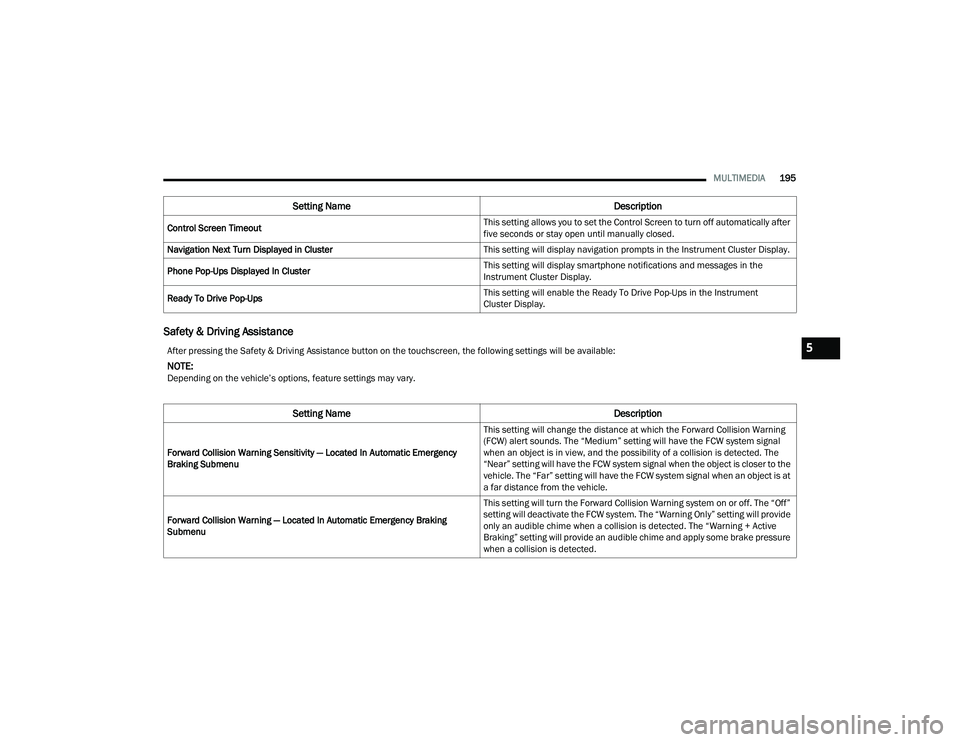
Safety & Driving Assistance
Control Screen Timeout This setting allows you to set the Control Screen to turn off automatically after
five seconds or stay open until manually closed.
Navigation Next Turn Displayed in Cluster This setting will display navigation prompts in the Instrument Cluster Display.
Phone Pop-Ups Displayed In Cluster This setting will display smartphone notifications and messages in the
Instrument Cluster Display.
Ready To Drive Pop-Ups This setting will enable the Ready To Drive Pop-Ups in the Instrument
Cluster Display.
Setting Name
Description
After pressing the Safety & Driving Assistance button on the touchscreen, the following settings will be available:
NOTE:Depending on the vehicle’s options, feature settings may vary.
Setting NameDescription
Forward Collision Warning Sensitivity — Located In Automatic Emergency
Braking Submenu This setting will change the distance at which the Forward Collision Warning
(FCW) alert sounds. The “Medium” setting will have the FCW system signal
when an object is in view, and the possibility of a collision is detected. The
“Near” setting will have the FCW system signal when the object is closer to the
vehicle. The “Far” setting will have the FCW system signal when an object is at
a far distance from the vehicle.
Forward Collision Warning — Located In Automatic Emergency Braking
Submenu This setting will turn the Forward Collision Warning system on or off. The “Off”
setting will deactivate the FCW system. The “Warning Only” setting will provide
only an audible chime when a collision is detected. The “Warning + Active
Braking” setting will provide an audible chime and apply some brake pressure
when a collision is detected.
5
22_RUP_OM_EN_USC_t.book Page 195
Page 200 of 384

198MULTIMEDIA
Phone/Bluetooth®
When the Phone/Bluetooth® button is pressed on the touchscreen, the system displays the options related to Bluetooth® connectivity from an external audio
device or smartphone. The list of paired audio devices or smartphones can be accessed from this menu.
NOTE:Depending on the vehicle’s options, feature settings may vary.
Setting Name Description
Device Manager This setting will open the Device Manager main screen.
Do Not Disturb This setting will open the Do Not Disturb settings menu. The settings are “Auto
Reply” (both, text, call), “Auto Reply Message” (custom, default), and “Custom
Auto Reply Message” (create message).
Do Not Disturb All This setting will open the “Do Not Disturb All” settings menu. The available
options are “On” and “Off”.
Enable Two Active Phones This setting will enable or disable two active phones with the vehicle.
The setting options are “On” and “Off”.
Phone Pop-Ups Displayed In Cluster This setting will activate phone message pop-ups in the Instrument
Cluster Display.
22_RUP_OM_EN_USC_t.book Page 198
Page 209 of 384

MULTIMEDIA207
Audio
When the Audio button is pressed on the touchscreen, the system displays options related to the vehicle’s sound system. These settings can change the audio
location within the vehicle, adjust the bass or treble levels, and auto-play settings from an audio device or smartphone.
NOTE:Depending on the vehicle’s options, feature settings may vary.
Setting Name Description
Balance/Fade This setting will adjust audio levels from specific speakers in the front/back
and left/right of the vehicle. The Speaker icon can be moved to set
audio location.
Equalizer This setting will adjust the “Bass”, “Mid”, and “Treble” ranges of the audio.
Speed Adjusted Volume This setting will adjust audio volume as speeds increase. At a higher setting,
the volume will increase more as the vehicle speeds up. The available settings
are “Off”, “1”, “2”, and “3”.
Surround Sound This setting will turn the Surround Sound system on or off.
AUX Volume Offset This setting will tune the audio levels from a device connected through the
AUX port. The available settings are “+” and “-”.
Auto Play This setting will automatically begin playing audio from a connected device.
Auto On Radio This setting will automatically turn on when the vehicle is in ON/RUN or will
recall whether it was on or off at last ignition OFF. The selectable options are
“On”, “Off”, and “Recall Last”.
Volume Adjustment This setting allows you to adjust the volume levels for features such as Media,
Phone, Navigation, and Voice Recognition.
5
22_RUP_OM_EN_USC_t.book Page 207
Page 210 of 384

208MULTIMEDIA
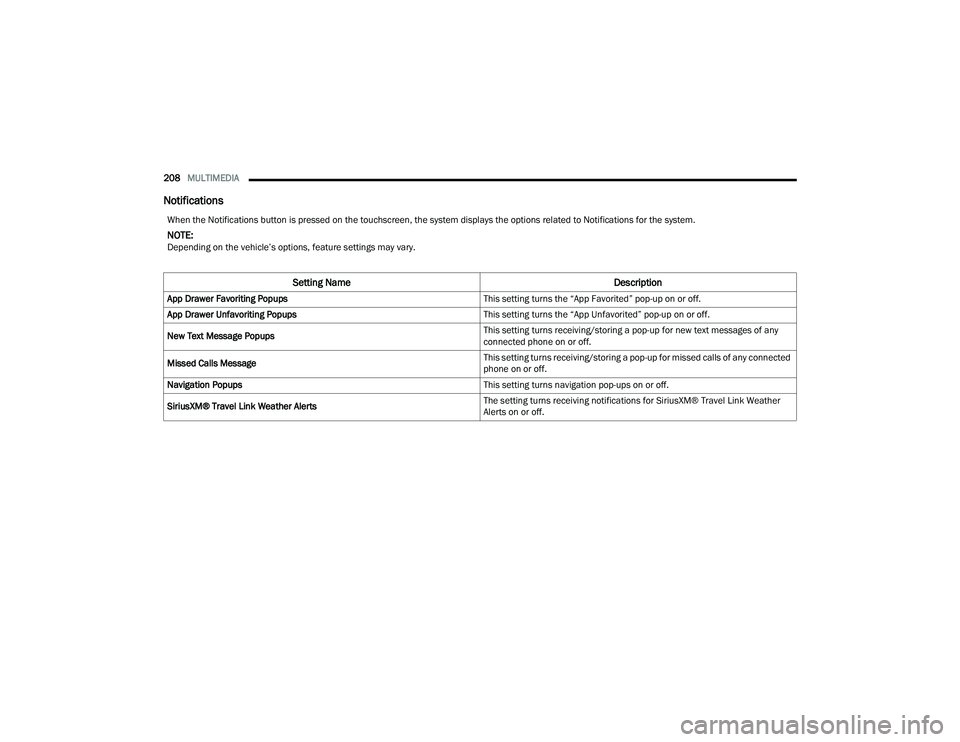
Notifications
When the Notifications button is pressed on the touchscreen, the system displays the options related to Notifications for the system.
NOTE:Depending on the vehicle’s options, feature settings may vary.
Setting Name Description
App Drawer Favoriting Popups This setting turns the “App Favorited” pop-up on or off.
App Drawer Unfavoriting Popups This setting turns the “App Unfavorited” pop-up on or off.
New Text Message Popups This setting turns receiving/storing a pop-up for new text messages of any
connected phone on or off.
Missed Calls Message This setting turns receiving/storing a pop-up for missed calls of any connected
phone on or off.
Navigation Popups This setting turns navigation pop-ups on or off.
SiriusXM® Travel Link Weather Alerts The setting turns receiving notifications for SiriusXM® Travel Link Weather
Alerts on or off.
22_RUP_OM_EN_USC_t.book Page 208
Page 215 of 384

MULTIMEDIA213
REAR SEAT ENTERTAINMENT WITH
AMAZON FIRE TV BUILT-IN — IF EQUIPPED
OVERVIEW
Rear Seat Entertainment with Fire TV built-in is
designed to give your family years of enjoyment.
Fire TV lets passengers enjoy a wide variety of
content from popular apps (subscriptions may be
required). Stream videos, play games, listen to
music, get information, and watch downloaded
programs all while on the road. In addition to
streaming and downloaded content, changing the
input in Fire TV also allows users to:
Play your favorite CDs, DVDs, or Blu-ray™ Discs
Mirror what’s on your phone or tablet to Fire TV
via Miracast capable devices (see support
here):
https://www.amazon.com/gp/help/
customer/display
Plug and play a variety of standard video games
or devices into the HDMI port
Listen to audio over wireless headphones
(not included, customer will have to provide
their own)
Plug and play a variety of devices into the
Video USB port
Plug in standard headphones to listen to audio
NOTE:Vehicle must be in an active and usable cellular
range and properly equipped with a Uconnect
5 NAV system and Rear Seat Entertainment with
Fire TV package. Streaming requires a Wi-Fi
connection and registered Amazon account to run
Fire TV in the vehicle. Streaming service subscrip -
tions are not included. Certain services are subject
to change or withdrawal at any time, may not be
available in all areas and languages, and may
require separate subscriptions.
GETTING STARTED
Rear Seat Entertainment for Uconnect 5/5 NAV
There are three different ways to operate the
features of Rear Seat Entertainment with Fire TV
built-in:
Rear Seat Entertainment Voice Remote with
Alexa
Front radio screen
Individual Rear Seat Entertainment with Fire TV
built-in Touchscreens
ACCESSING REAR SEAT
E
NTERTAINMENT WITH FIRE TV BUILT-IN
FROM THE FRONT RADIO SCREEN
You can access your Rear Seat Entertainment with
Fire TV built-in system by following these steps:
Option 1
1. Press the Media button.
2. Press the Rear Seat button icon.
Option 2
1. Press the Apps button on the bottom of the
touchscreen.
2. Press the Uconnect Theater button on the touchscreen. You may need to navigate to
different pages in the Apps drawer to find the
Uconnect Theater button.
1 — Rear Seat Entertainment (Rear Touchscreen)
2 — Headphone Jack
3 — HDMI Port
4 — USB C Charging Port
5 — Uconnect System (Front Touchscreen)5
22_RUP_OM_EN_USC_t.book Page 213
Page 216 of 384

214MULTIMEDIA
ACCESSING REAR SEAT
E
NTERTAINMENT WITH FIRE TV BUILT-IN
FROM THE REAR SCREENS
You can access your Rear Seat Entertainment with
Fire TV built-in system from the rear screens by just
flipping the screens open. Flipping open the rear
screens will automatically turn the system on.
Pushing the Power button on the Rear Seat
Entertainment Voice Remote with Alexa.
NOTE:While accessing on the rear screens, the system
will launch with the integrated Fire TV.
FIRST TIME STARTING UP
(U
SING THE REAR SCREENS)
Boot-Up Screen
When turning on the system for the first time from
the rear screens, a boot-up screen will appear on
the system displaying the Fire TV logo.
During this boot up sequence, language options
will be available for the system.
Voice Remote with Alexa Pairing
After the boot-up sequence is complete, the
system will then give the option to pair a Voice
Remote with Alexa (two are included with the
system). Follow the on-screen instructions to pair the Voice
Remote with Alexa to the system.
NOTE:If the Voice Remote with Alexa pairing fails,
on-screen instructions will appear for trying to pair
again.
Connecting to a Network
During the start-up process, the system will need to
be connected to a network. Multiple network
sources can be options for the system, and one will
need to be selected for the system to function.
Some options for a network connection are:
Wi-Fi Hotspot using a capable smartphone
(if activated, it will show as a possible network
for the system on the screen).
Outside connection like a home Wi-Fi network.
In-vehicle Wi-Fi.
NOTE:When a network is connected to the system for the
first time, an over-the-air software update will take
place using the Wi-Fi connection. After this
first-time update, updates will only accrue when
one is available. It is recommended that you
connect your RSE/Amazon Fire OS to a Wi-Fi
Hotspot with unlimited data and a good signal
(such as a home Wi-Fi network) in order to check
for future Fire OS updates.
Account Sign-in
The next step will be the option to sign in to your
Amazon account.
There are two options to sign into the system:
I already have an Amazon account:
Sign in with
an already existing Amazon account
I am new to Amazon: Create a new Amazon
Account
If “I am new to Amazon” is selected, follow the
on-screen steps to set up an Amazon account with
the system.
Parental Controls
Another feature that will appear during this first
time set up is parental controls.
When the parental controls page appears, it will
give the options to “Enable Parental Controls” and
“No Parental Controls”. If “Enable Parental
Controls” is selected, follow the on-screen steps to
set up parental controls for the system.
REAR SEAT ENTERTAINMENT WITH FIRE
TV B
UILT-IN ALEXA
A feature with Rear Seat Entertainment with Fire
TV built-in that enhances your experience is Alexa.
It is simple to get started using this feature. Push
the Voice button at the top of the Voice Remote
with Alexa to activate Alexa and get started.
22_RUP_OM_EN_USC_t.book Page 214
Page 218 of 384

216MULTIMEDIA
MEDIA SOURCES INPUT (USING THE
F
RONT RADIO AND REAR SCREENS)
Front Radio Screen
Inputs available within Launch Source under
“Inputs” are “Fire TV”, “HDMI”, “Blu-ray™”, “DVD’,
and “USB”.
Rear Screens
To select inputs on the rear screen, scroll down on
the Fire TV Home screen and select your desired
input under “Inputs”.
Inputs can also be selected from the Brand tab in
the top menu. While in this tab, scroll down to
“Inputs” for selection.
NOTE:The Brand tab naming in the top menu will depend
on the naming of the vehicle’s brand.
REAR SEAT ENTERTAINMENT WITH FIRE
TV B
UILT-IN VOICE REMOTE WITH ALEXA
Voice Remote with Alexa
1.
Power Button
— Turns the screen for the
selected channel on or off.
2. 5-way Navigation Control — This control has
options by pressing the Circle button Up,
Down, Left, or Right to navigate on-screen for
selections and pushing the center button to
confirm selections.
3. Back — Push to exit out of menus or return to
the previous screen.
4. Home — Push to return to the Fire TV Home
screen.
5. Seek Backward/Rewind Button — Push
and hold to fast rewind through the current
audio track or video chapter. Push once to
revert back to the previous track.
6. Volume — Push the - button to decrease the
volume and + button to increase the volume.
7. Channel Guide — Push to access the channel
guide for the system.
8. Mute — Mutes headphone audio.
22_RUP_OM_EN_USC_t.book Page 216