2022 CHRYSLER PACIFICA Head restraint
[x] Cancel search: Head restraintPage 271 of 384

SAFETY269
Car Seat With Head Restraint Folded
Locating The LATCH Anchorages
If applicable, refer to the “Hybrid Supplement” for
additional information. The lower anchorages are round bars
that are found at the rear of the seat
cushion where it meets the seatback,
below the anchorage symbols on the
seatback. They are just visible when you lean into
the rear seat to install the child restraint. You will
easily feel them if you run your finger along the gap
between the seatback and seat cushion.
LATCH Anchorages (Second Row Anchorages Shown) 7 Passenger Stow ‘n Go Seating LATCH Anchorages (Second Row Anchorages Shown)
8 Passenger Seating
LATCH Anchorages (Second Row Bench Anchorages Shown) 7 Passenger Bench Seating
WARNING!
Always make sure the head restraint is in its
upright position when the seat is to be used by
an occupant who is not in a child restraint.
Sitting in a seat with the head restraint in its
lowered position could result in serious injury or
death in a collision.
1 — Folded Headrest
2 — Child Restraint
6
22_RUP_OM_EN_USC_t.book Page 269
Page 273 of 384

SAFETY271
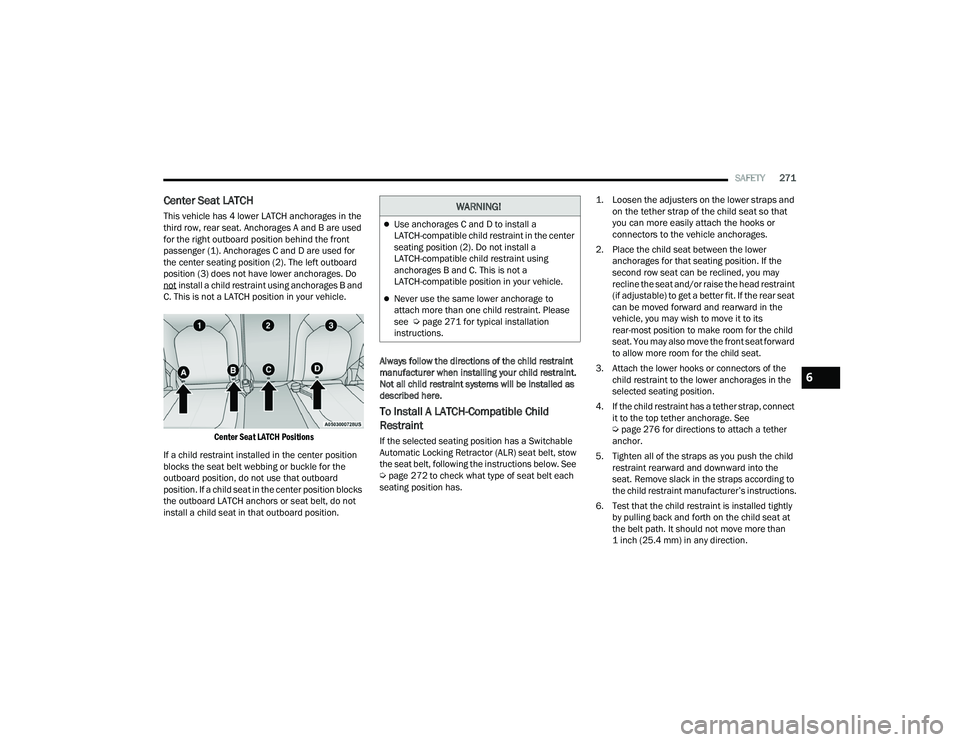
Center Seat LATCH
This vehicle has 4 lower LATCH anchorages in the
third row, rear seat. Anchorages A and B are used
for the right outboard position behind the front
passenger (1). Anchorages C and D are used for
the center seating position (2). The left outboard
position (3) does not have lower anchorages. Do
not
install a child restraint using anchorages B and
C. This is not a LATCH position in your vehicle.
Center Seat LATCH Positions
If a child restraint installed in the center position
blocks the seat belt webbing or buckle for the
outboard position, do not use that outboard
position. If a child seat in the center position blocks
the outboard LATCH anchors or seat belt, do not
install a child seat in that outboard position. Always follow the directions of the child restraint
manufacturer when installing your child restraint.
Not all child restraint systems will be installed as
described here.
To Install A LATCH-Compatible Child
Restraint
If the selected seating position has a Switchable
Automatic Locking Retractor (ALR) seat belt, stow
the seat belt, following the instructions below. See
Ú
page 272 to check what type of seat belt each
seating position has.
1. Loosen the adjusters on the lower straps and
on the tether strap of the child seat so that
you can more easily attach the hooks or
connectors to the vehicle anchorages.
2. Place the child seat between the lower anchorages for that seating position. If the
second row seat can be reclined, you may
recline the seat and/or raise the head restraint
(if adjustable) to get a better fit. If the rear seat
can be moved forward and rearward in the
vehicle, you may wish to move it to its
rear-most position to make room for the child
seat. You may also move the front seat forward
to allow more room for the child seat.
3. Attach the lower hooks or connectors of the child restraint to the lower anchorages in the
selected seating position.
4. If the child restraint has a tether strap, connect it to the top tether anchorage. See
Úpage 276 for directions to attach a tether
anchor.
5. Tighten all of the straps as you push the child restraint rearward and downward into the
seat. Remove slack in the straps according to
the child restraint manufacturer’s instructions.
6. Test that the child restraint is installed tightly by pulling back and forth on the child seat at
the belt path. It should not move more than
1 inch (25.4 mm) in any direction.
WARNING!
Use anchorages C and D to install a
LATCH-compatible child restraint in the center
seating position (2). Do not install a
LATCH-compatible child restraint using
anchorages B and C. This is not a
LATCH-compatible position in your vehicle.
Never use the same lower anchorage to
attach more than one child restraint. Please
see Ú page 271 for typical installation
instructions.
6
22_RUP_OM_EN_USC_t.book Page 271
Page 276 of 384

274SAFETY
NOTE:If the folding, non-adjustable head restraint interferes with the installation of the child restraint, the head restraint may be folded and the child seat installed in
front of it.
Frequently Asked Questions
What is the weight limit (child’s weight + weight of the child
restraint) for using the Tether Anchor with the seat belt to
attach a forward facing child restraint? Weight limit of the Child
Restraint Always use the tether anchor when using the seat belt to
install a forward facing child restraint, up to the
recommended weight limit of the child restraint.
Can the rear-facing child restraint touch the back of the front
passenger seat? YesContact between the front passenger seat and the child
restraint is allowed, if the child restraint manufacturer also
allows contact.
Can the rear head restraints be removed? YesThe 2nd row head restraints on bench and the center head
restraint in the 8 passenger vehicle can be removed if they
interfere with the installation of the child restraint. 2nd row
Stow 'n Go head restraints are not removable. The 3rd row
center head restraint is removable in all vehicles, but the 3rd
row outboard head restraints are not removable Ú
page 52.
Can the buckle stalk be twisted to tighten the seat belt
against the belt path of the child restraint? NoDo not twist the buckle stalk in a seating position with an ALR
retractor.
WARNING!
Always make sure the head restraint is in its upright position when the seat is to be used by an occupant who is not in a child restraint. Sitting in a seat with
the head restraint in its lowered position could result in serious injury or death in a collision.
22_RUP_OM_EN_USC_t.book Page 274
Page 277 of 384

SAFETY275
(Continued)
Car Seat With Head Restraint Folded
Installing A Child Restraint With A
Switchable Automatic Locking Retractor
(ALR):
Child restraint systems are designed to be secured
in vehicle seats by lap belts or the lap belt portion
of a lap/shoulder belt.
1. Place the child seat in the center of the
seating position. If the second row seat can
be reclined, you may recline the seat and/or
raise the head restraint (if adjustable) to get a
better fit. If the rear seat can be moved
forward and rearward in the vehicle, you may
wish to move it to its rear-most position to
make room for the child seat. You may also
move the front seat forward to allow more
room for the child seat.
2. Pull enough of the seat belt webbing from the retractor to pass it through the belt path of the
child restraint. Do not twist the belt webbing in
the belt path.
3. Slide the latch plate into the buckle until you hear a “click.”
4. Pull on the webbing to make the lap portion tight against the child seat. 5. To lock the seat belt, pull down on the shoulder
part of the belt until you have pulled all the
seat belt webbing out of the retractor. Then,
allow the webbing to retract back into the
retractor. As the webbing retracts, you will hear
a clicking sound. This means the seat belt is
now in the Automatic Locking mode.
6. Try to pull the webbing out of the retractor. If it is locked, you should not be able to pull out any
webbing. If the retractor is not
locked, repeat
step 5.
7. Finally, pull up on any excess webbing to tighten the lap portion around the child
restraint while you push the child restraint
rearward and downward into the vehicle seat.
8. If the child restraint has a top tether strap and the seating position has a top tether
anchorage, connect the tether strap to the
anchorage and tighten the tether strap. See
Úpage 276 for directions to attach a tether
anchor.
9. Test that the child restraint is installed tightly by pulling back and forth on the child seat at
the belt path. It should not move more than
1 inch (25.4 mm) in any direction.
Any seat belt system will loosen with time, so check
the belt occasionally, and pull it tight if necessary.
1 — Folded Headrest
2 — Child Restraint
WARNING!
Improper installation or failure to properly
secure a child restraint can lead to failure of
the restraint. The child could be badly injured
or killed.
Follow the child restraint manufacturer’s
directions exactly when installing an infant or
child restraint.
WARNING!
6
22_RUP_OM_EN_USC_t.book Page 275
Page 279 of 384

SAFETY277
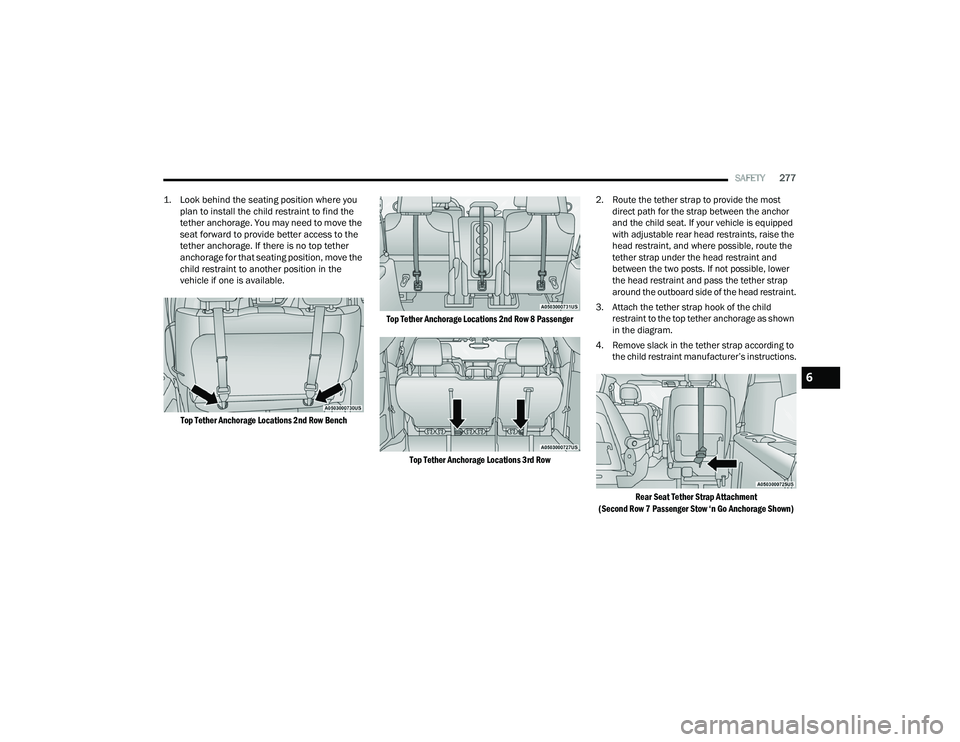
1. Look behind the seating position where you plan to install the child restraint to find the
tether anchorage. You may need to move the
seat forward to provide better access to the
tether anchorage. If there is no top tether
anchorage for that seating position, move the
child restraint to another position in the
vehicle if one is available.
Top Tether Anchorage Locations 2nd Row Bench Top Tether Anchorage Locations 2nd Row 8 Passenger
Top Tether Anchorage Locations 3rd Row
2. Route the tether strap to provide the most
direct path for the strap between the anchor
and the child seat. If your vehicle is equipped
with adjustable rear head restraints, raise the
head restraint, and where possible, route the
tether strap under the head restraint and
between the two posts. If not possible, lower
the head restraint and pass the tether strap
around the outboard side of the head restraint.
3. Attach the tether strap hook of the child restraint to the top tether anchorage as shown
in the diagram.
4. Remove slack in the tether strap according to the child restraint manufacturer’s instructions.
Rear Seat Tether Strap Attachment
(Second Row 7 Passenger Stow ‘n Go Anchorage Shown)
6
22_RUP_OM_EN_USC_t.book Page 277
Page 280 of 384

278SAFETY
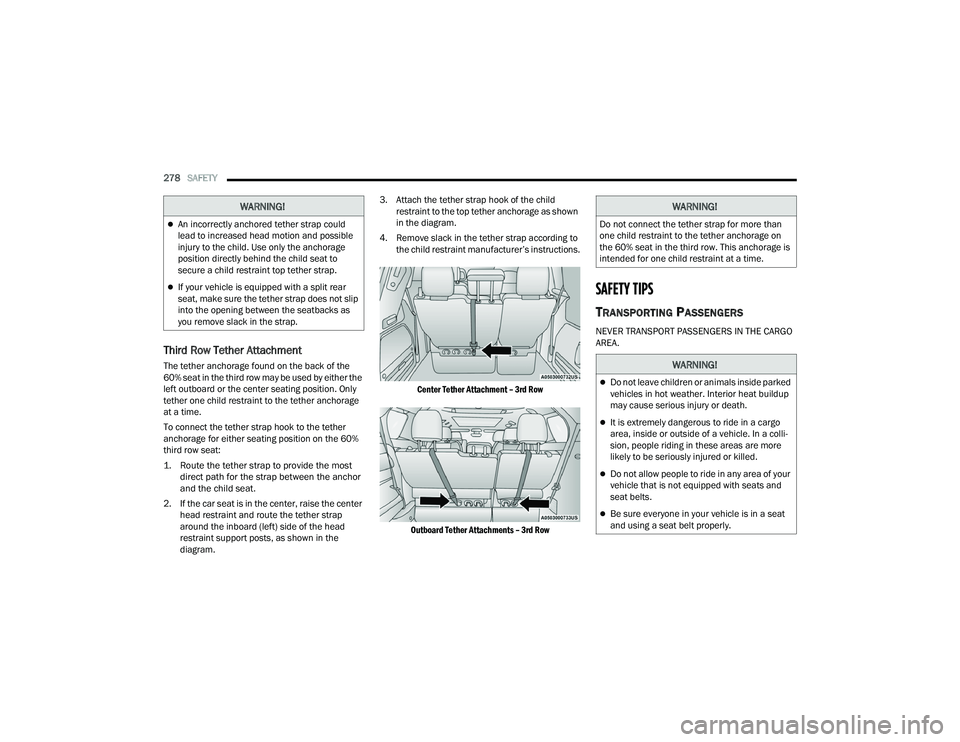
Third Row Tether Attachment
The tether anchorage found on the back of the
60% seat in the third row may be used by either the
left outboard or the center seating position. Only
tether one child restraint to the tether anchorage
at a time.
To connect the tether strap hook to the tether
anchorage for either seating position on the 60%
third row seat:
1. Route the tether strap to provide the most
direct path for the strap between the anchor
and the child seat.
2. If the car seat is in the center, raise the center head restraint and route the tether strap
around the inboard (left) side of the head
restraint support posts, as shown in the
diagram. 3. Attach the tether strap hook of the child
restraint to the top tether anchorage as shown
in the diagram.
4. Remove slack in the tether strap according to the child restraint manufacturer’s instructions.
Center Tether Attachment – 3rd Row
Outboard Tether Attachments – 3rd Row
SAFETY TIPS
TRANSPORTING PASSENGERS
NEVER TRANSPORT PASSENGERS IN THE CARGO
AREA.
WARNING!
An incorrectly anchored tether strap could
lead to increased head motion and possible
injury to the child. Use only the anchorage
position directly behind the child seat to
secure a child restraint top tether strap.
If your vehicle is equipped with a split rear
seat, make sure the tether strap does not slip
into the opening between the seatbacks as
you remove slack in the strap.
WARNING!
Do not connect the tether strap for more than
one child restraint to the tether anchorage on
the 60% seat in the third row. This anchorage is
intended for one child restraint at a time.
WARNING!
Do not leave children or animals inside parked
vehicles in hot weather. Interior heat buildup
may cause serious injury or death.
It is extremely dangerous to ride in a cargo
area, inside or outside of a vehicle. In a colli -
sion, people riding in these areas are more
likely to be seriously injured or killed.
Do not allow people to ride in any area of your
vehicle that is not equipped with seats and
seat belts.
Be sure everyone in your vehicle is in a seat
and using a seat belt properly.
22_RUP_OM_EN_USC_t.book Page 278
Page 376 of 384

374 Oil Filter
..................................................... 316Oil Selection.................................... 315, 364Oil Synthetic.............................................. 316Overheating............................................... 303Starting..................................................... 131Enhanced Accident Response
Feature................................................ 260, 308Ethanol.......................................................... 362Exhaust Gas Cautions.................................... 281Exhaust System................................... 281, 323Exterior Lighting...................................... 65, 338Exterior Lights...................... 65, 281, 337, 338
F
FiltersAir Cleaner
................................................. 316Air Conditioning.................................. 83, 318Engine Oil........................................ 316, 365Engine Oil Disposal................................... 316FireTV............................................................ 218FlashersHazard Warning......................................... 282Turn Signals.................... 65, 128, 281, 338Flash-To-Pass........................................... 65, 67Flat Tire Changing....................... 286, 339, 350Flat Tire Stowage........................ 294, 339, 350Flooded Engine Starting................................ 134
Fluid Capacities............................................ 364Fluid Leaks................................................... 281Fluid Level ChecksBrake........................................................ 327Engine Oil................................................. 314Fluid, Brake.................................................. 366Fog Lights................................................. 65, 68Fold In Floor (Stow ‘n Go) Seating.................... 42Fold-Flat Seats................................................. 33Forward Collision Warning............................ 233Freeing A Stuck Vehicle................................ 305Front Position Light....................................... 338Fuel............................................................... 361Additives................................................... 363Clean Air................................................... 361Ethanol..................................................... 362Filler Cap (Gas Cap).................................. 172Gasoline................................................... 361Materials Added....................................... 363Methanol.................................................. 362Octane Rating.................................. 361, 365Requirements........................................... 361Specifications........................................... 365Tank Capacity........................................... 364Fuses............................................................ 329
G
Garage Door Opener (HomeLink).....................61Gas Cap (Fuel Filler Cap)............................... 172Gasoline, (Fuel)............................................. 361Gasoline, Clean Air........................................ 361Gasoline, Reformulated................................ 361Gear Ranges................................................. 141Glass Cleaning.............................................. 359Gross Axle Weight Rating.............................. 175Gross Vehicle Weight Rating......................... 174GVWR............................................................ 173
H
HazardDriving Through Flowing, Rising, Or Shallow Standing Water
................... 186Hazard Warning Flashers.............................. 282Head Restraints...............................................52Headlights........................................................65Cleaning.................................................... 357High Beam/Low Beam Select Switch..........65Lights On Reminder..............................65, 67Passing.................................................65, 67Switch..........................................................65Time Delay...................................................65Washers.......................................................67
22_RUP_OM_EN_USC_t.book Page 374
Page 380 of 384

378 Reformulated Gasoline
.................................. 361Refrigerant.................................................... 318Release, Hood................................................. 96Reminder, Lights On........................................ 65Reminder, Seat Belt...................................... 240Remote Control Starting System........................................... 19Remote Keyless EntryArm The Alarm............................................. 22Disarm The Alarm........................................ 22Programming Additional Key Fobs.............. 16Remote StartingExit Remote Start Mode.............................. 20Remote Starting System.................................. 19Replacement Bulbs....................................... 337Replacement Tires......................................... 349Reporting Safety Defects............................... 369Restraints, Child............................................ 262Restraints, Head.............................................. 52Roof Luggage Rack........................................ 106Rotation, Tires............................................... 355
S
Safety Checks Inside Vehicle......................... 279Safety Checks Outside Vehicle...................... 280Safety Defects, Reporting.............................. 369Safety Information, Tire................................. 339Safety Tips..................................................... 278Safety, Exhaust Gas....................................... 281
Schedule, Maintenance................................ 309Seat Belt Reminder....................................... 124Seat Belts............................................ 240, 279Adjustable Shoulder Belt.......................... 244Adjustable Upper Shoulder Anchorage..... 244Adjustable Upper Shoulder Belt Anchorage..................................... 244Automatic Locking Retractor (ALR)........... 247Child Restraints........................................ 262Energy Management Feature................... 247Extender................................................... 246Front Seat............................... 240, 241, 243Inspection................................................. 279Lap/Shoulder Belt Operation.................... 243Lap/Shoulder Belt Untwisting................... 243Lap/Shoulder Belts.................................. 241Operating Instructions.............................. 243Pregnant Women...................................... 247Pretensioners........................................... 247Rear Seat................................................. 241Reminder.................................................. 240Seat Belt Extender.................................... 246Seat Belt Pretensioner............................. 247Untwisting Procedure............................... 243Seat Belts Maintenance............................... 358Seats................................................. 33, 47, 51Adjustment............................. 33, 34, 35, 47Bench.......................................................... 35Heated......................................................... 51
Memory.......................................................32Power....................................................47, 49Rear Folding................................................33Reclining......................................................34Seatback Release.......................... 33, 34, 35Stow ‘n Go (Fold in Floor).............................42Tilting....................................................33, 34Security Alarm............................................... 124Arm The System...........................................22Disarm The System......................................22Selection Of Coolant (Antifreeze).................. 365Sentry Key (Immobilizer)..................................17Service Assistance........................................ 367Service Contract............................................ 368Service Manuals........................................... 370ShiftingAutomatic Transmission........................... 140Shoulder Belts.............................................. 241Side View Mirror Adjustment............................57Signals, Turn........................ 65, 128, 281, 338SmartBeams....................................................66Snow Chains (Tire Chains)............................ 353Snow Tires.................................................... 350Spare Tire Changing...................................... 286Spare Tire Stowage....................................... 294Spare Tires........................ 287, 350, 351, 352Spark Plugs................................................... 365
22_RUP_OM_EN_USC_t.book Page 378