2022 CHRYSLER PACIFICA steering wheel
[x] Cancel search: steering wheelPage 115 of 384

GETTING TO KNOW YOUR INSTRUMENT PANEL113
INSTRUMENT CLUSTER DISPLAY
L
OCATION AND CONTROLS
The vehicle’s instrument cluster is equipped with
an instrument cluster display (base or premium
cluster), which offers useful information to the
driver.
Instrument Cluster Display Location
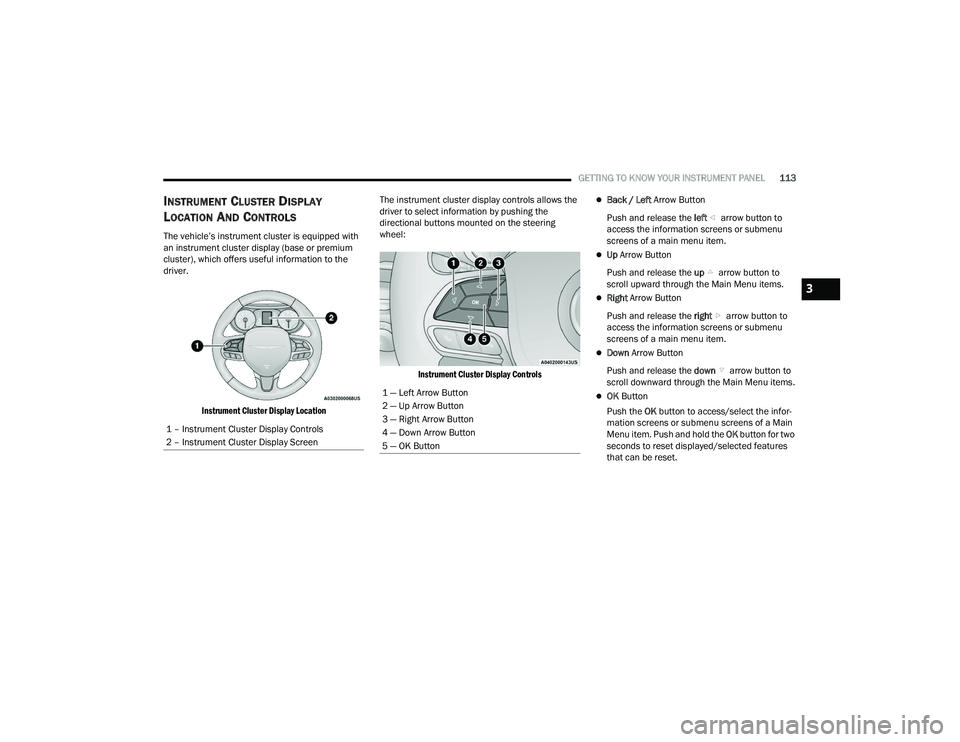
The instrument cluster display controls allows the
driver to select information by pushing the
directional buttons mounted on the steering
wheel:
Instrument Cluster Display Controls
Back / Left Arrow Button
Push and release the left arrow button to
access the information screens or submenu
screens of a main menu item.
Up Arrow Button
Push and release the up arrow button to
scroll upward through the Main Menu items.
Right Arrow Button
Push and release the right arrow button to
access the information screens or submenu
screens of a main menu item.
Down Arrow Button
Push and release the down arrow button to
scroll downward through the Main Menu items.
OK Button
Push the OK button to access/select the infor -
mation screens or submenu screens of a Main
Menu item. Push and hold the OK button for two
seconds to reset displayed/selected features
that can be reset.
1 – Instrument Cluster Display Controls
2 – Instrument Cluster Display Screen1 — Left Arrow Button
2 — Up Arrow Button
3 — Right Arrow Button
4 — Down Arrow Button
5 — OK Button
3
22_RUP_OM_EN_USC_t.book Page 113
Page 128 of 384

126GETTING TO KNOW YOUR INSTRUMENT PANEL
Service AWD Warning Light — If Equipped
This telltale will turn on to indicate that
the All Wheel Drive (AWD) system is not
functioning properly and that service is
required. Contact an authorized dealer.
Service Forward Collision Warning (FCW)
or Pedestrian Emergency Braking (PEB)
Warning Light — If Equipped
This warning light will illuminate to
indicate a fault in the FCW or PEB
Warning System. Contact an authorized
dealer for service Úpage 233.
Service Stop/Start System Warning Light —
If Equipped
This warning light will illuminate when the
Stop/Start system is not functioning
properly and service is required. Contact
an authorized dealer for service
Ú page 143.
Tire Pressure Monitoring System (TPMS)
Warning Light
The warning light switches on and a
message is displayed to indicate that the
tire pressure is lower than the
recommended value and/or that slow
pressure loss is occurring. In these cases, optimal
tire duration and fuel consumption may not be
guaranteed.
Should one or more tires be in the condition
mentioned above, the display will show the
indications corresponding to each tire.
Each tire, including the spare (if provided), should
be checked monthly when cold and inflated to the
inflation pressure recommended by the vehicle
manufacturer on the vehicle placard or tire inflation
pressure label. If your vehicle has tires of a different
size than the size indicated on the vehicle placard
or tire inflation pressure label, you should
determine the proper tire inflation pressure for
those tires.
As an added safety feature, your vehicle has been
equipped with a TPMS that illuminates a low tire
pressure telltale when one or more of your tires is
significantly underinflated. Accordingly, when the
low tire pressure telltale illuminates, you should
stop and check your tires as soon as possible, and
inflate them to the proper pressure. Driving on a
significantly underinflated tire causes the tire to
overheat and can lead to tire failure. Underinflation
also reduces fuel efficiency and tire tread life, and
may affect the vehicle’s handling and stopping
ability.
WARNING!
A malfunctioning catalytic converter, as
referenced above, can reach higher
temperatures than in normal operating
conditions. This can cause a fire if you drive
slowly or park over flammable substances such
as dry plants, wood, cardboard, etc. This could
result in death or serious injury to the driver,
occupants or others.
CAUTION!
Prolonged driving with the Malfunction Indicator
Light (MIL) on could cause damage to the
vehicle control system. It also could affect fuel
economy and driveability. If the MIL is flashing,
severe catalytic converter damage and power
loss will soon occur. Immediate service is
required.
CAUTION!
Do not continue driving with one or more flat
tires as handling may be compromised. Stop the
vehicle, avoiding sharp braking and steering. If a
tire puncture occurs, repair immediately using
the dedicated tire repair kit and contact an
authorized dealer as soon as possible.
22_RUP_OM_EN_USC_t.book Page 126
Page 145 of 384

STARTING AND OPERATING143
ALL-WHEEL DRIVE (AWD) — IF EQUIPPED
This feature provides on-demand All-Wheel Drive
(AWD). The system is automatic with no driver
inputs or additional driving skills required. Under
normal driving conditions, the front wheels provide
most of the traction. If the front wheels begin to
lose traction, power is shifted automatically to the
rear wheels. The greater the front wheel traction
loss, the greater the power transfer to the rear
wheels.
Additionally, on dry pavement under heavy throttle
input (where one may have no wheel spin), torque
will be sent to the rear in a preemptive effort to
improve vehicle launch and performance
characteristics.
ACTIVE NOISE CANCELLATION
Your vehicle is equipped with an Active Noise
Cancellation system. This system is designed to
address exhaust and engine noise. The system
relies on four microphones embedded in the
headliner, which monitor exhaust and engine noise, and assists an onboard frequency
generator, which creates counteracting sound
waves in the audio system’s speakers. This helps
keep the vehicle quiet at idle and during drive.
POWER STEERING
The electric power steering system will provide
increased vehicle response and ease of
maneuverability. The power steering system
adapts to different driving conditions.
If the Steering icon is displayed and the “POWER
STEERING SYSTEM OVER TEMP” message is
displayed on the instrument cluster screen, this
indicates an over temperature condition in the
power steering system. Once driving conditions are
safe, pull over and let the vehicle idle for a few
moments until the icon and message turn off
Ú
page 121.
If the “SERVICE POWER STEERING" or
"POWER STEERING ASSIST OFF -
SERVICE SYSTEM” message and a
steering wheel icon are displayed on the
instrument cluster screen, it indicates that the vehicle needs to be taken to an authorized dealer
for service. It is likely the vehicle has lost power
steering assistance Ú
page 121.
NOTE:
Even if the power steering assistance is no
longer operational, it is still possible to steer
the vehicle. Under these conditions there will be
a substantial increase in steering effort,
especially at low speeds and during parking
maneuvers.
The power steering system is fully electric; it
requires no power steering fluid.
If the condition persists, see an authorized
dealer for service.
STOP/START SYSTEM — IF EQUIPPED
The Stop/Start function is developed to reduce
fuel consumption. The system will stop the engine
automatically during a vehicle stop if the required
conditions are met. Releasing the brake pedal,
pressing the accelerator pedal or shifting out of
DRIVE (D) will automatically re-start the engine.
This vehicle has been upgraded with a heavy-duty
starter, enhanced battery, and other upgraded
engine parts to handle the additional engine starts.CAUTION!
All wheels must have the same size and type
tires. Unequal tire sizes must not be used.
Unequal tire size may cause premature wear of
the driveline components.
WARNING!
Continued operation with reduced assist could
pose a safety risk to yourself and others. Service
should be obtained as soon as possible.
4
22_RUP_OM_EN_USC_t.book Page 143
Page 147 of 384

STARTING AND OPERATING145
TO START THE ENGINE WHILE IN
A
UTOSTOP
While in a forward gear, the engine will start when
the brake pedal is released or the throttle pedal is
pressed. The transmission will automatically
re-engage upon engine restart.
Conditions That Will Cause The Engine To Start
Automatically While In Autostop:
The transmission selector is moved out of
DRIVE.
To maintain cabin temperature comfort.
HVAC is set to full defrost mode.
HVAC system temperature or fan speed is
manually adjusted.
Battery voltage drops too low. During this time a
message will display “Stop/Start Not Ready
Battery Charging”.
Stop/Start OFF switch is pushed.
Stop/Start related system malfunction.
Steering wheel is turned beyond threshold.
TO MANUALLY TURN OFF THE STOP/
S
TART SYSTEM
Stop/Start OFF Button
Push the Stop/Start OFF switch (located on the
switch bank). The light on the switch will illuminate.
The “STOP/START OFF” message will appear in the
instrument cluster display and the Autostop mode
will be disabled Ú page 121.
NOTE:The Stop/Start system will reset itself back to the
ON mode every time the ignition is turned OFF and
back ON.
TO MANUALLY TURN ON THE STOP/
S
TART SYSTEM
After turning off the Stop/Start system, push the
Stop/Start OFF switch again (located on the switch
bank). The light on the switch will turn off.
SYSTEM MALFUNCTION
If there is a malfunction in the Stop/Start system,
the system will not shut down the engine. A
“SERVICE STOP/START SYSTEM” message and a
yellow Stop/Start telltale will appear in the
instrument cluster display
If the “SERVICE STOP/START SYSTEM” message
appears in the instrument cluster display, have the
system checked by an authorized dealer.
If a malfunction occurs during an autostop, the
vehicle may not auto start and will need a key start.
4
22_RUP_OM_EN_USC_t.book Page 145
Page 148 of 384

146STARTING AND OPERATING
CRUISE CONTROL SYSTEMS — IF EQUIPPED
Your vehicle may be equipped with the Cruise
Control system, or the Adaptive Cruise Control
(ACC) system:
Cruise Control will keep your vehicle at a
constant preset speed.
Adaptive Cruise Control (ACC) will adjust the
vehicle speed up to the preset speed to main -
tain a distance with the vehicle ahead.
NOTE:
In vehicles equipped with ACC, if ACC is not
enabled, Fixed Speed Cruise Control will not
detect vehicles directly ahead of you. Always be
aware of the feature selected.
Only one Cruise Control feature can operate at a
time. For example, if Fixed Speed Cruise Control
is enabled, Adaptive Cruise Control will be
unavailable, and vice versa.
CRUISE CONTROL
When engaged, the Cruise Control takes over
accelerator operations at speeds greater than
25 mph (40 km/h).
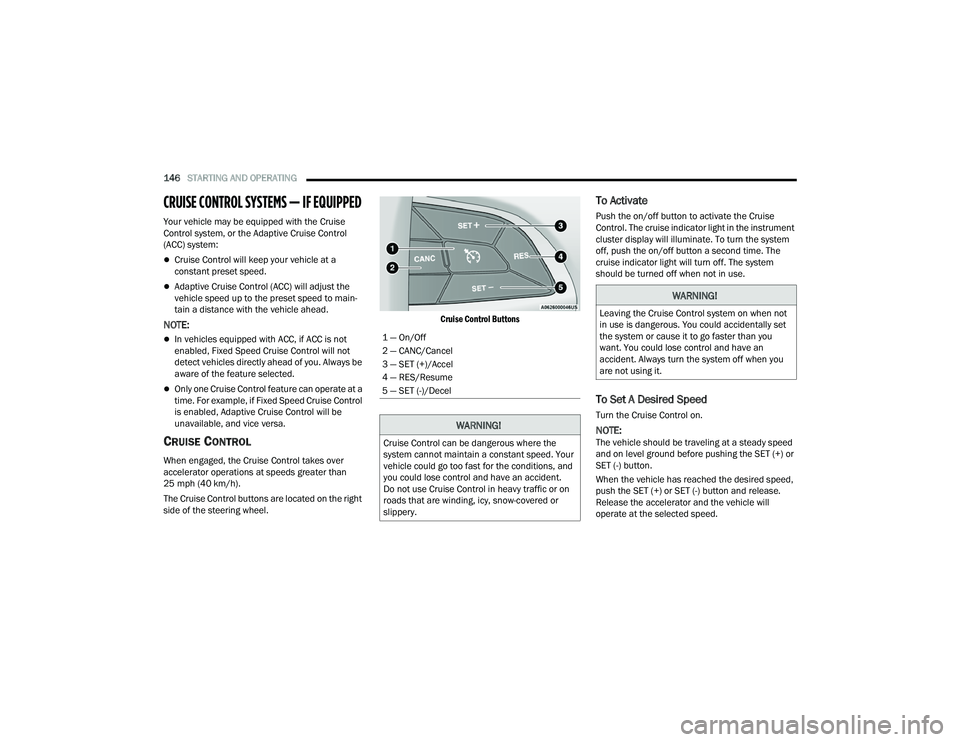
The Cruise Control buttons are located on the right
side of the steering wheel.
Cruise Control Buttons
To Activate
Push the on/off button to activate the Cruise
Control. The cruise indicator light in the instrument
cluster display will illuminate. To turn the system
off, push the on/off button a second time. The
cruise indicator light will turn off. The system
should be turned off when not in use.
To Set A Desired Speed
Turn the Cruise Control on.
NOTE:The vehicle should be traveling at a steady speed
and on level ground before pushing the SET (+) or
SET (-) button.
When the vehicle has reached the desired speed,
push the SET (+) or SET (-) button and release.
Release the accelerator and the vehicle will
operate at the selected speed.
1 — On/Off
2 — CANC/Cancel
3 — SET (+)/Accel
4 — RES/Resume
5 — SET (-)/Decel
WARNING!
Cruise Control can be dangerous where the
system cannot maintain a constant speed. Your
vehicle could go too fast for the conditions, and
you could lose control and have an accident.
Do not use Cruise Control in heavy traffic or on
roads that are winding, icy, snow-covered or
slippery.
WARNING!
Leaving the Cruise Control system on when not
in use is dangerous. You could accidentally set
the system or cause it to go faster than you
want. You could lose control and have an
accident. Always turn the system off when you
are not using it.
22_RUP_OM_EN_USC_t.book Page 146
Page 151 of 384

STARTING AND OPERATING149
Adaptive Cruise Control (ACC) Operation
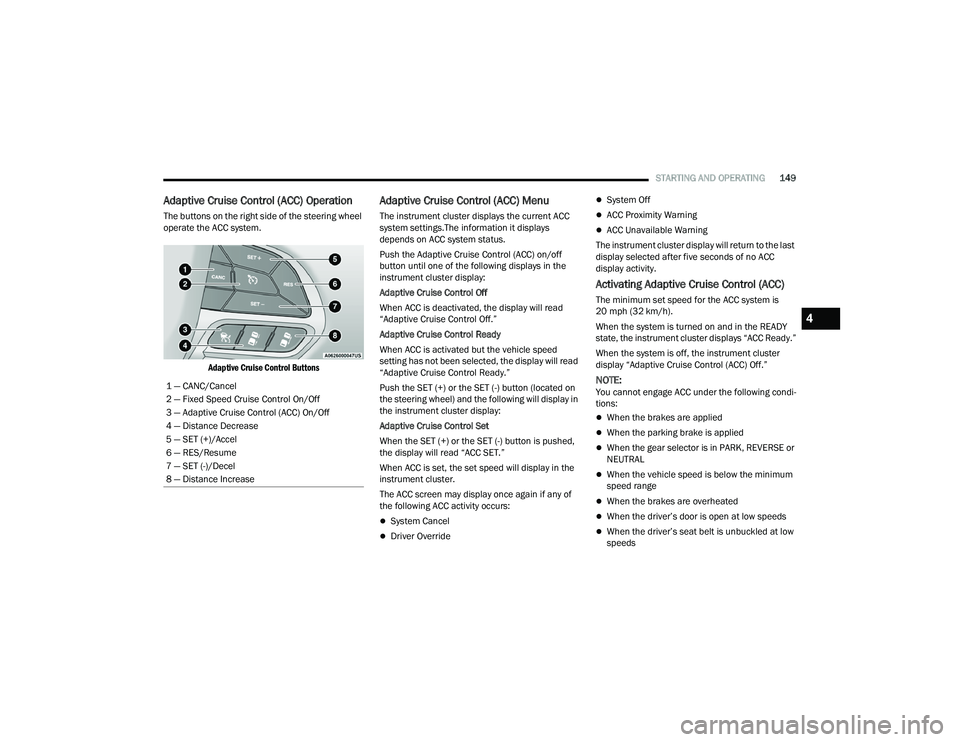
The buttons on the right side of the steering wheel
operate the ACC system.
Adaptive Cruise Control Buttons
Adaptive Cruise Control (ACC) Menu
The instrument cluster displays the current ACC
system settings.The information it displays
depends on ACC system status.
Push the Adaptive Cruise Control (ACC) on/off
button until one of the following displays in the
instrument cluster display:
Adaptive Cruise Control Off
When ACC is deactivated, the display will read
“Adaptive Cruise Control Off.”
Adaptive Cruise Control Ready
When ACC is activated but the vehicle speed
setting has not been selected, the display will read
“Adaptive Cruise Control Ready.”
Push the SET (+) or the SET (-) button (located on
the steering wheel) and the following will display in
the instrument cluster display:
Adaptive Cruise Control Set
When the SET (+) or the SET (-) button is pushed,
the display will read “ACC SET.”
When ACC is set, the set speed will display in the
instrument cluster.
The ACC screen may display once again if any of
the following ACC activity occurs:
System Cancel
Driver Override
System Off
ACC Proximity Warning
ACC Unavailable Warning
The instrument cluster display will return to the last
display selected after five seconds of no ACC
display activity.
Activating Adaptive Cruise Control (ACC)
The minimum set speed for the ACC system is
20 mph (32 km/h).
When the system is turned on and in the READY
state, the instrument cluster displays “ACC Ready.”
When the system is off, the instrument cluster
display “Adaptive Cruise Control (ACC) Off.”
NOTE:You cannot engage ACC under the following condi -
tions:
When the brakes are applied
When the parking brake is applied
When the gear selector is in PARK, REVERSE or
NEUTRAL
When the vehicle speed is below the minimum
speed range
When the brakes are overheated
When the driver’s door is open at low speeds
When the driver’s seat belt is unbuckled at low
speeds
1 — CANC/Cancel
2 — Fixed Speed Cruise Control On/Off
3 — Adaptive Cruise Control (ACC) On/Off
4 — Distance Decrease
5 — SET (+)/Accel
6 — RES/Resume
7 — SET (-)/Decel
8 — Distance Increase
4
22_RUP_OM_EN_USC_t.book Page 149
Page 164 of 384

162STARTING AND OPERATING
PARKSENSE ACTIVE PARK ASSIST SYSTEM —
IF EQUIPPED
The ParkSense Active Park Assist system is
intended to assist the driver during parallel and
perpendicular parking maneuvers by identifying a
proper parking space, providing audible/visual
instructions, and controlling the steering wheel.
The ParkSense Active Park Assist system is
defined as “semi-automatic” since the driver
maintains control of the accelerator, gear selector
and brakes. Depending on the driver's parking
maneuver selection, the ParkSense Active Park
Assist system is capable of maneuvering a vehicle into a parallel or a perpendicular parking space on
either side (i.e., driver side or passenger side).
NOTE:
The driver is always responsible for controlling
the vehicle, responsible for any surrounding
objects, and must intervene as required.
The system is designed to assist the driver and
not to substitute the driver.
During a semi-automatic maneuver, if the driver
touches the steering wheel after being
instructed to remove their hands from the
steering wheel, the system will cancel, and the
driver will be required to manually complete the
parking maneuver.
The system may not work in all conditions (e.g.
environmental conditions such as heavy rain,
snow, etc., or if searching for a parking space
that has surfaces that will absorb the ultrasonic
sensor waves).
New vehicles from the dealership must have at
least 30 miles (48 km) accumulated before the
ParkSense Active Park Assist system is fully
calibrated and performs accurately. This is due
to the system’s dynamic vehicle calibration to
improve the performance of the feature.
The use of wheels and tires that are different
size to the original equipment could affect the
operation of the system.
ENABLING AND DISABLING THE
P
ARKSENSE ACTIVE PARK ASSIST
S
YSTEM
The ParkSense Active Park Assist system can be
enabled and disabled with the ParkSense Active
Park Assist switch, located on the switch panel
below the Uconnect display.
To enable or disable the ParkSense
Active Park Assist system, push the
ParkSense Active Park Assist switch once
(LED turns on). Pushing the switch a
second time will disable the system (LED turns off).
The ParkSense Active Park Assist system will turn
off automatically for any of the following
conditions:
Parking maneuver is completed.
Vehicle speed is greater than 18 mph (30 km/h)
when searching for a parking space.
Vehicle speed is greater than 5 mph (7 km/h) during active steering guidance into the parking
space.
Steering wheel is touched during active steering
guidance into the parking space.
ParkSense switch is pushed.
The driver’s door is opened.
CAUTION!
ParkSense is only a parking aid and it is
unable to recognize every obstacle, including
small obstacles. Parking curbs might be
temporarily detected or not detected at all.
Obstacles located above or below the sensors
will not be detected when they are in close
proximity.
The vehicle must be driven slowly when using
ParkSense in order to be able to stop in time
when an obstacle is detected. It is recom -
mended that the driver looks over his/her
shoulder when using ParkSense.
22_RUP_OM_EN_USC_t.book Page 162
Page 165 of 384

STARTING AND OPERATING163
The liftgate is opened.
Electronic Stability Control/Anti-Lock Braking
System intervention.
The ParkSense Active Park Assist system will allow
a maximum numbers of shifts between DRIVE and
REVERSE. If the maneuver cannot be completed
within eight shifts, the system will cancel and the
instrument cluster display will instruct the driver to
complete the maneuver manually.
The ParkSense Active Park Assist system will only
operate and search for a parking space when the
following conditions are present:
The gear selector is in DRIVE.
The ignition is in the RUN position.
The ParkSense Active Park Assist switch is acti -
vated.
The driver’s door is closed.
The liftgate is closed.
Vehicle speed is less than 15 mph (25 km/h).
The outer surface and the underside of the front
and rear fascias/bumpers are clean and clear
of snow, ice, mud, dirt or other obstruction.
When pushed, the LED on the ParkSense Active
Park Assist switch will blink momentarily, and then
the LED will turn off if any of the above conditions
are not present.
NOTE:If the vehicle is driven above approximately
15 mph (25 km/h), the instrument cluster display
will instruct the driver to slow down. If the vehicle
is driven above approximately 18 mph (30 km/h),
the system will cancel. The driver must then reac -
tivate the system by pushing the ParkSense Active
Park Assist switch.
PARALLEL/PERPENDICULAR PARKING
S
PACE ASSISTANCE OPERATION
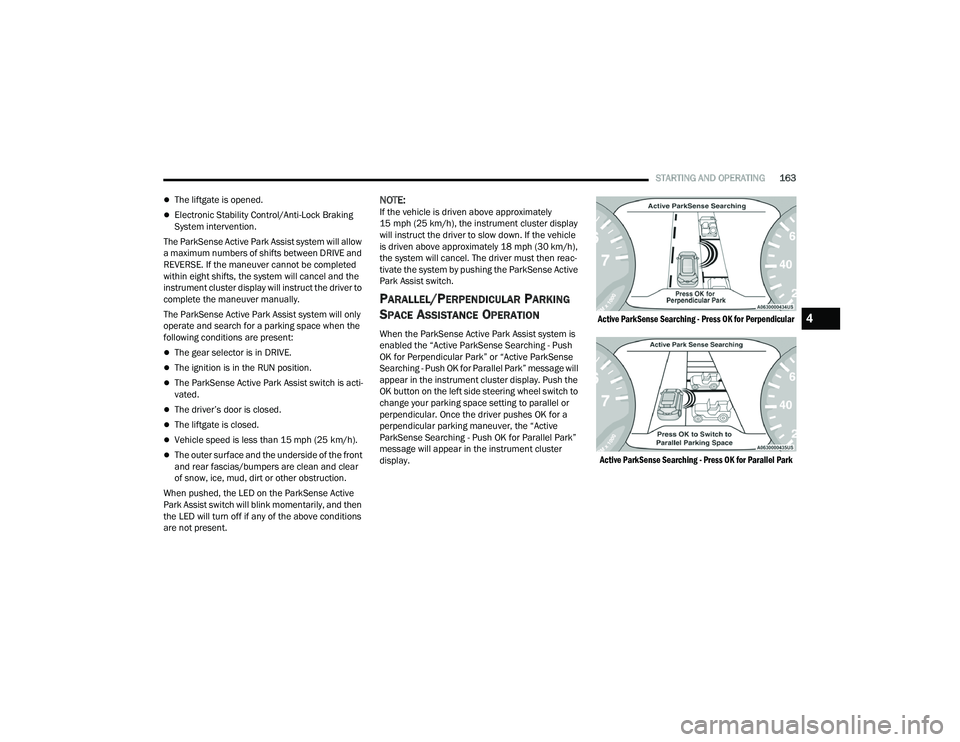
When the ParkSense Active Park Assist system is
enabled the “Active ParkSense Searching - Push
OK for Perpendicular Park” or “Active ParkSense
Searching - Push OK for Parallel Park” message will
appear in the instrument cluster display. Push the
OK button on the left side steering wheel switch to
change your parking space setting to parallel or
perpendicular. Once the driver pushes OK for a
perpendicular parking maneuver, the “Active
ParkSense Searching - Push OK for Parallel Park”
message will appear in the instrument cluster
display.
Active ParkSense Searching - Press OK for Perpendicular
Active ParkSense Searching - Press OK for Parallel Park
4
22_RUP_OM_EN_USC_t.book Page 163